A belt grinder shapes knife blanks, bevels and flat stock faster than hand files. Knife makers usually pick between a small 1 by 30 inch belt, a 2 by 42 inch belt-and-disc combo, or a longer 36 by 2 inch machine, and the choice sets how much material the tool can remove at one time.
The six machines below run from a 1 by 30 inch benchtop unit to a 36 by 2 inch variable-speed grinder. Belt sizes, motors and weights come from each listing page, and several listings contradict themselves, which we point out. We have not used these machines ourselves, and performance claims are the makers’ own.
As an Amazon Associate we earn from qualifying purchases. Links below are affiliate links, and they do not change the product information we give.
What to Look For
| Feature | Why it matters |
|---|---|
| Belt size | 1 x 30, 2 x 42 and 36 x 2 inch belts differ in reach and in belt supply |
| Speed control | Variable speed lets you slow down for fine work |
| Disc or wheel | A disc or bench-grinder wheel adds a second job |
| Weight | A heavier base resists movement on the bench |
In this guide
Specs at a Glance
| Machine | Belt and extras | Motor | Notes |
|---|---|---|---|
| VEVOR BG6 | 2 in belt; 6 in disc | 3450 rpm; 4.3 A listed | 27 lb; LED lamp; the bullets say 250 W, which does not match 4.3 A |
| KFMK KFBD6242 | 2 x 42 in belt; 6 in disc | 1/2 HP induction; 3.5 A; 3580 rpm | Work rest and miter gauge included; belt runs vertical or horizontal |
| Greteefor | 1 x 30 in belt; 6 in grinding wheel | 2.3 A; 3600 rpm; 3400 FPM belt | Three belts included; 60-grit wheel |
| Goldsand | 1 x 30 in belt | 550 W; VFD speed control | 17.4 lb; three belts; speed shown as 5500 rpm in one place and 6000 rpm in another |
| ApruNresi | 36 x 2 in belt; polishing tip and cloth wheel | 750 W; VFD; 6500 rpm | 36.9 lb; the listing also shows 15 A, which does not match 750 W |
| WEN 6515T | 1 x 30 in belt; 5 in disc | 2.3 A; 3160 FPM belt; 3450 rpm disc | 16 lb; two dust ports; 2-year warranty per the listing |
The 6 Best Belt Grinders for Knife Making and Metalwork
Top pickBest for a compact two-in-one for small blades
1. VEVOR 2IN1 Belt Grinder, BG6
A steel belt-and-disc machine with a 2 inch belt, a 6 inch disc and a 3450 rpm top speed, at 27 pounds with a rubber-padded base and LED lamp. The belt can run horizontal or vertical. The listing gives 4.3 A in its specs but 250 W in its bullets, so the motor figure is unclear.
Suits: a compact two-in-one for small blades. Strengths: a work lamp and a vertical belt option. Weaknesses: conflicting power figures. Skip it if you need a clear motor figure.
View VEVOR 2IN1 2 Inch Belt Grinder BG6 on Amazon
Best for a 2 inch belt with a disc
2. KFMK 2×42 Belt and 6 Inch Disc Sander, KFBD6242
A 1/2 HP induction-motor machine with a 2 by 42 inch belt, a 6 inch disc, a large belt table and a disc table that tilts to 45 degrees. The listing says it is aimed at knife making and sharpening, and includes a work rest and miter gauge.
Suits: a 2 inch belt with a disc. Strengths: an induction motor and a tilting disc table. Weaknesses: 2 x 42 belts are less common than 2 x 72. Skip it if you want a long-belt grinder.
View KFMK 2×42 Belt and Disc Sander KFBD6242 on Amazon
Best for sharpening plus belt work
3. Greteefor 6 Inch Bench Grinder and 1×30 Belt Sander
A combo that pairs a 6 inch bench grinder, with a 60-grit wheel and 1/2 inch arbor, with a 1 by 30 inch belt sander. The listing gives 2.3 A, 3600 rpm and 3400 FPM belt speed, and includes three belts (two 120-grit and one 100-grit).
Suits: sharpening plus belt work. Strengths: a wheel and belt on one base. Weaknesses: single speed. Skip it if you want variable speed.
View Greteefor 6 Inch Bench Grinder and 1×30 Belt Sander on Amazon
Best for stepless speed on a small belt
4. Goldsand 30 x 1 Inch Variable Speed Belt Grinder
A 17.4 pound machine with a 550 W motor, a reverse function and VFD speed control, shipped with three 1 by 30 inch belts (100, 180 and 240 grit) and a detachable workbench. The listing shows 5500 rpm in a bullet and 6000 rpm in its details, so the top speed is uncertain.
Suits: stepless speed on a small belt. Strengths: variable speed and reverse. Weaknesses: conflicting rpm figures. Skip it if you need confirmed speeds.
View Goldsand 30 x 1 Inch Variable Speed Belt Grinder on Amazon
Best for a wider belt with speed control
5. ApruNresi 36 x 2 Inch Variable Speed Belt Grinder
A heavier 36.9 pound machine with a 750 W motor, VFD speed control, a 6500 rpm maximum and a 2 inch wide belt. It comes with two grinding molds, a polishing tip and a cloth wheel. The listing also shows 15 A, which does not fit a 750 W figure.
Suits: a wider belt with speed control. Strengths: a 2 inch belt and the heaviest base here. Weaknesses: mismatched power figures. Skip it if you want a clear amp figure.
View ApruNresi 36 x 2 Inch Variable Speed Belt Grinder on Amazon
Best for a basic belt-and-disc starter
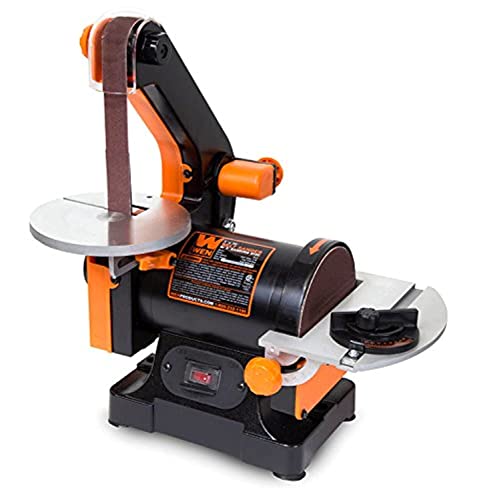
6. WEN 6515T Belt and Disc Sander
A 16 pound benchtop unit with a 1 by 30 inch belt and a 5 inch disc. The listing gives a 2.3 A motor, 3160 FPM belt speed, 3450 rpm disc speed, two dust ports, a miter gauge and a 2-year warranty, with an 80-grit disc and 100-grit belt included.
Suits: a basic belt-and-disc starter. Strengths: a stated warranty and dust ports. Weaknesses: a small 1 inch belt. Skip it if you want a 2 inch belt.

Specs to Check Before Ordering
- Belt size, since belt supply differs for 1 x 30, 2 x 42 and 36 x 2 inch sizes.
- Motor figures in watts, amps and rpm, and whether the listing agrees with itself.
- Variable speed or a single fixed speed.
- Machine weight and bench footprint.
- Which belts, discs and rests come in the box.
For setup, guarding and use, follow the maker’s manual.
Mistakes to Avoid
- Trusting a motor figure when watts and amps in the listing disagree.
- Assuming belts for one machine fit another size.
- Overlooking that three machines here take the same small 1 by 30 inch belt.
- Ignoring the weight difference between 16 and 37 pounds.
Motor Power and Speed Control Explained
The motor decides how the grinder behaves under load. A stronger motor holds belt speed when you press a thick piece of steel against it, while a weak motor bogs down and makes you work in short, frustrating passes. Listings give motor power in horsepower or watts, and the voltage requirement. Confirm that your workshop supplies the right voltage and has a circuit that can carry the load, because a grinder on an overloaded circuit will trip breakers or run poorly.
Speed control is the second big factor. Many grinders run at a single speed, which is fine for rough stock removal but harsh for fine work. Variable speed lets you slow the belt for delicate tasks such as finishing, grinding bevels near the edge, working with handle materials, or handling steels that suffer from heat. It also helps beginners, who benefit from a gentler pace while they learn control.
Check how the speed is changed. Some grinders use a dial with an electronic drive, while others use belts and pulleys that you move by hand. A dial is faster to adjust, but electronic drives add cost and need a clean power supply. Pulley systems are simpler and can be repaired with basic tools, though changing speed takes longer.
Finally, look at the start-up behavior and the switch. A switch within easy reach, and one that is clearly marked, lets you shut down quickly in an emergency. Read the manual for the motor’s duty cycle and cooling needs so you know how long you can run before taking a break.
Platens, Contact Wheels and Work Rests
The parts that touch the belt shape the cuts you can make. A flat platen supports the belt for straight bevels and flat surfaces, and its flatness determines how true your grinds will be. Check that the platen is made of a material that resists wear, and see whether it can be replaced or flipped when the surface wears down.
A contact wheel gives you a curved surface for hollow grinds, plunge lines and shaping curves. Wheels come in different diameters, and a smaller wheel produces a tighter curve. Many grinders offer one wheel as standard and let you add others, so check what the listing includes and whether attachments are sold for your model.
A work rest, sometimes called a tool rest, supports the knife near the belt and helps you hold a consistent angle. It should be rigid, adjustable and easy to lock at the angle you want. A wobbly rest defeats its purpose, and a rest that sits too far from the belt allows steel to catch and jam in the gap. Look for a design where the gap is small and adjustable.
Think about changing between these parts. A tool-free or quick-change system speeds work when you move between roughing and finishing. If you must use several wrenches to swap a wheel, you will do it less often, and your work will suffer.
Belt Abrasives, Grits and Wear
Belts are the consumable that determines results and running cost. Abrasive materials differ in how aggressively they cut and how long they last. Ceramic and zirconia grains are tough and tend to cut cool, while aluminum oxide is common and economical and suits lighter work and wood. Check the belt packaging for the intended material, because belts made for wood or paint may clog and overheat on steel.
Grit sequence matters. A coarse belt removes stock and sets the bevel, a medium belt cleans up scratches, and a fine belt prepares the surface for hand sanding or buffing. Skipping steps leaves deep scratches that take far longer to remove later. Start with a belt that matches your task and move up gradually.
Belt size must match the grinder. The listing states the belt length and width, and the wrong size will not fit or track properly. Before you order, confirm that belts in the size are widely sold, and that you can find a range of grits and types.
Watch for wear. A dull belt rubs rather than cuts, which makes more heat and wastes time. Replace belts when they shine, clog or stop removing material. Keep a stock of fresh belts, and store them hanging or flat, away from moisture and sun, which weaken the glue.
Heat Control and Grinding Technique
Heat is the biggest enemy of a hardened blade. If steel gets too hot, it can lose hardness and the edge will fail in use. Signs of overheating include color changes at the edge and a blade that is too hot to hold. The fix is to grind in short passes, use sharp belts, and keep a container of water nearby to cool the steel often.
Light pressure and consistent movement work better than force. Let the belt do the cutting, and keep the blade moving so heat does not build in one spot. Thin edges heat fastest, so leave the edge thick until late in the process. Many makers finish bevels before heat treatment to avoid the risk.
Angle control comes from steady hands and a stable rest. Practice on scrap steel or an inexpensive blank before you work on a project that matters. Mark the centerline of the edge and grind evenly on each side, checking often with good light.
Dust and sparks come with the territory. Position the grinder so that sparks fall away from combustible material. Note that grinding some materials, such as certain woods, composites and metals, makes harmful dust. Check safety data from the maker of each material and use appropriate protection.
Workshop Safety, Setup and Noise
A belt grinder can hurt you fast, so build safe habits. Wear eye protection with side shields or a face shield, hearing protection, and a respirator suited to the dust you create. Tie back hair, remove loose clothing and jewelry, and avoid gloves near a moving belt, which can catch and drag your hand into the machine.
Mount the grinder on a solid bench or stand. A grinder that vibrates or moves will ruin your accuracy and may be unsafe. Bolting the base down is better than relying on weight, and a mat underfoot reduces fatigue during long sessions.
Keep the area clear of oily rags, solvents and sawdust, because sparks can start fires. Keep a suitable fire extinguisher where you can reach it without crossing the grinder. Plan lighting so you can see the blade clearly without glare.
Consider dust collection and noise. A shop vacuum or dust extractor connected near the belt captures much of the particles, though sparks and metal dust mean you should follow the maker’s guidance on what collectors are suitable. For noise, check hours and local rules if you work at home. Finally, inspect the belt tracking, guards and fasteners before each session, and unplug the grinder when you change belts or wheels.
Which belt grinder for knife making should you buy?
Pick the belt grinder that matches the size of work you do and how much control you want over speed. The six machines here split into small 1 by 30 inch units, a 2 by 42 inch belt-and-disc machine, and a 36 by 2 inch variable-speed grinder.
- If you want a first machine for small blades and sharpening: the Greteefor puts a bench grinder wheel and a 1 by 30 inch belt on one base, which covers two jobs, but it runs at a single speed.
- If you want a basic belt-and-disc starter with support: the WEN 6515T lists a 2-year warranty, dust ports and a miter gauge. Its belt is small, so it suits modest projects.
- If you want to slow the belt for finishing: the Goldsand offers VFD speed control on a 1 by 30 inch belt. Check its listing carefully, since its top speed is shown two different ways.
- If you want a wider belt with speed control: the ApruNresi is the heaviest machine here and uses a 36 by 2 inch belt. Confirm its power figures before ordering.
- If you want an induction motor and a tilting disc table: the KFMK KFBD6242 includes a work rest and miter gauge and uses a 2 by 42 inch belt.
- If you want a compact two-in-one with a work lamp: the VEVOR BG6 runs its belt horizontally or vertically, though its motor figures conflict.
If you are unsure, start with the question of belt size. Belts are the part you will keep buying, so a size that is easy to find in several grits saves frustration later. Variable speed is the second question: it matters most when you finish bevels and manage heat, and less when you only rough out shapes.
What to check before you buy, and who should skip it
Before buying a belt grinder for knife making, confirm that the listing agrees with itself on power, speed and belt size. Several listings here show figures that do not match, so read the specifications and the manual if one is available.
- Confirm the belt size and look up whether replacement belts in that size are sold in the grits you need.
- Check what is in the box: belts, work rest, miter gauge, discs, wheels or a stand.
- Check the weight against your bench, and plan to clamp or bolt the machine down.
- Check your power supply, and whether the motor figures in watts and amps make sense together.
- Look at the warranty and return terms on the current listing.
- Plan for eye, ear and dust protection, plus a safe place for sparks.
Now the honest trade-offs. The small 1 by 30 inch machines are affordable and compact, but their narrow belts limit how much steel you can remove and how long a flat grind can be. A 2 inch belt gives more reach, yet extra weight and belt cost come with it. Variable speed helps with control, but it adds electronics and, on these listings, some unclear specifications.
Who should skip it? If you plan to forge-finish full-size chef knives or want long, flat bevels all day, a small machine will feel limiting, and a larger long-belt grinder is a different class of tool than the ones here. Anyone without space for dust, noise and sparks should also think twice.
Compare the picks above, check the current listing for belt size and what is included, then choose the one that fits how you will use it.
How Each Grinder Fits a Knife Maker’s Bench
Belt grinders look similar in a listing and behave very differently at the bench. Belt size, tracking, platen setup, and how the machine handles long grinding sessions matter more than any single headline feature. This section goes through the six picks above in practical terms: who each suits, where it shines, and where its limits will find you. A general note applies to all of them: grinding is hot, dusty, spark-producing work. Eye protection, hearing protection, a clear bench, and respect for the machine’s guarding and instructions are the baseline for every session, whatever you buy.
The VEVOR 2IN1 BG6 for Makers Who Want Versatility
A two-in-one machine speaks to the maker whose bench space is shared with other tools and whose work mixes shaping, sharpening, and general stock work. The appeal is consolidation: one footprint doing several jobs. It suits the hobbyist knife maker who also handles handles, fittings, and workshop repairs on the same machine. The honest limitation of any combination machine is compromise: a dedicated grinder built only for knife work will usually offer a more specialised setup for that single task. Choose the VEVOR if your work is genuinely varied. Skip it if you already know that ninety percent of your grinding is bevel work and you want a machine arranged around that alone.
The KFMK 2×42 With Disc for Makers Who Like a Wider Belt
The KFMK pairs a wider belt format with a disc, which suits makers who want more belt surface for flattening and profiling and who use a disc for squaring small parts and fittings. A wider belt can feel steadier for flat work, and the disc earns its keep on handle materials and spacers. The limitation is consumables discipline: a wider format means committing to that belt size and keeping a sensible range of grits stocked, because a grinder without the right belt is furniture. It suits a maker setting up a bench for the long term. Skip it if you are still experimenting and want the smallest, simplest entry into belt grinding.
The Greteefor Bench Grinder Combo for Small Shops
Combining a bench grinder with a small belt sander suits the compact workshop where sharpening, deburring, and light shaping share one corner. For a knife maker, this kind of unit often becomes the support act: touching up edges, cleaning up fittings, and handling small stock while a main grinder does heavy work, or serving as the only machine for someone making small knives at a gentle pace. Its limitation is capacity. Small belts remove stock slowly, heat small parts quickly because there is less belt to share the work, and long sessions of profiling will test your patience. Choose it for light duties and small work. Skip it as your main profiling machine for larger blades.
The Goldsand 1 Inch Variable Speed Grinder for Control
A narrow belt with variable speed suits detail work: plunge lines, small curves, sharpening, and the careful stages where removing a little too much stock ruins an edge. Variable speed is the meaningful feature here, because different stages of knife work want different belt behaviour, and slower, controlled passes are kinder to thin edges and heat-sensitive moments. The limitation is stock removal rate on big profiling jobs, where a narrow belt asks for more passes and more time. It suits the maker who values control over speed and works on small to medium blades. Skip it if your typical session is roughing out large blanks in quantity.
The ApruNresi 2 Inch Variable Speed Grinder for Bevel Work
The ApruNresi format, a wider belt with variable speed, is the combination many dedicated knife makers gravitate towards, because bevel grinding benefits from both belt width for flat, even passes and speed control for the finishing stages. It suits the maker whose central task is producing clean, consistent bevels and who expects to spend long sessions at the platen. The limitations are the usual ones for a more specialised machine: it asks for bench space, a real commitment to belt stocking across grits, and the discipline to learn tracking and tensioning properly rather than fighting the machine. Choose it if bevels are your main event. Skip it if your grinding is mostly sharpening and repairs, where a smaller unit does the job with less fuss.
The WEN 6515T Belt and Disc Sander as a General Wood-and-Metal Station
The WEN is best understood as a general sanding station that a knife maker can press into service for handle shaping and light metal work. Its home ground is wood: scales, handles, and shaping tasks where a belt and disc combination is genuinely convenient. For bevel grinding on steel it is the least specialised option here, and a maker who grows serious about blades will likely outgrow it for that task while still keeping it for handles. That is not a failure; it is a common workshop evolution. Choose it if handles and general sanding dominate your list. Skip it as a dedicated bevel machine.
Head-to-Head: The Choices That Matter
Narrow Belt Versus Wide Belt
Belt width changes how a grinder feels more than it changes what it can eventually do. A narrow belt turns into curves more willingly, concentrates work where you place it, and suits detail and sharpening. A wide belt spreads contact, which helps keep flats flat and bevels even, and it tends to feel calmer during long, straight passes. Makers who do mostly profiling and bevels usually prefer width; makers who do mostly detail and edges often prefer narrow. Your project list, not fashion, should decide.
Variable Speed Versus Fixed Speed
Variable speed earns its place at the extremes of the process: slow control for finishing and for work near edges, and for materials that dislike heat and speed, such as many handle materials. Fixed-speed machines are simpler and entirely workable for roughing and general work, but they ask you to manage heat and pressure with technique alone. If your work includes delicate finishing stages, variable speed stops being a luxury quickly.
Combination Machines Versus Dedicated Grinders
Combination machines trade peak performance in one task for competence across several. That trade is right when bench space is scarce and work is varied, and wrong when one task dominates your hours. A useful test: list your last ten grinding sessions. If one task fills most of the list, buy for that task. If the list is a genuine mix, a combination machine will serve you without complaint.
Working Habits That Protect Both Work and Maker
Grinding rewards calm habits. Secure the machine so it cannot walk or tip, keep the work area clear of clutter that could catch a belt or a sleeve, and keep loose clothing, gloves, and jewellery away from moving belts according to the machine maker’s guidance. Let the belt reach full speed before contact, use steady, even pressure rather than forcing stock into the belt, and keep work moving to avoid concentrating heat in one spot. Thin edges heat quickly; frequent cooling pauses and a lighter touch near the edge protect the steel’s temper and your fingers’ comfort. Manage dust seriously: grinding dust is unpleasant to breathe and fine metal dust around sparks deserves respect, so work with ventilation and tidy housekeeping, and never let dust build up around the machine. When a belt is worn, torn, or tracking badly, stop and replace it; a failing belt is not an economy, it is a hazard and a quality problem at once.
Belt Management
Keep belts organised by grit, store them hanging rather than folded, and work through grits in order instead of jumping and then trying to remove deep scratches with a fine belt. Mark the point where a belt stops cutting well for you; a dull belt generates heat, slows work, and tempts you to push harder, which is when mistakes happen. Good belt discipline is the cheapest performance upgrade any of these machines can get.
Troubleshooting Common Grinding Problems
The Belt Wanders or Will Not Track
Tracking problems usually trace back to setup rather than defects: a belt that is damaged or joined unevenly, tension that is not set as the maker directs, or wheels that have picked up debris. Stop the machine, inspect the belt and wheels while everything is still and unplugged, and work through the maker’s tracking procedure step by step instead of making large adjustments at random.
Bevels Come Out Uneven
Uneven bevels are normally a technique report, not a machine verdict. Inconsistent pressure, uneven pass speed, and changing the blade’s angle between passes all print directly into the bevel. Slow down, use consistent passes, check your work against the light frequently, and consider whether a jig or guide suits your stage of learning. Most makers’ bevels improve more from deliberate practice on scrap than from any machine change.
Work Gets Too Hot Too Fast
Heat builds when a dull belt, heavy pressure, and a stationary workpiece combine. Use a fresher belt, lighten pressure, keep the work moving, and build in cooling pauses, especially near thin sections. If everything you grind overheats, review your belt choice and speed setting for the stage you are at before blaming the machine.
Decision Scenarios
For a first dedicated knife grinder with bevels as the goal, the ApruNresi format fits the work most directly. For detail, sharpening, and small blades, the Goldsand’s control is the better match. For a mixed bench where the grinder must also earn its keep on other jobs, the VEVOR or the KFMK combinations make sense, chosen by whether belt width or consolidation matters more to you. For light duties and small shops, the Greteefor covers the basics, and for handle-heavy work with occasional metal, the WEN station is a reasonable home. In every case, leave room in the plan for belts, safety gear, and practice steel; the machine is only part of the setup.
Buying Criteria, Expanded: What to Check Before Choosing
Start with the work, stated plainly: the sizes of blade you expect to make, the stages you will do on the grinder, and how often you will use it. A maker roughing out large blanks weekly needs stock removal and belt life; a maker finishing small blades monthly needs control and a gentle touch at low speed. Then check the practicalities that listings underplay. Belt availability in your market for the machine’s size, across a range of grits, decides your running costs and whether the machine stays useful; a grinder whose belts are hard to source becomes a problem you store. Consider the platen and work rest arrangement and how they adjust, because most knife grinding happens against them and fiddly adjustment gets skipped, which shows in the work. Consider dust collection and where the machine will live; grinding throws sparks and dust in predictable directions, and a bench layout that respects that is part of the purchase. Finally, consider noise and your neighbours, your power supply, and the simple question of whether the machine can be mounted securely in the space you actually have.
The Real Cost of Ownership Is Belts and Time
New makers budget for the machine and forget the consumables. Belts in a sensible grit progression, replaced when they stop cutting, are a continuing cost that dwarfs small price differences between machines over a year of regular work. So is your time: a machine that tracks true, tensions easily, and changes belts quickly returns minutes on every session, and those minutes compound into finished knives. When you compare the six options here, you are really comparing how each will treat your belts, your time, and your patience across hundreds of sessions.
A Worked Example: One Blade’s Journey Across the Grits
Follow a typical small knife through a sensible grinding session on a suitable machine. The blank starts as flat stock, profiled first with a coarse, fresh belt using light, even passes and frequent checks against the pattern, because material removed cannot be replaced. Bevels are established next, working symmetrically, a few passes on one side then the other, so the edge stays centred and the geometry stays honest. As the bevels approach their final form, the work moves through finer grits, each one removing the scratches of the last, with the maker slowing down rather than speeding up as the edge gets thinner and more heat-sensitive. Handle shaping, if done on the same machine, happens with appropriate belts and speeds for the material, and with the blade itself protected and set safely aside or masked while attention is elsewhere. The session ends with the machine stopped, the belt inspected, and the bench cleared of dust and offcuts. Every machine in this guide can support that journey; they differ in how much control, speed, and comfort they offer at each stage, which is why the earlier sections matched them to makers rather than declaring a single winner.
Learning Deliberately Instead of Accidentally
Grinding skill grows fastest on practice material with a specific intention per session: today, even passes; next time, consistent plunge lines. Scrap steel and honest self-critique teach more in a month than random production teaches in a year, and they protect your good blanks while the lessons are learned. Keep one practice piece as a reference of your current standard. When your new work consistently beats it, retire it and keep the new benchmark. That small habit turns a grinder from a machine you own into a craft you are visibly improving at, whichever of these six is bolted to your bench.
Extra Questions Makers Ask After the First Month
How do I know when a belt is finished?
A belt is finished when it stops cutting and starts polishing and heating the work: passes take longer, pressure creeps up, and the surface looks burnished rather than freshly ground. Beginners keep belts far past this point because the belt still looks intact, and then blame their technique for heat and slow progress. Change the belt, repeat the same pass, and the difference teaches the lesson permanently. Keep the genuinely worn belts for rough, non-critical work if you like, clearly separated from your working stock, but do not let them near a bevel you care about.
Should a beginner start with a smaller machine and upgrade later?
Only if the smaller machine matches real work you will keep doing after the upgrade. A small unit bought as a pure stepping stone often becomes money spent twice, while a mid-sized machine matched to your intended blades serves for years. The honest exception is uncertainty: if you do not yet know whether knife making itself will hold your interest, a modest entry like the combination units here limits your exposure while you find out, and it will still earn bench space later on handles, fittings, and sharpening even if a dedicated grinder eventually joins it.
What is the most common beginner mistake at the grinder?
Impatience at the finishing stages. Beginners rough out carefully, then rush the fine grits, pressing harder to make a fine belt cut like a coarse one, overheating thin edges and rounding over lines they worked hard to create. The correction is procedural: as grits get finer, pressure gets lighter, passes get slower, and checks get more frequent. Write that sequence on a card at the bench if you need to; every experienced maker was taught it by a spoiled blade, and the card is cheaper.
How should I organise a grinding session for safety and quality?
Begin with the machine checked and the bench clear, protective equipment on, and the session’s stages planned in order so you are never improvising with the belt running. Work in blocks, stopping the machine to inspect, measure, and think rather than grinding continuously and discovering errors late. End by cleaning the area while the details of the session are fresh, noting what worked in a notebook if you keep one. Quality and safety in grinding are the same habit viewed from two sides: a calm, planned session produces both.
Final Advice: Your First Month With a New Grinder
Give the first month to learning rather than producing. Set the machine up exactly as its maker directs, and repeat the tracking and tensioning procedure until it is boring, because a setup you can do without thinking is a setup you will actually do every time instead of skipping it and grinding on a badly tracked belt. Run your early sessions on practice stock with one skill targeted at a time: even passes in one session, consistent angles in the next, heat management after that. Skills isolated like this improve measurably week to week, while general grinding improves slowly and invisibly, which is why so many beginners feel stuck despite owning a perfectly capable machine.
Keep a small notebook at the bench and use it without ceremony: belt fitted, grit sequence tried, what overheated, what wandered, what finally worked. A month of notes like that becomes a personal manual no video or forum can give you, because it describes your machine, your steel, your belts, and your hands. When a later session goes wrong, the notebook often contains the answer, dated and in your own handwriting. Inspect your safety habits as honestly as your bevels during this month: protective equipment worn every session rather than most sessions, a bench kept clear, dust managed rather than ignored, and a hard rule that a damaged belt is replaced rather than nursed. Habits set in the first month are the ones still protecting you in the fifth year.
Judge the machine at the end of the month, not at the end of the first afternoon. Every grinder in this guide feels awkward before its setup becomes familiar, and several of them feel like old friends shortly afterwards. The makers who finish knives consistently are rarely the ones with the most impressive machine; they are the ones whose machine, belts, and routine have disappeared into the background so that the work itself can take their whole attention. Aim for that disappearance, whichever of these six is bolted to your bench.
Knife Making Belt Grinder FAQ
Which has variable speed?
The Goldsand and the ApruNresi list VFD speed control. The others list a fixed speed.
Which uses the larger belt?
The ApruNresi lists a 36 by 2 inch belt and the KFMK a 2 by 42 inch belt. The VEVOR lists a 2 inch belt without a length in the details we read.
Is a beginner better off with a smaller belt grinder?
A smaller machine can teach the basics at lower cost, but belt choice and attachments may be limited. Consider how far you plan to go in knife making before choosing.
What grit should I start with?
Many makers begin with a coarse belt for shaping and move to finer belts for cleanup. Choose based on the steel and the task, and avoid skipping steps.
Can I grind wood and handle materials on the same belt?
It is possible, but belts clog and carry contamination between materials. Many people dedicate belts to steel and keep others for handles.
Why does my belt keep tracking off to one side?
Tracking depends on wheel alignment, tension and belt condition. Follow the manual's adjustment steps and replace worn or crooked belts.
How do I know when to replace a belt?
When it stops cutting, glazes, clogs, or shows frayed edges and cracks. Worn belts also create extra heat, which is bad for the blade.
Do I need a variable speed control?
Not strictly, but it makes finishing and heat management easier. Single-speed machines can work if you use a light touch.
Is it safe to use a belt grinder in a garage?
It can be, with good ventilation, fire precautions and no flammables nearby. Check local rules and keep the area clean.
What is the best belt size for making knives?
A 2 by 72 inch belt is common among serious knife makers, but none of the machines in this guide use it. The 1 by 30 inch units suit small blades and learning, while the 2 inch belts on the KFMK and ApruNresi give more reach. Choose by the size of the knives you plan to make.
Can you make a knife with a 1 by 30 inch belt grinder?
Yes, small blades and simple profiles are possible, but the narrow belt removes material slowly and limits long flat grinds. It works best for hobby projects, small knives and shaping. Expect to take more passes and manage heat carefully.
Is a belt and disc combo good for knife making?
It can be, because the disc is handy for squaring edges and shaping small parts. The belt does the main bevel work. Check the belt width, since a narrow belt limits what you can grind, and see that the disc table and work rest are solid.
Do I need to bolt a belt grinder to the bench?
Bolting or clamping it down is a good idea, especially with lighter machines. Vibration or movement ruins accuracy and can be unsafe. Follow the mounting guidance in the manual, and use a bench that can handle the weight.
What should I wear when using a belt grinder?
Wear eye protection, hearing protection and a respirator suited to the dust. Tie back hair, remove loose clothing and jewelry, and avoid gloves near the moving belt. Always follow the safety instructions from the maker.
Why does the listing for a belt grinder show conflicting specs?
Sellers sometimes copy figures from different versions or write them in different units. When watts, amps or rpm do not agree, treat the number as uncertain. Check the manual, ask the seller, or compare against other listings before ordering.
The Short Version
For a compact 2 inch belt, the VEVOR. For an induction motor, the KFMK. For a wheel plus belt, the Greteefor. For variable speed on a small belt, the Goldsand. For the widest belt, the ApruNresi. For a stated warranty, the WEN.


