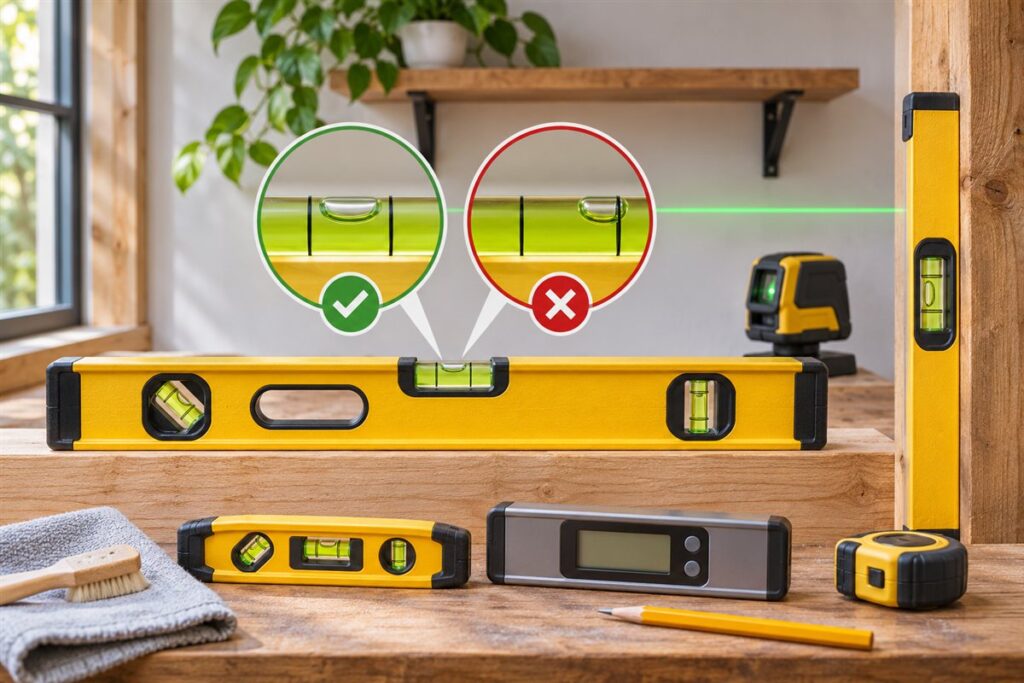
To use a level correctly, rest it flat against the surface, wait for the bubble to settle, and read whether it sits between the two lines on the vial. Centered means level or plumb; off to one side means that end is high. Small habits, such as checking the tool itself first, make results far more dependable.
Know the Vials
A typical level has several glass vials, each with a bubble in liquid.
- The long vial in the middle checks horizontal surfaces (level).
- The vial near the end, set at a right angle, checks vertical surfaces (plumb).
- Some levels add an angled vial, often marked at 45 degrees.
The bubble drifts toward the higher end. If it rests between the lines, the surface is close to level or plumb.
Check Your Level First
A level that is slightly off will pass its error to everything you do with it. A quick check takes a minute.
- Place the level on a flat, fairly stable surface and note where the bubble sits.
- Mark the position of each end of the level with a pencil.
- Turn the level end for end and set it back between the marks.
- If the bubble reads the same in both directions, the level is true. If it reads differently, the vial is out of true, so follow the maker’s guidance or replace the tool.
Using It in Practice
- Wipe dust from the level and the surface, since grit can tilt the reading.
- Hold the level firmly and flat. Do not twist it or lift one end.
- Read the bubble straight on, not from an angle, to avoid parallax errors.
- Adjust the work, then check again. Slide or shim until the bubble centers.
- Draw a line along the level’s edge to mark a straight line for shelves or rails.
On a long span, a longer level or a straight board under a short level gives a better picture than a short level alone. A short level can hide a slow dip over distance.
Where It Helps Most
| Job | Use | Tip |
|---|---|---|
| Hanging shelves | Horizontal vial | Mark one end, then level to the other |
| Setting a post | Vertical vial on two sides | Check adjacent faces |
| Checking a work surface | Both vials | Check across and along |
For anything load-bearing or structural, such as walls or decks, follow local codes and consult a qualified professional rather than relying on a level alone.
Choosing the Right Type and Length of Level
Levels come in several styles, and the best one depends on the work. A standard box or I-beam level is a good general choice for carpentry and household tasks. A torpedo level is short and fits tight spots, such as between studs or on pipes. A longer level spans more distance and averages out small bumps in a surface, which usually gives a more reliable reading on long runs.
Digital levels display an angle on a screen, which some people find easier to read, especially in poor light. Laser levels project a line across a room, useful for hanging a row of cabinets or tiles. A line laser still needs to be set up and checked, and it relies on a level base or a self-leveling feature. Check the manual for how to confirm accuracy.
Frame material affects feel and durability. Aluminum frames are lightweight and common, while wooden ones have a traditional look. Magnetic edges let a level stick to steel, which frees a hand when working with metal studs or beams.
- Pick a longer level for doors, walls and long shelves.
- Keep a short torpedo level for tight places.
- Consider a laser for room-wide lines, and check that it is rated for your light conditions.
What to Check When Buying a Level
Whatever type you choose, there are a few things worth checking before you buy. Look at the vials: they should be clear, well-seated and easy to read, with distinct lines. A vial that moves or has an uneven bubble can give inconsistent readings. If you can handle the level in a shop, rest it on a flat surface and see how the bubble behaves.
Inspect the frame. The edges that touch the work should be straight and undamaged, since a bent or dented edge will give wrong readings. Look for a frame that feels stiff and does not twist. The listing should describe the construction, and some makers state the accuracy they aim for, which you should compare in the specification rather than guessing.
Check how easy it is to read. Wide, bright vials and high-contrast markings help in dim light. Some levels have vials that can be read from the top as well as the side, which helps when you are working at awkward angles.
Think about extras like hand holes, a plumb site, rubber end caps and hanging holes. They can make daily use easier, but they do not replace accuracy. Look for a warranty or a simple return option in case the level arrives out of true.
Working Over Longer Spans and Uneven Surfaces
Long jobs call for technique as well as a tool. If your level is shorter than the distance you need to check, resting it on a long, straight board and placing the level on top of the board lets you check across the full span. The board must itself be straight, so check it before using it as a reference.
For large runs such as a fence line or a long row of cabinets, work from a reference. Mark a level line at one end, transfer it with a level and a straightedge or a laser, and measure from that line. Check frequently to avoid drift, since small errors multiply over distance.
On rough or uneven surfaces, place the level on a straight board or on a stable part of the work rather than on the bumpy surface itself. Moving the level to different spots and reading each time can show you the high and low points. A surface may be flat in one spot and tilted in another.
When the thing you are measuring is meant to slope, such as a drain or a patio, you are not trying to get a bubble centered. Check the amount of slope required by the plans, and use the appropriate method, such as shims under the level or an angle gauge.
Using a Level on Common Projects
Different tasks use the level in different ways. When hanging shelves, mark the position of one end, hold the level against the shelf or a straight edge, and adjust until the bubble centers before marking the second fixing point. Measure from the same reference for both ends to avoid slants.
For picture frames, a short level on top of the frame helps confirm it is straight on the wall, although you may choose to match the room’s features if the walls or ceiling are not square. Decide whether you want things to be truly level or to look right against the surroundings.
When setting posts, use the vertical vial on two adjacent faces so that the post is plumb in both directions. Check again after you add support, since fixing can pull the post out. For doors and window frames, check plumb on both sides and level across the head, then use shims as needed.
- Check both level and plumb on the finished work, not just the start.
- Use shims or packing to correct small errors before fixing permanently.
- Recheck after fixing, because fixings and glue can move parts.
Care and When to Replace a Level
A level is a measuring instrument, so handle it that way. Avoid dropping it, using it as a hammer or leaving it where it can be crushed. Store it flat or hung securely, and keep it away from extremes of heat that might affect the vials or frame. Wipe off dirt and wet material after use, and keep the edges clean.
Check accuracy from time to time, especially after a fall or if a result seems wrong. Use the end-for-end test described earlier, and also test the plumb vial against a known vertical reference such as a plumb bob hanging still. If the readings are inconsistent, the vial may be misaligned.
Some levels have adjustable vials, and the manual explains how to reset them. Many do not, and in that case a level that no longer reads true should be replaced rather than used with a guess. A tool that gives wrong results can cost far more in wasted work than the level itself.
Replace a level if the frame is bent, the vial leaks or is cloudy, the bubble sticks, or the edges are damaged. Keep a spare short level if you rely on the tool daily, so that a failure does not stop the job.
FAQ
Should I trust a level on a rough surface?
Not fully. Bumps tilt the tool. Use a straight board between the level and the surface.
Do temperature and knocks matter?
Drops and knocks can shift a vial. Re-check the tool if it has taken a hit.
Is a longer level always better?
A longer level averages out small surface bumps and spans more distance, but it can be awkward in tight places. Many people keep a long level and a short one.
Can I use a phone app instead of a level?
Phone apps can give a rough idea, but accuracy depends on the phone's sensors and how it is held. For work that must be accurate, use a proper level and check it.
What does plumb mean?
Plumb means truly vertical, straight up and down. The vial at the end of a level, or the side vial, checks this.
How do I check a laser level?
Follow the manual for its own accuracy check, which usually involves marking the line at two points and comparing. Make sure it stands on a stable surface.
Why does my level read differently on a wall than on a shelf?
The surfaces may not be square to each other, or one may be uneven. Place the level on a straight reference board and compare.
Should I use a level for a sloped surface?
Use the level with a shim, or an angle gauge, for the slope required by your plans. A centered bubble means flat, not sloped.
How do I read a level in poor light?
Use a work light, or a level with bright vials and high-contrast markings. A digital display can also help.
The Short Version
Check the level by flipping it, use it flat and clean, read the bubble straight on, and re-check after each adjustment. Use professional guidance for structural work.