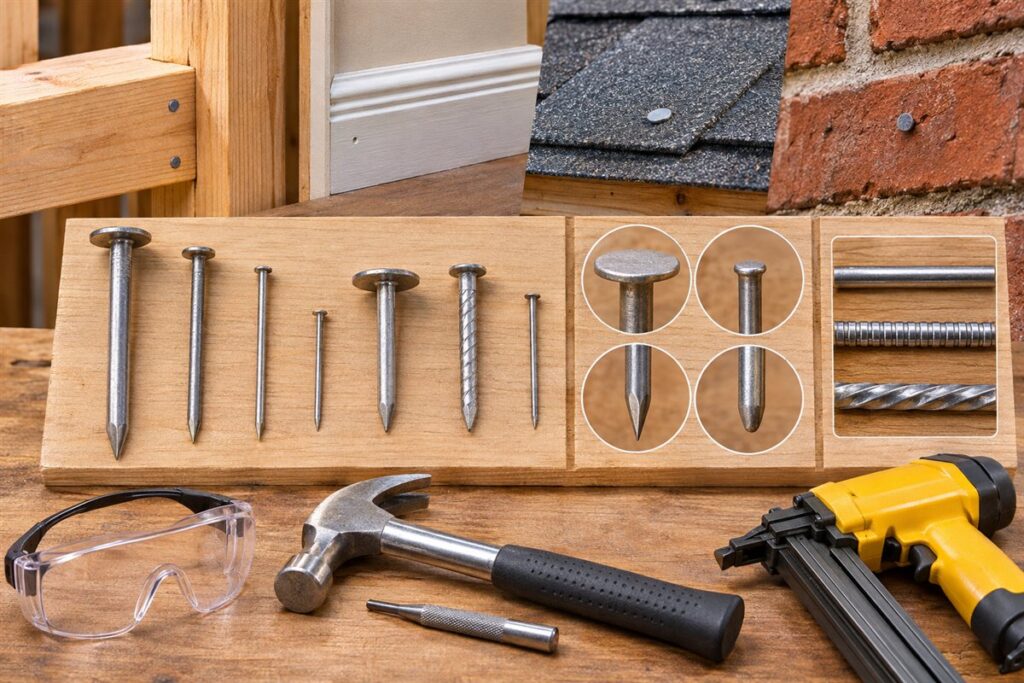
Nails differ in head, shank and length, and each variation suits a particular job. Common nails give strong framing joints, finish and brad nails leave small holes for trim, and masonry nails go into brick or block. Matching the nail to the task makes the joint stronger and neater.
Common Nail Families
- Common nails: thick shank, wide flat head, used in rough framing.
- Box nails: thinner than common nails, less likely to split boards.
- Finish nails: a small head that can be sunk below the surface and filled.
- Brad nails: thin and short, for delicate trim and mouldings.
- Roofing nails: wide heads for holding down felt and shingles.
- Masonry nails: hardened steel for brick, block and mortar.
- Panel pins: small thin nails for light fixing and backing panels.
Shank and Coating
A smooth shank is simple and easy to drive. Ring-shank and spiral nails have ridges that grip fibres and resist pulling out. Galvanised or coated nails resist rust and are used outdoors or in damp spots. Bare steel nails are fine inside dry rooms.
Length and Size
A general rule many woodworkers use is that the nail should be about two to three times as long as the thickness of the piece being fixed, so most of it sits in the base material. Sizes are labelled in different systems depending on the maker, so check the packaging and the maker’s guide.
| Job | Suitable nail |
|---|---|
| Framing a simple wooden structure | Common or box nails |
| Fixing trim and skirting | Finish or brad nails |
| Fixing into brick | Masonry nails, with eye protection |
| Outdoor timber | Coated or galvanised nails |
Driving a Nail Neatly
- Hold the nail near the head or use pliers if your fingers are close.
- Tap lightly to set the nail upright.
- Strike with firm, straight blows with a hammer of suitable weight.
- Near the edge of a board, blunt the tip slightly or drill a small pilot hole to reduce splitting.
- Sink finish nails with a nail set so the head sits just under the surface.
Always wear eye protection, particularly with masonry nails, which are hard and can chip. Before nailing into walls, remember that cables and pipes may run behind the surface. Use a detector if you have one and consult a qualified professional if unsure.
Head and Point Shapes and What They Do
Beyond the main nail families, two details change how a nail behaves: the head and the point. A flat, wide head spreads load and sits on the surface, which helps hold thin material like felt or sheathing. A small head can be driven below the surface and covered with filler, giving a neat finish on trim. A very large head, as on roofing types, resists pull-through in soft material.
The point shape affects splitting. A sharp, diamond point cuts through fibers and drives easily, but in some hardwoods and near board ends it can wedge fibers apart and split the wood. A blunt point crushes fibers instead of wedging them, which can lessen splitting. Some woodworkers lightly blunt the tip for this reason, but check guidance for your material.
The shank cross-section matters as well. Thinner shanks cause less splitting but offer less holding power, while thicker shanks grip more strongly and need more force. Choose the thinnest nail that does the job for delicate work, and a stouter one for structural fixings.
- Wide head: holds soft or thin material down.
- Small head: sinks and hides on trim.
- Blunt tip: may reduce splitting in some woods.
- Sharp tip: drives easily in softwood.
Matching Nails to Materials
The material you are fixing decides much of the nail choice. In softwood framing, common or box nails are typical. In hardwoods, nails tend to bend or split the wood, so a pilot hole or a different fastener may serve better. In thin trim, fine finish or brad nails hold without splitting.
Sheet materials need thought. Plywood and fiberboard hold nails differently from solid wood, and edges may crumble. Panel pins and smaller nails suit thin backing panels, while thicker sheathing calls for nails recommended by the board maker. Check the product information for the board you use.
For masonry, use nails made for the purpose, and wear eye protection since fragments can fly. Drive them straight, and expect that bricks and blocks differ in hardness. For soft or crumbly masonry, a nail may not hold, and a different fixing may be better.
Consider the environment. Outdoors, damp areas or treated timber call for coated or corrosion-resistant nails, since some preservatives can react with plain steel. Check the timber treatment label and fastener guidance. Mismatched metals can also corrode, so avoid mixing nails with unlike metal fittings in wet places.
Hammers, Nailers and Other Driving Methods
Hammer choice affects nailing. A hammer that is too light takes many blows, and one that is too heavy tires the arm and may dent the surface. Choose a weight you can control, with a face that is clean and a handle that feels comfortable. A smooth face is less likely to mark work, while a textured face grips the nail head.
A nail set, or punch, helps sink finish nails below the surface without marring the wood. Place it on the nail head and tap it down. Use one that is the right size for the head, so it does not slip. For delicate surfaces, a protective scrap of wood under the hammer reduces dents.
Powered nailers drive nails quickly and consistently. They come in various types for framing, finishing and brad nails, and each takes specific nail sizes and strips. Check that nails match the tool in the manual. Nailers are powerful and require eye protection and careful handling. Keep fingers away from the nose and follow the safety instructions.
For small work, a hand-held pin pusher or a drill-driven approach may suit. Know your limits, and consider screws when a joint needs to be taken apart or adjusted later.
Avoiding Splits, Bends and Other Mistakes
Splitting is the most common frustration, especially near the ends of boards. Keep nails away from the edge by a sensible distance, stagger them so they do not follow one grain line, and consider drilling a small pilot hole in hardwood or thin pieces. Use a nail with a smaller diameter if possible.
Bent nails often come from hitting at an angle or from nails that are too thin for the wood. Start the nail with light taps, then strike squarely. Hold the nail near the head or use pliers or a nail-holding aid to protect your fingers. If a nail bends, pull it and start a new one rather than hammering it flat.
Remove bad nails carefully. A claw hammer with a block under the head gives leverage and prevents damaging the surface. For finish nails, pulling them through from the back may leave less damage on the face, if accessible.
Driving at a slight angle in opposite directions, sometimes called toenailing, can resist pull-out in some joints, but it can also split wood or move parts. Use it when the design allows, and try it on scrap first.
- Check nail length so the point does not exit the far side.
- Keep fingers clear and wear eye protection.
- Use clamps to hold parts that tend to shift.
When to Choose Something Other Than Nails
Nails are quick and good under shear loads, meaning forces that slide parts along each other. They are weaker when pulled straight out, so jobs that put steady pull on a joint may need screws, bolts or specialized connectors. Check building guidance for structural work, since requirements differ by place and use.
Screws are better if you may need to take something apart, adjust it or if vibration could work nails loose. Adhesive can supplement nails in trim and furniture, giving a stronger joint while the nails hold parts in position as the glue sets. Check that the adhesive suits the material.
For heavy loads, like shelves carrying weight, nails alone are rarely the best choice. Use fasteners designed for the load and for the wall or material they enter, and follow the manufacturer’s guidance. For hollow walls, special anchors may be needed.
When unsure, ask at the store or consult the maker’s information for the product you are fixing. A fastener that matches the load and material saves rework, and in some cases it protects safety.
FAQ
Nails or screws?
Nails are quick and handle sideways forces well, while screws pull parts together and can be removed. Many projects use both.
Why did my wood split?
The nail was probably too thick or too close to the edge. Use a thinner nail or a pilot hole.
What does the penny size of a nail mean?
It is an older system for naming nail lengths, and the exact meaning depends on the nail type and region. Check the packaging for the actual length rather than relying on the number.
Should I drill a pilot hole for nails?
In hardwood, near edges or in thin pieces, a small pilot hole helps avoid splitting. In softwood it is often unnecessary, but try a test piece.
Can I use finish nails for framing?
They are generally too light for structural framing. Use nails recommended for the job, and follow local building rules for structural work.
Are galvanized nails needed for treated wood?
Some wood treatments can react with plain steel, so coated or corrosion-resistant fasteners are often advised. Check the timber treatment information and building guidance.
How do I fill nail holes?
Sink the nail head with a nail set, then fill the hole with a filler suited to the finish. Let it dry, sand lightly and finish.
Why do my nails keep bending?
Strikes at an angle, thin nails or very hard wood can cause it. Start with light taps, hit squarely and consider a pilot hole.
Is it safe to use a nailer at home?
Nailers are powerful. Read the manual, wear eye protection and keep fingers away from the nose, and consider hand tools if you are unsure.
The Short Version
Choose common nails for rough framing, finish or brad nails for trim, masonry nails for brick and coated nails outdoors. Size the length to the material, wear eye protection and watch for hidden services in walls.