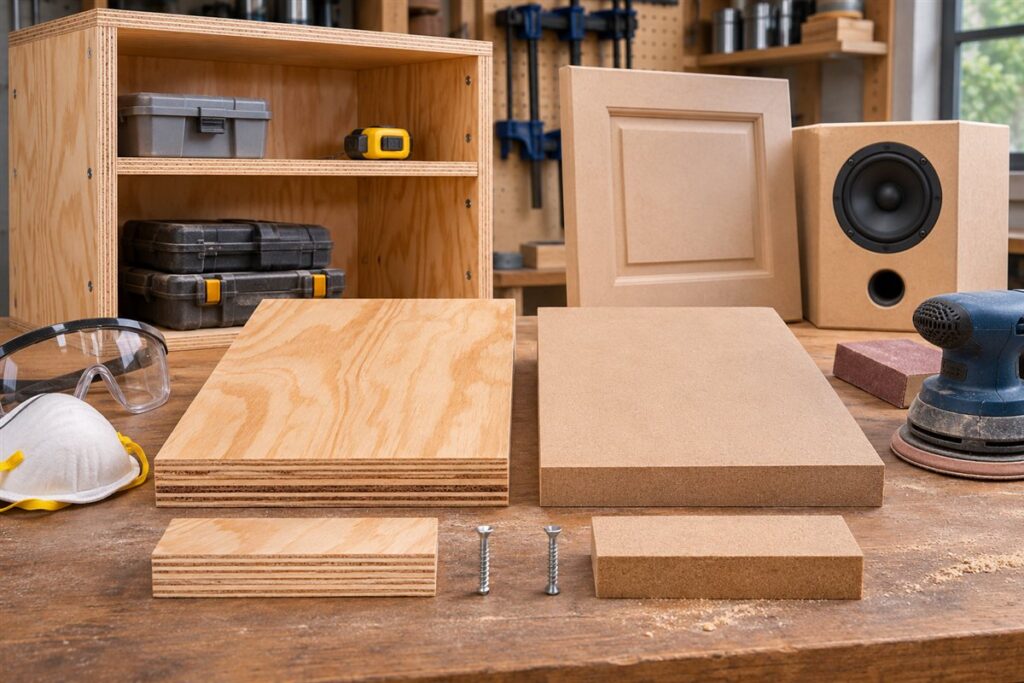
Plywood suits jobs that need strength, screw-holding power and some moisture tolerance, while MDF suits smooth, flat, easily shaped parts that stay dry. Neither is better in every case, so the right choice depends on the project.
What Each Board Is
Plywood is made of thin wood layers (plies) glued together with the grain of each layer running crossways to the one below. This gives strength in both directions. MDF (medium-density fibreboard) is made of fine wood fibres pressed with resin into a uniform board with no grain at all.
In this guide
Key Differences
| Factor | Plywood | MDF |
|---|---|---|
| Strength | Strong, resists bending | Stiff but can sag under load |
| Surface | Shows grain, can be rough on edges | Smooth and uniform |
| Moisture | Better, depending on type | Swells when wet |
| Weight | Lighter | Heavy |
| Screws | Holds well, even in the edge | Edges can split, needs pilot holes |
| Machining | Edges may chip | Cuts and routes cleanly |
Working With Each Board
Plywood can splinter on the face when cut, so use a fine-tooth blade and place masking tape along the cut line. MDF makes a lot of fine dust, so wear a dust mask, use extraction when you can and work in a ventilated space. Seal MDF edges before finishing, because they absorb liquid. Check the maker’s guide for the type of board, as grades differ.
Who Should Choose Which
- Choose plywood for shelves that carry weight, workshop cabinets, boxes, anything that may meet damp air, and parts that need strong screw holds.
- Choose MDF for smooth flat panels, router-cut shapes, jigs, speaker boxes and interior parts where weight and moisture are not concerns.
- Consider both in one project: plywood for the carcass and MDF for smooth door fronts.
Handling Steps
- Support the sheet fully on a flat surface before cutting.
- Mark the line and cut with the good face down if using a circular saw, or up with a jig saw.
- Drill pilot holes before screwing, particularly in MDF edges.
- Sand plywood lightly with the grain; sand MDF lightly and avoid rounding over the surface too much.
- Store both flat and dry.
Edges and Finishing
Plywood edges show the layers, which some people hide with edge banding or trim. MDF edges are rough and thirsty, so seal them with a suitable primer or filler before any coating. Both boards can be glued, screwed or joined with dowels and pocket holes, but test pilot hole sizes on an offcut first.
Plywood Grades and Types to Know
Plywood is not one product. Boards differ in the wood used for the face and core, the number and quality of plies, the glue and the surface grade. Softwood plywood is common for construction and utility work, while hardwood-faced plywood is chosen for furniture and cabinets where the surface shows. Grading systems vary by region, so read the grade marks on the board and the seller’s explanation.
Face quality matters when the board will be seen. A smooth, clean face veneer suits cabinets and painted or clear-finished pieces, while a rougher face is fine for hidden structures. Some boards have a good face and a lesser back, so check which side faces out. Ask whether you are buying a project-grade board for appearance or a utility board for strength only.
Core construction affects flatness and edge quality. Boards with many thin, evenly layered plies tend to give cleaner edges and a more stable sheet, while boards with voids in the core can leave gaps on cut edges. Inspect the edge of a sheet when you can, and look for obvious gaps.
The glue type and the intended use are also listed for some boards, such as interior or exterior ratings. Do not assume a board is suitable for wet use without the rating on the label.
- Check the face grade for visible surfaces.
- Look at the edge for voids or gaps.
- Read the interior or exterior marking.
MDF Grades and Special Versions
MDF also comes in several forms. Standard MDF is a general-purpose board for interior work. Moisture-resistant versions are made for damper rooms such as kitchens or bathrooms, and they are often tinted so you can tell them apart. Fire-rated versions exist for specific building needs. These variants have specific uses, and the label or datasheet explains them.
Some MDF is sold with a laminate or veneer already applied, which saves finishing work. Pre-finished boards are convenient for shelving and cabinets, but the surface can chip at cut edges, so cut carefully and consider edge banding. Check how the finish holds up for your use.
Thickness and density vary between boards. A heavier, denser board is usually stronger in screw holding and edge strength, but it is also harder to carry and cut. Lightweight versions reduce weight but may be softer. Compare product notes rather than guessing.
Also check the formaldehyde emission classification where relevant. Boards made with resin may carry labeling about emissions, and the label or supplier can explain it. If you are working in a small, enclosed space, ventilation is important whichever board you use.
Planning for Load and Span
When a board carries weight, such as a shelf, the span and thickness matter most. A long, unsupported span will sag over time, and this tendency differs between materials. MDF is more prone to gradual sagging under steady load than plywood, so for long shelves with heavy books, plywood or extra support is generally the safer choice.
Add support to reduce the span. Vertical dividers, a rail under the front edge, a back panel or a solid wood edge strip all stiffen the shelf. Orient plywood so the face grain runs across the span for better stiffness, as the maker or woodworking guides suggest. Check the plywood maker’s notes since stiffness depends on the ply layout.
Think about the whole system. The fasteners, the wall or carcass and the shelf supports all contribute. A strong board on weak supports will still fail. Use fixings suited to the material, and consider the maximum load you expect rather than the average.
If you are unsure, test a sample. Rest a piece across supports at the planned span, place a typical weight on it, and watch what happens over time. A sample test gives you a better sense than a table of numbers you cannot verify.
Fixing, Joining and Edge Treatment
Each board takes fasteners differently. Plywood holds screws well on the face and reasonably well on the edge, while MDF holds screws well on the face but less securely on the edge, where it can split or crumble. Use pilot holes in MDF, avoid over-tightening, and use screws designed for the board if available.
For repeated assembly and disassembly, MDF tends to wear out screw holes, so consider threaded inserts or other hardware where the maker suggests. Plywood is more forgiving, though repeated use in an edge can still wear it. Glue joints are effective in both materials when surfaces are clean, and a mechanical fastener can hold the parts while the glue sets.
Edge treatment changes appearance and durability. Plywood edges show the layers, which some people like and others cover with edge banding, solid wood trim or filler. MDF edges are smooth but absorb liquid, so sealing is important. Primer or sealer designed for the board keeps paint from soaking in unevenly.
Think about how the piece will be used. A tabletop edge sees knocks, so a hardwood edge or a robust banding may last longer than paint alone. Test the finishing method on an offcut first.
Cost, Weight and a Decision Checklist
Price and weight influence the choice. MDF is often cheaper than good plywood in comparable thickness, but it is heavier, which affects transport, handling and wall-mounted installation. Plywood is usually lighter, though the amount depends on the species and construction. Compare what is offered locally rather than relying on general ideas.
Waste and finishing time also count. MDF makes a smooth painted surface with less prep, which can save time on painted furniture and doors. Plywood often needs more sanding or filling at edges but is sturdier. Weigh the cost of the board against the effort you will spend.
Use a short checklist before you buy. Ask whether the piece will see moisture, carry weight, need screws in the edge, or be painted. Ask how you will move it, since sheet goods are large and heavy. Ask whether you need a particular thickness and whether the supplier can cut to size.
- Moisture or outdoor use: favor a suitably rated plywood.
- Painted flat panels: MDF is often a good fit.
- Heavy shelves: plywood or supported spans.
- Router work and shapes: MDF cuts cleanly.
When uncertain, ask the supplier what grade or type they recommend for your use, and check the label or datasheet.
Matching the Board to Common Projects
The comparison becomes clearer when you picture specific projects. These are general suggestions, and the right choice always depends on thickness, span, finish and the conditions in your home.
| Project | Usually better | Reason |
|---|---|---|
| Garage or workshop shelving | Plywood | Holds screws and weight, tolerates humidity swings better |
| Painted cabinet doors | MDF | Smooth face with no grain to telegraph through paint |
| Speaker enclosures | MDF | Dense, uniform and free of resonant voids |
| Bookcase with long shelves | Plywood | Resists sagging and long-term bending better |
| Router templates and jigs | MDF | Flat, stable and cuts a clean edge |
| Subfloor or sheathing | Plywood or similar structural panel | Made and rated for structural use |
| Toy boxes and storage crates | Plywood | Lighter and tougher at the corners |
| Craft or display backing | Either | Choose based on weight, finish and budget |
For projects that mix both, such as a cabinet with a plywood carcass and MDF door panels, plan the joints so each board does the work it handles best. Structural connections go into the plywood, and the smooth face goes where the eye lands.
How Moisture Changes the Choice
Water is the most common reason a good project fails. MDF is made of fine wood fibers bound with resin, and when the fibers get wet they swell and do not return to their original shape. Edges and screw holes are the weak points, because they expose the fibers directly. Plywood can also be damaged by water, but its layers, and particularly exterior or marine-rated glue lines, make it more tolerant of occasional dampness.
- Dry interiors: both boards work. Keep them away from direct water contact.
- Kitchens and bathrooms: use moisture-resistant products that the maker approves for the location, seal all edges and cut surfaces, and avoid constant wetting.
- Garages, sheds and basements: humidity swings can warp thin boards. Plywood is generally the safer choice, with a sealer or paint on all faces and edges.
- Outdoors: standard MDF is not suitable. Use boards rated for exterior use, and finish them to the maker’s directions. Even exterior plywood needs protection of its edges.
Seal both faces and all edges equally. A board finished on only one side can cup as it takes up or loses moisture unevenly.
Cutting and Dust Control in Detail
Both boards cut easily with common tools, but the dust and the edge quality differ.
Cutting plywood
A sharp blade with many fine teeth gives the cleanest result. Score the cut line with a knife, apply masking tape and cut with the show face oriented so the saw’s exit side is the hidden one. Tear-out usually appears on the side where the teeth leave the wood, which differs between tools, so test on an offcut and follow the guidance for your saw and blade. A track guide or a clamped straightedge helps keep the line straight.
Cutting MDF
MDF cuts cleanly but dulls blades quickly because of the resin. Carbide-tipped blades and bits last longer. The dust is very fine and spreads widely. Wear a well-fitting respirator rated for fine particles, wear eye protection and connect a dust extractor or vacuum if you can. Work outdoors or in a space with good airflow, and clean the area with a vacuum rather than a broom. Some MDF contains formaldehyde-based resins, so check the product’s emission information, particularly for large indoor projects.
General cutting safety
Support the sheet along its full length so it cannot pinch the blade or drop at the end of the cut. Make sure the offcut is free to fall away. Use clamps, keep your hands clear of the blade path and follow the tool manufacturer’s instructions. Full sheets are heavy and awkward, so get help or have the store make the rough cuts.
Fasteners, Glue and Joint Strength
The right fastener makes the difference between a joint that lasts and one that loosens.
- Screws in plywood: they hold well in the face and reasonably well in the edge. Pre-drill near edges to prevent splits.
- Screws in MDF: the face holds screws moderately, but the edge tends to split and the threads can strip with repeated use. Pre-drill a pilot hole sized for the screw, and consider fasteners designed for MDF or particleboard.
- Glue: wood glue works on both. MDF edges soak up glue like a sponge, so a thin first coat of glue, allowed to tack up, helps a second coat grip.
- Knock-down hardware: cam locks and similar fasteners hold better in plywood than in MDF, especially if the item will be assembled and taken apart repeatedly.
- Pocket holes: they work in plywood and in thicker MDF, but check the screw length against the board thickness so the tip does not break through.
- Heavy loads: use a backing board, blocking or a cleat rather than relying on a screw in the edge of either material.
When fastening something to a wall, find the studs and use fasteners suited to the load and wall type. Never trust a board edge, plywood or MDF, to carry a heavy wall-mounted item on its own.
Reading Labels and Buying at the Store
Buying well starts with looking at the stack. Sheets should be flat, with straight edges and without chipped corners or crushed edges. Hold a sheet on edge and sight along it for bow or twist. Check the grade stamp on plywood for the face quality, and ask staff about the adhesive rating if the board will be used in damp areas. For MDF, look for product information on density, thickness tolerance and moisture resistance. Real thickness is often a little different from the nominal size, so measure with calipers or a tape measure if the dimension matters. Compare price per square foot, not just per sheet, and ask whether the store offers cutting to size. Transport sheets flat and secure them well, since unsupported sheets can sag or snap.
Storage, Handling and Waste
How you store and handle a sheet affects how it behaves later. Store sheets flat on a level support with spacers, or stand them on edge against a wall if space is tight, with the bottom edge off damp floors. Leaning a sheet at a steep angle for weeks can introduce bow. Keep both materials out of direct sun and away from damp walls, and allow them to adjust to the room for a day or two before you cut and assemble, since moisture changes can move them slightly.
Plan your cuts on paper before you start. Sketch the sheet, lay out the parts and aim to cut the largest pieces first. Leave extra for the saw kerf, which is the width of material the blade removes. Small offcuts are useful for testing fasteners, finishes and router settings, so keep a few.
Dispose of waste thoughtfully. MDF dust and offcuts contain resins, and finished or treated boards may be restricted from burning or from some recycling streams. Check local rules for disposal. Bag fine dust before it goes into the trash, and keep it away from open flames. Vacuum the shop rather than sweeping, and clean tools after use so that resin and dust do not build up. These small habits keep the workspace safer and extend the life of your blades and bits.
A Deeper Comparison Framework
Beyond the headline differences, a handful of working properties decide how each board behaves across years of use. Weighing these one by one gives a clearer answer than any single rule of thumb.
Strength and stiffness in real spans
Plywood’s cross-banded veneers give it useful strength in both directions and a reassuring stiffness for its weight. MDF is consistent and flat but flexes more under the same load and thickness, and it creeps: a shelf that looks acceptable in the first month can develop a visible sag by the end of the year. The practical response is not to avoid MDF but to design for it, with shorter spans, intermediate supports and solid edge strips that add stiffness where the eye also benefits.
How each board holds fixings
Screws into the face of plywood bite into alternating grain and hold well. Screws into the edge of plywood can split plies if they are coarse, closely spaced or near a corner, so pilot holes and modest gauges matter. MDF accepts screws across its face evenly but its edges are its weak direction: fixings near an edge can blow out the material, and repeated removal and refitting quickly ruins the hole. Where a joint must be dismantled and rebuilt, plywood or solid timber battens inside an MDF carcass give the fixings something forgiving to bite.
Surface quality and finishing behaviour
MDF arrives smoother than most plywood and paints beautifully, with edges that can be shaped, sealed and painted to match the face. Plywood shows the character of its face veneer: attractive under clear finishes when the grade is good, telegraphing grain and occasional patches under paint. If the plan is painted built-ins, MDF panels with solid timber or plywood where structure is needed is a combination many workshops settle on, because it puts each material where it performs best.
Weight, handling and the reality of a home workshop
A full sheet of thick MDF is heavy and awkward, and its edges dent when knocked against door frames and bench corners. Plywood of the same thickness is noticeably lighter and tougher at the edges, which matters when one person is moving sheets alone. Cutting either is dusty work, but MDF dust is finer and more persistent, so extraction and a mask deserve extra respect, along with clearing dust from the saw between sessions so it does not build up in the machine.
A Decision Table by Scenario
For kitchen and bathroom cabinetry, moisture-resistant plywood or carefully sealed moisture-resistant MDF both appear, and the deciding factor is how wet the location truly gets: near sinks and baths, plywood’s tolerance of occasional wetting wins confidence. For wardrobe and bedroom furniture that will be painted, MDF panels with plywood or solid timber for hanging rails and shelf spans give a smooth finish without sagging surprises. For workshop jigs, templates and sleds, MDF’s flatness and stability make it the default, while plywood serves better for jigs that will be knocked about and re-clamped for years. For shelving that carries books and tools, plywood with a solid front edge strip is the safer long-term answer. For speaker cabinets and similar boxes, MDF’s density and consistency are prized. For anything that lives outdoors or in a damp garage, neither standard board is the right answer: exterior-grade plywood is the starting point, and standard MDF should stay indoors.
Worked Examples
A painted media unit with long shelves
The carcass can be MDF for its smooth painted finish, but the long shelves deserve either plywood or MDF reinforced with a deep solid front edge and a centre support. Doors in MDF can be routed with a panel profile in one piece, something plywood cannot imitate without applied mouldings, which is why painted media furniture so often mixes the two boards in exactly this way.
A garage workbench top
Here impact, spills and reconfiguration rule. A plywood top, or a sacrificial MDF layer over a plywood base, both work: the MDF gives a flat, renewable surface while the plywood underneath provides fixing strength for vises and stops. When the surface is scarred beyond tolerance, the sacrificial layer is replaced and the base carries on.
Alcove shelves that must not sag
Measure the span honestly, choose plywood of sensible thickness, and add a front lipping that deepens the section where bending is resisted. If the shelves must be painted MDF for budget reasons, shorten the effective span with an intermediate support and accept the design change openly rather than discovering the sag with the books already loaded.
Curved or shaped decorative panels
Thin flexible plywood bends to gentle curves and holds them, while MDF can be kerfed or bought in flexible form for similar work. For flat shaped panels with routed detail, MDF cuts cleanly and paints without grain showing through, which is why decorative wall panelling so often starts as an MDF sheet and a router.
Buying, Storing and Working Rules That Apply to Both
Inspect sheets before they are loaded: sight along the edge for bow, check corners for damage, and look at faces for defects that will land in a visible place. Store sheets flat and supported in several places, off a damp floor, because a sheet stored leaning will take a set that no clamp fully persuades out again. Let boards acclimatise in the room where the project will live, particularly before precise fitting. When cutting, support the whole sheet so the offcut cannot drop and tear the last fibres, and mark every piece as it comes off the sheet, because two similar rectangles become a puzzle by the end of a session.
Disposal and Leftover Pieces
Keep offcuts sorted by material and thickness; both boards earn their keep in jigs, spacers, drawer bottoms and test pieces for finish and machining setups. Dispose of dusty waste responsibly and avoid burning manufactured boards in domestic fires, since the resins in them are not suited to open burning. A tidy offcut rack quietly funds future projects, and a test cut in the actual material remains the cheapest insurance in the whole comparison: whichever board you choose, prove the joint, the finish and the fixing in a spare piece first.
Environmental and Health Considerations in Plain Terms
Both boards are manufactured products, and sensible handling reflects that. Cutting and sanding generate dust that should be controlled with extraction and a mask, with MDF dust in particular being fine enough to linger in the air. Work outdoors or with good ventilation for long machining sessions, and clean up with a vacuum rather than dry sweeping, which simply relocates the dust into the air again. Store offcuts dry and off the ground so they stay usable instead of becoming waste. When disposing of larger quantities, follow local guidance for manufactured wood products rather than burning them at home. None of this is cause for alarm; it is the same respect you would give any dusty workshop material, applied consistently.
Cost Thinking Beyond the Price of a Sheet
The sheet price is only the visible part of the comparison. MDF often costs less per sheet and paints with less preparation, which suits painted work on a budget. Plywood can cost more up front while saving time in finishing, edge treatment and long-term repairs, especially where edges stay visible or loads are real. Transport and handling belong in the account too: a sheet one person can move safely may be worth more than a cheaper sheet that needs two people and risks damage on every doorway. Finally, count the cost of failure honestly. A shelf that sags gets rebuilt, and the rebuild buys the board twice. Choosing the material that survives the application is usually the economical choice even when its ticket price is higher.
Repairs and Second Chances
Each board forgives mistakes in its own way. Damaged plywood veneer can be patched with a Dutchman repair or disguised under paint, and a split along an edge can often be glued and clamped back to strength. MDF dents fill and paint over almost invisibly, which is one of its quiet virtues in painted furniture, but a blown-out screw hole or a swollen, water-damaged edge rarely recovers its original strength or crispness. Knowing the repair profile of each board feeds back into the choice: projects likely to be modified, moved and re-fixed argue for plywood’s tolerance, while stable, painted, indoor pieces can enjoy MDF’s smooth economy without penalty.
Questions to Ask at the Timber Counter
A short list of questions will get you the right sheet more reliably than any brand loyalty. Ask what the face grade means in practical terms and whether a better face is available for visible work. Ask whether the plywood is interior or exterior bonded, and whether the MDF is standard or moisture-resistant, and match the answer to the room the project will live in. Ask about sheet flatness and whether the stack has been stored flat. Ask what thickness the sheet actually measures, since nominal and real dimensions differ and joinery notices the difference. Finally, ask about cutting services if your vehicle or workshop cannot handle a full sheet: accurate store cuts, made while the sheet is fully supported, can save a difficult transport and a risky first cut at home.
A Simple Rule Set to Remember
When the project must carry load across a span, lean plywood. When the project must paint up smooth and stay indoors and dry, lean MDF. When moisture is a regular guest, choose plywood with the right bonding, or rethink the material entirely. When edges will be seen and handled daily, give them solid timber whichever board you choose. And when the decision is genuinely balanced, make a test piece: a small shelf, a sample joint, a painted offcut. The boards will demonstrate their characters more persuasively in an afternoon than any comparison, including this one, can in words.
Joinery Recipes: Which Board for Which Joint
Joints reveal board character faster than any other test. Butt joints in MDF depend heavily on glue area and careful screw placement away from edges, and they reward the addition of battens or corner blocks inside carcasses. The same joint in plywood holds screws more forgivingly and tolerates the small inaccuracies of a home workshop. Rebates and grooves machine crisply in MDF and give glued joints a mechanical register that plain butt joints lack, which is why flat-pack design leans on them so heavily. In plywood, a housed joint gains strength from the plies themselves and resists racking well. Mitres in MDF paint beautifully but are fragile until reinforced; mitres in plywood show attractive edge banding possibilities but risk veneer chipping at the knife edge. The practical conclusion is not that one board joins better, but that each has joints it loves, and designing with those joints rather than against them is most of what good board selection means in practice.
What Goes Wrong Years Later: A Failure Survey
Walk through an older home with this comparison in mind and the failure patterns read like a checklist. MDF shelves bow gently in the middle, their front edges chipped where books have caught them for a decade. MDF skirting near a bathroom door swells at the bottom corner where mop water reaches it weekly. Plywood drawer bottoms sag only where they were made too thin for the span, and plywood edges delaminate only where water was allowed to sit in an unsealed end. Solid lessons emerge: nearly every failure is a span, moisture or edge problem that was predictable on day one. That predictability is good news, because it means the decision table earlier in this guide, honestly applied to span, moisture and edges, prevents almost all of it.
Acclimatisation and Timing in Real Projects
Boards bought in the morning and built by the afternoon carry the moisture of the store into the joinery of the home. Give sheets and cut parts a day or two stacked flat in the room where the project will live, with air able to reach both faces, before final cutting and assembly. This matters most for wide MDF panels that will be painted, where a moisture gradient through the thickness can bow a door that was flat on the bench, and for plywood parts that must meet solid timber in a fitted piece. Seal or prime MDF edges promptly after machining, because a machined edge left bare in a humid week can swell enough to change a fit. Timing is the cheapest quality control in the whole comparison: the same boards, the same tools and the same design produce a better piece when the calendar is allowed to help.
Working With Suppliers, Cutting Lists and Sheet Yield
A sheet is a small economy of its own, and planning its yield is part of choosing between the boards. Lay out every part on paper at sheet scale before buying, grouping parts so grain direction in plywood serves the visible pieces and so offcuts fall in useful sizes rather than in slivers. MDF, having no grain to respect, nests more freely, which can make a sheet go noticeably further on painted work with many small parts. Write a cutting list with each part’s dimensions, material and quantity, and mark which edges will be visible, because visible edges decide where the best face and the cleanest cuts must go. When the store cuts for you, give them the list in cutting order and check the first pieces against it before the sheet is reduced to a pile you cannot verify. At home, label every part as it is cut, on a face that will be hidden, and stack parts by assembly stage. This administrative layer sounds dull beside the romance of making, yet it is where the plywood-versus-MDF decision becomes real money: the right board, fully used, beats the theoretically perfect board bought twice.
A Final Word on Choosing Without Regret
Plywood and MDF have coexisted in workshops for generations because each is genuinely excellent at what the other does less well. The regrets in this comparison almost never come from the boards themselves; they come from a span that was underestimated, a damp corner that was wished away, or an edge that was left to fend for itself. Run the honest checks, span, moisture, edges, finish and fixings, and either board will serve you faithfully for years. Keep offcuts for tests, store sheets flat, and let a small sample piece settle any argument that words leave open. Chosen that way, the board disappears into the project, which is the highest compliment a sheet material can earn.
One More Habit: Label Everything You Cut
The simplest professional habit in sheet work costs one pencil. As each part comes off the sheet, write on a hidden face what it is, which way is up, and which board it came from. In a project with two similar sides, four similar shelves and a family of rails, unlabelled parts become a three-dimensional puzzle whose solution consumes the time the cutting saved, and the classic error, a part mirrored that should have been matched, is born in exactly that confusion. Labels also carry the comparison forward: when a shelf of one board behaves differently from a shelf of the other over the following year, the pencilled note inside the carcass tells you which was which, and your next decision is made from evidence rather than folklore. Keep a record sheet for the project with the cutting list, the board batch and the finish used, stored with the household documents for the room the piece lives in. Years later, when a repair or a matching piece is needed, that single sheet will be worth more than any memory, including the confident one you have right now.
Sheet Goods and the Wider Material Palette
Finally, place both boards honestly among their neighbours, because the best answer to a project is occasionally neither of them. Solid timber wins where edges will be shaped and handled for decades and where repair must be invisible. Blockboard and laminated boards offer stability with a solid core for wide, light panels. Modern compact laminates and moisture-proof boards serve wet areas that would defeat both of this guide’s subjects. Veneered boards of many core types let a fine face ride on an economical heart. Knowing the neighbours sharpens the original comparison rather than replacing it: plywood remains the strong, light, forgiving all-rounder, MDF remains the smooth, stable, paint-loving specialist, and each new material you meet can be judged by the same five questions, span, moisture, edges, finish and fixings, that have organised every page of this guide. Carry those questions to any material, in any store, and you will rarely bring home the wrong sheet again.
A Closing Note on Samples and Swatches
Before any large purchase, buy or beg one small sample of each candidate board and subject it to the project’s real life in miniature: a screw near the edge, a routed profile, a coat of the intended finish, a splash of water left standing for an afternoon. The samples will settle questions about edge quality, fixing behaviour and finish appearance that no specification sheet answers, and they cost almost nothing beside a full sheet. Keep the labelled samples afterwards; like the routed offcuts and the finishing notebook mentioned elsewhere in this guide, they become part of the workshop’s memory, ready to inform the next decision before a single new sheet is cut.
FAQ
Is MDF good for shelves?
For short spans with light loads it can work, but long spans may sag over time. Plywood is better for heavy loads.
Can I use either outdoors?
Standard MDF is not meant for outdoor use. Some plywood is made for exterior use, so check the maker’s labelling.
Is plywood always stronger than MDF?
In bending and screw holding it usually is, but the answer depends on the grade, thickness and how the board is used. Check the maker's information for the specific products.
Can I paint plywood and MDF the same way?
Both can be painted, but MDF needs sealed edges and a suitable primer, while plywood may need filling to hide grain or edges. Follow the paint maker's advice.
What is the difference between interior and exterior plywood?
Exterior-rated boards use glue and construction intended for damp conditions, while interior boards are not. Check the label, and remember that even exterior boards need protection.
Does MDF release harmful dust?
It produces fine dust that you should not breathe. Use extraction and a dust mask, and work in a ventilated space.
Why does my plywood edge look rough?
Cutting can lift fibers or reveal voids in the core. Use a sharp fine-tooth blade, support the cut line and consider edge banding or filler.
Can I use MDF for kitchen cabinets?
Some cabinet makers use moisture-resistant MDF with proper sealing. Keep it away from standing water and check the product suitability.
How do I carry full sheets safely?
Sheets are heavy and awkward, so use help, carry on edge and ask the supplier whether they can cut to size or deliver.
Which is cheaper, plywood or MDF?
MDF is often cheaper than plywood of a comparable grade, but prices vary by region, thickness and quality. Compare the price per square foot for the exact type you need, and think about waste and finishing costs, not only the sticker price.
Can I screw into the edge of MDF?
You can, but it is the weakest spot. Drill a correctly sized pilot hole, avoid placing screws too close to the end, and consider fasteners made for MDF. For repeated assembly or heavy loads, plywood or hardwood is a better choice.
Is plywood better for painted furniture?
Not always. Plywood face grain can show through paint unless it is filled and primed, while MDF gives a smoother painted surface. For furniture that needs both strength and a smooth paint finish, many builders combine the two.
Does MDF warp?
It can sag under load across long spans and swell when wet. It is less likely to twist like solid lumber, but it needs support and sealed edges. Keep it flat during storage and avoid damp areas.
What thickness plywood should I use for shelves?
It depends on span and load. Many people use 3/4 inch plywood for shelves that carry books or tools, with supports at modest spacing. Check span tables or manufacturer guidance, and add a front edge strip to resist sag.
The Short Version
Choose plywood for strength, screw-holding and damp-prone spots. Choose MDF for smooth, easily shaped, dry interior parts. Wear a mask when cutting either, and follow the maker’s guidance.


