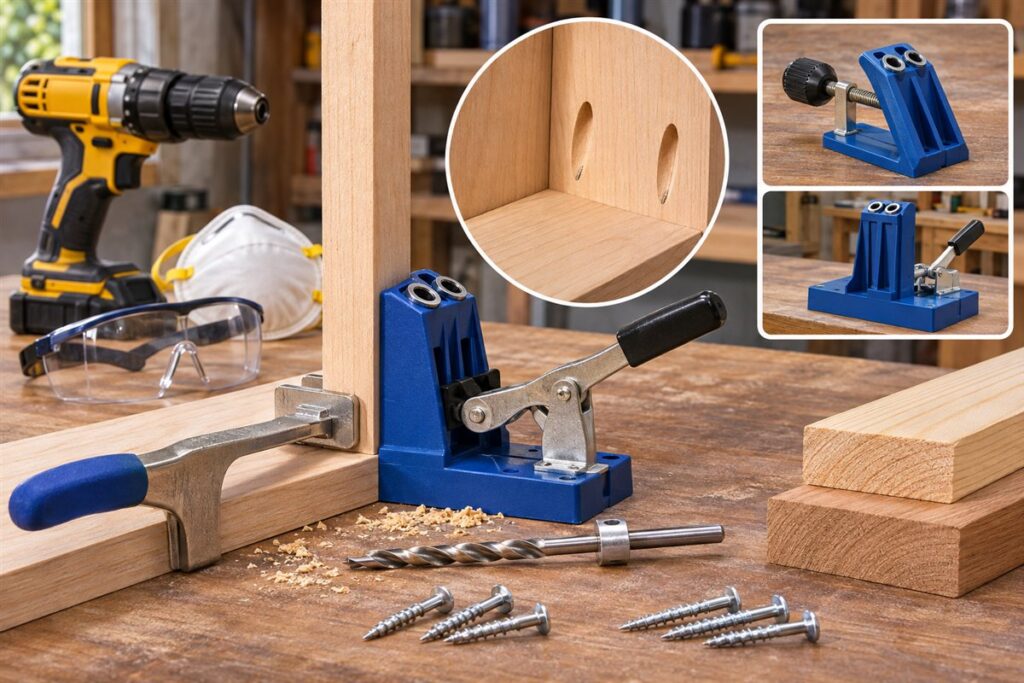
Pocket hole joinery joins two pieces of wood by drilling an angled hole in one board and driving a special screw through it into the other. It is quick, needs few tools and gives a firm joint that hides the fastener on the less visible face. A drilling jig guides the angle and depth for you.
What You Need
- A pocket hole jig with a stepped drill bit and a depth collar.
- A drill or drill driver.
- Pocket hole screws, with coarse threads for softwood and fine threads for hardwood.
- Clamps, including a face clamp if your jig has one.
- Eye protection and a dust mask.
Step by Step
- Set the depth. Measure the thickness of your board and set the jig and the drill collar to match, following the jig maker’s chart.
- Clamp the board in the jig. Place the board face down so the pocket ends up on the hidden side, and clamp it firmly.
- Drill the holes. Push the bit through the guide bush with steady pressure, withdrawing it now and then to clear chips, until the collar touches the guide.
- Dry-fit the parts. Hold the pieces in position and check the alignment before adding glue.
- Clamp the joint. Use a clamp across the joint so the surfaces stay level while you drive the screw.
- Drive the screws. Use the screw type the jig maker recommends and stop when snug, without sinking the head too deep.
Choosing Screws
| Material | Screw type | Why |
|---|---|---|
| Softwood and plywood | Coarse thread | Bites well in soft fibres |
| Hardwood | Fine thread | Less risk of splitting |
| Outdoor use | Corrosion-resistant coated type | Resists rust |
Length depends on board thickness, so check the jig maker’s guide rather than guessing.
Common Problems
If the boards slide as you drive the screw, add a second clamp or use a clamp made for pocket joints. If the screw tip pokes through the face, the screw is too long for that thickness. If the wood splits near an end, move the holes a little further from the edge. Thin boards may need fine-thread screws and gentle driving.
Pocket holes show on one face, so plan them for the underside of tables or the inside of cabinets, or fill them with plugs made for the purpose. For joints that carry heavy or structural loads, seek advice from a qualified professional and follow the maker’s instructions.
Jig Styles and What to Compare
Pocket hole jigs come in several forms, and the right one depends on how often you will use it and what you build. A small clamp-on jig is light and easy to store and suits occasional work or projects on site. A bench-mounted or larger jig holds the board more securely and speeds up repeated drilling, which suits frequent builders.
Compare how each jig sets board thickness. Some use a manual adjustment with a stop, while others have indexed positions. A clear scale and a firm lock reduce errors. Check the listing for the range of board thicknesses the jig handles, and make sure it covers the material you use.
Look at the guide bushings, since these wear. Hardened steel guides last longer and keep the hole aligned. Check how the jig clamps the work and how easily you can load and release boards. A jig that is awkward to clamp slows you down and may lead to crooked holes.
- Portable jig: good for occasional or on-site work.
- Bench-mounted jig: better for repeated drilling.
- Multi-hole jig: drills several holes along one board edge.
- Check whether bits, collar and screws come with the jig.
Screw Length, Thread and Head Details
The screw does the real work in a pocket hole joint, so get this right. Length must match the board thickness, so that the screw bites into the second piece without poking through its surface. The jig maker usually supplies a chart linking thickness to length, and following it is safer than guessing.
Thread choice relates to the material. Coarse threads grip softwoods and sheet materials, while fine threads suit denser hardwoods that could split. Self-tapping tips help the screw start without a pilot hole. Check the packaging for which wood types the screw is designed for.
Head style matters because the screw sits at the bottom of a pocket. Washer heads give a broad bearing surface that pulls the joint tight without sinking too deep. Pan or similar heads may behave differently. Use the head type the jig maker recommends, since the pocket shape is designed for it.
For outdoor or damp uses, choose screws with a corrosion-resistant coating or material that suits the conditions. Check what the screw maker says about exposure. Also consider that the wood itself needs to be suitable for outdoor use, since a coated screw in unprotected wood still faces trouble.
Clamping and Alignment Technique
Many pocket hole problems come from joint movement as the screw pulls. Because the screw is driven at an angle, it tends to push the pieces out of alignment. Clamping the joint firmly before driving solves most of this. A face clamp, which squeezes the pieces together with a pad that grips the surface, is made for this job.
Line the surfaces up carefully, especially for visible faces. Mark the boards, use a flat reference surface, and keep the edges flush. If you are joining a frame, clamp each corner, and check squareness before driving screws. Once screws are in, adjustments are harder.
Drive screws gradually, and stop when snug. Many drivers can overpower the joint, and too much torque can strip the wood or push the screw through. A drill with a clutch setting helps. Start at a low setting and increase if needed.
Work from the center outward on wide panels, and alternate sides where the design allows. This reduces cupping or twisting as the screws pull the joint together. Check the surfaces with a straightedge after the first screws.
- Clamp near the joint so that the pieces cannot slip.
- Use a clutch to avoid overdriving.
- Clean glue squeeze-out as the product directions advise.
Where Pocket Holes Work Best and Where They Do Not
Pocket holes suit a wide range of jobs. Face frames, cabinet boxes, shelves, simple furniture, workshop projects and repairs all benefit from the quick, hidden fastening. They help when you do not have clamps long enough for a glue-up, since the screws hold the parts while glue sets.
The method has limits. The holes are visible on one face, so plan where they will sit. On pieces seen from all sides, you may need to plug the holes, hide them on an inside face or choose another joint. Plugs made for pocket holes can fill them, though results depend on the wood and finish.
Pocket screws are not the best choice for every structural purpose. Heavy loads, outdoor structures, and joints under repeated stress may need other joinery or hardware, and building guidance may specify certain fasteners. Check requirements for load-bearing work.
End grain joints and thin boards need extra attention. Thin boards may not take a pocket without breaking out, and some jigs have a minimum thickness. Check the jig’s range and test on scrap first. Hardwoods can be difficult in thick sections, requiring a suitable drill and bit.
Planning and Finishing a Pocket Hole Project
Good planning avoids most mistakes. Before drilling, decide on the orientation of each part and where the pockets will be hidden. Mark each pocket location, and label the face of each board. Mistakes in layout are easy to make because the jig works from a particular side.
Think about spacing. Place the holes evenly and keep them back from the ends and edges by a safe distance. On wide boards, use more than one pocket. The jig’s instructions often suggest spacing, so follow the guidance for your thickness.
Prepare the surface before assembly. Sand the parts while they are flat, because sanding inside a finished box is harder. Apply finish to inside faces if appropriate before closing up the assembly. Keep glue off surfaces that will take a stain.
Finally, test the joint. Check for gaps, rock or twist, and fix problems before the glue sets. Keep spare screws and offcuts for practice. If a pocket splits the wood, redo it on a fresh part, and adjust the technique such as using a smaller screw or finer thread.
FAQ
Do I need glue as well?
Often glue adds strength in face-to-face joints. In end-grain joins the screws do most of the work. Follow the glue maker’s directions.
Can I use pocket holes in plywood?
Yes, with care. Plywood edges can be weaker, so clamp tightly and avoid overdriving screws.
How do I hide pocket holes?
Plan the pockets on faces that will not be seen, or use plugs made for the hole size. Test the plug and finish on scrap to check how it looks.
Can I use pocket screws in thin material?
Check the jig's minimum thickness. Thin boards may split, so test on scrap or use a different joint.
Do I need a special drill bit?
Pocket hole jigs normally use a stepped bit that drills both the pilot and the larger pocket in one go. Use the bit made for your jig and set the depth collar correctly.
Why does my joint end up misaligned?
The screw's angle pushes the pieces as it pulls them together. Clamp the joint firmly before driving, and drive in stages.
Are pocket hole joints strong enough for furniture?
They are widely used for cabinets and furniture, but strength depends on the wood, screws and design. For heavy or critical loads, check the guidance for the project.
How many pocket holes do I need per joint?
It depends on the board width and use. Wider boards usually need more than one, spaced evenly, and the jig maker often gives suggested spacing.
What can I do if the screw pokes through?
The screw is too long or the board too thin. Remove it, use a shorter screw as the chart suggests and check the depth setting.
The Short Version
Set the jig for board thickness, drill on the hidden face, clamp the joint, and drive the right screw to a snug fit. Use gentle pressure and follow the jig maker’s chart.