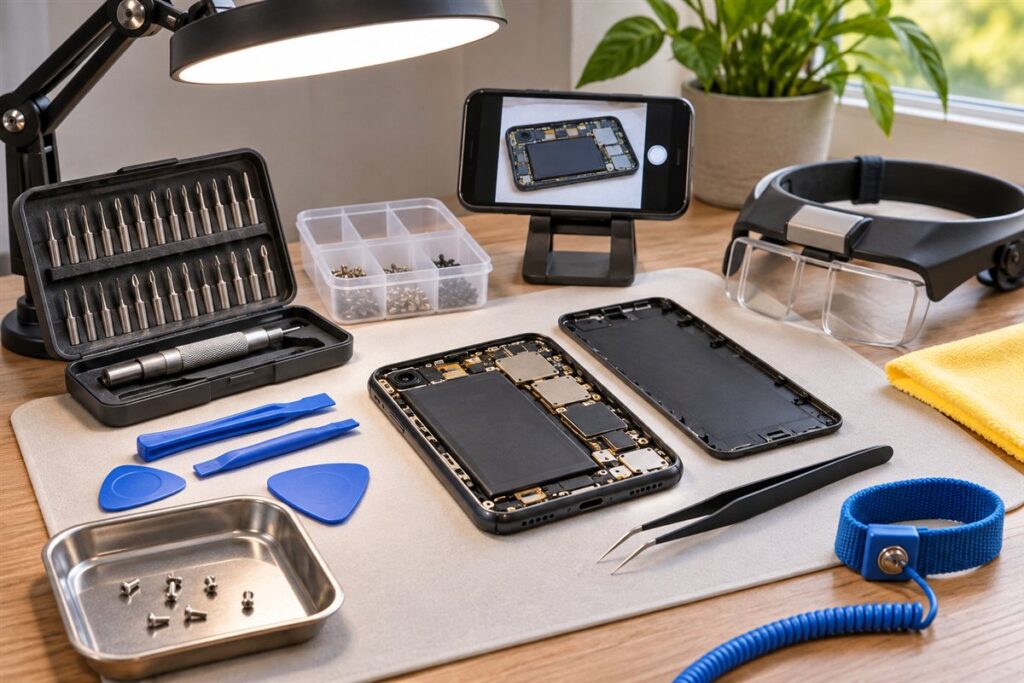
Small electronics repair relies on precision screwdrivers, plastic opening tools, tweezers and good light. These items let you open a gadget without damaging it, but you should always follow the maker’s guidance, power the device off first, and stop if a repair involves mains power, swollen batteries or anything you are unsure about. This guide covers the kit, a careful workflow, and the habits that protect both the device and you.
The Basic Precision Kit
- A precision screwdriver set with cross-head, slotted and six-point bits, plus the tamper-style bits some devices use.
- Plastic spudgers and opening tools for prying open cases without scratching.
- Fine-tip tweezers, preferably anti-static types.
- A magnifier or headband magnifier.
- A small magnetic tray or a sectioned box for screws.
- A bright, adjustable lamp.
Compare screw sizes to the bits and test fit before turning. A bit that does not seat fully can strip the head.
A Careful Workflow
- Check whether the device is covered by a repair programme or the maker’s service instructions.
- Power it off and unplug it. Disconnect any external power source.
- Work on a clean, light-coloured surface so tiny parts are easy to see.
- Photograph each stage, and lay screws out in the order you removed them.
- Open the case gently, working around the seam and listening for clips.
- Make the repair, reassemble in reverse order, and check that no cables are pinched.
Batteries and Static
Lithium batteries can be damaged by pressure or puncture. If a battery looks swollen, hot or damaged, do not continue; contact a qualified professional or your local collection point. Old batteries and electronics should be taken to local recycling collection and not placed in ordinary waste. Touching a grounded metal object before handling circuit boards helps reduce static, and anti-static wrist straps are a common aid, used as the maker directs.
Soldering Notes
Soldering needs a hot iron, ventilation and practice. Beginners should learn on scrap boards first and follow the iron maker’s instructions. Repairs on mains-powered equipment, power supplies and large capacitors can store dangerous energy, so leave those to qualified professionals.
Match Tool to Job
| Task | Tool |
|---|---|
| Opening a case | Plastic spudger |
| Removing tiny screws | Precision driver, magnetic tray |
| Handling components | Tweezers |
Worked Walkthrough: Opening and Repairing a Handheld Gadget
Many small repairs are simple, such as reseating a loose internal connector or replacing a part the maker supplies with instructions. This outline suits a handheld gadget where the maker allows user repairs.
- Confirm the fault. Try a different cable and power source first, since the problem is often outside the device.
- Find the maker’s service guide, if one exists, and follow its sequence. Do not skip warnings about batteries or adhesives.
- Power the device down fully, disconnect all cables and clear your bench. Place a sheet of paper on the tray and draw a rough outline of the device so screws can be placed where they came from.
- Release the screws with a driver that seats fully. Keep different lengths in different places, and mark them.
- Run the plastic opener gently along the seam. If it resists, stop and look for a hidden screw or clip rather than adding force.
- Disconnect the battery connector first, as the service guide directs, before touching other parts. Lift connectors by the plug body or with the flat of a spudger, not by the wires.
- Replace or reseat the part, reconnect the battery last, close the case and refit screws in the order you removed them. Check that the device behaves normally before you finish with the final screws.
Common Scenarios
- A remote control with dead buttons: opening the case and cleaning the contact pads as the maker allows is often possible. Use a soft, lightly damp cloth and let the parts dry fully.
- A loose headphone connector: reseating or replacing the part may be possible on some models. Consider whether a repair service would be more sensible for sealed designs.
- A gadget that will not charge: try a different cable and source first. If it still fails, check the port for lint using a plastic tool, with the device off.
- A swollen battery: stop using the device. Do not press or puncture the battery. Contact a qualified professional or your local collection point.
- A sealed or glued device: adhesive, fine ribbon cables and tight clips make these harder. Weigh up whether a repair service would be wiser.
Mistakes to Avoid
- Forcing a case open. Hidden screws and clips are common, and forcing the seam can crack plastic or tear cables.
- Using metal tools near a battery. A slip can puncture or short a cell, so use plastic tools around batteries.
- Mixing up screws. Screw lengths often differ, and a long screw in the wrong hole can damage components.
- Working on a powered device. Disconnect all power first, and follow the maker’s guidance.
- Using liquids carelessly. Cleaning products can damage plastics and coatings. Use only what the device maker allows.
Quick Troubleshooting
| Symptom | Likely cause | What to try |
|---|---|---|
| Screw head rounds off | Bit does not seat fully or too much pressure | Try a different bit size, press firmly and turn slowly |
| Case will not open | Hidden screw under a label or foot, or hidden clips | Check the service guide and look under feet and labels carefully |
| Device dead after reassembly | Connector not seated or cable pinched | Reopen, check each connector and cable path |
| Part will not click in | Misalignment | Compare with your photographs and reposition without force |
Care and Record Keeping
Keep notes as you work. Record which screws came from which holes, because lengths often differ, and tape small parts onto a sheet of paper in the order they came off. If a repair does not go well, stop rather than forcing anything. A device that is open and half-fixed is easier to hand to a professional than one that has been damaged by a rushed attempt. Store precision bits in a case, keep tweezers tips from bending and keep the kit dry and free of dust.
Glossary
- Spudger
- A flat plastic or nylon tool used to separate parts and lift connectors.
- ESD
- Electrostatic discharge, a sudden release of static that can damage electronic parts.
- Ribbon cable
- A flat, flexible cable that connects boards inside a device.
- Tamper-style screw
- A screw with an unusual recess shape that needs a matching bit.
- Flux
- A cleaning agent used with solder to help it flow.
- Lithium cell
- A rechargeable battery type common in small gadgets.
FAQ
Is it worth repairing small gadgets?
Often, when the fault is simple, such as a loose connector or a worn cable. For complex faults, a repair service may be the better choice. Consider the value of the device, the parts and your own time.
What if I lose a screw?
Search with a magnet, check the maker’s parts info, or ask a repair shop for a matching screw. Do not substitute a screw of a different length without checking.
Do I need an anti-static wrist strap?
It can help, particularly in dry rooms, and touching a grounded metal object is a simple alternative. Follow the strap maker’s directions.
Will opening a device affect its coverage?
It may. Read the maker’s coverage terms before you open a device, and consider contacting the maker or a repair service first.
Can I repair a power supply or mains-powered gadget?
No. Those can hold dangerous energy even when unplugged. Leave them to a qualified professional.
The Short Version
A precision driver set, plastic openers, tweezers and light cover the basics. Work slowly, mind batteries and static, and keep notes and photographs as you go. Leave mains or high-energy repairs to qualified people.