A honing guide clamps a chisel or plane iron at a fixed angle so you can slide it across a stone and keep the bevel flat. Most use a roller that rides on the stone. The main choices are the blade width the jaws will take, the way the angle is set, the build material and whether a stone comes with it.
The six guides below run from a plastic holder to a system with a cast jaw and a Japanese style steel jig. Widths, materials and weights come from each listing page and are the makers’ own claims. We have not used these guides ourselves. Several listings are short, and where details conflict we say so.
As an Amazon Associate we earn from qualifying purchases. Links below are affiliate links, and they do not change the product information we give.
What to Look For
| Feature | Why it matters |
|---|---|
| Width range | Narrow carving chisels and wide plane irons need different jaws |
| Angle setting | Projection, a registration square or a fixed angle sets the bevel |
| Roller | A wide, smooth roller tracks straight on the stone |
| Material | Metal bodies resist wear better than plastic |
In this guide
Specs at a Glance
| Guide | Width range | Material | Notes |
|---|---|---|---|
| Veritas Mk.II | Not stated | Not stated | Three bevel-angle ranges; eccentric roller for a micro-bevel |
| Stanley 16-050 | 1/4 to 2-3/4 in | Cast iron (kit) | Includes oil stone, guide, oil |
| Robert Larson 800-1800 | Not stated | Plastic | 8 oz; 5 x 4.5 x 1.75 in |
| Sharp Pebble | Chisels 0.25 to 1.96; plane irons 1.41 to 3.22 | Stainless steel | 11.2 oz; bronze bearing; manual and eBook |
| KAKURI KBS-50 | See listing | Carbon steel, ash handles | Roller; made in Japan (maker) |
| Mt Diablo | Chisels 1/4 to 2 in; plane irons 1-3/8 to 3-1/8 in | Aluminum, stainless rollers | 8 oz; three rollers; flat and grooved jaws |
The 6 Best Honing Guides

Top pickBest for those who want a micro-bevel setup
1. Veritas Mk.II Honing System
A honing system whose listing is bullets only. They say it has a built-in blade registration that squares the blade and sets the bevel angle in one step, three bevel-angle range configurations, and a three position eccentric roller for honing a micro-bevel. It is described as taking flat and tapered blades and blades with odd shapes. The page gives no dimensions, width range or material, so check the maker’s pages.
Suits: those who want a micro-bevel setup. Strengths: squaring and angle set together. Weaknesses: no specs on the page. Skip it if you need sizes before buying.

View Advanced Build Quality Veritas Mk.II Honing System — by Veritas on Amazon
Best for a first full sharpening setup
2. Stanley 16-050 Sharpening System
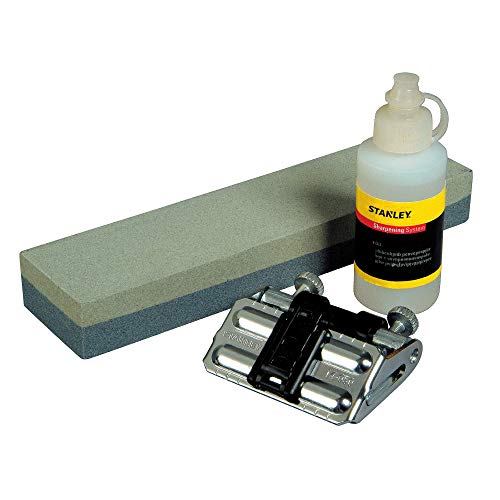
A kit rather than a guide alone. It includes an oil stone, a honing guide, white oil and instructions, and is described as taking chisels and plane irons from 1/4 to 2-3/4 inches. The overview lists cast iron, fine and medium grit, and a limited lifetime warranty is mentioned in the details.
Suits: a first full sharpening setup. Strengths: stone, oil and guide together. Weaknesses: a single stone. Skip it if you already own stones.

Best for light use
3. Robert Larson 800-1800 Honing Guide
A plastic guide of about 5 by 4.5 by 1.75 inches and 8 ounces. The listing is short: it gives the model number, a Taiwan origin and a very fine grit field, but no width range. The component field reads “step stools”, which looks like a listing error.
Suits: light use. Strengths: a simple holder. Weaknesses: plastic and no capacity listed. Skip it if you want metal jaws.

Best for chisels and plane irons in one guide
4. Sharp Pebble Honing Guide
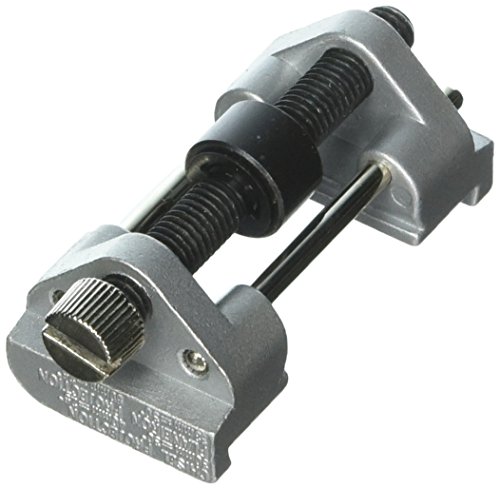
A stainless steel guide with a bronze bearing. The highlight says it fits chisels from 0.25 to 1.96 and plane blades from 1.41 to 3.22, written with a single quote mark rather than inches. The angle is set by how far the tool projects, with a manual and an eBook. The listing gives 4.7 by 1.6 by 1.2 inches and 11.2 ounces.
Suits: chisels and plane irons in one guide. Strengths: a metal body with instructions. Weaknesses: angle by projection takes measuring. Skip it if you want preset angles.

View Sharp Pebble Honing Guide for Chisels and Planes – Chisel Sharpening Jig on Amazon
Best for japanese planes and chisels
5. KAKURI Honing Guide, KBS-50
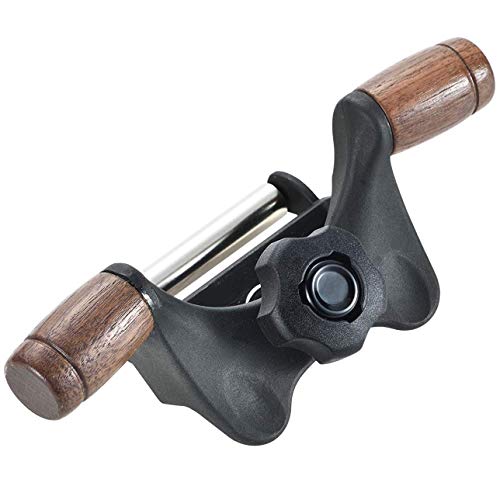
A Japanese made jig with a roller, a steel body and wooden handles on both sides, aimed at Japanese plane blades and chisels. The details table gives 16 ounces and 2.79 inches in length, but a bullet states 7.08 by 2.83 by 2.83 inches, so the size is not consistent.
Suits: Japanese planes and chisels. Strengths: a steel body and handles. Weaknesses: conflicting size data. Skip it if you need a clear width range.


Best for both chisels and plane irons
6. Mt Diablo Chisel Sharpening Kit
A cast aluminum guide with stainless steel rollers. It takes chisels from 1/4 to 2 inches and plane irons from 1-3/8 to 3-1/8 inches, with grooved jaws for chisels and flat jaws for plane irons. The listing gives 3.75 by 1.5 by 1.25 inches and 8 ounces.
Suits: both chisels and plane irons. Strengths: separate jaws and clear ranges. Weaknesses: the kit name suggests more than the guide. Skip it if you need a stone included.

Care and Setup
- Square the blade in the jaws before the first pass.
- Measure the projection if the guide sets the angle that way.
- Keep the roller clean and wipe off slurry.
- Check that the stone is flat before the first pass.
Mistakes to Avoid
- Using a guide for blades wider or narrower than its range.
- Clamping the blade crooked.
- Skipping a flat stone.
- Assuming a kit includes stones when it does not.
How a Honing Guide Controls the Angle
A honing guide holds a chisel or plane iron at a fixed angle while you move it across an abrasive. The tool is clamped in the guide, and a roller or a wheel rides on the stone, so the angle stays consistent from stroke to stroke. That consistency is what lets beginners get a flat, sharp edge without practicing freehand skills for months.
The angle depends on how far the blade sticks out of the guide, called projection. Longer projection gives a shallower angle, and shorter projection a steeper one. Most guides include a setting jig or a gauge, or markings along the body to help you set it. Use a ruler or the jig and measure from the same reference each time, so repeat sharpenings land at the same angle.
Think about the angles themselves. A primary bevel is ground first and sets the geometry, and a slightly steeper secondary or micro bevel is added at the very edge. This small second bevel reduces the amount of metal you remove at each sharpening session, saving time. Common bench chisels often work well at a modest angle, but the maker’s recommendations or the intended use in your woodwork should guide your choice.
Check how the listing describes angle adjustment. Fine control is helpful, and so is the ability to reset the same angle later. A guide that is awkward to set encourages guessing, which defeats the purpose.
Clamping Styles and Blade Security
The clamping method separates a good guide from a frustrating one. Side-clamp guides grip the blade between two jaws, usually with a thumbscrew. They are common, simple and work with a range of widths. The risk is that a narrow or tapered blade may shift or skew as you tighten, leaving the edge out of square.
Some guides use a wedge or a cam to hold the blade in a fixed channel, which can help center narrow tools. Others have a clamp with a lip that references the side of the blade or a back stop that keeps the edge square. Look at how the listing describes squareness, and check buyer comments about skew.
Check that the blade seats firmly and cannot slip. Tighten screws gradually and evenly, then test by pressing the blade against the guide. After the first strokes, check that the edge is square to the sides, and correct it before the metal wears unevenly. A small engineer’s square or a combination square helps here.
Be cautious with very thin or very thick blades. Some clamps have limits, and some tools such as short plane irons, narrow mortise chisels and skewed blades require specific jaws. Always compare the stated width and thickness range with the tools you own, and keep this in mind for future purchases.
Pairing the Guide With Stones, Plates and Paper
A guide is only half of a sharpening setup. You also need abrasives, and the choice depends on your habits. Water stones cut quickly and give a fine edge but need soaking and regular flattening. Oil stones are traditional and durable and work with the right oil. Diamond plates are flat, hard and quick, and they need little maintenance. Abrasive paper stuck to a flat surface such as glass is an economical way to try the process.
The guide’s roller must run smoothly on the abrasive without catching. Narrow wheels can dig into soft stones, leaving grooves. Wider rollers distribute pressure better. If you use water stones, check the manual for any warnings about wheel material.
A typical sequence runs from coarse to fine. A coarse abrasive removes nicks and sets the bevel, a medium one removes the scratches and a fine one polishes the edge. Many woodworkers finish with a strop, a piece of leather charged with a polishing compound, to remove the last fine burr. Choose grits that match how much work your tools need.
Wear is also a consideration. Guides can leave marks on stones, so use the full surface and flatten stones as needed. A flat abrasive is critical, as a hollowed one will round the edge. Keep clean water or oil handy and wipe the guide after use, because grit left on the roller scratches the next stone.
A Simple Sharpening Routine and Common Errors
Start with a flat back. The back of a chisel or plane iron should be flat near the edge, because it forms half of the cutting edge. Polish just the first inch or so, working through the grits, until it shows an even scratch pattern at the edge. You only need to do this thoroughly once, with light touch-ups later.
Next, clamp the tool in the guide at the chosen projection. Begin on the coarse abrasive, using even pressure and long strokes across the full surface, until you raise a burr, a thin curl of metal along the back of the edge. Feel for it with a fingertip, moving off the edge, never across it. Then move up through finer grits, taking fewer strokes each time.
Remove the burr by lightly rubbing the back on the finest abrasive or the strop, then strop the bevel. Test the edge on end grain or scrap wood. A sharp edge slices cleanly and leaves a glossy surface.
Common errors include pressing too hard at the end of a stroke and rocking the guide, which rounds the edge. Letting the roller leave the surface, using too many strokes on coarse grits, skipping grits and failing to flatten the stone are others. Take your time, and check the edge often. If the edge looks uneven, loosen the clamp, square the blade and redo it.
Maintaining the Guide and Knowing When to Replace It
A honing guide is a simple tool, and a little care keeps it accurate. After each session, rinse off slurry or oil, and dry the guide. Wipe the roller and the clamping surfaces, and check that the roller spins freely. Put a drop of light oil on the axle if the manual allows.
Inspect the clamping faces for wear, nicks and dirt. Debris on the faces can cause a blade to sit crooked. If the guide has a flat reference surface, keep it clean and unscratched. Store the guide with the screws loosened so the clamp is not under tension, in a dry place away from moisture.
Check the roller for flat spots or scoring. A damaged roller will skate or dig and give uneven results. Some makers sell replacement parts, so check before you buy whether rollers, screws and clamps are available. Replacement rollers can extend the life of a good guide.
Signs that it is time to replace the guide include a bent frame, stripped threads, a loose roller, a clamp that no longer holds square and an angle that drifts between sessions. Before you replace it, re-check your technique and your abrasives, because those cause most problems. Keep a record of your favorite angle and projection setting for each tool, so you can reproduce results quickly.
A Pre-Sharpening Checklist at the Bench
Good edges begin with preparation. Before you clamp a blade into a guide, run through these quick points so the work goes smoothly.
- Make sure the stone, plate or paper sits on a flat, stable surface that will not slide.
- Check that the blade back is flat enough to hold a clean edge, and flatten it first if it is not.
- Wipe away old oil, dust and metal swarf from the blade and from the guide rollers.
- Set the blade projection using the method in your guide’s instructions, and check that the blade sits square in the clamp.
- Wear eye protection if you are working with a grinder, and keep your fingers clear of the edge.
- Keep a clean rag and a small container of water or oil nearby, depending on your stones.
A few minutes of preparation prevents the skewed bevels that frustrate so many beginners.
Guide or Freehand: Choosing by Situation
Freehand sharpening is a skill worth learning, yet a guide is often the more dependable route for people who sharpen only now and then. The table below compares the two ways of working.
| Point | With a guide | Freehand |
|---|---|---|
| Learning curve | Short | Longer |
| Angle consistency | High once set | Depends on practice |
| Setup time | A little each time | Almost none |
| Odd blade shapes | May need another method | Flexible |
Many woodworkers use both. They rely on the guide for a clean primary bevel and then switch to freehand for a quick touch-up at the bench.
Reading a Product Listing for a Honing Guide
Listings usually give a few numbers worth decoding. Blade width capacity tells you the widest chisel or plane iron the clamp can hold. Angle settings may be fixed, adjustable by a gauge or set by how far the blade projects, so check which method the guide uses. Look at the roller as well. A wide roller spreads pressure and suits broad blades, while a narrow one can be easier to use on small chisels.
Check what is included, since some guides come with a setting gauge and others do not. If a listing is vague about capacity or angles, ask the seller or read the maker’s instructions before ordering.
Common Setup Errors and How to Spot Them
Most poor results come from a blade that is not square in the clamp. If the edge looks lopsided, release the blade, reseat it against the guide’s registration surface and tighten evenly. Another common slip is changing the projection between stones, which alters the angle. Mark the setting on a scrap of tape so you can reproduce it. Finally, keep pressure light and even on the stone, as pushing hard on one side can wear the stone and skew the bevel.
Keeping the Guide in Good Shape Between Jobs
A guide is a simple tool, but grit and oil gather in the clamp and on the roller, and that debris can stop the blade seating properly. Wipe the body and the roller with a dry cloth after each session, and clean the clamp faces so no metal dust gets pressed into the next blade.
Check that the roller turns freely and that the screws or knobs are snug. A light drop of oil on moving parts, as the maker suggests, keeps them from seizing. Store the guide in a dry drawer or a small box with your stones so it is not knocked around, and keep any setting gauge with it, since a lost gauge makes repeat settings harder to find.
Building a Complete Sharpening Station Around Your Guide
A honing guide is one component in a small system, and the picks in this guide perform very differently depending on the system around them. The full station needs four things: the guide itself, an abrasive sequence that runs from reshaping to polishing, a flat reference for checking edges, and a way of setting and verifying angles. The abrasive sequence is where most beginners under-invest. A guide holding a chisel at a perfect angle over a single medium stone can maintain an edge but cannot repair one, and cannot polish one to the standard that makes paring cuts effortless. Think in stages: a coarse stage for damage and reshaping, a medium stage for the working bevel, a fine stage for refinement, and a strop for the final polish and for maintenance between stone sessions. Those stages can be stones, diamond plates, or abrasive paper on a flat plate — the guide does not care — but each stage must be flat, because the guide’s roller faithfully follows whatever surface it rolls on, including the hollow in the middle of a dished stone. Flattening is therefore part of the system, not an occasional chore: check your stones against a known flat surface and flatten them when a pencil grid rubbed across the face shows the middle surviving while the edges clean.
Angle setting deserves the same system thinking. Whether your guide uses a projection jig, a registration stop, or your own marked measurements, write the settings down for each tool you own and keep the note at the station. The repeatability that makes a guide valuable is only realised when the same chisel returns to the same projection and the same stop every time, so the honing touches the existing bevel rather than slowly walking the angle somewhere new. Add a simple magnifier or a strong light to the station and checking an edge becomes a ten-second habit instead of a guess: under magnification, a wire edge shows as a bright, ragged line, a polished bevel shows an even sheen, and a missed spot near one corner shows as a dull patch that explains why that corner of the chisel always tears the wood. Finally, keep a test piece of the wood you actually work at the station. An edge is not sharp in the abstract; it is sharp when it pares the end grain of your project wood cleanly, and testing there ends arguments that fingernails and paper tests only start.
The order of operations for a damaged edge
When a chisel comes to the station nicked or reshaped by accident, the order matters more than the effort. First flatten and refresh the back near the edge, because every later step references the back. Then regrind or coarse-hone the primary bevel in the guide until the damage is gone and a burr forms along the whole edge. Then refine through the medium and fine stages, raising a smaller burr at each stage and spending less time than the stage before. Then add the micro bevel if your guide supports one, which concentrates the final polishing on a narrow band and makes future maintenance fast. Then strop, remove the burr from the back with a flat pass, and test. Skipping the back work, or jumping to the fine stone while damage remains, are the two shortcuts that produce edges that look polished and cut badly. The guide’s gift is that it holds the angle through this whole sequence without your hands having to remember it, so the sequence itself becomes the skill to learn.
Head-to-Head: Precision Systems, Classic Jigs and Budget Kits
The Veritas Mk.II and the Stanley 16-050 represent the two philosophies most buyers are choosing between. The Veritas is a system: a wide roller, an angle registration jig, and a micro-bevel adjustment built into the guide, all aimed at making the setup repeatable by measurement rather than by feel. Its width keeps the tool stable on the stone and resists the rocking that rounds bevels, and its registration jig means a chisel can be removed, used, and returned to the identical angle weeks later. The Stanley is the classic side-clamp jig pattern that generations of woodworkers learned on: simpler, lighter, and dependent on the user to set projection consistently. It sharpens perfectly well — the pattern’s longevity proves that — but it asks more of your routine: mark your projections, check squareness by eye each time, and accept a narrower roller that demands a steadier hand on wide plane irons. Choose the Veritas when repeatability and wide blades are the priority; choose the Stanley pattern when simplicity, portability and a smaller bench footprint matter more.
The Robert Larson guide and the KAKURI KBS-50 occupy the thoughtful middle. The Larson is a refined take on the classic jig with a reputation for holding tools honestly, the kind of guide a woodworker buys once and keeps while stones and benches change around it. The KAKURI brings Japanese workshop logic to the same problem, and pairs naturally with waterstones and with the shorter, laminated blades of Japanese chisels and plane irons, whose proportions some Western jigs handle awkwardly. The Sharp Pebble guide competes on value within the familiar jig pattern, and its real test is the one you should apply to any budget guide: does it clamp the tool square, does the roller run true without wobble, and does it repeat a setting? A budget guide that passes those three checks sharpens as well as any other; one that fails the squareness check will produce skewed edges no matter how good your stones are. The Mt Diablo kit bundles the guide with the sharpening media, which suits the beginner who owns nothing yet and wants a matched starting point, with the understanding that the abrasives are consumables you will replace and upgrade while the guide remains.
Testing a guide in the first week
Whichever pick you choose, run three tests in the first week while returning it is still easy. Clamp your widest plane iron and your narrowest chisel and check both sit square, using a small square against the edge or a marker line across the bevel that should wear evenly. Roll the guide the length of your stone under light pressure and feel for any catch, rock or gritty point in the roller. Then sharpen the same chisel twice, removing and replacing it between sessions using your recorded settings, and confirm the second session polishes the existing bevel rather than cutting a new facet. A guide that passes these tests will serve for years; a guide that fails one will annoy you on every single edge, which is a poor trade for any saving.
First Sharpening Session With a New Guide
Set up with the blade you care least about — an old chisel or a spare iron — because the first session is for learning the guide, not for producing your best edge. Flatten the back first, then clamp the tool and set the angle using the guide’s jig or your measured projection, and check squareness before the tool touches abrasive. Colour the bevel with a marker. The marker is the beginner’s best teacher: after a few strokes, the wear pattern shows exactly where the abrasive is cutting, whether the angle matches the existing bevel, and whether the guide is holding the tool flat or letting it roll to one side. Adjust until the marker wears evenly across the bevel, then work through your abrasive stages, keeping the strokes long, even and unhurried, with the guide rolling fully on the abrasive rather than tipping at the end of each pass.
Watch for the burr and treat it as information. A burr raised evenly along the whole edge says the bevel has been honed completely at that stage; a burr missing at one corner says that corner has not yet reached the abrasive, because the tool is skewed, the stone is dished, or the corner was damaged deeper than the rest. Do not move to a finer stage until the burr is complete at the current one. Finish with the micro bevel if you use one, strop, and test on end grain. Write down the settings that produced this edge — projection, stop position, stages used — because that note is the difference between a guide that delivers repeatability and a guide that merely delivers an angle. Clean the guide after the session: grit and swarf in the roller and clamp are the quiet cause of many later mysteries, and a soft brush and a wipe take less than a minute.
Keeping wide and narrow tools equally honest
Wide plane irons expose a guide’s stability, and narrow chisels expose its clamping. With a wide iron, keep your downward pressure centred over the roller and resist pressing on one corner, which rocks the iron and rounds that side of the bevel. With a narrow chisel, check that the clamp grips the sides evenly and that the tool has not twisted as the clamp tightened — tighten, check squareness, loosen and reset if the act of clamping itself skewed the blade. Skewed honing on a narrow chisel is the single most common guide complaint, and it is almost always this clamping twist rather than a fault in the guide’s machining. A moment spent checking before the stone saves the slow work of correcting a skewed edge afterward.
Troubleshooting Honing Problems in Diagnostic Order
When an edge disappoints, diagnose in the order that matches how edges fail. First, squareness: an edge honed out of square points to clamping twist or uneven pressure, and no sharpness compensates for a chisel whose edge leads with one corner. Second, the stone’s flatness: a dished stone produces a bevel that is polished in the middle of its length and untouched at the corners, and the guide cannot correct a surface it must follow. Third, angle drift: if the new bevel shows a second facet, your projection or stop changed between sessions, and your recorded settings — or the lack of them — are the cause. Fourth, the burr: an edge that feels sharp but performs dull usually still carries its wire edge, which folds on first contact with wood; strop and a flat back pass remove it. Fifth, the back: a back that was never flattened near the edge leaves a ragged intersection no bevel work can fix, and the edge crumbles early because the steel at the very tip is unsupported by a clean meeting of two planes.
Roller problems form a second cluster. A roller that leaves tracks or feels gritty has picked up abrasive grit, and continuing to hone grinds that grit into your stone’s surface; stop, clean, and check the stone. A roller that wanders sideways suggests the tool is not clamped in line with the guide body, or that you are steering with uneven hand pressure. A guide that chatters on a diamond plate may simply be telling you the plate’s surface is coarser than the roller enjoys; a sheet of abrasive paper or a stone suits that stage better. In every case, change one variable, re-colour the bevel with the marker, and let the wear pattern confirm the diagnosis before you continue. The marker turns troubleshooting from opinion into observation, which is why experienced sharpeners keep one at the station permanently.
Maintenance, Storage and Knowing When Parts Wear Out
A honing guide lives in the harshest environment in the workshop: abrasive slurry, water and metal particles. Rinse or wipe it after waterstone sessions, dry it, and keep the roller spinning freely; a roller that has rusted stiff or filled with dried slurry will flat-spot and then thump its way across every stone, engraving its damage into your bevels. A drop of light oil on the roller axle and the clamp screw threads, kept away from the gripping faces, keeps the mechanism honest. Store the guide dry, in a drawer or case rather than on the wet sharpening bench, and never leave it sitting in a tray of water between sessions. Check the clamp faces occasionally for embedded grit that can mark a blade’s back, and check the roller for a developing flat spot by rolling it across glass or a flat stone and listening. Replacement time is honest and simple: a guide whose clamp no longer holds a tool square under working pressure, or whose roller no longer runs true after cleaning, has finished its service, because every edge it touches will carry the fault. Guides that are cleaned and stored dry routinely outlast several sets of stones, which makes the minute of care after each session the cheapest maintenance in the whole sharpening system.
Choosing by User: Matching the Guide to Your Sharpening Life
If you sharpen a full set of bench chisels and plane irons weekly, the system-style guide repays its complexity every session through fast, repeatable setups and honest wide-iron handling. If you sharpen occasionally and mostly maintain edges that are already in good shape, a classic jig and a strop will cover your life as a woodworker, and the money saved buys better stones, which matter more. If your tools are Japanese, weight the choice toward the guide that clamps shorter, thicker blades securely and pairs with your waterstones. If you are equipping a first bench from nothing, a kit that bundles guide and abrasives gets you a working edge on day one, and you can upgrade the consumables as your judgement develops. If you travel to a shared or site workshop, a compact jig that sets up by projection measurements you keep in a notebook is more practical than a system with loose registration parts to lose. In all cases, judge a guide by squareness, roller truth and repeatability — the three properties every edge you ever hone will inherit from it.
Extra questions readers ask about honing guides
Can I hone a blade that is wider than my stone? Yes, by working the guide so the blade overhangs evenly on alternate passes, though a wider abrasive surface is the better long-term answer for wide irons. Why does my bevel polish only in the centre? Either the stone is dished or you are rocking the guide; flatten the stone, then re-check with the marker test. Should I hone with the guide rolling toward me or away? Consistency matters more than direction: choose the stroke that keeps the roller fully supported and your pressure even, and use it for the whole session. How do I stop rust forming on a freshly honed edge? Dry the tool fully, strop it, and store it out of the damp sharpening area; a light protective wipe helps in humid shops, removed before the tool next meets wood.
Sharpening the Whole Kit: Chisels, Plane Irons and Awkward Blades
A guide proves its worth across the whole tool kit, not just the easy chisels, so it is worth walking through how the routine adapts. Bench chisels are the straightforward case: flat backs, straight edges, and bevels that suit the standard angles, with the only common complication being a chisel shorter than the guide’s clamp prefers, which asks for care that the tool seats fully and does not tip as the clamp closes. Plane irons add width and, often, a slight camber for smoothing work; a guide holds the iron for the main bevel, and the camber is added with pressure at the corners during the final stage rather than by rocking the guide, which would round the whole bevel. Trying to hone a camber by rocking is the classic way to ruin both the iron’s geometry and your confidence in the guide, so keep the guide honest and let finger pressure at the corners do the subtle work. Block plane irons, bevel-up and used hard, reward the micro bevel even more than bench tools, because their low beds make edge durability the limiting factor in use.
The awkward cases define a guide’s real capacity. Very thick irons from older wooden planes, narrow tools that barely fill the clamp, and blades with a skew all test whether the clamp grips squarely and whether the roller tracks truly under an off-centre load. For skew blades, some guides in this class simply are not the right tool, and recognising that is part of sharpening judgement: a skew honed slightly out of true in a guide is worse than a skew maintained freehand on a stone with a simple angle reference. Spokeshave blades and other short irons sit at the boundary — holdable in the wider-capacity guides, frustrating in the narrow ones — and are a legitimate reason to choose capacity when buying. The pattern across all these cases is the same one this guide has repeated: squareness, flat abrasives, recorded settings and a burr checked at every stage. A woodworker who internalises those four can sharpen almost anything with almost any of the picks here; a woodworker who skips them can struggle with the finest guide made.
A weekly sharpening rhythm for a working bench
Guides reward rhythm. Rather than sharpening in a crisis when every chisel is dull, keep a short weekly session: the tools used that week get their backs wiped on the fine stone, their bevels polished at their recorded settings, and a strop, which takes minutes per tool when the geometry is already established. Deep repairs — the nicked edge, the dropped chisel — get their own session with the full coarse-to-fine sequence, so they never contaminate the rhythm of maintenance. Keep the station set up permanently if space allows; a guide and stones that must be unpacked before use will be used late and reluctantly, while a station that is always ready turns sharpening into the background habit it should be. The result over a season is a kit that is always sharp, which changes the woodworking itself: cuts get planned around sharp tools rather than around avoiding the sharpening bench.
Sharpening as part of the project, not a pause from it
The deepest change a honing guide makes is not mechanical but organisational: it lets sharpening move inside the project instead of sitting outside it as a dreaded interruption. When setup takes a minute because the settings are recorded, a chisel can be refreshed the moment its cut begins to tear, in the middle of a dovetail, without the project losing its thread. That changes the work itself. Cuts get taken with edges that are always near their best, joinery fits improve for reasons that look like improved sawing and chiselling but are really improved edges, and the temptation to push a dull tool through one last cut — the moment when most slips and most ruined workpieces happen — quietly disappears. Plan for this when you arrange the bench: the guide, the fine stone and the strop within reach of the work, a clear space where a tool can be clamped without moving the project, and the settings note on the wall. A workshop arranged for mid-project sharpening produces better work with the same hands, which is the entire promise of the guides in this list, stated as a floor plan.
It also changes how beginners should budget. Money spent making sharpening convenient — the guide that sets up fastest for your tools, the stone that lives out rather than in a cupboard — returns more good work than the same money spent on another hand tool that will itself need sharpening. Judge every purchase near the sharpening station by whether it shortens the distance between noticing a dull edge and cutting with a keen one. By that measure the picks in this guide are not accessories to the real tools; they are the reason the real tools perform.
Honing Guide FAQ
Can a honing guide hold curved carving gouges?
Most listed here are for flat chisels and plane irons. None of the six pages mention curved gouges.
Which guide has the widest capacity?
The Stanley kit lists up to 2-3/4 inches and the Sharp Pebble lists plane blades up to 3.22. The Veritas page gives no range.
Do I need a honing guide if I can sharpen freehand?
No, but a guide gives repeatable angles with less practice. Many people use one for plane irons and wide chisels and sharpen small tools by hand.
What angle should I use for a bench chisel?
It depends on the tool and the wood. Check the maker's recommendation, then adjust for your work. Consistency matters more than the exact number.
How do I know the edge is square in the guide?
Hold a small square against the blade side and compare the edge to it. Adjust and re-clamp if it is off.
What is a micro bevel?
It is a small second bevel at a slightly steeper angle at the very edge. It reduces how much steel you grind at each sharpening.
Can I use a honing guide on very short tools?
Only if the guide's clamp can hold them securely. Check the minimum length and width limits in the listing.
Why does my roller leave marks on the stone?
Pressure on a narrow wheel can dig into soft stones. Use light pressure, vary the track and flatten the stone regularly.
How often should I sharpen?
Sharpen when the tool tears the wood rather than slicing, or when it needs more force. Frequent light honing is easier than waiting until it is dull.
The Short Version
For a micro-bevel system, the Veritas Mk.II. For a kit with an oil stone, the Stanley. For a light plastic holder, the Larson. For a stainless guide with a manual, the Sharp Pebble. For Japanese tools, the KAKURI. For clear chisel and plane iron ranges, the Mt Diablo.


