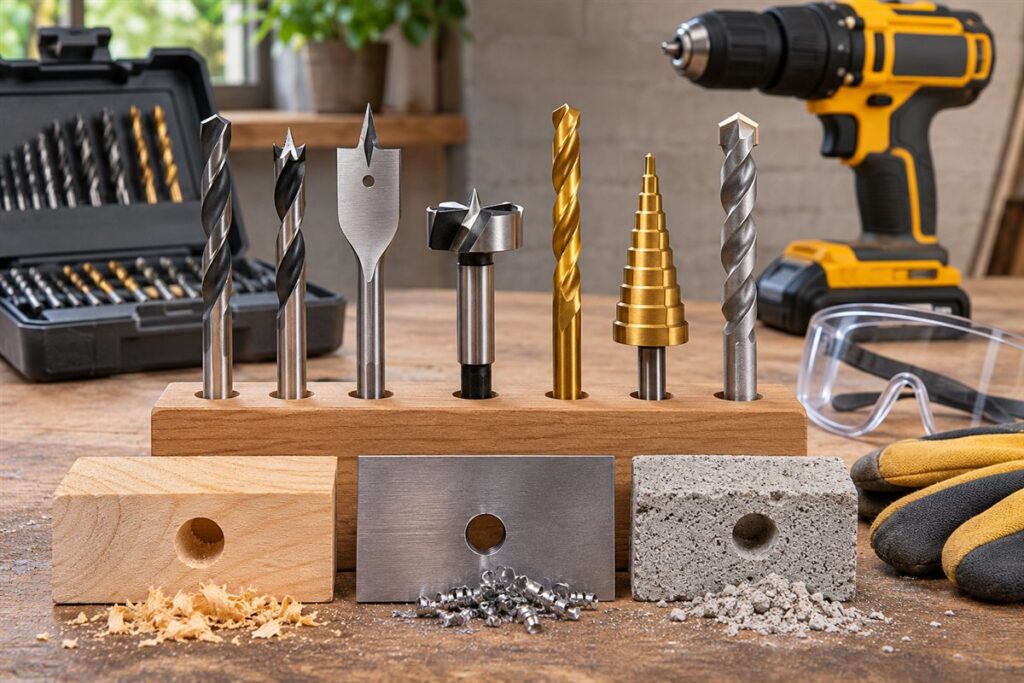
Choosing a drill bit comes down to the material, the hole size and the type of hole you need. Wood, metal and masonry each call for a different bit design, and using the wrong one gives rough holes, wear and extra strain on the drill.
Bit Types by Material
- Twist bits: general purpose, used for wood, plastics and thin metal.
- Brad-point bits: have a centre spike for accurate entry into wood.
- Spade or flat bits: cut larger holes in wood quickly but rougher.
- Forstner bits: make clean flat-bottomed holes in wood.
- Metal-cutting bits: made for steel and other metals, often with special coatings.
- Masonry bits: have a hard tip for brick, block and concrete.
- Step bits: widen holes in thin sheet metal gradually.
Decision Table
| Factor | Why it matters | What to check |
|---|---|---|
| Material | Determines bit shape and tip | Label on the bit or pack |
| Hole size | Affects fit of screw or plug | Plug or screw maker’s guide |
| Shank type | Must fit the chuck | Chuck size and type of drill |
| Depth | Bit length limits depth | Flute length and reach |
| Hole quality | Clean edges need specific bits | Brad-point or Forstner for visible holes |
Choosing Step by Step
- Identify the material and check for hidden obstacles, such as pipes, cables or metal behind a surface.
- Find the required hole size from the screw, plug or anchor packaging.
- Choose the bit type listed for that material.
- Check that the shank fits your chuck and that the bit is long enough for the depth.
- Inspect the bit for wear and damage before use.
- Clamp the work, set the drill speed as the maker advises, and drill steadily.
Working Habits
Wear eye protection, and tie back loose hair and clothing. Hard materials generally call for lower speeds, while softer ones allow higher speeds, but follow the drill and bit maker’s guidance. Masonry bits may require the hammer function on a suitable drill only. Back the bit out occasionally to clear dust. Drilling into walls can strike wiring or pipes, so check with a detector and ask a qualified professional if unsure.
Keep your bits organised and clean. A drill index case stops them rolling around and chipping, and wiping off dust and resin after use extends their life. Replace damaged bits instead of forcing them, and store them dry to reduce rust. A small set of good bits in common sizes usually serves a beginner better than a huge assortment.
Bit Materials and Coatings
The material a bit is made from, and any coating on it, affects how long it stays sharp and what it can cut. Basic carbon steel bits are inexpensive and fine for soft wood, but they dull quickly and cannot take heat. High-speed steel bits hold an edge longer and are the common choice for general work in wood, plastic and metal. Cobalt-alloy bits are made for harder metals such as stainless steel and keep their hardness at high temperature, though they can be more brittle.
Coatings are applied to some bits to reduce friction, resist heat or protect from rust. Oxide finishes help reduce rust and some friction. Titanium-based and similar coatings are intended to prolong life by hardening the surface, but a coating is only a surface layer. Once the edge is sharpened or worn through, the benefit is gone. Treat coating claims as a feature to compare, and read the maker’s description of the intended materials.
Masonry bits use a hard tip, often tungsten carbide, brazed onto a steel body. The tip does the cutting, so the bit loses performance quickly if the tip chips or overheats. Check the listing for whether a bit is meant for hammer action or rotary only.
- Light hobby use: general-purpose high-speed steel is often enough.
- Frequent metal work: look at bits made for metal, and consider cobalt types for harder metals.
- Concrete and brick: choose bits with a carbide tip suited to your drill.
Shank Styles and Drill Compatibility
A good bit that does not fit your drill is no use, so check how it holds. The shank is the end that goes into the chuck. Round shanks work in standard three-jaw chucks. Hex shanks grip well in quick-release chucks and impact drivers and resist slipping. Some larger bits have reduced shanks so they fit a smaller chuck than the cutting diameter, which allows large holes with a modest drill, but they may need slow speeds and care.
Rotary hammer drills use special shank systems, such as grooved or slotted ones, that lock the bit while letting it slide back and forth. These differ from standard round shanks. A standard masonry bit may work in a hammer-action drill, but a rotary hammer needs its matching shank type. Check your drill’s manual to see which fit it uses.
Chuck capacity is another limit. Compare the largest shank the chuck accepts with the bit you plan to use. A cordless drill has limits on the size of hole it can drill comfortably, and pushing it past those limits can overheat the motor or battery. Impact drivers expect hex shanks and are generally designed for driving screws, not for precision drilling.
- Check that the bit is tight in the chuck, then give it a gentle tug.
- Inspect the shank for scoring; a slipping bit can mark the shank.
Speed, Pressure and Lubrication
Speed and feed pressure change results more than most people realize. As a general principle, larger bits and harder materials call for slower speeds, while smaller bits and softer materials tolerate faster speeds. Running a bit too fast in metal generates heat that dulls the edge, which is the commonest reason metal bits fail early. Too slow in wood can leave rough holes and burn marks from friction. Check the speed guidance from the bit maker and your drill’s manual.
Pressure should be steady and firm enough to keep the bit cutting, not so heavy that the drill stalls. Let the bit do the work. If you see smoke, the bit is overheating, and you should stop, back off and let it cool. In metal, a cutting oil or lubricant intended for drilling reduces friction and heat and lengthens bit life. Apply a small amount at the cutting point, and follow safety directions on the product.
For deep holes, withdraw the bit periodically to clear chips, otherwise the flutes clog and the bit binds. In masonry, clear dust as you go, and wear a dust mask and eye protection. When starting on metal, use a center punch to mark the spot so the tip does not wander, and consider drilling a small pilot hole before the final size. On thin material, clamp a scrap board underneath to limit tear-out on the exit side.
- Clamp the work; never hold small pieces by hand.
- Reduce pressure as the bit breaks through to avoid grabbing.
Sets Versus Individual Bits
Buying a set is convenient, but it is worth thinking about what you will actually use. A basic set of twist bits in common fractional or metric sizes covers most general drilling and comes in an index case, which helps with storage. Larger sets add more sizes, but you may find that you reach for the same handful over and over, while the odd sizes sit untouched.
Individual bits make sense for specific tasks, such as a Forstner bit for a clean hole in a cabinet door or a masonry bit sized to fit particular wall plugs. Buying single bits as you need them spreads the cost and lets you choose better quality for tasks that matter. At the same time, a lower-priced set is perfectly reasonable for occasional work, as long as you accept that individual bits may wear faster.
When assessing a set, look at the case. Does it hold each bit firmly, label the sizes and close securely? Check that sizes are marked clearly on the bits themselves or on the case so you can replace them. Check whether the set includes the type you need, as some sets are mostly wood bits while others are made for metal. Look for the range of sizes you use most often, including small pilot sizes.
- Replace broken sizes individually if the set allows.
- Match the set to the materials you drill, not to the number of pieces.
Sharpening, Wear and Replacement
A dull bit makes poor holes, requires extra force and can overheat the drill. Signs of dullness include smoke or burning, a squealing sound in metal, bits that skate on the surface, ragged hole edges and a need to lean on the drill. Look at the cutting edges. A sharp bit has clean edges and, in the case of twist bits, a point with matching lips. A rounded tip, chips or discoloration from overheating suggest the bit is finished or needs resharpening.
Some bits can be sharpened. Twist bits can be touched up on a grinder or with a sharpening jig, but accurate angles matter, and a poorly sharpened bit drills off-center or cuts slowly. Practice on cheap bits first, or have a sharpening service do it, if one is available. Other bit types, such as masonry bits and thin coated bits, are generally replaced rather than sharpened. Follow the maker’s advice for each bit type.
Protect bits between uses. Wipe off chips, dust and moisture, and store them in an index case or holder, so they do not clash together. A thin film of oil on steel bits helps in damp places. Wear safety glasses when changing or inspecting bits, and unplug the drill or remove the battery before changing them. Discard bits that are bent, cracked or badly chipped. A damaged bit can break during use and throw fragments.
FAQ
Can one bit do everything?
Multi-purpose bits exist, but results are usually better with a bit made for the material.
How do I know the bit is worn?
Signs include burning, extra force, wandering holes and a dull tip. Replace or sharpen as the maker allows.
Why does my bit wander when I start a hole?
A smooth surface lets the tip slide. Mark the spot with a center punch or a small dent, use a brad-point bit in wood, or start with a small pilot hole and then move to the final size.
What causes tear-out on the back of a hole?
The bit breaks through and splits the last wood fibers. Clamp a scrap board behind the work, reduce pressure as the bit exits or drill from both sides. Sharp bits help.
Can I use a wood bit in metal?
Not in general. Wood bits are not designed for the heat and hardness of metal and will dull or fail. Choose a bit made for metal and use appropriate speed and lubricant.
Do I need a hammer drill for masonry?
Hammer action helps in harder masonry and concrete, and it speeds up drilling. For soft brick or block, a rotary drill with the right bit can work. Check the manual of the drill and the anchor instructions.
How deep can I drill with a standard bit?
Depth is limited by the flute length and the bit's reach. Deep holes need longer bits, and you must clear chips regularly. Check the bit's description for its working length.
Why does my bit get hot?
Speed too high, too much pressure, a dull bit or poor chip clearing are the usual reasons. Slow down, ease the pressure and clear chips. In metal, use lubricant.
What size pilot hole should I drill for a screw?
Check the screw packaging or the maker's guide, which lists the recommended pilot size for the material. In general, the pilot should be a little smaller than the screw's core so the threads bite. Test on scrap.
The Short Version
Match the bit to the material, size to the fastener, and shank to the chuck. Check what is behind the surface, wear eye protection, and read the manual.