A magnetic stud finder has no screen and no battery. It uses a strong magnet that is drawn to the nails or screws that hold wall board to the framing behind it. Most are small enough for a pocket, and some add a bubble level or a marker.
The six tools below differ in magnet design, markers and the wall types their makers mention. All details come from each product’s listing page and are the makers’ own claims. We have not used these tools ourselves. Read the maker’s instructions for the wall types each one supports.
As an Amazon Associate we earn from qualifying purchases. Links below are affiliate links, and they do not change the product information we give.
What to Look For
| Feature | Why it matters |
|---|---|
| Magnet design | Fixed magnet, or a moving magnet that signals a fastener |
| Built-in level | Helps when marking shelf or frame lines |
| Markers | Removable magnetic markers cut down on pencil marks |
| Wall types | Makers differ on plaster and tile |
| Size | Compact tools fit a pocket or tool bag |
In this guide
Specs at a Glance
| Tool | Design | Extras | Wall notes (maker) |
|---|---|---|---|
| CH Hanson | Rare earth magnets; yellow | Built-in level | Listing text is brief |
| StudBuddy | Plastic with encapsulated neodymium magnets; orange | Listed as made in the USA | Best on drywall and wood; not for lath and plaster |
| Studball | 27 lb pull rare earth magnet; round | Sticks to the wall at the spot | Through 5/8 in drywall or 3/4 in plywood paneling |
| StudMark | Rare earth magnet; rectangular | 2 removable magnetic markers | Not recommended for plaster |
| Zircon StudScout | Magnet with mark button | Rotating bubble level; wrist lanyard | Aimed at drywall |
| StudPoP | Moving 1 in magnet; ABS; 1.5 in cube | Click and lifting popper signal | Maker says it works on old and new construction |
The 6 Best Magnetic Stud Finders
Top pickBest for a basic locator with a level
1. CH Hanson Magnetic Stud Finder
A yellow battery-free finder with rare earth magnets and a built-in level. The listing text is short, so the main details are the title and overview: manual operation, a blend of materials and a use for finding nails and screws behind drywall.
Suits: a basic locator with a level. Strengths: no battery and a built-in level. Weaknesses: little listed detail. Skip it if you want markers.
View CH Hanson Magnetic Stud Finder with Level on Amazon
Best for drywall and wood walls
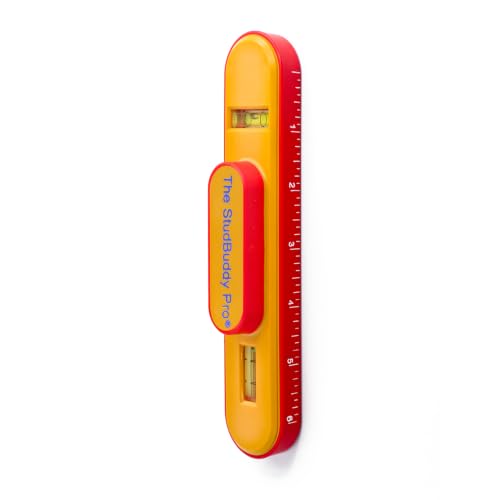
2. The Original StudBuddy Magnetic Stud Finder
An orange plastic finder with encapsulated neodymium magnets, which the listing says is made in the USA. The maker says it finds the screw or nail heads in drywall construction and is best on drywall and wood, not for lath and plaster walls.
Suits: drywall and wood walls. Strengths: a simple design made in the USA. Weaknesses: the maker excludes lath and plaster. Skip it if you have plaster walls.
Best for a strong, round finder
3. Studball 27 lb Magnetic Stud Finder
A round rare earth magnet with a stated 27 pounds of pull. The title says it detects metal through 5/8 inch drywall, wood, 3/4 inch plywood paneling or ceramic tile, and the maker says it stays fixed at the spot where it finds a fastener. The overview lists the brand as JOTOVO.
Suits: a strong, round finder. Strengths: a high stated pull and it holds its position. Weaknesses: a brand name that differs between title and overview. Skip it if you want a built-in level.
View Studball 27 lb Pull Magnetic Stud Finder on Amazon
Best for marking several stud positions
4. Calculated Industries 7310 StudMark
A rectangular finder that comes with two removable magnetic stud markers, so you can mark up to three stud locations. The maker says the updated stronger magnets let it stick to the wall hands free and that it is not recommended for plaster walls.
Suits: marking several stud positions. Strengths: two markers included. Weaknesses: not for plaster per the maker. Skip it if you need plaster wall support.
View Calculated Industries 7310 StudMark Magnetic Stud Finder on Amazon
Best for a finder with a level and a mark button
5. Zircon StudScout Magnetic Stud Finder
A battery-free finder with a one-press mark button, a rotating bubble level and a built-in wrist lanyard. The maker says the magnet sticks to ferrous nails and screws commonly fastened to wall studs in drywall.
Suits: a finder with a level and a mark button. Strengths: three built-in aids. Weaknesses: no size listed in the text we read. Skip it if you want the simplest tool.
View Zircon StudScout Magnetic Stud Finder with Level on Amazon

Best for a visible signal instead of a feel
6. Original StudPoP Moving Magnet Stud Finder
A small ABS cube, about 1.5 inches per side, with a moving 1 inch magnet. Instead of a tug you must feel, the maker says it gives a click and lifts a popper when it reaches a fastener. The maker also says it works on new or old construction, including plaster, tile and metal studs. Those are the maker’s claims.
Suits: a visible signal instead of a feel. Strengths: a click and a popper. Weaknesses: broad wall claims come only from the maker. Skip it if you want a level or markers.

Best Picks by Category
They summarize listing data and are not hands-on test results.
- Top rated: CH Hanson Magnetic Stud Finder — mid-range tier; check price on Amazon.
- Most reviewed: The Original StudBuddy Magnetic Stud Finder — mid-range tier; check price on Amazon.
- Best value: The Original StudBuddy Magnetic Stud Finder — the lowest-priced pick in this guide; check price on Amazon.
- Lowest price: The Original StudBuddy Magnetic Stud Finder — mid-range tier; check price on Amazon.
- Premium option: CH Hanson Magnetic Stud Finder — mid-range tier; check price on Amazon.
Price, Rating and Review Comparison
The table lists the picks alongside their price tier. Prices change often, so confirm the current price on Amazon.
| Product | Price | Rating | Ratings | Price tier |
|---|---|---|---|---|
| The Original StudBuddy Magnetic Stud Finder | Check price on Amazon | — | — | Mid-range |
| Calculated Industries 7310 StudMark | Check price on Amazon | — | — | Mid-range |
| Zircon StudScout Magnetic Stud Finder | Check price on Amazon | — | — | Mid-range |
| Original StudPoP Moving Magnet Stud Finder | Check price on Amazon | — | — | Mid-range |
| CH Hanson Magnetic Stud Finder | Check price on Amazon | — | — | Mid-range |
| Studball 27 lb Magnetic Stud Finder | Check price on Amazon | — | — | Mid-range |
How Much Feedback Backs Each Rating
A high average from a handful of ratings is weaker evidence than a slightly lower average from thousands. Here is how the sample size looks for each pick.
Care and Setup
- Read the maker’s instructions for the wall types supported.
- Slide the tool slowly and watch for a pull or signal.
- Keep it away from tools, cards and electronics that magnets can affect.
- Store it in a drawer or tool bag.
Mistakes to Avoid
- Assuming every model works on plaster.
- Sliding too fast to feel the pull.
- Relying on one fastener hit instead of the manual.
- Storing magnets near devices.
How Does a Magnetic Stud Finder Work?
A magnetic stud finder works by being attracted to the metal nails or screws that hold wall board to the studs. It does not sense the wood itself, so what you find is a line of fasteners, and the stud sits behind them.
Because the tool depends on metal, the way the wall was built decides how well it works. Drywall is usually fastened along each stud in a fairly regular pattern, so a magnet tends to find a row of screw or nail heads. Once you find two or more in a vertical line, you have good evidence of where the stud runs.
This is why a magnetic stud finder needs no battery and no screen. The tool has a magnet that pulls toward steel, and you feel or see that pull. Designs differ in how they show it:
- Fixed magnet: you feel it grab or stick to the wall when it meets a fastener, as with the Studball and the StudMark.
- Moving magnet: a small magnet moves inside a housing and gives a click or a visible signal, as with the StudPoP.
- Magnet with aids: some add a level, a mark button or markers, like the CH Hanson and the Zircon StudScout.
The method has limits. If fasteners are sparse, hidden under thick finishes or made of a non-magnetic material, the magnet may find nothing. Always treat the result as a good guide, then confirm before you drill or hang something heavy.
Magnetic vs Electronic Stud Finders: Which Is Better?
A magnetic stud finder is simpler, cheaper to run and needs no power, while an electronic stud finder senses changes in the wall and can show an area on a screen. Neither is better in every case, and the right choice depends on your walls and your patience.
Magnetic models are strong on reliability of the basic idea. There is no battery to die, no calibration step and nothing to switch on. They also fit in a pocket or tool bag, which makes them handy for quick jobs like hanging a shelf or a picture frame.
Electronic models can detect more than fasteners, and some warn about live wires or pipes. That extra information may matter on a big renovation. The cost is more bulk, batteries and a learning curve.
- Pick magnetic if you have drywall, want a low-cost backup tool and like simple gear.
- Pick electronic if you often work on mixed wall types or want warnings about wiring.
- Own both if you do frequent projects, and use the magnet to cross-check the electronic reading.
The related guide linked at the bottom of this page covers both kinds if you want to compare them in more detail. For occasional hanging jobs, a magnetic model is often all you need.
How Do You Use a Magnetic Stud Finder on Drywall?
To use a magnetic stud finder on drywall, hold it flat on the wall and slide it slowly sideways until you feel a pull or see the signal. Mark that spot, then keep going to find the next fastener.
Follow these steps for a cleaner result:
- Start about a foot from where you expect a stud, so you can approach it from one side.
- Move slowly. A fast sweep can skip over a screw head, and a weak pull is easy to miss.
- Mark the first hit lightly, then slide up or down and look for another fastener in a straight line.
- Check the other side of the stud by moving in from the opposite direction, and compare the marks.
- Find the center by splitting the distance between the edges you marked.
Studs are often spaced at regular intervals, so once you find one you can measure along the wall to predict the next. Check the result against outlets and switches, which are usually attached to the side of a stud.
If you get a hit but only one, look for a second fastener above or below it. A single hit may be a lone nail or a stray piece of metal, not a stud.
Why Won’t My Magnetic Stud Finder Work? Common Problems and Fixes
If a magnetic stud finder finds nothing, the cause is usually the wall type, a slow technique or a lack of fasteners in that spot. Most problems can be fixed by slowing down and trying a different area.
- Plaster and lath walls: several makers say their tools are not meant for these walls, including the StudBuddy and the StudMark. Read the maker’s notes before relying on the result.
- Thick or layered walls: extra layers put more distance between the magnet and the fastener, which weakens the pull.
- Sliding too fast: the pull is subtle, so go slowly and watch the tool.
- Metal behind the wall: pipes, metal studs, brackets or corner beads can give false hits, so confirm with a second fastener in line.
- Stray magnets nearby: keep other magnets and steel tools away from the area while you work.
When the tool keeps failing, try a different part of the wall. Fasteners are sometimes missing or off-center. You can also tap the wall and listen for a more solid sound, or use a small test hole in a spot that will be hidden.
The StudPoP maker says the tool works on old and new construction, but that is a maker claim, so test it on your own wall before depending on it.
Which Magnetic Stud Finder Should You Buy?
Choose the magnetic stud finder that matches the one feature you care about most, whether that is a level, markers, a visible signal or a simple low-cost design. Here is how the six picks line up.
- If you want a basic tool with a level, go for the CH Hanson Magnetic Stud Finder with Level.
- If you want a simple, popular tool for drywall and wood, choose The Original StudBuddy, and note the maker excludes lath and plaster.
- If you want a round magnet that holds its place, consider the Studball, which the listing says stays fixed at the spot.
- If you want to mark several stud locations, the Calculated Industries 7310 StudMark includes two removable markers.
- If you want a mark button and a rotating level, look at the Zircon StudScout.
- If you would rather see a signal than feel a tug, the Original StudPoP gives a click and a popper.
If you are unsure, start with the simplest option that suits your wall. A stud finder is a small purchase, and many people end up keeping two kinds in the drawer.
What to Check Before You Buy a Magnetic Stud Finder
Before you buy, check which wall types the maker supports, what comes in the box and how you will read the result. These few checks prevent most returns.
- Wall type: confirm whether the maker mentions drywall, wood paneling, plaster or tile.
- Signal style: decide if you prefer a feel, a click, a popper or a sticking magnet.
- Extras: a built-in level, a mark button or removable markers can save time.
- Size: a compact tool fits a pocket, while a larger one may be easier to hold.
- Strength claims: compare statements carefully, and remember they are the maker’s words.
- Returns and warranty: read the terms on the listing, since they vary by seller.
- Storage: think about where a strong magnet will live so it stays away from cards and electronics.
It also helps to know what you will hang. A light picture needs less certainty than a heavy shelf or television mount, where you should confirm the stud with more than one method.
Are Magnetic Stud Finders Worth It? Who Should Skip Them?
A magnetic stud finder is worth it for drywall projects where you want a cheap, battery-free way to locate studs, and it is not the right tool for every wall. Being honest about its limits will help you choose well.
The main advantage is simplicity. You get a tool that works the moment you pick it up, with nothing to charge. For hanging shelves, mirrors and frames, that is often enough.
The trade-offs are real, though. A magnet only finds metal, so it can miss a stud or give a false hit. It does not warn about wires or pipes, and it may struggle on plaster or thick finishes.
You might skip a magnetic model if:
- Your walls are plaster over lath and the maker does not support them.
- You need to know about wiring or plumbing before you cut or drill.
- You want a screen that shows the width of the stud.
Paying a little more usually buys extras such as a level or markers, not a stronger guarantee. Compare the six picks above, check the current listing for supported wall types and what is included, then choose the one that fits your walls and your habits.
Going Deeper: The Craft of Finding Studs With Nothing but a Magnet
A magnetic stud finder is the simplest tool in this guide’s category — no batteries, no calibration, no display — yet using one well is a genuine skill. The six options here, from CH Hanson, StudBuddy, Studball, Calculated Industries, Zircon and StudPoP, all exploit the same fact: drywall is fixed to studs with metal fasteners, and a strong magnet can feel those fasteners through the board. What separates a quick, confident find from a frustrating wall-scanning session is technique, and this section covers that technique in the depth the short product descriptions cannot.
What the magnet is really telling you
The magnet does not find wood. It finds the screws or nails driven through the drywall into the stud, which means it finds points along the stud rather than the stud itself. One attraction point tells you a fastener exists there; two or more points in a vertical line tell you the line of the stud, and that vertical confirmation is what turns a guess into a fixing you can drill with confidence. Fasteners are usually spaced at intervals up and down the stud, so a patient vertical search above and below the first find is the core move of the whole method. Once you have the line, the stud’s edges can be estimated from standard framing dimensions, and the centre — your drilling target — sits between them.
Slow, flat and close: the scanning technique that works
Move the finder slowly across the wall, held flat against the surface, in overlapping horizontal passes at different heights. Speed is the beginner’s enemy: sweep too fast and the magnet’s pull passes before you register it, especially with moving-magnet designs such as the StudPoP, which signal by a visible shift, and with smaller finders whose pull is subtler. When you feel a tug, stop, work the finder in small circles to find the strongest point, and mark it lightly in pencil. Then move up and down that vertical line hunting the next fastener. Two or three marks in a column confirm the stud far more reliably than any single strong pull, which could be a random piece of metal, a pipe bracket or a corner bead near an edge.
Reading the wall: patterns, spacing and false friends
Studs are usually spaced at regular intervals, so once you have one confirmed stud, measuring the standard spacing to either side gives you a strong prediction for the next stud, which your magnet then confirms or corrects. Predictions matter because walls contain other metal: plumbing, electrical boxes, ducting and corner beads all attract a magnet and none of them will hold your shelf. The discipline is to trust patterns over single pulls — a vertical line of fasteners at a plausible spacing from the last confirmed stud is a stud; an isolated pull near a sink or a switch deserves suspicion. Mark everything in pencil first and drill only when the pattern makes sense as framing.
Choosing Between the Six Designs
Fixed-magnet finders: feel the pull
Classic designs such as the CH Hanson finder and the StudBuddy ask you to feel the magnet drag and stick as it passes a fastener, and many models are designed to stay attached to the wall at the find spot, leaving a hands-free marker while you work. That stick-and-stay behaviour is genuinely useful when you are marking a line alone. The StudBuddy approach adds a level-oriented presentation aimed at keeping pictures and shelves straight once the stud is found, which suits the hanging tasks most homeowners buy these tools for.
Moving-magnet finders: see the signal
The StudPoP design signals with a moving indicator that pops or shifts when it passes a fastener, which some users find clearer than judging a subtle pull by feel, particularly through thicker finishes. The trade-off is that the signal still rewards a slow pass, and the mechanism deserves gentler storage than a solid puck. If you have struggled to feel the tug with fixed designs, a visual signal may simply suit your hands and eyes better — this is a preference decision, not a quality ranking.
Strength-focused designs and levelling hybrids
The Studball concept leans on a notably strong pull to work through more demanding wall build-ups, which helps on thicker or older walls where weaker magnets feel vague. The Calculated Industries StudMark approach builds the marking and levelling task into the tool, aiming at users hanging multiple items who want the find-and-mark steps combined. The Zircon StudScout brings a familiar stud-finder brand’s ergonomics to the magnetic method. Across all six, the honest summary is that magnet strength, signal style and marking convenience are the real differences — the underlying physics is identical, so buy the interaction style you will use most carefully.
Putting the Find to Work: Hanging Heavy Things Safely
From marks to a fixing you can trust
Confirm the stud line, estimate the centre, and drill a small pilot first, feeling for the change as the bit passes from board into timber and checking the dust it brings out. If the pilot misses wood, you have lost nothing but a pinhole that filler hides in seconds, and your marks need revisiting before any larger hole is made. For heavy items — televisions, large mirrors, loaded shelves — fix into the stud with screws of suitable length and gauge for the load, and where an item spans two studs, use both. A magnetic finder used carefully gives you the location; the fixing choice still has to respect the weight.
When a magnet is not the right tool
Honesty about limits prevents damage. Walls with very thick plaster, tile, or metal lath can mask or confuse the fastener signal; metal-stud construction changes the target entirely; and locating pipes and cables — the things you must not drill — is not what a magnet does, since it may find some metal while missing plastic pipe and live cable entirely. For renovations, bathrooms and any wall where services are uncertain, pair the magnetic method with knowledge of the building, careful pilot holes and, where needed, an electronic detector suited to services. Skipping the magnet altogether is also right for anyone who wants edge-to-edge electronic scanning with a display; these simple tools reward patience, not gadgetry.
Care and storage of a tool with no parts
There is almost nothing to maintain, which is the point of the category. Keep the magnet clean of metal filings that dull its feel, store it away from cards, phones and precision instruments as a courtesy to their sensitivities, and keep it somewhere findable — a tool this small is most often replaced because it was lost, not because it failed. Many owners keep theirs on the fridge or the toolbox lid, where the magnet holds itself. Used slowly, verified vertically and backed by sensible fixing choices, any of the six finders in this guide will locate studs reliably for years at effectively zero running cost — a rare claim in any tool category, and the reason these simple devices keep outselling far more complicated alternatives.
Extra Depth: Wall Types, Tricky Rooms and Edge Cases
Standard drywall over timber studs is the friendly case every finder in this guide handles. Real homes add variations, and knowing how each variation changes the magnet’s behaviour keeps you from misreading a difficult wall as a broken tool.
Plaster and lath, and older construction
Older plaster walls are thicker and their fixings sit deeper, so the magnet’s pull arrives softened and the slow-pass discipline matters twice as much. A strength-focused finder earns its keep here, and expectations should adjust: work in smaller sweeps, mark tentative finds, and demand the vertical-line confirmation before believing any of them. Lath itself, especially where metal mesh was used in repairs, can produce broad vague attraction that mimics nothing drillable — another reason the pattern of discrete fastener points, not a general pull, is the signal to trust.
Tiled, panelled and finished feature walls
Tile adds thickness and its own risks, and drilling tile is a separate skill from finding the stud behind it; locate and mark from an adjacent unfinished area at the same stud line where possible, or work with extreme care and the right bits where not. Wood panelling fixed to battens changes the target geometry, since the battens may run horizontally and their fixings tell a different story from the studs behind. On any finished feature wall, pencil marks should be tested with the smallest pilot first, because the cost of a wrong hole is measured in repairs to a surface you cannot easily patch invisibly.
Ceilings, floors and other directions
The same fastener logic applies to ceiling joists, where a magnet can find the fixings of a boarded ceiling — useful for heavier light fittings that deserve a joist rather than a plug. Working overhead is slower and more tiring, so mark generously from a stable platform and confirm each line twice. The method does not transfer to floors in any reliable way, and fixings there should be located by other means. Knowing where a simple tool’s physics stops working is part of using it like a professional.
Worked Examples: Three Common Jobs, Step by Step
Hanging a large television
Decide the screen position, then find and confirm two stud lines within the bracket’s span using the vertical fastener method, marking each line at the bracket’s height. Check the pattern against expected spacing before drilling, pilot into the confirmed centre of each stud, and fix the bracket with the hardware the mount specifies for timber. Level from the bracket, not from the wall’s other features, because rooms are rarely as square as they look.
A run of shelves in a home office
Find the first stud, predict the next from standard spacing, confirm it with the magnet, and repeat across the run before marking any bracket positions, so the whole layout is adjusted to the real framing rather than forcing the last bracket into plasterboard. Where a shelf end lands between studs, shorten or extend the shelf to meet the framing instead of trusting a wall plug with a loaded span.
Pictures, mirrors and the single-stud problem
For a single heavy picture or mirror, one confirmed stud line near the item’s centre is enough with the right fixing, and levelling hybrids such as the StudBuddy and StudMark designs in this guide streamline exactly this job by combining the find with the level check. For lighter items, be honest about whether a stud is needed at all — appropriate plasterboard fixings exist for modest loads — and save the stud hunt for the weights that genuinely demand it. Judgement about when not to use a tool is part of craftsmanship too.
Building Confidence: Practice Before It Matters
If this is your first magnetic finder, spend ten minutes practising on a wall you already understand — a garage or utility wall where framing may be visible from the other side — before trusting your technique on the living room’s best surface. Learn how your particular model feels or signals at a true fastener, how fast you can sweep without missing, and how a false friend such as a corner bead behaves differently. That small investment converts the first real job from an experiment into a routine, and it is the difference between owners who call these tools brilliant and owners who call them useless while using the same magnet on the same kind of wall.
Extra Depth: Fixings, Loads and What the Stud Must Actually Hold
Finding the stud is half the job; the other half is choosing a fixing that respects the load, the stud and the item being hung. This section completes the picture, because a perfectly located stud paired with an undersized screw is still a failure waiting for a quiet moment to happen.
Matching the fixing to the job
Light items need little: a suitable screw driven into the stud’s centre holds pictures and small shelves with a wide margin. Heavy, dynamic loads — a television on an articulated arm, a loaded bookcase, a pull-up bar — multiply forces as they extend from the wall, and they deserve the mount maker’s specified hardware, full engagement in the stud, and fixings at every point the bracket offers rather than the convenient subset. Where an item’s design assumes two studs, honour the assumption; bridging with a properly fixed timber batten or a rated rail is the correct adaptation when spacing disagrees with the item, never a single-stud compromise with extra optimism.
Stud quality is not guaranteed
A stud can be located perfectly and still be a poor anchor if the pilot reveals soft, split or drilled-through timber, or if the stud at that point is interrupted by services or notching from earlier work. Pay attention to the pilot hole’s story: consistent resistance and clean timber dust describe a sound fixing, while sudden emptiness or crumbling describes a problem to relocate around rather than screw into hopefully. Moving a fixing a short distance along the same stud usually escapes a local defect while keeping the layout intact. The magnet found the framing; the pilot confirms it, and skipping that confirmation on a heavy load is the one shortcut this guide will argue against every time.
Leaving the wall as you found it
Good stud work is nearly invisible afterwards. Pencil marks erase, pilot pinholes fill in seconds, and a finder that sticks to the wall while you mark leaves no tape residue or scuffs. When items come down, the same stud map you drew on day one serves the next arrangement, so consider keeping a simple record — a phone photo of your marks with measurements from a corner — for rooms you reconfigure often. It is a fitting end for the simplest tool in this guide: a small magnet, used slowly and verified carefully, quietly underpinning shelves, screens and cabinets for as long as the house stands, asking for nothing but ten minutes of practice and the patience to trust patterns over hunches.
Final Perspective: Why the Simplest Tool in the Box Keeps Its Place
There is a particular satisfaction in a tool that cannot run out of battery mid-job, needs no update, survives being dropped, and will work identically in twenty years if it is not lost first. Magnetic stud finders are that tool, and their endurance in a market full of electronic alternatives is not nostalgia — it is the rational preference of people who value a direct physical signal they can verify with a pilot hole over an interpreted display they must trust. The six designs in this guide differ in signal style, strength and marking convenience, and choosing among them is properly a matter of hands and habits: feel or sight, stick-and-mark or level built in, compact puck or stronger pull for difficult walls. What none of them can do is supply the patience the method runs on. Give any of them a slow pass, a vertical confirmation and a pattern that makes sense as framing, and it will find your studs today, next year and in the next house, for a total running cost of nothing. In a workshop culture of charging cables and calibration schedules, that quiet self-sufficiency is not a compromise. It is the entire point, and it is why one of these small magnets belongs in every home that has pictures to hang and shelves to trust.
A Note on Teaching the Method to Someone Else
At some point the person who owns the finder becomes the person asked to find studs in someone else’s home, and teaching the method well is its own skill. Start by handing over the finder and letting the learner feel a true fastener’s pull or see a true signal on a wall where you have already confirmed the framing, because the sensation must be learned from a known example before it can be trusted on an unknown one. Then insist on the two disciplines that separate finding from guessing: slow down, and demand the vertical line of fasteners before believing any single attraction. Supervise the first pilot hole and let the timber dust make the argument for the method more persuasively than you can. Most learners need one wall to become competent and one heavy hanging to become believers. What you are really teaching is not magnetism but a habit of verification — locate, confirm by pattern, prove with a pilot, then commit — and that habit transfers to every other measuring task in the home long after the finder itself has gone back onto the fridge where it lives.
A Note on Apartments, Rentals and Shared Walls
Renters face a version of stud finding with extra constraints: walls they must not damage, landlords whose permission covers fixings only within limits, and neighbours on the other side of some of those walls. The magnetic method suits this life particularly well, because its entire investigation is non-destructive — no scanning marks, no exploratory holes, nothing to explain at inspection time beyond the agreed fixings themselves. Work the method fully before drilling anything: confirm lines, confirm spacing logic, and choose fixing points that serve the item with the fewest holes, since each hole is a future repair. Where a landlord restricts drilling entirely, the stud map still earns its keep by showing which walls could carry rated adhesive or tension solutions near framing and which spans are hollow and hopeless. And in older rental stock, expect the wall variations covered earlier in this guide — thicker plaster, repaired sections, the odd metal surprise — and let the vertical-line discipline sort evidence from noise. The renter who masters this small tool hangs what they need, damages nothing they should not, and leaves with a deposit intact and a skill that moves house with them, which is more than can be said for most of the furniture.
One Last Word on Trusting a Simple Signal
Modern tools increasingly ask to be trusted on the strength of their displays, and there is a quiet pleasure in a finder that asks for no trust at all: its signal is a physical event you can feel or watch, at a spot you can mark, on a line you can confirm, behind a pilot hole that settles the question in seconds. That verifiability is why the method survives every generation of electronic alternatives and why owners so often describe these tools with an affection usually reserved for much grander equipment. If you take one sentence from this guide to the wall, take this one: slow down, and let the pattern prove the stud. Everything else — the choice among the six designs here, the fixings, the loads, the teaching of the next person — builds on that small act of patience. The magnet is ready when you are, needs nothing from the wall socket, and will still be ready in the next home and the one after that. Few purchases in the whole toolbox can honestly say as much.
A Practical Habit: The Two-Minute Wall Survey
Before any hanging project, spend two minutes surveying the whole wall rather than hunting a single stud in isolation. A full survey reveals the framing rhythm of the room, exposes the odd stud that breaks the pattern where a doorway or repair intervened, and lets you plan item placement around the structure instead of negotiating with it afterwards. Those two minutes, spent with the finder moving slowly and the pencil marking generously, are the cheapest planning in the entire project — and they turn the hanging itself into the simple, almost anticlimactic step it should be.
Magnetic Stud Finder FAQ
Do they need batteries?
No. All six here are battery-free.
What do they actually find?
They respond to metal fasteners in the wall, not to the wood itself. Follow each maker’s manual.
Can a magnetic stud finder find studs behind plaster?
It depends on the model and the wall. Some makers say their tools are not for lath and plaster, while others make broader claims, so read the listing and test on your own wall.
Is a magnetic stud finder accurate?
It is accurate at finding metal fasteners, which usually line up with the stud. It is less reliable if fasteners are missing or if metal behind the wall causes false hits, so confirm with a second hit.
How do I find the center of a stud with a magnet?
Find a fastener on each side of the stud by approaching from both directions, then mark the midpoint between your two marks. A second check farther up the wall helps confirm the line.
Do magnetic stud finders work through wallpaper or paint?
Usually yes, because thin paint and wallpaper add little distance. Thick layers can weaken the pull, so slow down if the finish is heavy.
How far apart are wall studs?
Studs are commonly spaced at regular intervals, but the spacing can vary by house and builder. Use the first stud you find as a guide and check the next by measuring, then confirm with the tool.
Can I use a magnetic stud finder on metal studs?
A magnet can react to metal framing, but the result may be broad and less precise than on wood studs. Read the maker's notes for the model you choose.
Will a magnetic stud finder damage my wall?
It should not leave marks when slid gently across a wall, though rough sliding could scuff soft paint. Keep the face clean and move it with light pressure.
Is a magnet stud finder safe around phones and cards?
Keep strong magnets away from cards with magnetic strips and from sensitive electronics as a precaution. Store the tool in a drawer or tool bag, not next to devices.
The Short Version
For a basic level model, the CH Hanson. For a simple USA-made tool, the StudBuddy. For a high stated pull, the Studball. For markers, the StudMark. For a mark button, the Zircon. For a visible signal, the StudPoP.