A laser level tripod holds a line laser, rotary laser or distance measurer at a steady height so you are not balancing it on a shelf or a box. The main choices are the thread on the mount, the height range and how heavy a unit the legs are meant to carry.
The six tripods below range from a compact 22 to 61 inch model to a survey-style stand that extends past 133 inches. Heights, threads and weights come from each product’s listing page. We have not used these products ourselves. Load and accuracy figures are the makers’ own, and the manuals of your laser and tripod come first.
As an Amazon Associate we earn from qualifying purchases. Links below are affiliate links, and they do not change the product information we give.
What to Look For
| Feature | Why it matters |
|---|---|
| Thread mount | 1/4-20 and 5/8-11 are the common sizes; match your laser |
| Height range | Tall ranges reach ceilings; short minimums work near the floor |
| Head type | A pan and tilt head or a bubble level helps with setup |
| Weight and bag | Light legs and a pouch ease transport |
In this guide
Specs at a Glance
| Tripod | Height | Thread | Notes |
|---|---|---|---|
| Bosch BT 150 | 22 to 61 in | 1/4-20 | Aluminum; listing weight 2.9 lb, text says 2 lb |
| DEWALT DW0881T | Not stated | 1/4-20 | Tilting head with integrated level; carrying pouch; about 3 lb |
| Klein Tools 69345 | 22 to 61 in | 1/4-20 | Quick release plate; bullseye level; 3.2 lb |
| Huepar TPD14B | About 18.7 to 60 in | 1/4-20 and 5/8-11 adapter | 3-way pan head; bubble level; maker says 22 lb load |
| VEVOR extendable | 40.94 to 133.85 in | 1/4-20 and 5/8-11 | Four extension rods; carry bag; 6.1 lb |
| QWORK survey | 38 to 63 in | 5/8-11 | Quick clamps; metal feet; 6.29 lb |
The 6 Best Laser Level Tripods
Top pickBest for bosch lasers and compact kits
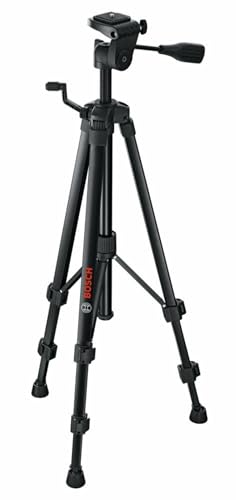
1. Bosch BT 150 Compact Tripod
An aluminum tripod that adjusts from 22 to 61 inches with a swiveling base and a 1/4-20 mounting thread, listed as compatible with Bosch line lasers, point lasers and laser distance measurers. The listing gives 2.9 pounds in one place and 2 pounds in the text.
Suits: Bosch lasers and compact kits. Strengths: a wide height range at a small size. Weaknesses: conflicting weight figures. Skip it if your laser needs a 5/8-11 thread.
Best for a brand-matched jobsite kit
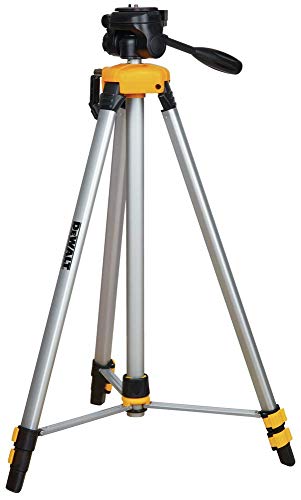
2. DEWALT Laser Level Tripod DW0881T
A tilting-head aluminum tripod with an integrated level, collapsible legs, non-skid feet, a removable 1/4-20 thread mount and a carrying pouch. The listing does not give a height range.
Suits: a brand-matched jobsite kit. Strengths: a tilting head and a pouch. Weaknesses: no height figures on the page. Skip it if you need to know the exact reach.

Best for light line lasers and cameras
3. Klein Tools 69345 Tripod
A 22 to 61 inch aluminum tripod with a quick-release plate on a 1/4-20 thread, a pan and tilt handle for 360-degree rotation, a bullseye level and non-skid feet, stored in a pouch. The listing gives a weight limit of 1.1 pounds.
Suits: light line lasers and cameras. Strengths: a quick-release plate and a pouch. Weaknesses: a low stated load limit. Skip it if your laser is heavy.
View Klein Tools 69345 Laser Level Tripod on Amazon
Best for both thread sizes
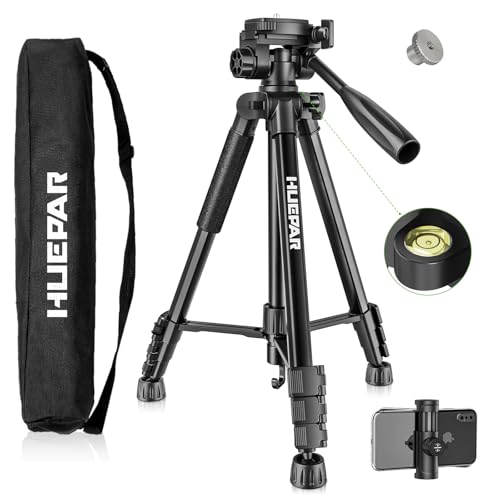
4. Huepar TPD14B Laser Level Tripod
A 60 inch tripod with a 3-way pan head, a bubble level, four-section legs with locking buckles, an extendable center column and a bag. It ships with a 1/4-20 quick-release plate and a 5/8-11 adapter nut, and the maker says it carries 22 pounds. The minimum height is 20 inches in one place and 18.72 inches in another.
Suits: both thread sizes. Strengths: a pan head, adapter nut and bag. Weaknesses: minimum height is listed two ways. Skip it if you want a survey-style stand.


Best for tall ceilings and high marks
5. VEVOR Laser Level Tripod 40.94 to 133.85 in
An aluminum tripod with four extension rods marked in inches and centimeters, a rotating elevating head, 1/4-20 and 5/8-11 mounts, a bubble level and a carry bag. The maker says it carries up to 12 pounds.
Suits: tall ceilings and high marks. Strengths: a very long reach and both threads. Weaknesses: 6.1 pounds and many parts. Skip it if you work mostly near the floor.


Best for a 5/8-11 rotary laser
6. QWORK Universal Survey Tripod
An orange aluminum tripod with quick-clamp legs that extend from 38 to 63 inches, metal feet and a 5/8-11 thread. The listing has no specification table, so details come from its text.
Suits: a 5/8-11 rotary laser. Strengths: quick clamps and metal feet. Weaknesses: few listed details. Skip it if you need a 1/4-20 mount.

View QWORK Universal Survey Tripod Aluminum 5/8 in Thread on Amazon
Best Picks by Category
They summarize listing data and are not hands-on test results.
- Top rated: Bosch BT 150 Compact Tripod — check price on Amazon.
- Most reviewed: DEWALT Laser Level Tripod DW0881T — check price on Amazon.
- Best value: DEWALT Laser Level Tripod DW0881T — check price on Amazon.
- Lowest price: DEWALT Laser Level Tripod DW0881T — check price on Amazon.
- Premium option: Klein Tools 69345 Tripod — check price on Amazon.
Price, Rating and Review Comparison
Prices change often, so confirm the current price on Amazon.
| Product | Price | Rating | Ratings | Price tier |
|---|---|---|---|---|
| DEWALT Laser Level Tripod DW0881T | Check price on Amazon | — | — | Budget |
| Bosch BT 150 Compact Tripod | Check price on Amazon | — | — | Mid-range |
| VEVOR Laser Level Tripod 40.94 to 133.85 in | Check price on Amazon | — | — | Mid-range |
| QWORK Universal Survey Tripod | Check price on Amazon | — | — | Mid-range |
| Huepar TPD14B Laser Level Tripod | Check price on Amazon | — | — | Mid-range |
| Klein Tools 69345 Tripod | Check price on Amazon | — | — | Mid-range |
How Much Feedback Backs Each Rating
A high average from a handful of ratings is weaker evidence than a slightly lower average from thousands. Here is how the sample size looks for each pick.
Care and Setup
- Read the manuals of your laser and your tripod.
- Check the thread size before ordering.
- Extend the thick leg sections first.
- Wipe dust off the threads and feet before storing.
Mistakes to Avoid
- Ordering a 1/4-20 tripod for a 5/8-11 laser.
- Ignoring the stated weight limit.
- Skipping the bubble level check at setup.
- Buying more height than the job needs.
Mount Threads and Adapters Explained
The thread on top of a tripod is the first compatibility check, and it is where many buyers go wrong. Two sizes are common in this guide: 1/4-20 and 5/8-11. The 1/4-20 thread is the same size used on many camera tripods and is found on many small line lasers and distance measurers. The 5/8-11 thread is a larger survey-style thread, often used on rotary lasers. The two are not interchangeable without an adapter.
Your laser’s manual and its base tell you which thread it uses. Look for a threaded socket on the bottom of the laser, and check the manual for the size. Some lasers have a built-in socket, and others use a bracket or a magnetic base. Do not guess from the type of laser alone, because designs vary.
If your tripod and laser do not match, an adapter may solve it. Some tripods in this guide ship with both a 1/4-20 plate and a 5/8-11 adapter nut. Using an adapter adds one more joint that can loosen, so tighten it by hand, check that it is seated, and recheck after moving the tripod. Do not force a thread that does not fit, since cross-threading can damage the laser’s mount.
Also look at the attachment style:
- Screw-on mount: simple and secure, but slower for repeated setup.
- Quick-release plate: the plate stays on the laser, and clicks on and off the tripod. It saves time if you move the laser often.
- Removable thread mount: some listings mention a removable mount, which can be useful if you need to swap fittings.
Check the listing for the thread size before ordering. If the page does not state it, check the images or ask the seller.
Load Rating and Stability
A tripod is only useful if it holds the laser steadily. The stated load rating is a good place to start, and the ratings across the picks here differ a lot. One listing gives a limit of just over one pound, while others state much higher figures. These are the makers’ own numbers, so confirm them in the manual.
Compare the rating with the weight of your laser, including any batteries, receivers or brackets attached to it. Leave a margin, not a close match. A rotary laser is generally heavier than a small line laser, so check your laser’s weight on its spec page. Putting too much weight on a light tripod can make it sag, tilt or tip.
Stability also depends on the design:
- Leg spread: wider stance resists tipping. Make sure the legs lock at a fixed angle.
- Feet: non-skid or rubber feet grip hard floors, and metal spikes or points grip soil. Some tripods have both.
- Weight: a heavier tripod tends to be more stable but is harder to carry.
- Extension: the higher you raise the center column or the upper leg sections, the less stable the tripod becomes. Use the legs for height where possible and keep the column low.
- Center hook: if the tripod has one, hanging a bag of weight from it can add stability. Check the manual before doing so.
Test a new tripod before relying on it. Mount your laser and nudge the legs lightly. The unit should stay steady, with no creeping or slow sag. If the head drifts after tightening, look at the locks and the head before trusting any measurement. Never leave an unattended laser on a tall tripod in a place where people or vehicles pass.
Choosing the Height Range for the Job
More height is not always better. A tall tripod is bulkier, heavier and less stable at full extension, and a short one may be all you need for floor-level work. Match the range to the jobs you do.
Think through typical uses:
- Floor and low wall work: tiles, baseboards and cabinets. A low minimum height helps, so check that figure on the listing. Some pages give conflicting minimums, so check the product page.
- Standard wall and ceiling lines: a mid-range tripod in the 60 inch class reaches most eight to ten foot ceilings when combined with the laser’s own beam spread.
- High ceilings and elevated marks: an extendable tripod with extension rods reaches higher, such as the long-reach model in this guide. These add parts and weight and can flex when fully extended.
- Outdoor layout and grading: a survey-style stand with a heavier build and a larger thread is common.
Remember that the height on the listing is for the tripod, and the laser sits on top of it. Account for the laser’s height too. Also check the collapsed length, because a tripod that is too long to fit in your vehicle or tool bag will be a nuisance.
Look at how the legs adjust. Flip locks or quick clamps are faster to use than twist locks, but either type can wear. Make sure all leg sections extend evenly. If the listing mentions a ruler marking on the legs, it can help set equal heights on each leg for a level starting point. A more stable setup is worth more than the last few inches of height.
Heads, Leveling and Fine Adjustment
The head is the part that connects the laser to the legs, and it decides how easily you can aim and level. The picks here include simple fixed mounts, heads with a bubble level, and pan and tilt heads. A basic head is fine for a self-leveling laser, since the laser handles its own leveling. Even so, getting the tripod roughly level helps keep the laser inside its self-leveling range.
A pan and tilt head lets you rotate the laser horizontally and tilt it up and down. This is helpful when you need to aim a line at a specific spot. Check that the head locks firmly once set, because a head that creeps will move the line after you have aimed it. A bubble level on the tripod gives a visual check, but check whether the bubble is adjustable and whether it is accurate. Small bubble levels give a quick reference, not a precision measurement.
Setup steps that work for most tripods:
- Spread the legs fully and set the feet on a firm, stable spot.
- Extend the thicker leg sections first, then the thinner ones.
- Level the head roughly using the bubble, adjusting leg length if needed.
- Mount the laser, tighten the thread and switch it on.
- Check that the laser has leveled itself, and look for any warning indicator.
Some tripods have a center column you can crank up and down. This allows fine height changes without moving the legs, but it adds a point of flex. For lines that need to hit a specific height, adjust the legs first and use the column for small changes. Always follow the manuals for your laser and tripod.
Transport, Care and Signs of Wear
A jobsite tripod gets carried, knocked and left in dusty places, so build quality and care matter. Several picks include a pouch or bag, which makes carrying easier and protects the legs and head from scratches. If a tripod has no bag, a simple strap or a tool bag pocket will do.
To keep a tripod in good shape:
- Wipe dust and debris from the legs, locks and threads after each job. Grit in a lock can cause it to slip.
- Collapse the legs before carrying so they do not catch on things.
- Do not overtighten locks or the mounting thread. Firm hand pressure is enough.
- Dry the tripod if it gets wet, and store it somewhere dry.
- Extend and retract each leg section fully now and then to keep it moving freely.
Check the tripod from time to time for signs that it needs attention. A leg that slowly slips under load, a head that will not stay locked, a bent leg section, a cracked plate or a thread that is stripped are all reasons to stop using it for precision work. A thread that wobbles can shift the laser line without you noticing it.
A simple check for stability is to set the laser to project a line on a wall some distance away, mark the line, then tap the tripod gently and see if the line returns to the mark. If it drifts, something is loose or worn. For aluminum tripods, small dents in a leg section can stop it sliding, so avoid dropping or stepping on the legs. Most of these tripods are intended for light to moderate loads, so do not use them for heavy equipment unless the maker says it is safe.
How Each Tripod Behaves on a Real Job
A laser level tripod is judged in the minutes when a line has to stay exactly where you put it while you work somewhere else in the room. The Bosch BT 150 is the natural home for owners of Bosch lasers who want the mount, the height range, and the general feel to match the tool they already own. Brand-matched tripods remove the small frictions that generic stands introduce: the thread is right, the head movement suits the laser’s weight, and nothing about the pairing feels improvised. For a tradesperson who reaches for the same laser every week, that absence of friction is the feature.
The DEWALT DW0881T plays the same role inside the DEWALT ecosystem, and its appeal is identical in structure: buy it when your laser is a DEWALT and your working day has no room for adapter hunting. The Klein Tools 69345 takes a different route to the same calm, with its quick-release plate turning the daily mount and dismount into a seconds-long habit rather than a threading ritual. Anyone who sets up and packs down several times a day, moving room to room or site to site, feels that difference in their schedule, not just their hands.
The Huepar TPD14B is the list’s bridge between worlds, handling both common thread sizes and adding a pan head for controlled rotation. That combination suits the buyer whose laser collection is mixed, whose next laser is unknown, or who shares a tripod between a laser and other instruments. Flexibility always costs something, usually a little of the locked-in solidity a dedicated stand offers, but for a shared workshop or a growing tool kit the trade is often worth it. The VEVOR tripod answers a completely different question: height. Its long extension range exists for stairwells, tall rooms, commercial spaces, and outdoor work where a compact stand simply cannot put the line where the job needs it.
The QWORK universal survey tripod is the heavy-duty end of the list, built around the larger survey thread and a stance that expects instruments with real weight on ground that is not a finished floor. It is overkill for hanging pictures and exactly right for layout work outdoors, where a light photo-style stand flexes in wind and sinks unevenly. Reading the list this way matters: none of these tripods is the best in general, and each is the best answer to a specific pattern of work. Your pattern, honestly described, picks the tripod for you.
Head-to-Head: The Comparisons That Decide This Purchase
Bosch BT 150 versus DEWALT DW0881T
This comparison is decided before it starts, by the logo on your laser. Both are compact, brand-matched stands designed to make a same-brand laser feel complete, and cross-shopping them makes sense only for a buyer choosing a whole laser system from scratch. In that case, choose the laser first, on its line quality, visibility, and the work you do, and let the tripod follow. Buying the tripod first and constraining the laser to match it puts the accessory in charge of the system, which is backwards.
Klein 69345 versus Huepar TPD14B
Here the contest is speed against versatility. The Klein’s quick-release plate wins every working day that involves repeated setup, because the saving is multiplied by every move. The Huepar wins the workshop where one stand must serve different instruments with different threads, and where the pan head’s smooth rotation helps when a line must sweep a room precisely. A solo tradesperson with one laser should usually take the speed. A shared stand serving several tools should usually take the versatility. The honest question is how many different things will ever sit on top of your tripod.
VEVOR long-reach tripod versus QWORK survey tripod
Both look like the serious end of the range, but they are serious about different things. The VEVOR is about vertical reach indoors and out: tall lines, high ceilings, staircases. The QWORK is about planted stability for survey-style instruments on real ground. If your work is tall rooms, reach wins. If your work is outdoor layout, stance and thread win. Confusing the two leads to the classic mistake of buying the tallest stand for a windy site, where height without mass is a liability, or the heaviest stand for a flat-pack kitchen fit, where it never leaves the van.
Setup Habits That Make Lines Stay Put
Most wobbling-line complaints trace back to setup, not to the tripod’s price or brand. Set the legs on the firmest surface available, spread them to a stance that feels planted rather than merely sufficient, and extend the centre column only as far as the job requires, because every extra increment of column trades stability for height. Lock each leg section and then test the whole stand with a deliberate nudge before trusting the line; a tripod that moves under a nudge will move under a door slam, a floorboard spring, or a colleague’s boot catching a leg.
Level the base as well as the stand allows before relying on the laser’s own self-levelling, because a laser correcting for a badly tilted base works near the edge of its range and warns or wanders sooner. Keep the laser’s weight centred over the head rather than cantilevered on an adapter stack, and route any cable so it cannot tug the head when someone walks past. Outdoors, weight the stand if the design allows a hanging bag, keep the height as low as the sight line permits, and re-check the line after the first few minutes, since ground that felt firm can settle under a loaded leg.
Pack-down habits protect the next setup. Retract sections in order, clear grit from leg locks before closing them, and store the tripod where the head cannot take knocks in transit. A bent or gritty head turns a good tripod into a frustrating one slowly, and the damage usually happens in a van or a cupboard rather than on the job. The stand that is stored kindly is the stand whose locks still bite and whose head still turns smoothly when the next ceiling needs a line.
Troubleshooting: Drift, Wobble and Thread Trouble
If a line drifts after setup, work from the ground up. Check that no leg is slowly shortening under load, that the floor is not a sprung board flexing as you move, and that the laser itself is seated fully on its mount rather than cross-threaded and tilted. Cross-threading is the quiet villain of this category: a laser forced onto the wrong thread or an adapter can feel attached while sitting at an angle no levelling range can fix. If the thread match is wrong, the answer is the correct adapter fitted properly, never force.
If the head creeps under the laser’s weight, the load is beyond what that head wants to hold in that position, or the lock is worn or contaminated with dust. Clean the mating surfaces, confirm the laser’s weight suits the stand’s rating as described in the guidance above, and consider whether a heavier-duty stand is the honest fix. Repeated creep is information, not bad luck. If the whole stand rocks on hard floors, look for a foot resting on debris, a grout line, or a cable; tripods rock for embarrassingly small reasons far more often than they rock because they are broken.
If reach keeps falling short, resist the urge to balance the stand on blocks, steps, or furniture, which converts a measurement tool into a falling hazard. A stand that is too short for your regular work is the wrong stand, and the long-reach option on this list exists precisely for that pattern. Likewise, if a survey-weight stand never leaves the store cupboard because carrying it is a chore, a lighter stand that actually travels will produce better work than a superior stand left behind.
Decision Scenarios: Which Tripod, For Which Work
Buy the Bosch BT 150 if your laser is a Bosch and your work is ordinary rooms at ordinary heights. Buy the DEWALT tripod on the same logic inside the DEWALT range. Buy the Klein if your day is a sequence of setups and the quick-release plate will pay for itself in minutes saved. Buy the Huepar if one stand must serve mixed instruments and you value the pan head’s control. Buy the VEVOR if height is your recurring problem, in stairwells, tall spaces, or outdoor sight lines. Buy the QWORK if your instruments are survey-weight and your ground is real ground.
Skip buying a dedicated tripod at all if your laser work is a single shelf, a picture wall, or one room, once, where a step ladder and patience will do. And skip the bargain instinct that buys the cheapest stand for an expensive laser: the laser’s accuracy is only ever delivered at the height and steadiness the stand provides, so the stand is not an accessory to economise on but half of the instrument. Match the thread, respect the load, buy for your tallest and roughest regular job rather than your easiest, and the line will stay where you left it.
Reading the Picks Again With Fresh Eyes: What Owners Notice After a Month
A month of real work sorts tripod owners by their daily irritations, and the picks above map onto them neatly. Bosch and DEWALT owners mostly report an absence: no adapter hunt, no thread doubt, no moment of improvisation at the start of a job. Absence is an underrated feature in tools that exist to save time, and it is what brand-matched stands are really selling. Klein owners report the quick-release plate becoming invisible in the best way, a second saved so often it stops being counted, which across a month of room-to-room work is a genuine slice of a working week returned.
Huepar owners report the stand becoming the workshop’s shared instrument, borrowed for lasers and other tools alike, and occasionally needing to be reclaimed from wherever it was last borrowed to. VEVOR owners report the tall jobs becoming unremarkable: the stairwell, the high ceiling, the outdoor sight line, all handled without the furniture-balancing improvisations that preceded the purchase. QWORK owners report the outdoor equivalent, layout work on real ground where the stand simply stays where it was planted, in weather that used to end the argument early.
The disappointments, when they come, follow the mismatches this guide has flagged throughout: the compact stand trembling at full extension in a tall room it was never meant for, the heavy survey stand sulking in a cupboard because carrying it is a decision nobody wants to make, the versatile stand resented by a solo user who needed only speed. Every one of those owners bought a good tripod and the wrong pattern. The fix for the next buyer is the discipline of describing last month’s jobs before this month’s purchase, in rooms, heights, and surfaces, rather than in hopes.
A Longer Buying Checklist: Questions to Answer Before You Order
Write down your laser’s thread before anything else, and confirm the stand or the adapter answers it exactly; this single line prevents the commonest failure in the category. Write down the laser’s weight and compare it against the stand’s stated capacity with room to spare, because a head at its limit creeps, and creep is drift, and drift is a line that lies to you politely. Then list your three commonest jobs with their ceiling heights and floor surfaces, and let that list, not a showroom impression, choose the height range and the stance.
Count your setups per day. A stand mounted once a week forgives a slow mount; a stand mounted six times a day taxes it, which is where quick-release designs repay their design. Consider who else will use the stand, because shared stands need thread versatility and a tolerance for borrowers, while personal stands should be selfishly optimised for one laser and one pair of hands. Consider transport honestly: the distance from van or cupboard to the furthest job decides whether a heavy stand is a tool or a sculpture.
Finally, budget the stand as part of the instrument. A precise laser on a trembling stand delivers a trembling line, and the money saved on the stand is spent again in re-measured work and quiet distrust of every line the pair produces. The stand and laser are one measuring system with two receipts, and the checklist that treats them that way produces the setups that professionals recognise on sight: planted, centred, level, and boringly reliable from the first minute of the job.
Working Patterns: One Stand Across a Whole Project
Across a full renovation, a tripod’s job changes character. Early on it carries layout lines for studs, cabinets, and tile, where height is modest and moves are constant. Later it serves ceiling work, where reach matters and the stand may sit undisturbed for hours while other trades work around it. A stand chosen only for the first phase will be cursed in the second, which is why the height and stability questions deserve answers from the whole project rather than from next Tuesday. Marking the stand’s home position in a busy room, and telling the room’s other occupants why the funny three-legged thing must not be knocked, is project management at its most practical.
On multi-day jobs, leave the setup notes with the stand: the height used, the reference marks trusted, the adapter fitted. The next session then starts from knowledge rather than from reconstruction, and lines agree with yesterday’s lines because the system that made them was recorded. Photographing a setup with a phone before pack-down is the modern version of the same habit and takes less time than re-levelling from memory. These are small disciplines, but measuring work is a chain of small disciplines, and the tripod is the link that touches the floor.
When the Answer Is Not a New Tripod
Sometimes the honest conclusion of a tripod search is that the current stand is fine and the workflow is not. A stand that wobbles on sprung floors will wobble at any price until it is placed on the firm patch every room possesses. A laser that seems to drift may be a laser whose base was never levelled within its comfortable range. A setup that takes forever may need its adapter stored on the stand and its parts kept together, not a quicker stand. Work through the setup and troubleshooting guidance above before spending, because money spent fixing a habit buys nothing but a newer version of the same frustration.
Conversely, when the stand truly is the limit, when the thread is wrong, the head creeps under a load it was never rated for, or the height runs out on job after job, replacement is not indulgence but correction. Tools that fight their users get worked around, left behind, and finally distrusted, and a measuring tool that is distrusted is worse than none, because its lines still get used. Replace the stand that has earned replacement, keep the one that has merely been blamed, and your lines will tell you that you chose correctly.
A word about sharing: in workshops and on sites where a tripod serves several people, agree where it lives and what may be mounted on it. Most stand damage comes from one hurried borrower forcing a thread, overloading a head, or returning it with a leg lock full of plaster dust. A stand with a known home and a known load limit lasts for years; a stand that belongs to everyone belongs to no one, and its slow decline gets blamed on its brand rather than its treatment.
For buyers torn between two heights, measure your real rooms before deciding. Note the ceiling heights where you actually project lines, add the working height you need above or below the line, and compare that with the ranges discussed above. Guessing at height is how compact stands end up fully extended and trembling, and how tall stands end up bought for rooms that never needed them. A tape measure in your own hallway settles the argument in a minute.
Finally, keep the adapter you need with the tripod, not with the laser, if the two live in different cases. The commonest setup failure is a small part in the other bag, in the other vehicle, in the other building. A pouch taped or clipped to a tripod leg, holding the adapter and any thread converter your kit needs, turns that failure into a non-event for the rest of the stand’s working life.
One more ownership note: legs and locks age in proportion to the grit they meet. A stand used on finished interiors will feel new for years, while the same stand on building sites earns a wipe-down at pack-up as a condition of survival. Build the wipe into the routine, thirty seconds with a cloth kept in the same case or van pocket, and the locks will still bite cleanly when the stand is old enough to have a history.
And keep the purchase in perspective: a tripod is among the cheapest ways to make an expensive laser honest. Owners who upgrade lasers while keeping a trembling stand often report the strange experience of a better instrument producing worse-feeling work, until the stand is replaced and the system’s true accuracy finally arrives. Upgrade the foundation first; the instrument will thank you in the only currency it has, which is a line that stays.
Think also about the second instrument problem. Workshops accumulate measuring tools over time, and a tripod bought only for today’s laser may be asked next year to carry a different laser, a camera for site records, or another instrument entirely. That possibility argues for the versatile thread options when the price of versatility is small, and against it when your work is a single repeated setup where speed is everything. The honest forecast of your own tool buying, which you know better than any reviewer, should cast the deciding vote between the dedicated and the adaptable stands on this list.
Weather deserves a paragraph of its own for anyone working outdoors. Wind moves tall stands, rain makes every lock and foot slippery, and cold hands make fine adjustments clumsy, so outdoor setups should be lower, heavier, and checked more often than indoor ones as a matter of doctrine. A line verified at the start of an outdoor session and trusted blindly at its end is a line gambling on the weather’s kindness. Build the re-check into the work rhythm, after breaks and after gusts, and the stand’s stability stops being a hope and becomes a monitored fact.
There is also the question of the stand’s treatment by other people on shared sites. A tripod in a busy room will be brushed, bumped, and occasionally borrowed by hands that did not pay for it. Positioning it out of traffic lines, marking its legs so they are seen, and mentioning it in the morning’s conversation are not fussiness; they are how measuring setups survive contact with construction. The most accurate laser in the world projects a crooked line from a knocked stand, and the knock, not the instrument, is what the client remembers.
Storage between jobs shapes the stand’s old age more than the jobs themselves. A stand stored extended invites knocks and bent sections; a stand stored wet invites corrosion in its locks; a stand stored under heavy clutter arrives at work pre-damaged. Collapsed, dry, and hung or shelved in its own place, a stand can serve for many years with nothing but wiping and the occasional check of its locks. Owners who give the stand a home get a stand that behaves like it has one: settled, complete, and ready.
Last, keep a sense of proportion about the whole purchase. A tripod is not the glamorous half of a laser kit, and it will never be the half that gets admired, but it is the half that touches the ground, and everything the laser promises is delivered or squandered at that contact. Choose it with the same seriousness as the instrument, maintain it with the same routine, and replace it on evidence rather than fashion, and your measuring system will have the quality clients actually pay for, which is lines that can be trusted without thinking about them.
One more scenario is worth rehearsing before the order: the borrowed-laser day. If colleagues, a hire shop, or a future purchase might put a different instrument on your stand, the thread and load questions stop being about today’s laser at all. Owners who expect variety should say so now and choose accordingly, while owners certain of a single partnership should optimise for it without guilt. Regret in this category almost always wears the uniform of an unexamined assumption about the future, so examine it while it is still free to change.
And do the humble arithmetic of ownership once: setups per week, minutes saved or lost per setup, lines re-checked or trusted. Multiplied across a year, those small numbers describe the stand’s real price and real value far better than its ticket did. A stand that saves a minute a day and a re-measure a week has repaid itself before its first birthday, in the only currency a workshop cannot print, which is unbothered, billable, confident time.
Laser Level Tripod FAQ
Which thread do I need?
Check your laser’s manual. Small line lasers often use 1/4-20, and many rotary lasers use 5/8-11.
Can a camera tripod work?
Some have a 1/4-20 plate, but check the laser maker’s guidance and the stated weight limit.
Can I use a camera tripod for a laser level?
Sometimes. Many camera tripods use a 1/4-20 plate, but you should check your laser maker's guidance and the tripod's weight limit. Camera heads also differ in how they level.
What is the difference between 1/4-20 and 5/8-11?
They are two thread sizes. The 1/4-20 is smaller and common on small lasers and cameras, while 5/8-11 is larger and often found on rotary lasers. An adapter can bridge them in some cases.
How high should my tripod go?
Match it to your jobs. A 60 inch class tripod suits many wall and ceiling lines, while very high marks may need an extendable model. A taller tripod is heavier and less stable at full height.
Do I need a pan and tilt head?
Not for a self-leveling laser on a flat surface. It helps if you need to aim the line at a precise spot. Make sure the head locks firmly.
Why does my laser line move after I set it up?
Check that the thread is tight, the legs are locked and the head is not creeping. Also make sure the floor is firm and not shifting.
Is a heavier tripod better?
A heavier tripod tends to be more stable, but it is harder to carry. Choose a weight and load rating that suits your laser and how far you carry it.
How do I know if the tripod is level?
Use the bubble level as a rough guide. The laser's own self-leveling will do the fine work, so check that it shows no out-of-range warning.
The Short Version
For Bosch lasers, the BT 150. For a DEWALT kit, the DW0881T. For a quick-release plate, the Klein. For both threads and a pan head, the Huepar. For the longest reach, the VEVOR. For a 5/8-11 survey stand, the QWORK.