A rotary cutter is a round blade on a handle that rolls through fabric, paper or leather. It cuts long straight lines faster than scissors and works best on a self-healing mat. The main choices are the blade diameter, how the handle holds the blade and how the blade is covered between cuts.
The six cutters below cover 28, 45 and 60 millimeter blades in squeeze, loop and classic handle styles. Sizes, materials and layer counts come from each listing page and are the makers’ own claims. We have not used these cutters ourselves. Where a listing disagrees with itself, we say so.
As an Amazon Associate we earn from qualifying purchases. Links below are affiliate links, and they do not change the product information we give.
What to Look For
| Feature | Why it matters |
|---|---|
| Blade size | Larger blades cut more layers; smaller ones turn tight curves |
| Handle style | Squeeze, loop and classic grips change how the wrist works |
| Blade cover | A guard that closes between cuts keeps the edge covered |
| Spare blades | A dull wheel skips; check which blade size fits |
In this guide
Specs at a Glance
| Cutter | Blade | Handle | Notes |
|---|---|---|---|
| OLFA RTY-2/DX | 45 mm endurance | Rubber squeeze handle | Self-retracts; 2.4 oz |
| OLFA RTY-3/DX | 60 mm endurance | Rubber squeeze handle | Up to 12 layers of cotton; 5.44 oz |
| Fiskars 45mm Loop | 45 mm steel | Loop handle | Slide button; 2.88 oz; lifetime warranty |
| Fiskars 60mm Loop Titanium | 60 mm titanium coated | Loop SoftGrip | Slide button; 0.11 kg |
| Creative Grids 45mm | 45 mm | Metal body | Zippered case; works with slotted rulers; 0.4 kg |
| OLFA 28mm RTY-1/C | 28 mm tungsten tool steel | Steel handle | Built-in blade cover; 22.68 g |
The 6 Best Rotary Cutters
Top pickBest for general fabric and paper cutting
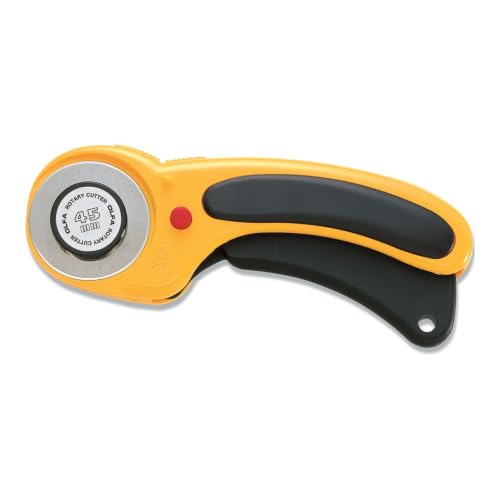
1. OLFA 45mm Ergonomic Squeeze-Handle Rotary Cutter (RTY-2/DX)
A 45 millimeter cutter pre-loaded with an RB45-1H Endurance blade, which the maker says lasts twice as long as a standard OLFA blade. A squeeze handle exposes the blade and it retracts when released, with a dual-action lock that holds it open or closed. The listing says it also takes the pinking, scallop and wave blades.
Suits: general fabric and paper cutting. Strengths: auto-retract and a rubber grip. Weaknesses: the squeeze motion takes a few cuts to learn. Skip it if you prefer a classic fixed handle.
View OLFA 45mm Ergonomic Squeeze-Handle Rotary Cutter (RTY-2/DX) – Auto-Retract on Amazon
Best for thicker stacks of fabric
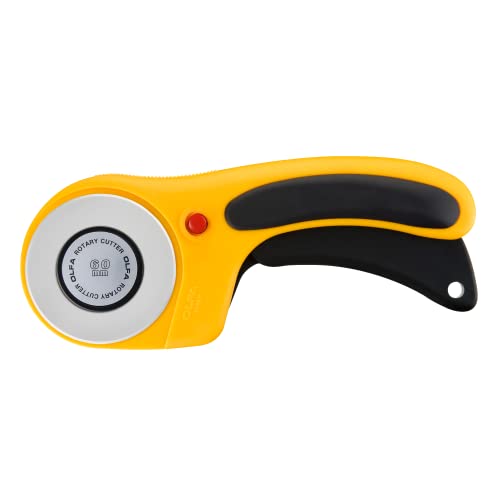
2. OLFA 60mm Ergonomic Squeeze-Handle Rotary Cutter (RTY-3/DX)
The larger sibling, with a 60 millimeter Endurance blade (RB60H) and the same squeeze-to-expose handle. The maker says it cuts up to 12 layers of cotton in one pass and calls it suited to heavy-duty projects. It weighs 5.44 ounces, more than twice the 45 millimeter model.
Suits: thicker stacks of fabric. Strengths: a big blade and a rubber grip. Weaknesses: too large for tight curves. Skip it if you mainly cut small pieces.

View OLFA 60mm Ergonomic Squeeze-Handle Rotary Cutter (RTY-3/DX) – 12-Layer on Amazon

Best for everyday sewing and craft cutting
3. Fiskars 45mm Loop Rotary Cutter
A 45 millimeter quick-change cutter with a loop handle and a sliding button that extends the blade, locks it open and retracts it. The maker says it cuts multiple layers of fabric, felt and vinyl, and lists a lifetime warranty that excludes the blade. The table lists the blade as steel and the handle as stainless steel, which does not describe the plastic parts.
Suits: everyday sewing and craft cutting. Strengths: a slide button and a loop grip. Weaknesses: the handle material entry is vague. Skip it if you want a cutter with extra blades in the pack.

View Fiskars 45mm Loop Rotary Cutter for Fabric, Arts, Crafts, Sewing on Amazon

Best for batting and thick layers
4. Fiskars 60mm Loop Titanium SoftGrip Rotary Cutter
A 60 millimeter cutter whose blade has a titanium coating that the maker calls three times harder than steel. It uses the same slide-button action as the 45 millimeter version and has a SoftGrip loop handle. The maker lists it for batting, foam and several fabric layers, and the warranty is stated as full lifetime.
Suits: batting and thick layers. Strengths: a coated blade and a large cutting wheel. Weaknesses: bigger and heavier than the 45 millimeter pick. Skip it if you cut small shapes.

View Fiskars 60mm Loop Titanium SoftGrip Rotary Cutter for Fabric and Sewing on Amazon

Best for left or right-handed quilt cutting
5. Creative Grids 45mm Rotary Cutter with Case
A red metal-bodied 45 millimeter cutter that comes in a zippered case with room for extra blades. The maker says the blade extends past the guard so it works with Creative Grids slotted rulers, and that the metal body adds weight so less pressure is needed. A center button position covers the blade, and a quarter turn left or right opens it for right or left hands. The listing weight of 0.4 kg likely includes packaging.
Suits: left or right-handed quilt cutting. Strengths: a case and either-hand setting. Weaknesses: the blade material is only listed as metal. Skip it if you want a lightweight cutter.

Best for curves and small pieces
6. OLFA 28mm Quick-Change Rotary Cutter (RTY-1/C)
A small cutter with a 28 millimeter RB28 blade in tungsten tool steel, finger grooves, a hang hole and a built-in blade cover. The maker describes it for small projects, miniatures and tight corners. The material field says cotton, which is an error, and the listing weight is 22.68 grams.
Suits: curves and small pieces. Strengths: a compact blade and a light body. Weaknesses: fewer layers per pass. Skip it if you cut long straight strips.
View OLFA 28mm Quick-Change Rotary Cutter (RTY-1/C) – Tungsten Steel Blade on Amazon
Care and Setup
- Cut on a self-healing mat and away from your body.
- Close the blade guard after each cut.
- Buy blades that match the diameter, 28, 45 or 60 millimeters.
- Follow the maker’s instructions for changing a blade.
Mistakes to Avoid
- Buying 45 millimeter blades for a 60 millimeter handle.
- Cutting on a table top or a glass surface.
- Pressing hard instead of rolling with steady pressure.
- Trusting the material fields when a listing contradicts itself.
Mat, Ruler and Surface Setup
A rotary cutter is only as good as what it cuts on. The usual partner is a self-healing mat, whose surface closes up after the blade passes through, so the blade does not catch in old cuts and the table underneath is protected. Pick a mat that is large enough for the fabric widths you use most, with printed grid lines that help you square up edges. Keep it flat, because warping makes cuts uneven. Store it on a flat surface or hanging, away from heat and sun, since heat can distort the surface.
Pair the cutter with a clear acrylic ruler. A ruler wide enough to cover your usual strip width lets you hold the fabric still with your free hand while the cutter rolls along the edge. Some rulers have a slot or groove designed for particular cutters, such as the listing in this roundup that mentions slotted rulers, and these are meant to work with the blade guard position. If you use a slotted ruler, check that your cutter and ruler are compatible.
Think about the workspace. Stand at a comfortable height so you cut with your shoulder over the cutter, and make sure there is enough room to rotate the mat or walk around it. Good lighting makes marks and ruler lines easier to see. Keep a small tray nearby for pins and loose blades, and a lint brush to clear threads from the mat.
- Do not cut on a table, glass or a hard counter; the blade dulls and the surface suffers.
- Do not use a mat for anything other than cutting with rotary tools if the maker warns against it.
- Clean the mat gently with soap and water and let it air dry.
A good setup makes even a basic cutter feel more accurate than a fine cutter on a poor surface.
Cutting Technique for Straight, Clean Lines
Most poor cuts come from technique rather than the tool. Start by pressing the fabric flat and smoothing out wrinkles. Fold the cloth to align selvages if you are cutting strips, and square the edge before measuring. Place the ruler on the fabric and hold it down with your fingers spread, keeping them back from the edge by a safe distance. Open the blade guard only when the cutter is against the ruler and ready to move.
Cut away from your body in a single smooth motion. Apply firm, even pressure downward and forward, letting the blade roll rather than pushing or sawing. If you stop in the middle of a cut, the blade can leave a nick and drag a thread. For long cuts, stop, move your hand up the ruler and continue. The blade should not need force to go through; if you are pushing hard, the blade is probably dull or nicked, or the layers are too many.
Layers are a trade-off. A larger blade can slice through multiple layers in one pass, but cutting too many at once leads to slippage and uneven bottom layers. Start with fewer layers and increase gradually, checking the bottom layer for clean edges. For curves, a small blade turns more easily, and a lighter hand helps.
- Cut with the blade guard closed whenever you put the cutter down, even briefly.
- Rotate the mat instead of reaching across your body.
- Use the same amount of pressure on every cut to keep widths consistent.
Practice on scrap fabric first, especially if you use a new cutter, and measure twice before you cut your main piece.
Blade Care, Changing and Disposal
Sharp blades make cutting easier and safer. A dull blade skips threads, leaves ragged edges and encourages you to push harder, which is when slips happen. Signs of a worn blade include a faint sound of dragging, threads left uncut and a need for extra pressure. A nick in the edge shows as a repeated line of uncut thread. Replace the blade as soon as you notice these problems rather than trying to continue.
Changing a blade is a simple task but needs care. Follow the maker’s instructions for your model, because the order of washers, nuts and covers is specific. Work on a flat surface, keep the blade guard in mind and handle the blade by its sides. Keep track of small parts so none are lost. Reassemble the parts in the same order and make sure the blade spins freely without wobbling and the nut is snug but not overtightened.
Blade size and type must match the handle. Buying a 45 millimeter blade for a 60 millimeter cutter will not work, as the roundup warns. Check that the replacement blade is made for your cutter model, since some brands use similar sizes but different center holes. Specialty blades, such as pinking or wave types, change the edge and suit crafts and trims, but they may need a particular handle.
- Clean lint from around the blade with a small brush.
- Wipe the blade with a soft cloth; some makers allow a drop of light oil on the pivot.
- Wrap used blades in tape or place them in a rigid container before throwing them away.
Never drop used blades loose into a bin where they can cut someone, and keep spares out of reach of children.
Safety, Guards, Grips and Left-Handed Use
A rotary blade is a circular razor, so guard design is a core part of choosing a cutter. Some handles retract the blade automatically when you release your grip, which reduces accidents if you drop the tool. Others have a manual slide or button lock that holds the blade open or closed. Auto-retract is forgiving, but the squeeze action takes practice, and some people find it tiring on long cutting sessions. Sliding locks are easy to operate with one hand, but you must remember to close them. Read the listing to see which style a cutter uses and whether it can be locked in the closed position.
The grip changes comfort and control. Loop handles and squeeze handles place your wrist in different positions, and each suits different hand sizes. A rubberized grip reduces slipping, while a metal body adds weight and can reduce the pressure you need. If you have wrist or hand pain, a handle that lets you keep a neutral wrist can make long projects easier. Try holding a similar cutter in a shop if you can.
Left-handed users should check that the cutter works in either hand. Some designs are reversible with a switch or have a symmetrical shape, while others favor a right-handed grip. The listing may state that it suits both hands, as one in this post does.
- Close the guard after every cut, without exception.
- Keep the cutter out of children’s reach and store it in a drawer or case.
- Never carry a cutter with the blade open, and never cut toward your hand.
If a guard fails to lock or the blade does not retract properly, stop using the cutter and replace it or contact the maker.
Choosing by Material and Project Type
The material and project size help decide which blade diameter and extras are worth paying for. For quilting and garment sewing, a mid-size blade is a common choice for strips and straight edges. Larger blades work well when you cut many layers or thick items such as batting and foam, but they feel bulky around small pieces. Small blades turn curves and tight corners well, which suits appliqué, miniatures and detailed shapes.
The same tool can cut materials other than cotton. Paper, thin card, felt, vinyl and thin leather can be cut with a rotary blade, but each material dulls blades differently. Leather and vinyl dull edges quickly and may call for a dedicated blade; keeping a separate blade for paper protects your fabric blade, because paper wears the edge faster. Slippery fabrics such as silk and knits may shift, so pin or weight them down. Stretchy fabrics should not be pulled while cutting.
Think about how much you cut. Occasional crafters can use a basic cutter and a couple of spare blades. Quilters who cut for hours may value comfort, a balanced handle and a quick blade change more than a feature list. A kit that includes a case, spare blades or rulers can be good value if you need those items, but it makes less sense if you already own them.
- Match blade size to the smallest curve you plan to cut.
- Use separate blades for paper and fabric where possible.
- Buy spare blades that fit before you need them.
If a listing contradicts itself on blade material or size, check the title, photos and the maker’s page before ordering.
Which rotary cutter should you buy?
The right rotary cutter depends mostly on blade size and handle style, so match those to what you cut most often.
- You want an all-round fabric cutter with a safety-minded handle: the OLFA 45mm RTY-2/DX retracts its blade when you release the squeeze handle.
- You cut thick stacks, batting or foam: the OLFA 60mm RTY-3/DX or the Fiskars 60mm Loop Titanium SoftGrip give you the larger wheel.
- You prefer a slide button and a loop grip for everyday sewing: the Fiskars 45mm Loop is the straightforward pick.
- You quilt with slotted rulers and want a case, or you are left-handed: the Creative Grids 45mm has a quarter-turn setting for either hand and a zippered case.
- You cut small pieces, curves or miniatures: the OLFA 28mm RTY-1/C turns tighter than the larger wheels.
If you are unsure, the 45 millimeter size is the middle path. It handles straight strips and gentle curves, and replacement blades are easy to match to the handle.
Consider how long you cut in a session. Someone cutting for an hour at a time may care more about grip comfort and a balanced feel than about extra layer capacity, while an occasional crafter can choose on size alone.
Buying a second, small cutter later is a normal path. Many sewists keep a large wheel for long cuts and a small one for details, so you do not have to find one tool that does everything.
What to check before you buy, and who should skip a rotary cutter
Before buying a rotary cutter, check the blade size, the handle style and what the listing actually includes, since several listings here contradict themselves.
- Blade diameter, and whether spare blades for that size are easy to find.
- Guard type: auto-retract, slide lock or turn lock, and whether it locks closed.
- Hand fit: left or right handed use, and grip shape for your wrist.
- Included items: a case, a spare blade, or only the cutter.
- Compatibility with your ruler, especially slotted rulers.
- Warranty terms, including whether the blade is excluded.
- A self-healing mat and ruler, if you do not own them yet.
The honest trade-offs: a rotary cutter needs a proper mat, blades wear out and need replacing, and the blade is a real hazard around children. Larger wheels are less suited to small shapes, and a squeeze handle takes a few cuts to learn.
You can skip a rotary cutter if you only trim a few pieces a year, since good scissors may do the job. Anyone who cannot give up a table or glass surface for cutting should also think twice, because a hard surface ruins blades.
When you are ready, compare the picks above, check the current listing for blade size and what is included, then choose the one that fits how you will use it.
Putting the Picks to Work: Fabric, Quilting and Paper Scenarios
A rotary cutter earns its keep in volume and in straightness. Scissors cut one layer well and chew through a stack unevenly; a rolling blade, guided by a ruler on a proper mat, cuts several layers to the same line. The six picks here split mainly by blade diameter and handle style, and those two choices decide which jobs feel easy and which feel like a fight.
Quilting cotton and strip cutting
Strip cutting for quilting is the home ground of the 45 mm class, represented here by the OLFA RTY-2/DX, the Fiskars 45 mm Loop and the Creative Grids 45 mm cutter. The workflow is always the same: fabric pressed and squared on the mat, ruler aligned to the grid, non-cutting hand flat on the ruler with fingers well away from the edge, and one firm pass away from your body. Roll through the full strip without stopping; a stop mid-strip leaves a nick that shows up later as a wobble in the seam allowance. If a few threads survive the pass, roll back over just that spot rather than sawing, which frays the edge. The squeeze-handle OLFA suits quilters who open and close the guard constantly between strips, because the guard retracts as you release your grip. The loop handles suit quilters who prefer the blade guarded by a manual action they control deliberately at the start and end of each cut.
Long runs, thick stacks and heavier cloth
The 60 mm picks, the OLFA RTY-3/DX and the Fiskars 60 mm Loop Titanium SoftGrip, exist for leverage. A larger wheel rolls over thick stacks, fleece, denim and batting with less downward force, because more of the blade’s circumference is engaged and the wheel climbs seams and folds instead of stalling against them. The trade-off is manoeuvrability: a big wheel wants long, straight runs and gentle curves. On a day of cutting garment pieces from doubled fabric, that trade is worth it. On a day of trimming small appliqué shapes, it is not, and reaching for the smaller wheel is the professional move rather than a compromise.
Curves, small pieces and trimming in place
The OLFA 28 mm Quick-Change (RTY-1/C) is the detail tool of the group. Its small wheel turns tighter curves, trims seam allowances close to stitching, and works inside pattern notches where a 45 mm wheel bridges over the detail. Keep one in the kit even if a 45 mm cutter does most of your work; the small wheel also shines for paper templates, foundation piecing and trimming blocks, where its light touch avoids distorting the piece. Quick blade changes matter here because detail work dulls a small edge quickly relative to the distance it travels.
Paper, vinyl and mixed craft cutting
Rotary cutters cut paper beautifully and dull quickly doing it, because paper is abrasive. Dedicate one blade to paper and keep it separate from your fabric blade; a wheel retired from fabric duty makes an excellent paper blade. Vinyl and interfacing sit in between: they cut cleanly with a sharp wheel and benefit from a ruler with a raised edge or a guard, since the material’s slight stretch tempts the blade to wander.
Head-to-Head: Handle Styles and Sizes Compared
Squeeze handle versus loop handle
The squeeze design exposes the blade only while you grip, so the guard closes the moment you set the cutter down. That automatic habit is the strongest safety argument in this roundup, and it suits shared workspaces and anyone who sets the tool down mid-task often. The loop design keeps the blade position under your direct manual control and many sewists find it steadier for very long cuts, because the hand posture does not change between guarding and cutting. Neither mechanism cuts better; they differ in what your hand must remember. Choose the one whose safety routine you will actually perform a hundred times a day without thinking.
45 mm versus 60 mm versus 28 mm
Think of diameter as gearing. The 28 mm wheel is low gear: slow, precise, ideal for curves and trimming. The 45 mm wheel is the all-round gear most quilters live in. The 60 mm wheel is high gear: fast over distance and thickness, clumsy in tight work. Owning two sizes covers nearly everything; owning only one means choosing the middle and accepting slower detail work and harder thick-stack work. Blade cost follows size, so the economical pattern is to do bulk straight cutting on the larger wheel and save the smaller, cheaper blades for the fiddly work that dulls them.
Case, guard and blade-change systems
The Creative Grids pick’s included case and the quick-change mechanism on the small OLFA address the two fussy parts of rotary ownership: storage and blade swaps. A case keeps a guarded cutter from rattling loose in a project bag. A quick-change system lowers the temptation to stretch a dull blade one more session. When comparing the group, weigh these ownership details as heavily as the first cut, because you will change blades and pack the tool away far more often than you will notice a small difference in handle shape.
Your First Session: Setup and Checks in Order
Start on the mat, never on a table or cutting board meant for a kitchen; rotary blades need the self-healing surface described elsewhere in this guide. Fit the blade, confirm the nut or latch is snug, and test the guard action several times before fabric goes down. Make practice cuts on scrap cotton: one straight strip against the ruler, one gentle curve freehand, and one stop-and-restart to feel how a nick forms. Check your stance: stand, do not sit, for long cuts, keep the ruler hand’s fingers curled away from the edge, and always roll away from your body. End the session by closing the guard before the cutter leaves your hand, every time, including the last cut of the day when attention fades.
Troubleshooting in Diagnostic Order
Skipped threads and incomplete cuts
First suspect is pressure distribution: the wheel cut the near layers and skimmed the far ones because the ruler flexed or your hand drifted off the ruler’s centre. Second suspect is a nicked blade, which misses at the same point in every revolution; rotate the blade by hand against light fabric and feel for the catch. Third is a scarred mat groove swallowing the edge. Change one variable at a time: fresh mat area, then firmer ruler pressure, then a new blade.
Wavy lines on straight cuts
Waviness usually comes from the fabric moving, not the blade. Press the fabric, align it to the mat grid, weight the far end of the ruler, and cut in one continuous motion. If waves appear only on bias edges, the fabric is stretching under the wheel; reduce downward force and let sharpness do the work.
The blade feels dull far too soon
Audit what the blade has cut. One session of paper or one encounter with a pin will shorten a blade’s life dramatically. Pins are the silent killer: a single rolled-over pin nicks the edge permanently. Keep pins out of the cutting path entirely, using clips or pattern weights inside the cut area.
The guard sticks or the wheel wobbles
Lint is the usual cause. Open the assembly over a bin, clear the felted lint ring that builds up around the hub, reassemble with the blade seated flat, and tighten until the wheel spins freely without side play. A wobbling wheel means something is mis-seated or the blade is bent; do not cut with it, because a wobble becomes a wandering cut under load.
Blade Life, Storage and Who Should Buy What
Store the cutter guarded, in its case or a drawer slot, never loose in a bag with the guard open. Keep spare blades in their packaging until fitting, and put used blades into a rigid closable container for disposal rather than loose in household rubbish. Judge blade changes by cut quality: when strips need a second pass or threads survive a firm stroke, the blade is done, whatever the calendar says.
Decide by project mix. The production quilter cutting strips all week belongs on a 45 mm squeeze or loop handle, chosen by which guard habit feels automatic. The garment sewist cutting doubled yardage and thick cloth should start with a 60 mm model. The appliqué and detail worker should start with the 28 mm and add a 45 mm later. And anyone outfitting a first sewing room should buy one mid-size cutter, a proper mat and a clear ruler as a single system, because the cutter alone, however good, cannot produce a straight cut on the wrong surface.
Cutting Sessions Planned: Three Worked Examples
A quilt top’s worth of strips in one sitting
Plan the session in layers. Press all fabric first, because cutting unpressed yardage wastes the accuracy the cutter exists to provide. Square one edge of each piece against the mat grid, then cut strips in descending width order so offcuts stay large and useful. Stand for the long cuts, keep the cutter’s guard closed between strips, and swap to a fresh blade the moment a strip needs a second pass; mid-session blade changes are a mark of experience, not waste. Stack cut strips in order on a flat surface away from the mat so the next cut never drags across finished work.
Garment pieces from doubled fabric
Doubled fabric doubles every error, so slow the setup down. Align the fold to the grid, pin or weight outside the cutting lines, and use the 60 mm wheel for the long outer seams where its momentum keeps the line true. Switch to the 45 mm or 28 mm wheel for necklines, armholes and notches. After cutting, check the bottom layer against the pattern before separating the pair; a drift caught now can sometimes be trimmed true, while a drift found at the sewing machine is permanent.
Trimming finished blocks to size
Block trimming is precision work at small scale. Centre the block under a square ruler, trim two adjacent sides, rotate the block rather than the ruler, and trim the remaining sides to the finished measurement. The smaller wheels earn their place here because the cuts are short and the ruler is small; a large wheel overhangs the ruler and tempts the hand to rock it. Press blocks before trimming, never after, since pressing a trimmed block can stretch it past the size you just cut.
More Questions Buyers Ask After the First Month
Why do my strips come out bowed in the middle?
Bowing means the ruler moved or the fabric shifted mid-cut, usually because the ruler was held at one end while the cut travelled beyond the hand’s control. Hold the ruler at its centre, walk your holding hand along it for very long cuts without lifting the cutting hand’s rhythm, and confirm the fabric’s squared edge truly matches the grid before the first strip.
Can I cut batting and fleece with the same blade?
Yes, but expect faster dulling, because lofty fibres carry abrasive dust and the wheel works harder through thickness. Cut batting with the largest wheel you own, clean lint from the hub after the session, and retire that blade to paper duty afterwards rather than returning it to quilting cotton.
What should I do with a blade that still looks fine?
Judge by the cut, not the look. A blade can appear perfect and carry a nick too small to see that skips threads once per revolution. If strips need a second pass, the blade is finished for fabric regardless of appearance. Mark retired fabric blades and demote them to paper, where they remain useful.
Is a rotary cutter worth it if I only sew garments?
For straight seams, long pattern pieces and doubled fabric, yes: the speed and layer accuracy repay the cost quickly. For a practice built entirely on small curved pieces in single layers, scissors remain competitive. Most garment sewists end up using both, the wheel for the long architecture of a garment and shears for the sculptural parts.
Decision Scenarios: Matching the Cutter to the Sewing Room
Consider four common buyers. The new quilter should start with a 45 mm cutter, and the choice between the OLFA squeeze handle, the Fiskars loop and the Creative Grids model should be made by holding each style mentally through a day’s routine: the squeeze guard protects a beginner’s inconsistent habits, the loop rewards deliberate ones, and the cased option suits a quilter who travels to classes. The experienced quilter adding a second cutter should add the 60 mm OLFA or Fiskars rather than a duplicate 45 mm, because the larger wheel changes what a session feels like on thick work. The appliqué artist should start small with the 28 mm OLFA and treat the mid-size cutter as the later addition. The sewing-room teacher should standardise on one guard system for every station, because a room full of mixed mechanisms is a room where someone eventually sets down an open blade. In each scenario the mat and ruler are part of the purchase, not accessories after it: a cutter bought without its surface is half a tool. Finally, budget for blades as a running cost from the start. A quilter who hesitates to change a dull blade pays for the hesitation in recut fabric, strained hands and wavy strips, which cost more than blades ever will. Sharpness is not an upgrade in rotary cutting; it is the operating condition the whole system assumes.
Ergonomics: Cutting All Afternoon Without Paying for It
Rotary cutting is standing work, and its aches are predictable: a sore wrist from pressing down at a bent angle, a tired shoulder from reaching across a wide mat, and a stiff back from a table at the wrong height. Set the table so the mat sits just below elbow height, which lets your arm’s weight, rather than your wrist’s force, supply cutting pressure. Keep the ruler within the span your arm covers without leaning, and walk around the table instead of reaching across it for far cuts. Alternate cutting with pressing and pinning tasks so the same muscles rest in rotation. If your wrist complains, audit the blade before your posture: most rotary-cutting strain is a dull wheel demanding force that a sharp wheel never asks for. Change the blade, straighten the wrist, lower the shoulder, and the afternoon session that used to end early becomes ordinary. Good ergonomics in this craft is mostly sharpness plus table height, and both are cheaper than the discomfort they prevent.
Working With Slippery, Stretchy and Fragile Fabrics
Chiffon, knits and other unstable fabrics expose every weakness in a rotary setup. Stabilise the fabric’s behaviour before cutting: lay it in a single layer where possible, align it without stretching, and let it rest flat so cutting does not capture a stretched state that relaxes into a smaller piece afterwards. Use a sharp blade and a lighter touch than cotton demands, because dragging a dull wheel across a knit pulls the fabric into the cut and distorts the edge. For very slippery cloth, sandwiching it between tissue layers, cut through together, gives the wheel something honest to bite and the ruler something stable to hold. Slow down at curves, where these fabrics shift most, and check the first piece against the pattern before cutting its pair. The cutter is not the limitation in this work; fabric management is, and the sewists who master it cut difficult cloth with the same tools everyone else uses on cotton.
A Note on Cutting Direction and Body Position
Stand or sit so the cut travels away from you and slightly across your front, never toward your holding hand and never with the blade passing close to your body. Position the work so your cutting arm moves in its comfortable arc rather than reaching; reaching is where control quietly leaves. Turn the mat, not yourself, for the next side of a piece. These habits sound like safety boilerplate until the day a blade slips, when they become the whole story of why the slip harmed nothing. Build them while the work is easy and they will be there when the work is not.
The Habit That Protects Every Other Habit
Close the guard before the cutter leaves your hand. Say it as a rule, practise it until it is reflex, and audit yourself at the end of a session: if you ever find the cutter sitting open, treat it as information and slow the next session’s pace. Every other technique in this guide assumes a guarded blade between cuts.
Rotary Cutter FAQ
Which blade size should I choose?
The 45 millimeter size is the common middle choice. The 28 millimeter blade suits curves, and the 60 millimeter blade suits thick stacks.
Do I need a special mat?
A self-healing mat is the usual partner. OLFA states that its own cutting mat is for rotary cutters only, so check the mat maker’s advice.
Can I use a rotary cutter without a self-healing mat?
It is not recommended. Cutting on a hard surface dulls the blade and can damage the table. Use a mat made for rotary cutting.
How many layers of fabric can I cut at once?
It depends on the blade size and the fabric. Start with fewer layers and check the bottom piece for clean edges. Larger blades handle more layers.
How do I know when to change the blade?
When the cutter skips threads, needs extra pressure, drags or leaves a repeated nick line, replace the blade.
Are rotary cutters safe around children?
The blade is very sharp, so keep the cutter closed and out of reach. Use a model with a lock and store it properly.
Can a rotary cutter cut paper and leather?
It can cut paper, felt, vinyl and thin leather, but these dull blades faster. Keep a separate blade for them.
Do all rotary cutters use the same blades?
No. Blades come in set diameters, and center holes and fittings can differ between makers. Buy ones made for your model.
What is a slotted ruler for?
It has a groove that guides the cutter and blade guard along the edge. Check that your cutter works with it.
What size rotary cutter is best for quilting?
The 45 millimeter size is the common choice for strips and straight cuts. Use a 60 millimeter blade for thick stacks and a 28 millimeter blade for curves. Choose by the pieces you cut most.
Is a rotary cutter better than scissors?
For long straight lines and multiple layers, a rotary cutter is usually faster and more even. Scissors suit small snips, thick trims and cutting without a mat. Many sewists keep both.
Can left-handed people use a rotary cutter?
Yes, if the handle works in either hand. Some designs have a reversible setting, while others favor right-handed grips. Check the listing for left-hand notes.
How often should I replace a rotary blade?
Replace it when it skips threads, drags or needs extra pressure, rather than on a fixed schedule. Use depends on the fabric and how much you cut. Paper and vinyl wear blades faster.
Can I sharpen a rotary cutter blade?
Some makers sell sharpeners, but many people simply replace the blade. Follow the maker's advice for your blade type. A nicked blade should be replaced.
What is the difference between a squeeze handle and a loop handle?
A squeeze handle exposes the blade while you hold it and retracts it when released. A loop handle usually uses a slide button and a different wrist position. Choose the one that feels comfortable and that you will remember to close.
The Short Version
For a squeeze handle, the OLFA 45mm. For thick stacks, the OLFA 60mm or Fiskars 60mm. For a slide button, the Fiskars 45mm. For a case and slotted rulers, the Creative Grids. For small curves, the OLFA 28mm.


