A digital caliper reads length, inside width, depth and step height from one tool, and shows the value on a small screen. Most hobby and shop models cover 0 to 6 inches, or 150 millimetres, and switch between inch and metric with one button. The main choices are the body material, the listed accuracy and resolution, and extras such as data output or a case.
The six picks below are all 6 inch models, from a plastic body to stainless steel bodies from long-established makers. Figures come from each listing page and are the makers’ own claims. We have not used these calipers ourselves. Where a listing disagrees with itself, we say so.
As an Amazon Associate we earn from qualifying purchases. Links below are affiliate links, and they do not change the product information we give.
What to Look For
| Feature | Why it matters |
|---|---|
| Body material | Stainless steel feels stiffer than plastic |
| Accuracy and resolution | Resolution is the smallest step on screen; accuracy is the listed error |
| Units | Some models add a fraction mode |
| Extras | A case, spare batteries or data output may matter to you |
| Auto-off | Saves the battery when the caliper is left on |
In this guide
Specs at a Glance
| Caliper | Body | Listed accuracy | Notes |
|---|---|---|---|
| Adoric KC24 | Plastic | +/- 0.2 mm (0.01 in) | Resolution 0.01 in / 0.1 mm; auto shutdown after 5 minutes |
| Kynup 170-2 | Stainless steel | +/- 0.001 in (0.02 mm) | Inch, metric and fraction; auto-off; IP54 |
| NEIKO 01407A | Stainless steel | 0.001 in (0.02 mm) | Resolution 0.0005 in; thumb roller; case |
| iGAGING Absolute Origin | Stainless steel | 0.001 in | SPC/USB output; keeps zero when off; case |
| Fowler 54-101-150-2 | Stainless steel | +/- 0.001 in (0.02 or 0.03 mm, conflict) | Two CR2032 batteries; case; 1 year warranty |
| Starrett EC799A-6/150 | Stainless steel | +/- 0.001 in (0.02 mm) | Fine adjustment thumb wheel; 11.2 oz |
The 6 Best Digital Calipers

Top pickBest for occasional hobby and household measuring
1. Adoric Digital Caliper, 0-6 Inch (KC24)
A light plastic caliper with a 0 to 6 inch, 0 to 150 millimetre range, a 0.01 inch or 0.1 millimetre resolution and a listed accuracy of plus or minus 0.2 millimetres. The maker lists inside, outside, depth and step modes, a one-button inch and millimetre switch, a zero button and an auto shutdown after five minutes. The listing positions it for household, hobby and jewelry measuring.
Suits: occasional hobby and household measuring. Strengths: a very light body at 0.07 kilograms. Weaknesses: plastic construction and a coarser resolution than the steel models. Skip it if you want fine readings.

Best for shop use with a fraction mode
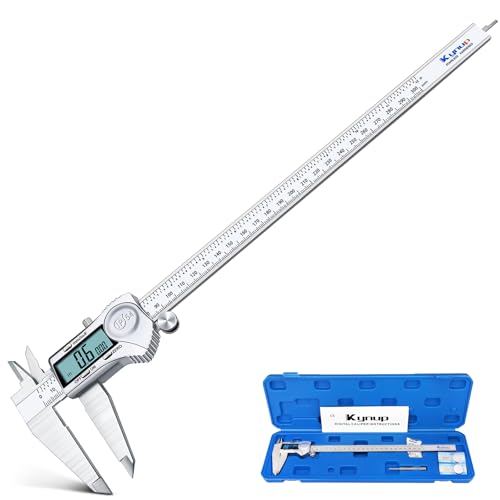
2. Kynup Digital Caliper, 6 Inch Stainless Steel
A stainless steel caliper with a 6 inch, 150 millimetre range and a listed accuracy of 0.001 inch or 0.02 millimetre. The maker lists inch, metric and fraction modes, an auto-off feature and IP54 splash protection. It weighs 0.19 kilograms. The highlight line calls it a dial vernier caliper while the title says digital and the bullets describe an LCD, so the listing is not consistent on the type.
Suits: shop use with a fraction mode. Strengths: a steel body and three unit modes. Weaknesses: a confusing type description. Skip it if you want a well-known tool brand.

View Kynup Digital Caliper, Caliper Measuring Tool, Stainless Steel Micrometer on Amazon
Best for general shop and workshop measuring
3. NEIKO 01407A Electronic Digital Caliper, 0-6 Inches
A stainless steel caliper with a knurled thumb roller and a locking screw. The maker lists a 0 to 6 inch and 0 to 150 millimetre range, a resolution of 0.0005 inch, 1/128 inch or 0.01 millimetre, and an accuracy of 0.001 inch or 0.02 millimetre. A quick-change button cycles through inch, fraction and millimetre, the screen is described as large and a case is included. The maker calls it splash and dust resistant.
Suits: general shop and workshop measuring. Strengths: a fraction mode and a case. Weaknesses: no data output. Skip it if you want to log readings to a computer.

Best for shops that log measurements
4. iGAGING Absolute Origin 0-6″ Digital Caliper, IP54
A stainless steel caliper that the maker says keeps its zero reference after being switched off. It has an SPC and USB data output port for sending readings to CAD software or a spreadsheet, an IP54 dust and moisture design, inch and metric modes, a battery, a manual and a case. The listed accuracy is 0.001 inch.
Suits: shops that log measurements. Strengths: data output and a retained zero. Weaknesses: the output needs a compatible cable and software, which the listing does not say are included. Skip it if you only need a screen reading.


Best for a ready-to-use kit with spare batteries
5. Fowler 54-101-150-2 Xtra-Value Cal Digital Caliper
A stainless steel 0 to 6 inch, 150 millimetre caliper with inside, outside, depth and step measuring and a two unit inch and millimetre switch. The maker lists a 0.0005 inch resolution, a one year warranty, two CR2032 batteries, a protective case and a manual. The accuracy is given as 0.001 inch or 0.02 millimetre in the table and 0.03 millimetre in a bullet, so the metric figure is not consistent.
Suits: a ready-to-use kit with spare batteries. Strengths: a case and batteries included. Weaknesses: two metric accuracy figures. Skip it if you want a fraction mode.


Best for users who want a long-established brand name
6. Starrett Stainless Steel Electronic Slide Caliper, 0-6″
A 0 to 6 inch electronic caliper from Starrett with hardened stainless steel measuring surfaces, a fine adjustment thumb wheel and a high-contrast LCD. The listing gives a resolution of 0.0005 inch or 0.01 millimetre and an accuracy of plus or minus 0.001 inch or 0.02 millimetre. The display turns off after 30 minutes without slide movement and wakes without losing position. It weighs 11.2 ounces.
Suits: users who want a long-established brand name. Strengths: a clear listing and a fine adjustment wheel. Weaknesses: only one body in the box with no extras listed. Skip it if you want a case and data output.

View Starrett Stainless Steel Electronic Slide Caliper, 0-6″ Range, .0005″ Res on Amazon
Care and Setup
- Clean the jaws and press zero before each measurement.
- Follow the maker’s instructions for battery type and changing.
- Close the jaws gently and store the caliper in its case if one is supplied.
- Keep the slide dry and free of grit.
Mistakes to Avoid
- Pressing the jaws hard on the work.
- Skipping the zero check.
- Expecting a plastic body to match steel for stiffness.
- Treating a listed accuracy as the same as a reading on a worn caliper.
Using the Four Measuring Faces Correctly
A caliper measures in four ways, and each one has its own habits. Outside jaws are the large lower pair, used for the width of a block or the diameter of a rod. Inside jaws are the small upper pair, used for the width of a slot or the inside of a hole. The depth rod slides out of the end of the beam to measure the depth of a recess. The step feature uses the flat face of the slide against the end of the beam to measure the height of a shoulder. Knowing which face to use prevents most beginner errors.
Close the jaws and press zero before each session, and check again after changing the battery. Hold the work against the fixed jaw and bring the slide in with the thumb roller until the jaws touch, using light pressure. Squeezing hard bends the jaws slightly and changes the reading, especially on plastic bodies. Keep the jaws square to the part, because tilting makes it read larger. For round objects, rock the caliper slightly and take the smallest reading across the diameter. For inside measurements, find the widest reading. For depth, keep the beam flat on the edge of the hole. Take the reading, then lock it with the screw, if the caliper has one, before you slide it off the part. Repeat the measurement a couple of times and note whether the numbers agree.
Resolution, Accuracy and What Your Job Needs
This guide already explains the difference between resolution and accuracy, so here the question is how much you need. For general household and hobby work, such as checking the diameter of a dowel, a drill bit or a model part, a listed accuracy of a few hundredths of a millimetre is plenty. For machining, fitting bearings or making mating parts, you may want the tighter figures listed on the steel models, and you would want to verify them. Remember that the listed accuracy covers specific conditions, and technique often adds more error than the instrument does.
Think about the tolerance of your work. If a joint can vary by a fraction of a millimetre, a plastic caliper is fine. If parts must fit within a few thousandths of an inch, treat a caliper as a good screening tool and consider a micrometer for the final check. Calipers measure a wide range with one tool, but micrometers are usually better for small features that must be exact. Think also about display features: inch, millimetre and fraction modes help if you read plans in more than one unit, and a hold function freezes a reading when you cannot see the screen. Check the listing for what each mode shows, and do not assume a fine display step means a fine true accuracy.
Battery, Power and Display Care
Most digital calipers run on a small button cell, such as the CR2032 or a similar cell mentioned in the Fowler listing. Check which battery your model uses and keep a spare, since a weak battery can cause flickering digits, jumping readings or a display that shuts off. Replace the battery if you see erratic numbers, and remember to rezero after the change. Some calipers shut off automatically after a period of inactivity to save power, as the Adoric and Starrett listings describe, and some keep their reference position when they wake, which saves you from rezeroing each time.
Protect the display from moisture and dust. Splash resistance ratings, like the IP54 mentioned in two listings, describe limited protection against dust and splashes, but they do not make a caliper suitable for submerging or use in a coolant flood. Wipe away cutting fluid and water, and dry the caliper before storing it. Remove the battery if the caliper will sit unused for months, since leaking cells can damage the electronics. Avoid exposing the display to extreme heat or cold, which can slow it down or make it unreadable. If the digits fade, the calipers stop responding or the readings drift after you change the battery, clean the contacts and check the manual before you assume the tool is broken.
Data Output, Fractions and Other Extras
Some calipers add features beyond a simple screen. A data output port, like the SPC and USB output on the iGAGING listing, lets you send readings to a computer, which saves time for repeated measurements and helps avoid transcription errors. It typically needs a compatible cable and software, and the listing may not say that these are included, so confirm before you buy. If you only measure a few parts, an output port may never be used.
A fraction mode, found on the Kynup and NEIKO, converts readings to fractions of an inch, which is handy for woodworkers who work from tape measure marks. The fraction shown is typically rounded to a set denominator, so check how fine it goes. A thumb roller makes fine adjustment easier, and a locking screw holds the reading. A case protects the caliper from knocks, and a spare battery avoids downtime. Hardened stainless steel surfaces resist wear better than soft metals or plastic, but all of them need care. Consider what you will actually use. A caliper with many features that you never touch is no better than a simpler one, and each extra feature adds a little to the cost and the complexity.
Checking Calibration, Storage and Replacement
Calipers drift if they are dropped, dirty or worn, so check them occasionally. A simple check is to close the jaws and confirm the display reads zero, then measure a known standard such as a gauge block, a ground pin or a precision reference. If you do not own one, a machinist’s reference sold for this purpose is inexpensive. Measure at several points along the range, since errors can vary along the beam. If the readings are consistently off, the jaws are worn, or the display jumps, the tool needs attention.
Store the caliper in its case, or in a drawer where nothing can fall on it, with the jaws slightly open so they do not press against each other. Keep it away from magnets, grit, welding spatter and water. Wipe the beam and jaws with a clean cloth before and after use, and never use the jaws as scribers or screwdrivers. Replace the caliper when the jaws are nicked or bent, the beam is scored, the slide binds or sticks, or the readings cannot be trusted. For tasks where safety or expensive materials are involved, replace instead of guessing. Follow the listing and manual for warranty, service and calibration guidance, and remember that a low-cost tool used with care often serves as well as an expensive one used carelessly.
Which digital caliper should you buy?
The best digital caliper for you depends on how precise your work is and which extras you will really use. Match your needs to the six picks above.
- Occasional hobby or household measuring: the Adoric KC24 is light and plain, with a coarser resolution than the steel models.
- Shop work with a fraction mode: the Kynup and the NEIKO 01407A both offer inch, metric and fraction readings in a steel body. The Kynup listing is inconsistent about its type, so read it closely.
- Logging readings to a computer: the iGAGING Absolute Origin has a data output port. Confirm the cable and software before ordering.
- A ready-to-use kit: the Fowler 54-101-150-2 lists spare batteries, a case and a one year warranty, though its metric accuracy figure is inconsistent.
- A long-established brand and a fine adjustment wheel: the Starrett is the pick for people who value that name and a clear listing.
If you machine parts or fit bearings, lean toward a steel model with the tighter listed accuracy. If you mostly check dowels, drill bits and craft parts, the lighter choice may do the job.
Think about how you will hold and use the tool. A thumb roller, as on the NEIKO and Starrett listings, makes fine adjustment easier, and a lock screw helps you carry a reading away from the part. A case matters if the caliper will travel in a toolbox. Do not choose on the display step alone, because a fine step does not mean a fine true accuracy. Pick the model whose listed accuracy, body and extras fit the tolerance of the work you do most often. If you are unsure, a steel model with a case is a safe default.
What to check before you buy, and who should skip it
Before you buy a digital caliper, check the range, the display options and what comes in the box. Most disappointment comes from missing a detail on the listing.
- Confirm the 0 to 6 inch range covers the largest part you measure.
- Check whether you need a fraction mode or only inch and millimetre.
- See whether a case and spare battery are included.
- Check the battery type so you can buy a spare.
- Look at the listed accuracy and read any note where the listing disagrees with itself.
- Confirm the warranty and return terms.
Be realistic about the trade-offs. A steel body costs more than a plastic one but resists flex better. Data output is useful only if you will connect it. The listed accuracy applies under set conditions, and your technique affects the result as much as the tool. A caliper also cannot replace a micrometer when a part must be exact.
You may want to skip a caliper if you only measure large objects, where a tape measure is faster, or if your work needs micrometer-level checks. Compare the picks above, check the current listing for size and what is included, then choose the one that fits how you will use it.
Digital Caliper FAQ
What is the difference between resolution and accuracy?
Resolution is the smallest step the screen can show. Accuracy is the error range the maker lists. A caliper can show a fine step while listing a wider error range.
Which picks include a case?
The NEIKO, iGAGING and Fowler listings state a case. The Kynup, Adoric and Starrett pages we read do not mention one.
Why does my caliper reading change when I press harder?
The jaws and beam can flex slightly, especially on lighter bodies. Use a gentle, consistent pressure, and let the thumb roller close the jaws gradually. A rough, steady touch gives more repeatable numbers.
Should I buy a caliper or a micrometer?
A caliper is versatile and quick for a wide range of sizes. A micrometer is usually the better choice for small features that need tight tolerances. Many workshops keep both.
How often should I replace the battery?
It depends on use and the model. Replace it when the display flickers, dims or gives erratic readings. Keep a spare and remove the cell during long storage.
Can I use a caliper to check a drill bit size?
Yes, measure across the flutes at the shank or the widest point. Bits can be slightly different from their labeled size, so measure the part you will actually use.
What does IP54 mean?
It is a protection rating that indicates limited dust ingress and splash resistance. It does not mean the tool is waterproof. Check the listing and manual for how the maker describes the protection.
How do I convert between inch and millimetre?
Use the unit button on the caliper. Press it to switch the display. Remember to check the zero after switching if the manual advises it.
Is a plastic caliper accurate enough?
For rough hobby and household tasks, often yes, but plastic bodies flex more than steel. For precise fits, a steel body with a tighter listed accuracy is the safer choice.
How do I read a digital caliper?
Close the jaws, press zero, then measure the part and read the number on the screen. Choose inch, millimetre or fraction with the unit button before you start.
What is the difference between inside, outside, depth and step measurements?
Outside uses the large jaws, inside uses the small upper jaws, depth uses the rod at the end of the beam, and step uses the face of the slide. Pick the face that fits the feature.
Are stainless steel calipers worth it over plastic?
For tighter fits and regular use, usually yes, because steel bodies are stiffer and wear better. For rough hobby tasks, a plastic caliper may be enough.
Why does my caliper display jump or flicker?
A weak battery is the most common cause. Replace the cell, clean the contacts and rezero, then check the manual if the problem remains.
Can a digital caliper replace a micrometer?
Not for the tightest tolerances. A caliper covers a wide range quickly, while a micrometer is usually the better choice for small features that must be exact.
What does a fraction mode do on a caliper?
It shows readings as fractions of an inch, rounded to a set denominator. It helps woodworkers who work from tape measure marks, so check how fine the denominator goes.
Going Deeper: Getting the Most From Your Digital Caliper
A digital caliper earns its place by answering small questions quickly: Is this shaft the size the drawing says? Which drill made this hole? Is this replacement part actually the same thickness as the one that failed? The picks above — the Adoric, the Kynup, the NEIKO 01407A, the iGAGING Absolute Origin, the Fowler Xtra-Value and the Starrett — all measure the same nominal range, yet they differ in build, display behaviour, sealing and the confidence you feel when a reading repeats. The deeper sections below explain the four measuring faces in practical terms, separate resolution from accuracy so marketing numbers stop misleading you, and give you a checking and storage routine that keeps a caliper honest. Whether you reload, machine, print parts in three dimensions, or simply sort hardware, the best caliper is the one whose readings you stop second-guessing.
Decide first how small a difference must matter to you. Sorting bolts and checking lumber thickness tolerates a relaxed tool. Fitting bearings, measuring printed parts that must mate, or checking wear on a shaft rewards the stiffer, better-sealed end of this list. Your tolerance, honestly stated, points straight at the right pick.
Head-to-Head: How the Picks on This List Differ in Real Use
Spec tables flatten differences that your hands notice immediately. Put the picks on this list — the Adoric, the Kynup, the NEIKO 01407A, the iGAGING Absolute Origin, the Fowler Xtra-Value and the Starrett — side by side in a real task and three gaps open up. The first is effort over repetition: a tool that feels fine for one use can tire your hand, slow your rhythm or demand constant readjustment across a full afternoon of measuring small parts to a repeatable reading. The second is forgiveness: some designs tolerate slightly imperfect technique, awkward angles or worn materials, while others punish the same habits with a slipped grip, a damaged workpiece or a reading you cannot trust. The third is upkeep: some picks ask for little more than a wipe and dry storage, while others reward a regular check, a fresh consumable part or careful handling to stay at their best.
Use that lens when you reread the individual reviews above. If your work is occasional and forgiving — a few jobs a year, plenty of time, easy access — the simpler and lighter picks on this list will feel like the smart buy, and they usually are. If your work is repetitive, time-pressured or done in poor positions, the picks described as sturdier, better balanced or easier to read earn their place not through any single feature but through dozens of small moments where they ask less of you. Neither answer is wrong; mismatching the tool to the rhythm of your work is the only real mistake.
When the budget pick is genuinely enough
Budget picks on a list like this one are not consolation prizes. For light, infrequent work with good access and no deadline, they complete the same job as the premium options, and the money saved can go toward materials, a case or a second complementary tool. The honest limit is durability under repetition and precision under pressure. If you expect to measure weekly, to work in cramped or awkward positions, or to stake a finished result on one careful attempt, step up within this list. If you expect a handful of jobs a year in open space, stay at the sensible end and buy with confidence.
When stepping up actually changes the outcome
Stepping up changes the outcome when the job punishes small weaknesses: a workpiece that is expensive to replace, a fastener or fitting that is already damaged, a measurement or setting that everything else depends on, or a position where you cannot easily apply force or see what you are doing. In those moments the better-balanced, better-finished picks on this list are not luxuries — they are insurance. Notice that this logic is about the job, not about owning impressive tools. Buy the step up for the hardest job you do regularly, not for the hardest job you can imagine.
A Practical Setup and First-Use Routine
Whatever digital caliper you choose from this list, give it a deliberate first session instead of throwing it straight at an important job. Start by reading the maker’s instructions fully, including the warnings — not because the tool is mysterious, but because each model on this list has one or two model-specific habits, adjustments or limits that generic advice misses. Inspect the tool out of the box: moving parts should travel smoothly, markings should be legible, and any included case, accessory or spare part should be accounted for before packaging goes in the bin. If something feels rough, bent or incomplete, that is a return conversation, and it is far easier on day one than after a job has marked the tool up.
Next, rehearse on scrap or on a low-stakes task. Practice the core motion of measuring small parts to a repeatable reading slowly, watching what the tool does rather than what you expect it to do. Notice how much force the task actually needs, where your hands naturally grip, and whether you can see the relevant mark, edge or contact point without contorting. Most early frustration with a new tool is really unfamiliarity with its feedback — the sound, resistance or visual cue that says things are going well. Ten unhurried practice repetitions teach that feedback better than any review can, and they cost you nothing but scrap material and a few minutes.
Finally, set up your storage and your supporting kit in the same session. Decide where the digital caliper will live, what it will live next to, and which small companions it needs — the cleaning cloth, the spare consumable, the case or the organizer that keeps it findable. Tools that have a home get used and maintained; tools that migrate around a bench get damaged and lost. This small act of organization, done once, pays out on every future job.
Technique That Separates Clean Results From Repairs
Across every pick on this list, technique matters more than tier. Begin each task by preparing the workpiece and the area: clean contact surfaces, good light, and a stable position for both the work and your body. Rushed setups produce the classic failures — slips, skewed results and damaged finishes — far more often than weak tools do. Work in a steady rhythm, applying force progressively rather than in sudden bursts, and stop to reassess the moment feedback changes. A tool that suddenly feels different mid-task is telling you something: the material shifted, the contact point moved, or something is about to fail. Listening to that change is a learnable skill, and it is the single habit that most protects your work.
Support the work, not just the tool. Many disappointing results blamed on a digital caliper trace back to a workpiece that flexed, rolled or vibrated while being worked on. Clamp, brace or back up the piece whenever the task allows it, and position yourself so your force travels in the direction the tool was designed to take it. Keep your non-tool hand out of the line of travel, and keep your eyes on the contact point rather than on your hands. When a task needs more force than feels controlled, the correct response is almost never to push harder; it is to reset your position, check the tool’s adjustment, or step to the larger or more suitable pick on this list.
A short pre-flight check before important work
Before any job where failure would be costly, run a thirty-second check. Confirm the tool is clean and undamaged, confirm any setting or adjustment matches the task, confirm the workpiece is secured and correctly oriented, and confirm you have the companion items — lighting, a rag, the next tool in the sequence — within reach. Then do the first small increment of the job and inspect the result before continuing. That first-increment inspection catches wrong settings, wrong accessories and wrong assumptions while they are still free to fix.
Troubleshooting: When Results Disappoint
When a job goes sideways, diagnose in a fixed order so you fix causes instead of symptoms. First, check the consumable or contact element: on tools like a digital caliper, wear at the working edge, teeth, jaw, vial, blade or tip explains most sudden declines in performance, and it is the cheapest thing to renew. Second, check your settings and setup against the manual — a surprising share of poor results come from an adjustment left over from the previous task. Third, check the material: harder, softer, dirtier or more corroded stock than usual changes what correct technique even looks like. Only after those three should you suspect the tool itself.
Keep a simple log if a problem recurs. Note the material, the setting, the pick you used and what happened, in plain words on your phone or a shop notebook. Patterns appear quickly: a problem that follows one material is a technique adjustment; a problem that follows one pick across all materials is maintenance or replacement; a problem that follows you across every pick is a habit worth retraining. This sounds formal, but three lines per incident is enough, and it turns frustration into information.
Knowing when to stop and get help
Some situations outgrow any tool on this list. Work involving gas lines, refrigerant, live electrical conductors, structural members, pressure systems or safety-critical fasteners carries rules and risks that no buying guide can waive. If a task involves those systems, if a fitting or fastener resists reasonable force, or if you cannot verify your result with confidence, stopping is the professional move. A licensed tradesperson is cheaper than the repair that follows a confident mistake, and every experienced tradesperson has a story that proves it.
Care, Storage and Making the Tool Last
Longevity is mostly housekeeping. After each use, clean the digital caliper before you put it away: wipe down working surfaces, clear debris from moving parts and recesses, and dry the tool fully if the job involved moisture. A tool put away dirty deteriorates in storage — corrosion starts in damp grime, mechanisms stiffen with packed dust, and the next job begins with a tool that is already compromised. Periodically, work through the maker’s maintenance guidance: the adjustment to check, the part to inspect for wear, the storage condition to avoid. Put that check on a seasonal rhythm rather than waiting for failure, the way you would change a filter or test an alarm.
Store the tool the way it arrived or better: in its case if it has one, in a drawer or on a rail where it will not be knocked onto concrete, buried under heavier tools or left in a damp vehicle. Temperature swings and humidity in garages and trucks age tools quietly; a simple indoor home for precision or frequently used pieces repays itself. If the tool uses batteries or has electronic parts, follow the maker’s storage guidance for those components, and remove or refresh power sources on the schedule the manual suggests rather than after a mid-job failure.
When repair, parts or replacement make sense
Judge a tired tool by its working surfaces and its consistency. If renewal parts exist for the worn element and the body, frame or mechanism remains sound, renewal is usually the economical path. If the tool has become inconsistent — results vary without explanation, adjustments drift, or damage affects alignment or grip — replacement is the honest answer, because an inconsistent tool costs you materials and confidence on every job. When you replace within this list, you will usually find your second purchase is easier than your first: you now know your rhythm, your materials and your real priorities.
Decision Scenarios: Matching a Pick to Your Situation
If you are outfitting a first home or a first real toolbox, favour the pick on this list described as the most versatile rather than the most specialized. Versatility covers the unpredictable mix of small jobs a home produces, and you can add a specialist later when a hobby or a renovation makes the need concrete. If you are replacing a tool you wore out, buy one tier of robustness above the one that failed — your usage has already told you its intensity, and repeating the same purchase repeats the same lifespan. If you are buying for a specific project, list the project’s hardest single task and choose the pick that handles that task comfortably; the easy tasks will take care of themselves with any pick here.
If two people will share the tool, weight comfort and clarity more heavily: the pick whose grip, markings or feedback suit the less experienced user will be the one that actually gets used correctly by both. If the tool will travel — in a truck box, a site bag or a club kit — weight the case, the weight and the resistance to knocks, because travel kills more tools than work does. If the tool is a gift, choose the pick with the gentlest learning curve and the clearest instructions on this list, and include the small companion items that make the first session go well.
Whatever scenario is yours, apply one final filter before buying: read the individual review of your leading pick once more and check its stated limitation against your life. Every pick on this list has an honest limitation, named in its review. If that limitation touches a job you do often, believe it and choose differently. If it touches only jobs you rarely or never do, you have found your tool — buy it, set it up carefully, and put it to work.
Ownership Lessons From the First Season of Use
One more question owners ask after the first month
Owners often ask whether they should have bought the next tier up. The honest answer is to look at your last ten jobs: if the tool completed nine of them without drama, your tier is right and the tenth job is a technique or setup problem worth solving directly. If several jobs strained against the same limitation — the same reach, the same capacity, the same fading feedback — that pattern is the tool telling you its ceiling, and stepping up within this list for that specific reason is money well spent. Patterns justify upgrades; single bad afternoons justify practice.
Keep a small bench ritual around this tool and your results will tighten up noticeably within a few jobs. Lay out everything the task needs before you begin, work in the same order each time, and inspect the finished result under good light before you call it done. Ritual sounds like overkill for home work, yet it is exactly how professionals stay consistent when they are tired, rushed or working in a borrowed space. The ritual also protects you from the most common home-work failure of all: discovering a skipped step only after everything has been put away, assembled or closed up, when going back costs ten times the effort it would have cost to check in the moment.
Think about the second tool in the system, because few jobs on this list are truly one-tool jobs. The companion might be a clamp that holds the work steady, a light that shows the contact point honestly, a rag and a brush for cleanup, or the measuring tool that verifies the result. Buying the headline tool and neglecting its companions is why some well-reviewed purchases still disappoint: the system around the tool was never completed. When you budget, reserve a modest share for those companions and for the consumables the tool will eat over its first year. A complete, modest system outperforms an incomplete premium one on almost every real job you will do.
Experience changes what you value, so revisit your choice after a season of use rather than treating the purchase as permanent wisdom. Beginners prize forgiveness and clear feedback, because those qualities teach good habits. With a year of jobs behind you, you may find that speed, compactness or a particular adjustment now matters more than the quality that first sold you. That shift is normal, and it is why many owners end up with two tools from a category like this one: the forgiving first purchase that still handles rough or loaner duty, and the refined second purchase matched to the work they now know they love. Neither purchase was a mistake; together they describe your learning curve.
Pay attention to how the tool behaves at the edges of its range, because that is where honest differences between picks live. Almost every tool on this list performs pleasantly in the comfortable middle of its capacity. The edges — the smallest and largest workpieces, the hardest and softest materials, the tightest spaces — are where grips run out, adjustments bottom out and readings or results start to drift. If your regular work lives near an edge, weight the reviews’ comments about that edge heavily and forgive weakness in the middle. If your work lives in the middle, do the opposite: choose the pick that feels most pleasant there, since edge performance you never use buys you nothing.
Teach someone else to use the tool once, even informally, and you will learn where your own technique has silent gaps. Explaining the setup, the grip and the check-you-do-after forces each step into words, and the steps you cannot explain clearly are usually the steps you have been doing by luck. This is also the kindest way to make a shared household or club tool survive: a five-minute walkthrough prevents the borrowed-tool damage that resentment is made of. Keep the manual with the tool, note any quirk you discover on a card in the case, and the next user — including future you, six months from now — starts ahead instead of starting over.
Weather and environment deserve a thought if your work happens in garages, yards or unfinished spaces. Cold stiffens materials and numbs the hands that guide the tool; heat and humidity invite corrosion and make grips treacherous; dust settles into every mechanism that is not cleaned the same day. None of this demands special equipment, just adjusted expectations and a slightly more deliberate routine: warm the work area when you can, dry and wipe the tool without exception after damp work, and store it indoors even if it works outdoors. Tools rarely die from one bad day; they fade from a hundred slightly careless ones, and environment is where that fading starts.
Finally, judge the purchase a month later by evidence rather than by mood. Count the jobs it completed, the repairs it avoided, and the times you reached for it without hesitation. A tool that gets reached for is earning its shelf space regardless of its tier on this list, and a tool that gets avoided is telling you something worth hearing — about its fit for your hands, your storage, or your actual work. Act on that evidence calmly: adjust the setup, add the missing companion, move it to a better home, or replace it within this list while the lesson is fresh. That honest loop, repeated across your toolbox, is worth more than any single buying decision.
The Short Version
For light occasional use, the Adoric. For a fraction mode in steel, the Kynup or the NEIKO. For data output, the iGAGING. For a kit with spare batteries, the Fowler. For a known brand, the Starrett.