A marking knife cuts a fine line into wood, which gives a chisel or saw a clean edge to register against. It replaces a pencil line for joinery such as dovetails and tenons. The main choices are the blade steel, whether the bevel is on one or both sides, the blade length and whether the handle is fitted.
The six knives below run from a single handled Czech knife to an unhandled blade kit and a six piece set. Steel, hardness and sizes come from each listing page and are the makers’ own claims. We have not used these knives ourselves. Where a listing disagrees with itself, we say so.
As an Amazon Associate we earn from qualifying purchases. Links below are affiliate links, and they do not change the product information we give.
What to Look For
| Feature | Why it matters |
|---|---|
| Bevel | Dual bevel marks either side, a flat back suits marking against a square |
| Blade thickness | Thin blades leave a fine kerf, thicker ones hold up better |
| Steel | Hardness and type affect how long the edge lasts |
| Handle | A flat profile keeps the knife from rolling off the bench |
| Sheath | Some knives include a cover for the point |
In this guide
Specs at a Glance
| Knife | Blade | Steel | Notes |
|---|---|---|---|
| Narex 822302 | 0.055 in thick; 1.5 or 2 in (conflict) | Mn-V alloy, HRc 61 | Dual bevel; hornbeam handle; 6.75 in long |
| Narex Richter 3 piece | 0.75, 1.2 and 2.5 mm | 420 stainless, HRC 57 | Finger indents; maple handles; brass pins |
| Mikov V2003014 | 5-7/8 in; 0.060 in thick | 420 stainless, HRC 57 | Unhandled; finger indents; 1/2 in wide |
| RUITOOL | 1.8 in | High carbon, 58 HRC | Leather sheath; hardwood handle; 7.6 in long |
| Big Horn 19061 | 1.5 in | Steel type conflicts | Flat one side, beveled the other; rosewood handle |
| Mudder 6 piece | 0.94 in | Type conflicts | Dual bevel; faux mahogany handles; 5.47 in long |
The 6 Best Marking Knives

Top pickBest for fine joinery layout
1. Narex Thin Blade Dual Bevel Marking Knife (822302)
A Czech made knife with a Mn-V steel blade that the maker says is heat treated to HRc 61, 0.055 inch thick and 0.410 inch wide. The dual bevel is ground at 20 degrees with the tip at 55 degrees. The handle is hornbeam and the overall length is 6.75 inches. The details table lists a 2 inch blade while a bullet says 1.5 inches, so the blade length is not consistent.
Suits: fine joinery layout. Strengths: a stated hardness and bevel angles. Weaknesses: conflicting blade length. Skip it if you want an unhandled blade.


Best for trying thin and thick blades
2. Narex Richter Extra Anniversary 3 Piece Set of Marking Knives
Three knives in different blade thicknesses of 0.75, 1.2 and 2.5 millimeters. The maker lists AISI 420 stainless steel hardened to HRC 57, dual bevel spear points ground to 55 degrees with a 25 degree grind on both bevels, and laser cut finger indents. The handles are hand polished maple with two brass pins and a square profile. The listing weight is 8.8 ounces for the set.
Suits: trying thin and thick blades. Strengths: three thicknesses. Weaknesses: the listing gives no blade length. Skip it if you only want one knife.

View Narex Richter Extra Anniversary 3 Piece Set of Marking Knives on Amazon

Best for makers who want to fit their own handle
3. Mikov V2003014 Unhandled Thin Blade Marking Knife Kit
A blade only kit, 5-7/8 inches long, 1/2 inch wide and 0.060 inch thick, made by Mikov to the seller’s specification. The maker lists AISI 420 stainless steel at HRC 57 with a dual bevel spear point tip and finger indents. It can be used bare or fitted with wood scales, which are not included. A light stropping may be needed to remove a wire edge, per the listing.
Suits: makers who want to fit their own handle. Strengths: a long, thin blade. Weaknesses: no handle. Skip it if you want to use it straight away.

Best for everyday layout
4. RUITOOL Woodworking Marking Knife with Leather Sheath
A double bevel, spear point knife with a 1.8 inch high carbon steel blade that the maker says is hardened to at least 58 HRC. The hardwood handle is riveted and has a flat profile, and a leather sheath is included. Overall length is 7.6 inches and the weight is listed as 50 grams, with a one year manufacturer warranty.
Suits: everyday layout. Strengths: a sheath and a flat handle. Weaknesses: a short blade. Skip it if you need a very thin blade.
View RUITOOL Woodworking Marking Knife, Double-Bevel Blade with Leather Sheath on Amazon

Best for marking along a square
5. Big Horn 19061 Marking, Striking and Scribing Knife
A 7.25 inch knife with a rosewood handle of 5.75 inches, a solid brass ferrule and a 1.5 inch blade that is flat on one side and beveled on the other, meant to ride against a square or straightedge. The details table says the blade is stainless steel while the specification bullet says high carbon steel.
Suits: marking along a square. Strengths: a flat-backed blade. Weaknesses: an unclear blade material. Skip it if you want to mark from either side.

View Big Horn 19061 Marking/Striking/Scribing Knife Red, Small on Amazon
Best for shared shop use
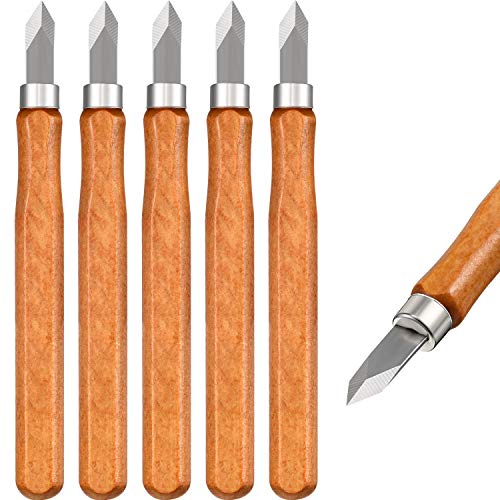
6. Mudder 6 Pieces Woodworking Marking Knives
A set of six dual bevel knives with faux mahogany handles. Each is 5.47 inches long, with a 0.94 inch blade and a 4.53 inch handle. The title says manganese steel, the material field says alloy steel and the blade field says stainless steel. The maker says the blades come pre-oiled and that some points may need grinding.
Suits: shared shop use. Strengths: six knives in one pack. Weaknesses: unclear steel and possibly blunt points. Skip it if you want one well-documented knife.

View Mudder 6 Pieces Woodworking Marking Knives, Dual Bevel Manganese Steel on Amazon
Care and Setup
- Keep the flat or bevel against the square as the maker advises.
- Strop a wire edge lightly if one forms.
- Wipe the blade dry and oil carbon steel.
- Use the sheath or cover whenever the knife is stored.
Mistakes to Avoid
- Pressing hard on the first pass instead of scoring lightly.
- Choosing a thick blade for tight dovetails.
- Leaving an unsheathed blade loose in a drawer.
- Assuming all listed hardness numbers can be compared.
Why a Knife Line Beats a Pencil Line
A pencil line has width, and the pencil point wears as you work, so two marks that were meant to meet can drift apart. A marking knife cuts a very thin line into the wood fibers. It leaves a tiny shoulder that a chisel or saw can register against, and it tends to give cleaner results in fine joinery such as dovetails, tenons and shoulder lines on cross-grain cuts.
The knife line does two jobs. First, it shows exactly where to cut. Second, it severs the surface fibers so that the cut edge does not tear as a saw or chisel passes. For crisp shoulders, a chisel can be placed into the knife line and pushed in, which helps it sit exactly where you want.
Think about the work you do. If you cut a lot of joinery by hand, a knife is almost a necessity. If you mostly build rough carpentry, a pencil may be enough. A knife line also takes practice, since the cut must be consistent and light.
When choosing, picture the marks you make most often. Long, straight lines along a square favor a blade with a flat back that rides against a straightedge. Small lines in tight corners need a fine point and a narrow blade. Layout across wide boards needs a blade with enough length to handle the stroke. Matching blade shape to typical tasks gives better results than chasing the longest spec sheet.
Bevel Geometry, Point Shape and Blade Length
The geometry of the blade determines where it cuts and how it behaves in the wood. A single-bevel knife has one flat face and one beveled face. Placing the flat face against a square lets the line fall exactly at the edge of the guide, which suits marking along a try square. The disadvantage is that the knife is handed in some uses, so you may need to switch knives or hold it differently for marks on the other side.
A dual-bevel knife is ground on both sides, so it can mark on either side of a guide. It is flexible, but the cut line may sit slightly off from the face of the guide because of the angle of the bevel. A thin dual-bevel blade can reduce this effect.
Point shape also matters. A spear point is symmetrical, with the point in the center, which makes it usable from either side and good for small marks. A skew or oblique tip gives access in tight corners, such as inside a dovetail. A pointed tip should be kept sharp, but not so delicate that it snaps.
Blade length affects reach and control. A short blade is stiff, and it sits close to the work. A longer blade can reach farther into joints, but it can flex. Check the listing for stated thickness, since a thin blade makes a finer cut, and a thick blade resists bending.
Because listings can disagree with themselves about blade details, treat the specs as a starting point and measure when the knife arrives.
Steel Type, Hardness and Edge Holding
Steel choice affects how long a blade stays sharp and how easily you can sharpen it. Hard steels hold an edge for longer, but may chip if misused and take more effort to sharpen. Softer steels sharpen quickly but dull sooner. A middle path suits many users.
Listings may give a hardness number on the Rockwell scale. Use it as a general guide only. A number from one maker does not guarantee the same performance as the same number from another maker, because heat treatment and alloy composition vary. Do not rely on a single figure when comparing knives. Where a listing gives conflicting steel descriptions, as some do, treat the material as unconfirmed and ask the seller if it matters to you.
Carbon steels can take a keen edge but may rust if not kept dry and oiled. Stainless steels resist rust better and suit damp shops or hands that sweat, but may be harder to sharpen to the same keenness. If you leave tools in a garage or basement, rust resistance can be valuable.
Sharpening ability matters. A marking knife needs a sharp edge to cut cleanly, so you will need a way to hone it. A fine stone, a strop and a little compound are enough for most users. Learn to keep the bevel flat on the stone. If you do not want to sharpen, choose a knife with a hard edge and plan to replace it when it dulls.
Handles, Sheaths and Unhandled Blades
The handle shapes how the knife feels and how well you can control it. Round handles can roll off a bench, while flat or faceted handles stay put. Wood handles feel warm and comfortable, while plastic can be durable and easy to clean. A handle that is too long or too short for your hand can reduce control. Look at the handle shape, and think about whether you hold the knife like a pencil or with a fuller grip.
Some knives are sold as blade-only kits. These suit makers who want to fit their own handle, or who want to use the blade in a holder. If you buy an unhandled blade, plan for the time and tools needed to fit it. Without a handle, it is also easier to cut yourself, so take care and consider a temporary wrap or a cover.
A sheath or cover protects both the user and the edge. A small leather or plastic sheath keeps the point from damage in a drawer or tool bag. If a knife does not include one, make a simple cover from card or leather. Store knives where the blade cannot be touched by other tools, because contact dulls them.
Multi-piece sets give you several blade shapes, which helps if you are unsure which style suits you. But more knives mean more to sharpen and store. Decide whether you want a variety for learning or a single knife you can keep sharp and know well.
Marking Technique, Safety and Blade Care
Good marking technique gives better joints. Hold the knife like a pen, with your index finger on the spine or the side. Place the work against a firm stop, and hold the square or straightedge firmly. For the first pass, use light pressure, creating a shallow line. Make a second pass in the same groove, slightly deeper, and avoid wandering. Deep cuts in a single pass can drift with the grain.
Keep the flat side of the blade against the guide when using a single-bevel knife. Start the cut at the far end and pull the knife toward you, or follow the maker’s advice. Always keep your free hand behind or beside the blade, not in front of it. Use a clamp or a bench hook to hold the work.
Check your marks. Under raking light, the line should be clear and thin. If the cut wanders, you may be pressing too hard or the grain may be pushing the blade. Deepen the line with a chisel placed in the groove, and clean up the waste on the waste side.
For care, wipe the blade after use, especially if you handle damp wood. Apply a light coat of oil to carbon steel. Strop the edge occasionally to remove a wire edge, and sharpen when it begins to tear instead of slice. Cover the point when not in use.
Replace or repair the knife when the tip is broken, the handle is loose, or the edge will not sharpen evenly. Wear eye protection when grinding.
Which marking knife should you buy?
The right marking knife depends on whether you want a ready handled tool, a way to compare blade thicknesses, or a blade you will finish yourself. Match your habits to the picks below, then check the listing for the details that matter to you.
- Fine dovetail and tenon layout with a handle: choose the Narex 822302. It is handled, dual bevel and lists a stated hardness, though its blade length is inconsistent on the page.
- Learning which blade thickness suits you: choose the Narex Richter 3 piece set. Three thicknesses let you compare a thin and a thick blade on your own joints.
- Building or fitting your own handle: choose the Mikov V2003014. It is sold unhandled, so it suits makers who enjoy the handle as part of the project.
- A protected point and an everyday knife: choose the RUITOOL. The included sheath and flat handle suit a bench or a tool roll.
- Marking tight against a square: choose the Big Horn 19061. Its blade is flat on one side and beveled on the other, so the flat face can ride the guide.
- A shop, class or shared bench: choose the Mudder 6 piece set. Six knives mean no one waits, as long as you accept that the steel is described inconsistently.
If you are unsure, a dual bevel knife with a handle is the least fussy starting point for marking knife work. You can add a single bevel knife later for square work.
What to check before you buy a marking knife, and who should skip it
Before you order a marking knife, confirm the handle, the blade steel and the bevel type on the live listing, because several pages here disagree with themselves. A few minutes of checking prevents most returns.
- Is the knife handled or a blade-only kit, and are scales or a sheath included?
- Is the bevel single or dual, and does that match how you mark against a square?
- Does the listing state one consistent steel, or does it conflict?
- Is the blade thin enough for tight dovetails, or thick enough to resist flexing?
- What warranty, return window and seller details does the page show?
- Do you have a stone and strop, or will you rely on the factory edge?
There are honest trade-offs. A harder steel may hold an edge longer but can be slower to sharpen, and a cheaper multi-pack may need some point grinding before it cuts cleanly. An unhandled blade costs you time and some shop work before first use. A short blade is stiff but limits reach, while a long, thin one can flex.
You can skip a marking knife if your work is rough carpentry where a pencil line is accurate enough. Skip the unhandled blade if you want to start cutting today, and skip the six piece set if you only need one knife you can keep sharp.
When you are ready, compare the picks above, check the current listing for blade length and what is included, then choose the one that fits how you will use it.
From Pencil Line to Knife Line: Planning Your Layout Workflow
A marking knife earns its place in the workflow at a specific moment: after rough dimensioning and before any cutting, when the joinery layout becomes the contract that every later operation follows. Understanding that moment helps you use the picks in this guide well. The sequence in a dovetail joint, for example, runs from marking the baseline with a gauge, to knifing the shoulder lines, to transferring the tail positions onto the pin board with the knife tip registered in the actual cuts. Each knife line does a different job. The shoulder line gives the saw a physical wall to start against and gives the chisel a registered edge to pare back to. The transferred marks preserve the exact shape of the tails you cut, including any tiny irregularities, which is why a joint marked this way fits better than one marked from measurements alone. A pencil cannot do either job well: its line has width, it sits on top of the fibres rather than severing them, and it disappears under the first pass of a plane.
Plan the workflow so the knife work happens in one calm pass. Lay out all the parts of a joint while the boards are still in their marked orientation, with the face sides and face edges identified, because a knife line cut on the wrong face is worse than no line at all — it is a confident, precise error. Keep the knife, a square, and a cutting gauge within reach and return the knife to its sheath or its place on the bench between operations rather than laying it loose among shavings, where an edge can be nicked by a hidden tool or find a fingertip during cleanup. Work under light that rakes across the surface; a knife line is a shallow cut, and raking light makes it visible as a fine shadow, while flat overhead light can make even a deep line vanish. If you wear an apron, a chest pocket keeps the knife oriented the same way every time you reach for it, which sounds trivial until you are holding a board with one hand and fishing for the knife with the other.
Reading the line you just cut
A good knife line tells you about your technique the moment you make it. It should be continuous, of even depth, and free of the doubled, fuzzy edge that means the blade wandered and corrected mid-stroke. If the line steps sideways where it crosses a grain reversal, the bevel was likely facing the wrong way for that section, or the pressure was heavy enough to let the grain steer the blade. If the line is deep at the start and fades at the end, your hand is lifting through the stroke; consciously finish every stroke with the same pressure you started with. If the line is clean but in the wrong place, the problem is registration, not cutting: the square or gauge fence moved, or the blade was not held flat against the reference edge for the first part of the stroke. Diagnosing the line before you cut to it saves joints, because the saw and chisel will faithfully follow whatever the knife left behind, right or wrong.
Head-to-Head: How the Six Picks Differ at the Bench
The Narex thin blade dual bevel knife and the RUITOOL knife with its leather sheath represent the two most common starting points, and comparing them clarifies what you are paying attention to. The Narex is a specialist layout tool: a thin blade that registers flat against a square, a point that reaches into corners, and a handle shaped for a pencil-like grip during fine work. The RUITOOL adds the practical protection of a sheath, which matters if the knife travels in a tool roll or shares a drawer. In use, the difference shows in transfer work. The thinner blade follows the inside of a cut tail socket with less wedging, so the mark lands exactly where the wood was removed; a thicker blade bridges slightly and nudges the mark outward, which over a whole joint adds up to a looser fit. For general bench work both cut a clean line, but for dovetail transfer the thin blade has a genuine mechanical advantage.
The Narex Richter three-piece set and the Mudder six-piece set sit at opposite ends of the commitment scale. A matched set of three knives gives you bevel orientations and sizes that cover left-hand, right-hand and general marking without re-gripping or working against the bevel, which speeds up repetitive layout on casework. The six-piece Mudder set spreads the bet differently: more knives, simpler execution, and the freedom to keep one at the bench, one in the site kit, and spares for lending or for the rough jobs you would not risk a favourite blade on, such as marking out on gritty reclaimed timber. The Big Horn knife adds striking and scribing duties to marking, suiting a bench where one tool handles layout on both wood and the occasional sheet material. The Mikov kit is the outlier and, for the right person, the most interesting pick: an unhandled blade you fit with your own handle, trading ready-to-use convenience for a grip shaped to your hand and a blade you can mount at the length you prefer. Choose it if you enjoy making your own tooling and want the handle to disappear in your hand; skip it if you want to mark out a joint this evening.
Single bevel versus dual bevel, decided by the joint
Rather than treating bevel choice as a matter of taste, decide it joint by joint. For marking around a template or transferring from a cut part, a single bevel with the flat face against the reference is the most accurate option, because the flat cannot deflect away from the edge it registers against. For general shoulder lines struck against a square, a dual bevel is forgiving: it cuts whichever way you draw it, and the line is consistent even when you work from the other side of the board. For deep scoring that will guide a saw, the dual bevel parts the fibres on both sides and leaves a small trench the saw teeth settle into. Many experienced markers keep one of each and reach without thinking, the way you reach for a different chisel width. If you are buying one knife only, the dual bevel is the safer generalist; if your work is mostly dovetails and fine boxes, a single bevel earns its keep quickly.
First Layout Session: A Controlled Routine
Start on scrap, not on project wood, and practise the three strokes that cover nearly all layout: the drawn line against a square, the transferred mark inside a cut, and the deepened shoulder line. For the drawn line, register the square firmly, place the blade flat against its edge with the point at the start position, and draw the knife toward you in one unhurried stroke with moderate pressure. One stroke is the goal; a second pass should deepen the same cut, not carve a parallel one, so keep the blade in the existing line if you repeat it. For the transferred mark, hold the cut part exactly in its final position, support it so it cannot rock, and let the knife tip fall into the cut before drawing it along the edge. Any movement of the reference part during this step transfers directly into the joint, so clamp or weight the part if your free hand is not enough.
Deepening the shoulder line is the step beginners rush. The first light line is a guide; only once you have checked it against the square and against its mating line should you take a second, firmer pass to open the wall the saw will follow. Then pare a tiny chamfer on the waste side of the line with a chisel, which creates the small notch that catches the saw teeth at the start of the cut and stops the saw skating across your line. Check your work by holding the two parts together before cutting anything else: knife lines that meet cleanly at the corners predict a joint that closes cleanly after cutting. Practise this routine on offcuts of the same species as your project whenever you can, because the pressure that cuts a perfect line in pine will tear through the earlywood bands of a ring-porous hardwood and barely scratch a dense exotic.
Safety habits specific to marking knives
A marking knife is small, sharp and used close to the holding hand, so its safety rules are about direction and storage. Always draw the blade toward a part of the bench where your other hand is not resting, and never hold a small workpiece in your palm while knifing a line across it; clamp it or pin it against a bench hook instead. Keep fingers behind the line of the stroke, and reposition the work rather than reaching across the blade path. When the knife is not in your hand it belongs in its sheath, in a rack, or in a designated slot — never loose in an apron pocket point-up, and never buried under shavings on the bench. Keep a basic first aid kit at the bench; knife nicks are usually minor, but they should be cleaned and covered at once so you can keep working without marking the wood in a way you did not intend. Cut away from your body wherever the geometry allows, keep the workpiece secured, and treat the point with the same respect as the edge, because most marking knife injuries come from the point during a slip, not from the edge during a cut.
Troubleshooting Wandering, Torn and Misplaced Lines
Work through line problems in diagnostic order, starting with the reference and ending with the blade. First, check registration: if the square or gauge moved, no blade will save the line, so confirm the reference is seated against a true face and has not ridden up on a shaving or a burr. Second, check bevel orientation: a single-bevel knife with the bevel against the reference will be pushed away from the edge by the wedge action of the bevel, drawing a line that drifts further from true the longer the stroke runs. Third, check pressure: too much force lets the grain steer the blade, especially where the grain runs diagonally; lighten the first pass and deepen in a second pass once the shallow groove is guiding the blade. Fourth, check the edge: a dull or nicked edge tears fibres instead of severing them, leaving a fuzzy line that widens under the chisel; a few strokes on a fine stone restore it. Fifth, check the wood: lines across reversing grain, knots and earlywood bands will always be harder, and the fix is technique — shorter strokes, a shallower first pass, and working from both ends toward the difficult patch so a tear-out runs into already-cut fibres.
A line that is accurate but hard to see is a lighting and depth problem, not an accuracy problem. Deepen it slightly, or run the tip of a sharp pencil along the cut to darken it for sawing, keeping the pencil in the knife groove rather than beside it. A line that disappears after planing was too shallow for the amount of stock you still had to remove; mark after final surfacing wherever the process allows, or re-knife the line once the surface is at final thickness. A transferred dovetail mark that produces a loose joint usually traces back to the blade thickness issue described earlier, or to the reference part rocking during transfer; a mark that produces a joint too tight to close usually means the line was drawn on the wrong side of the cut edge, effectively adding the blade thickness instead of subtracting it. Naming which of these happened, once, teaches you more than a dozen careful joints that happened to work.
Care, Sharpening and Storage That Protect the Point
The point of a marking knife does more work than any other part, and it is the first thing damaged by careless storage. A knife dropped point-first onto a concrete floor or tossed into a drawer of steel tools can lose the fine tip that reaches into dovetail sockets, and regrinding a point changes the geometry you rely on. Store the knife sheathed, racked, or in a roll, and never use it to open packaging, lever a lid, or score anything abrasive such as drywall or gritty reclaimed boards with embedded dirt; keep a utility knife for abuse and the marking knife for wood. Sharpen little and often: the edge responds best to brief maintenance on a fine stone or strop before it feels dull, working both bevel faces evenly on a dual bevel blade so the edge stays centred, and keeping the flat face truly flat on a single bevel blade so registration stays honest. Wipe the blade dry after use in green or acidic woods, since tannin-rich species can stain and pit a blade left damp overnight. A well-kept marking knife should need a full regrind only after damage, not as a routine.
Choosing by User: Who Should Buy Which Style
If you are building your first joinery bench, a single dual bevel knife with a sheath covers nearly everything you will mark in the first year, and the money saved goes further spent on a good square. If dovetails and small boxes are your main work, prioritise the thinnest blade you can handle comfortably, because transfer accuracy is the whole game. If you mark out large casework and sheet goods, a handled knife with a slightly longer blade and a striking-knife profile gives you the reach and the robustness for long lines against a straightedge. If you work at multiple benches or on site, the multi-piece sets make practical sense: one knife lives in each location, and no single loss stops the work. If you enjoy tool-making, the unhandled Mikov blade is a small project that returns a knife fitted to your grip alone. The common thread is that the best marking knife is the one whose geometry matches the lines you actually cut — buy for your joints, not for a catalogue photograph.
Extra questions readers ask about marking knives
Can I mark metal with a woodworking marking knife? Light layout lines on soft metal are possible, but the edge will dull quickly and the point suffers; a dedicated scribe is the better tool, and the Big Horn style of combined knife is the closest compromise in this guide. How do I keep the knife from rolling off the bench? Choose a handle with flats, park the knife in a rack or on a magnetic strip, and make a habit of sheathing it the moment a layout step ends. Why is my line wider on one side of the board than the other? You are likely tilting the blade as you cross from one reference face to the other, so the bevel geometry changes; slow down at the corner and re-register the blade flat before continuing. Should I knife lines on both faces of a board? For through joinery, yes: marking both faces and connecting the lines keeps the cut honest through the thickness, and it exposes any twist in the board before you commit to cutting.
Marking the Whole Project: Consistency Across Parts
Single-joint accuracy is only half of marking; the other half is consistency across every part of a project, and the knife plays a quiet role there too. When a case has four legs, two sides and a set of rails, the knife lines that define each joint must agree with each other, or the case assembles with a twist that no clamp can argue with. The discipline that produces agreement is to mark from the same reference faces throughout, to keep the knife and the square set up the same way for every repeated line, and to batch the marking: all the shoulder lines in one pass, all the transfers in another, so your hand settles into one motion and repeats it identically. Marking one joint completely, cutting it, then marking the next invites small drifts in setup that accumulate invisibly until the last joint. Batching also exposes mistakes kindly — a line that disagrees with its seven identical siblings is obvious while all eight are still only lines, and a knife line in the wrong place can be planed away and re-cut, which a sawn shoulder cannot.
Label as you mark. A knife line does not say which side is waste, so add a clear cross on the waste side of every line the moment it is cut, and pair-mark mating parts with matching symbols before they are separated. Most experienced markers can tell a story about a perfect joint cut on the wrong side of a perfect line, and the moral is always the same: the knife did its job and the labelling did not. Keep the system simple enough that you will actually use it when tired at the end of a session — a cross, a tick on the face side, and matching letters on mating parts cover nearly everything. When the project is done, the habit remains: consistent references, batched operations and immediate labels are what turn a good marking knife from a precision instrument into reliable furniture.
Marking Knife FAQ
What does dual bevel mean?
The blade is ground on both sides, so it can mark on either side of a guide. A single bevel knife is flat on one face.
Which knife is sold without a handle?
The Mikov V2003014 is an unhandled blade kit. The wood scales are not included.
Do I need a marking knife if I use a pencil?
For rough work, a pencil is fine. For joinery where fit matters, a knife line is finer and can guide a chisel or saw.
Is single or dual bevel better for beginners?
Single bevel is good for marking against a square, while dual bevel works from either side. Many beginners start with a dual bevel for flexibility.
How do I sharpen a marking knife?
Use a fine stone and a strop, keeping the bevel flat. A few light passes usually restore the edge.
Can I use a utility knife instead?
It can mark, but the blade is thick and the geometry is not designed for fine layout. A marking knife gives a narrower line.
Why does my line wander with the grain?
Pressing too hard in one pass is the usual cause. Make a light first pass, then deepen the groove.
Do I need a sheath?
A cover protects both the edge and your hands. If none is included, make a simple one.
How can I tell if a blade is hard enough?
Hardness figures from different makers are not directly comparable. Judge by how long the edge lasts in your work, and check the listing for conflicting details.
What is the best marking knife for dovetails?
A thin, dual bevel knife with a fine point is the usual choice for dovetails, because it fits tight corners. Of the picks here, the Narex 822302 and the thinner blades in the Narex Richter set suit that work. Check the listing for blade thickness before buying.
Should a marking knife be single bevel or double bevel?
Single bevel suits marking along a square, while double bevel marks from either side of a guide. Neither is wrong, so choose by the work you do most. Beginners often start with double bevel for flexibility.
How long should a marking knife blade be?
A blade of a couple of inches is enough for most joinery layout. Longer blades reach farther but can flex, and shorter ones feel stiffer. Listings can disagree, so check the stated length and measure on arrival.
Is a marking knife the same as a striking knife or scribing knife?
They overlap, and some products are sold under all three names, such as the Big Horn 19061. A marking knife cuts a fine line for a chisel or saw to register against. Check the blade shape on the listing rather than relying on the name.
Can I make my own marking knife handle?
Yes, if you buy an unhandled blade such as the Mikov V2003014, which lists wood scales as not included. You will need wood, glue or pins and basic shop tools. Take care with the exposed edge while fitting.
How often should I sharpen a marking knife?
Sharpen when the knife begins to tear the surface instead of slicing it. A light strop often restores a wire edge between sharpenings. How often depends on the steel, the wood and how much you mark.
The Short Version
For a handled Czech knife, the Narex 822302. For three blade thicknesses, the Narex Richter set. For your own handle, the Mikov blade. For a sheath, the RUITOOL. For a flat back, the Big Horn. For a six pack, the Mudder.