A palm gouge is a short carving tool with a curved blade and a handle shaped to sit in the palm of the hand. You push it with hand pressure, often with the other hand guiding the blade, to scoop, shape and cut lines in wood. The main choices are the number of tools in the set, the sweep and width of the blades, the handle wood and the steel.
The six picks below run from a nine tool set to a single V-tool and a single gouge. Sizes, steel and handle woods come from each listing page and are the makers’ own claims. We have not used these tools ourselves. Where a listing leaves a gap or disagrees with itself, we say so.
As an Amazon Associate we earn from qualifying purchases. Links below are affiliate links, and they do not change the product information we give.
What to Look For
| Feature | Why it matters |
|---|---|
| Blade profile | Gouges, V-tools and veiners cut different shapes |
| Sweep and width | Deeper sweeps remove more wood; narrow ones add detail |
| Handle | A short, rounded handle should sit in the palm |
| Steel | High carbon and alloy blades hold and take an edge differently |
In this guide
Specs at a Glance
| Pick | Contents | Handle | Notes |
|---|---|---|---|
| Flexcut FR405 | 9 tools: 7 gouges, 2 V-tools | Ash | 1095 high carbon; lidded box; warranty entry conflicts |
| Flexcut FR310 | 5 tools | Ash | 1095 high carbon; wooden box; profiles not listed |
| PFEIL Set C | 6 pieces; 4-3/4 in long | Half round hardwood | 2 V-parting, 1 veiner, 3 gouges |
| Narex 868300 | 5 pieces | Beech, flat back | Cr-V steel at 61 to 62 HRc; hand pressure only |
| Flexcut FR803 | 1 V-tool, 45 degrees by 1 mm | Ash | High carbon; lifetime warranty entry |
| Pfeil No. 7 | 1 gouge, 14 mm | Octagonal hardwood | Chrome vanadium; square tang; 6.75 in |
The 6 Best Palm Gouges
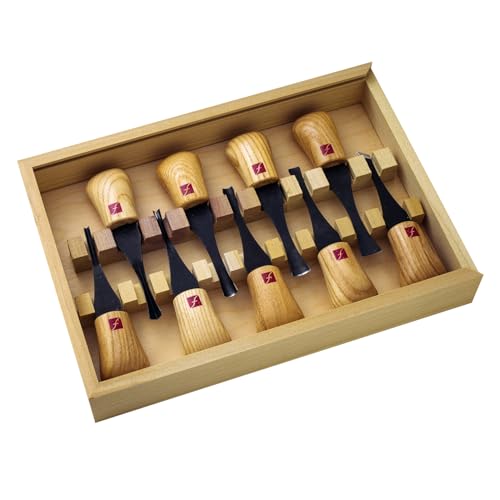
Top pickBest for a full range of sweeps in one case
1. Flexcut Deluxe Palm Gouge Set FR405
A nine tool set with seven gouges (#2 by 5/16, #3 by 3/8, #3 by 5/8, #5 by 9/16, #6 by 5/16, #8 by 3/8 and #11 by 1/8) and two 70 degree V-tools, 1/4 and 3/8 inch. The handles are ash and the blades are 1095 high carbon steel. It comes in a lidded box and is described as made in the USA. The details table says no warranty and gives an odd item type, so treat those fields with care.
Suits: a full range of sweeps in one case. Strengths: clear sizes and a storage box. Weaknesses: the largest set here and a muddled details table. Skip it if you want only a few tools.


Best for a small, boxed set
2. Flexcut Beginners Palm Set of 5, FR310
Five palm tools with ash hardwood handles and 1095 high carbon steel blades, supplied with a wooden box. The listing sizes it at 7.6 by 6.2 inches and shows a lifetime limited warranty. The bullets do not say which blade shapes are in the five, so check the product page before you order.
Suits: a small, boxed set. Strengths: the same handle and steel as the larger set. Weaknesses: blade shapes are not listed. Skip it if you need to know the exact sweeps up front.


Best for small, detailed cuts
3. PFEIL Palm Set C, 6 Pieces
A Swiss made set with half round hardwood handles and hand-sharpened special alloy steel, about 4-3/4 inches long. The contents are a 2 mm No. 15 V-parting tool, a 4 mm No. 12 V-parting tool, a 0.5 mm No. 11 veiner, a 2 mm No. 9 gouge, a 7 mm No. 8 gouge and a 3 mm No. 8 gouge. The maker says it suits block carving and fine work. The details table shows the brand as PF Flyers, while the maker is Pfeil.
Suits: small, detailed cuts. Strengths: every tool is named by number and width. Weaknesses: a mislabelled brand field. Skip it if you want wide gouges.


Best for fine detail and engraving
4. Narex 5 Piece Palm Carving Chisel Set 868300
A five piece set made in the Czech Republic with chrome vanadium blades that the maker says are heat treated to 61 to 62 HRc and hand honed. The beech handles have a flat back so they do not roll on the bench. The maker says they are for hand pressure only, for fine detail and engraving. The listing does not name the blade shapes, and the 2.76 by 1.57 inch size looks like a package figure.
Suits: fine detail and engraving. Strengths: a flat-backed handle and a stated hardness. Weaknesses: no blade list. Skip it if you want a mallet set.

View Narex 5 Piece Set Engraving Graving Palm Carving Chisels for Woodcut 868300 on Amazon

Best for fine lines and lettering
5. Flexcut Palm V-Tool FR803, 45 Degrees by 1 mm
A single V-tool with a 45 degree angle and a 1 mm width, a fixed ash handle and a high carbon steel blade. The maker says it is sharp out of the package and lists a limited lifetime warranty. It weighs 1.44 ounces.
Suits: fine lines and lettering. Strengths: a very narrow cut. Weaknesses: one profile only. Skip it if you need a gouge to remove wood.

Best for a wide, shallow cut
6. Pfeil Swiss Made 14 mm Gouge No. 7
A single gouge with a 14 mm width in the No. 7 sweep, made in Switzerland from chrome vanadium alloy steel. The handle is an octagonal hardwood shape with a square tang. The listing gives a length of 6.75 inches and does not call it a palm tool, and the 0.353 ounce weight looks low for that size, so check the page for detail.
Suits: a wide, shallow cut. Strengths: a known width and sweep. Weaknesses: a longer handle than the palm sets. Skip it if you want a true palm handle.
View “Swiss Made” 14Mm, Gouge, No. 7 on Amazon
Care and Setup
- Clamp the work so both hands stay behind the blade.
- Keep the edge sharp with a strop, as the makers suggest.
- Wipe the blade clean after use.
- Store the tools in a box or roll so the edges stay apart.
Mistakes to Avoid
- Buying a single tool when a set covers more sweeps.
- Assuming every set lists its blade shapes.
- Pushing a tool that is made for hand pressure with a mallet.
- Cutting toward the hand that holds the work.
Sweep, Width and Profile Explained
Every gouge is described by a few numbers, and learning to read them makes set listings much clearer. The width is the distance across the cutting edge, shown in millimeters or fractions of an inch. The sweep describes how curved the blade is, from a flat edge to a deep U or a very tight curve. In most numbering systems a low sweep number is a shallow, nearly flat curve and a high number is a deep curve, but the exact scale varies by maker, so check the listing or the maker’s chart.
These two measures determine what the tool does. A wide, shallow gouge removes a broad, smooth scoop of wood and leaves a flowing surface, which suits shaping the faces of a bowl, spoon or relief. A narrow, deep gouge cuts a deep channel in one pass and is used for grooves, hollows and details. The tightest profiles, often called veiners, cut a narrow line with a rounded bottom.
V-tools, also called parting tools, have two flat faces that meet at an angle. They cut crisp grooves, outlines and lettering, and they define the edges of a design. A narrow angle makes a deeper, narrower line, while a wider angle makes a shallower, wider one. A V-tool and a few gouges of different sweeps can already carry out a surprising range of work.
When you compare sets, check whether the maker lists each tool by sweep and width. Sets that do are easier to judge, because you can see whether they give a mix of shallow, medium and deep curves or several near-duplicates. If a listing does not say, check the product page or ask the seller before buying.
Choosing a First Set and What to Add Later
For a beginner, the number of tools matters less than the spread of shapes. A small set with a shallow gouge, a medium gouge, a deep gouge and a V-tool covers most of what simple carving asks for: roughing out shapes, smoothing, cutting lines and cleaning up details. Larger sets add more sweeps and widths, which helps if you carve varied subjects, but can include tools you will rarely use.
Think about what you plan to carve. For small figures, spoons and fine relief, narrow tools in the small-width range give the most control. For larger relief panels and lettering you will want a wider range. For detail and engraving work on small pieces, a few very small tools may matter more than a big case.
A boxed set has practical advantages: the edges are protected and each tool has a place. Consider whether the set comes with a case, roll or box, and whether it has enough room if you add tools later. A single tool sold separately is a good way to fill a gap, for example a wide gouge for removing waste or a very narrow V-tool for lettering.
Budget tiers are mostly about steel, edge finish, handle shape and how many tools are included. Entry sets can be fine for learning but may need more sharpening to perform well. Higher-priced tools tend to emphasize steel quality and a ready edge, though you should rely on the details in the listing rather than the price alone. Match the set to how often you will carve, and add or upgrade one tool at a time.
Handle Shape and Comfort
A palm tool is held in the hand rather than driven by a mallet, so the handle shapes how it feels and how well you can control the cut. The handle is usually short and rounded, and it sits in the palm with the blade extending past the fingers. Your thumb or other hand often guides the blade near the tip.
Look at the handle shape. A flat or faceted back stops the tool from rolling off the bench, which saves you from reaching for dropped blades. A fully round handle rolls but can feel smooth in the hand. A longer handle gives more leverage and can suit larger hands, while a short one gives a more delicate touch. Check the dimensions in the listing if you have large or small hands, since a handle that is too small can cramp.
Handle material affects feel too. Hardwoods such as ash or beech are common and are comfortable for long sessions. Plastic or rubberized grips can be easier to clean, though they may not suit everyone. A finish that is too smooth can get slippery when your hands are sweaty, so consider a handle with light texture if that is a concern.
Also check how the blade is attached. A fixed blade is secured in the handle by the maker. If you plan to use palm tools for long stretches, try gripping different handle shapes in a shop if you can. Comfort matters because a tool that tires your hand tends to lead to slips, and slips are how carving injuries happen.
Sharpening, Stropping and Edge Care
Sharpness is the most important condition for carving. A sharp tool cuts cleanly with light pressure, while a dull one needs force and is more likely to slip, tear the grain and cut you. Many new tools come with a ready edge, but all of them need regular maintenance.
The simplest habit is stropping. A strop is a piece of leather, often charged with a polishing compound, and drawing the bevel of the blade across it removes the fine burr and keeps the edge keen. Strop frequently, often every few minutes of carving, and only occasionally go to a stone. Many makers suggest this routine for their tools, so follow the maker’s advice on the listing or in the box.
Gouges need shaped honing tools, because the edge is curved. Slipstones and profiled strops fit the inside and outside of the curve. Follow the original bevel angle and do not round it over. Keep the inside flat face clean and flat, and hone the outside bevel gently. V-tools need extra care at the point where the two faces meet, where overgrinding can ruin the shape.
Protect the edge between sessions. Wipe the blade clean of sap and moisture, store the tools so the edges do not touch each other, and use a box, roll or edge guards. A light film of oil can help in damp places, but keep oil away from the handle where you grip.
Signs that a tool needs attention include chipped edges, tearing instead of cutting and the need to push harder to make a cut. Small chips may need a coarse stone, while light dulling usually responds to the strop.
Wood, Grain and Safe Carving Habits
The material you carve changes the choice of tool and the way you cut. Softer woods such as basswood are easy to carve and forgiving for beginners. Harder woods hold detail well but need sharper tools and more care. Whatever you choose, look at the grain direction. Cutting with the grain gives a smooth surface, while cutting against it tends to tear. If the surface starts to lift or split, turn the piece and cut from the other direction.
Palm tools are designed for hand pressure, so do not hit them with a mallet unless the maker says they are meant for it. Handles and tangs are not intended for impact, and forcing a cut can damage the tool or chip the edge. For bigger removal jobs, use larger tools designed for a mallet.
Safety comes from where your hands are. Hold the workpiece securely, using a clamp, a bench hook or a carving vise, so that both hands stay behind the cutting edge. Never cut toward the hand that holds the work. Take shorter, shallower cuts rather than trying to remove a lot at once, and keep your thumb as a brace behind the blade rather than in front of it.
Many carvers wear a cut-resistant glove on the hand that holds the work, which can reduce the chance of an injury, though it is no substitute for good habits. Work in good light, take breaks when your hands tire and keep a first aid kit within reach.
Which palm gouge set should you buy?
The best palm gouge set gives you the shapes you will actually cut, in a handle that suits your hand. Map your carving to the picks above.
- A wide range of sweeps in one box: the Flexcut Deluxe Palm Gouge Set FR405, which lists seven gouges and two V-tools.
- A smaller boxed set: the Flexcut Beginners Palm Set of 5, FR310. Check the product page for the blade shapes, since the bullets do not name them.
- Small, detailed cuts with every tool named: the PFEIL Palm Set C, 6 Pieces.
- Fine engraving and detail with a flat-backed handle: the Narex 5 Piece Palm Carving Chisel Set 868300. It is for hand pressure only.
- Narrow lines and lettering: the Flexcut Palm V-Tool FR803.
- A single wide, shallow gouge to remove waste: the Pfeil Swiss Made 14 mm Gouge No. 7, though its handle is longer than the palm sets.
A sensible path for most beginners is a small set first, then one single tool at a time to fill a gap. If you carve spoons or small figures, narrow tools give control. If you carve larger relief, add a wider gouge later.
Do not buy the biggest set just for the count. A tool you never use is cost without benefit.
What to check before you buy palm gouges, and who should skip them
Check these points on the listing before you order.
- Blade list: whether each tool is named by sweep and width, or only counted.
- Handle: shape, length and whether it suits your hand size.
- Intended use: hand pressure only, or mallet allowed.
- Steel: the stated type, and note any conflicts in the details.
- Storage: a box, roll or guard that keeps edges apart.
- Warranty and returns: some listings in this guide show mixed warranty details, so read them closely.
Be honest about the limits. Palm tools remove wood slowly, so they are not the fastest way to rough out a large piece. They need regular stropping, and a gouge that is not kept sharp becomes unsafe. A few listings here leave out blade shapes or contain odd data fields, which means you may need to confirm details with the seller.
You might skip palm gouges if you mainly rough out big shapes, where mallet-driven tools are a better fit. You might also skip them if you will not learn to strop, because dull blades slip.
Compare the picks above, check the current listing for blade shapes and what is included, then choose the set or single tool that fits what you plan to carve.
Putting the Picks to Work: Carving Scenarios by Project
Palm gouges are control tools. The short handle sits in the palm so the hand pushes the edge in short, deliberate strokes, which suits detail work, relief carving and small sculpture far better than long mallet tools. The six picks here range from broad sets to single specialist profiles, and the right choice depends on the shapes your projects actually contain.
First carvings: spoons, simple figures and practice pieces
A beginner’s first projects need a small set of forgiving profiles rather than a wall of options. The Flexcut Beginners Palm Set (FR310) and the Narex 5 Piece Palm Carving Set (868300) both answer that need with a curated handful of sweeps that cover hollowing, rounding and basic detail. Work in a soft, even-grained wood while learning, clamp or hold the workpiece so both hands stay behind the cutting edge, and cut with the grain wherever the design allows. Short pushing strokes, repositioning the work rather than reaching across it, build the muscle memory that keeps carving safe and the cuts clean.
Relief carving and lettering backgrounds
Relief work lives on shallow sweeps and a good V-tool. Grounds are lowered with wide, flat-ish gouges, edges of the design are outlined with the V-tool, and details are cleaned with small profiles. A broad set such as the Flexcut Deluxe Palm Gouge Set (FR405) or the PFEIL Palm Set C earns its keep here because relief punishes a missing profile: substituting a too-curved gouge for a shallow one leaves scallops that telegraph through the finished surface. The single Flexcut Palm V-Tool (FR803) exists precisely because the V profile is the one relief carvers wear out and reach for most; owning a dedicated, quality V-tool alongside a set is a common and sensible pattern.
Detail, texture and finishing cuts
Texture work, fur, foliage, drapery, is done with small, deep profiles used in repeated short strokes. This is where a single-profile purchase such as the Pfeil Swiss Made 14 mm Gouge No. 7 makes sense: one exact sweep, bought to fill a known gap in a working set, in a steel and finish quality aimed at carvers who strop constantly and notice small differences in edge behaviour. Buying singles is the second phase of a carver’s kit, after a set has taught you which profiles your hand keeps wishing for.
Head-to-Head: Set Philosophies Compared
Flexcut sets versus PFEIL set versus Narex set
The two Flexcut sets split by ambition: the Beginners set trims the profile list to the essentials so a new carver learns technique instead of tool-hunting, while the Deluxe set widens coverage for relief and varied work. The PFEIL Palm Set C represents the Swiss tradition, with profiles shaped for carvers who expect to maintain edges to a high standard and keep tools for many years. The Narex set brings the Czech workshop approach, typically appealing to carvers who want sound profiles and handles at an accessible point in the range and are happy to hone edges to their own preference on arrival. None of these philosophies is wrong; they prioritise breadth, refinement and value in different orders. Choose by which quality you will still care about after a year of carving.
Sets versus single tools
A set buys coverage and a shared handle feel at a lower cost per tool. Singles buy exactness: the precise sweep and width a project demands, in the best execution you can justify. The practical path most carvers follow is set first, singles later, guided by a simple rule: when you catch yourself modifying a cut to suit a profile you own, instead of choosing the profile the cut wants, that missing profile is your next single purchase.
Handle comfort over a long session
All palm tools ask the palm to supply force, so handle shape decides how a long session ends. A fuller handle spreads pressure and suits sustained pushing; a slimmer one gives finer directional control for detail. If your palm aches, the causes are usually a handle too small for your hand, strokes that are too long, or an edge dull enough that you are pushing with force instead of sharpness. Fix sharpness first; it is the cheapest comfort upgrade in carving.
First Session: Setup and Safety Checks in Order
Start by inspecting every edge out of the box; a new tool may carry a protective coating and an edge that benefits from stropping before its first cut. Set up a strop and learn it before you need it, because palm gouges are maintained by stropping far more than by grinding. Secure the workpiece: a clamp, a bench hook or a non-slip mat, so the holding hand never sits in the path of a slip. Plan each cut’s direction so the edge always moves away from your body and away from the holding hand, and keep both hands behind the edge at all times. Make practice cuts on scrap of the same wood: a with-grain push, a cross-grain cut, and a stop cut, and notice how differently the same tool behaves in each. That ten minutes teaches more about sweep choice than any chart.
Troubleshooting in Diagnostic Order
The gouge tears the wood instead of slicing
Tearing means the edge is crushing fibres. First, strop the edge and retest; most tearing is simple dullness. Second, check direction: cutting against rising grain tears even with a sharp edge, so reverse the work or approach from the other side. Third, reduce depth per stroke; a deep bite in end grain or reversing grain will tear regardless of sharpness.
Cuts keep running deeper than intended
Runaway depth comes from too steep an entry angle and too long a stroke. Lower the handle so the bevel rides the wood and governs depth, shorten the stroke, and use a stop cut at the boundary of the area so the chip has somewhere to end. The bevel is the depth control; the palm only supplies travel.
The edge chips or folds
Chipping suggests the edge met something harder than expected, a knot, grit in bark, or a drop onto a hard surface, or that the bevel is too acute for the wood. Hone out the damage rather than stropping over it, and consider a slightly sturdier edge for hard, dry timber. Folding or rolling suggests excessive force on a fine edge, which returns to the same fix: sharper, shallower, shorter strokes.
Hands tire or the palm bruises
Shorten strokes, sharpen the tool, and check the workpiece height so your arm pushes in line rather than downward at an angle. Rotate tasks within a session, roughing with one profile and detailing with another, so the same grip is not loaded continuously. Persistent bruising is information: the handle shape does not suit your hand, and a different set philosophy will serve you better than endurance.
Sharpening Routine, Storage and Who Should Buy What
Strop little and often, a few passes per profile during a session, rather than letting edges degrade until they need stones. Store palm gouges in a roll, rack or case where edges cannot knock together; edge-to-edge contact in a loose drawer is how sharp tools become dull ones overnight. Keep tools dry, wipe them after use, and inspect edges under good light before a project rather than discovering damage mid-cut.
Decide by stage and project. The new carver should buy the beginners’ set and a strop, and spend the first months on technique. The relief carver should buy the broad set whose profile list matches the work, and expect to add a dedicated V-tool. The experienced carver should buy singles to fill proven gaps. The carver on a careful budget should buy the value set and invest remaining funds in sharpening supplies, because a sharp modest tool outperforms a dull premium one on every cut. In palm carving, the edge is the tool; everything else is how comfortably you deliver it.
Reading Grain and Choosing Cuts: A Working Method
Test the grain before the design
Every piece of carving wood has a direction it wants to be cut, and it can reverse inside a single blank. Before committing to the design, take shallow test cuts with a mid-sweep gouge on an offcut or a hidden face, in both directions. The direction that leaves a smooth, shiny surface is with the grain; the direction that leaves a rough, fibrous surface is against it. Mark the blank with a pencil arrow so the information survives handling. Ten seconds of testing prevents the torn patches that beginners blame on their tools.
Sequence a carving from large to small
Work profiles in descending order of size: establish forms with the widest, shallowest gouges, model with mid sweeps, and finish with small profiles and the V-tool. Jumping to detail early wastes it, because later roughing cuts will erase fine work and because small tools remove wood too slowly to correct a form that is wrong at the large scale. The sets in this roundup are organised around exactly this sequence; a set whose wide profiles suit your project’s scale matters more than one extra tiny profile you may never use.
Stop cuts and clean boundaries
Where a carved area must end crisply, outline it first with a stop cut: a vertical incision made with the V-tool or a knife, into which the gouge’s chip can break cleanly. Without a stop cut, chips run past the boundary and tear the surface you meant to keep. Relief carvers live by this rule, and it is the single technique that most separates tidy relief work from fuzzy relief work.
More Questions Buyers Ask After the First Month
Why do my cuts look fine in soft wood and ragged in hardwood?
Hardwood exposes edge quality and stroke length. Shorten your strokes, strop more often, and take shallower bites; the same tool and hand that cruise through soft, even timber must work in smaller increments through dense, dry wood. If raggedness concentrates where grain reverses, approach those zones from the opposite direction rather than forcing the original line.
How do I stop a small workpiece moving without endangering my hand?
Never let the holding hand be the clamp in the line of fire. Use a bench hook, a clamp, a carving screw from below, or a non-slip mat for light work, and position the piece so every cut travels away from the hand that steadies it. If a cut cannot be made without your hand entering the path, reposition the work or your body, not your standards.
When does a tool need a stone instead of a strop?
Stropping maintains an edge that is fundamentally sound. When stropping no longer restores clean cutting, when the edge shows a visible nick, or when the bevel has rounded from months of stropping alone, the tool needs a stone to re-establish its geometry. Return to the strop afterwards; stones set the shape, strops keep it keen.
Should I buy the biggest set I can afford?
Buy the set whose profiles match the scale of your projects, not the largest count. Oversized sets include profiles a small-scale carver never touches, while undersized sets force substitutions that mark the work. A mid-size set plus one or two singles chosen after real carving experience covers more ground, for most carvers, than the largest box bought on day one.
Decision Scenarios: Building a Kit Over Time
Picture the kit at three moments. In the first month, the beginner with the Flexcut Beginners set or the Narex set owns enough profiles to learn grain, stropping and stroke control, and the most valuable accessory is not another tool but a strop and a supply of practice wood. By the end of the first year, the same carver knows which two or three profiles do most of their work and which missing shape keeps forcing compromises; that is the moment for a broad set such as the Flexcut Deluxe or the PFEIL Palm Set C if projects have widened, or for a first single such as the dedicated Flexcut V-tool if relief work has taken over. In the third year, purchases become surgical: a single Pfeil gouge in an exact sweep, bought because a specific carving on the bench demands it and justified within one project. This staged approach spends money in step with knowledge, which is why experienced carvers’ kits look eclectic and beginners’ kits look uniform. The mistake to avoid is buying the third year’s kit in the first month: profiles chosen without experience are guesses, and guesses in hardened steel are expensive. Equally, avoid starving the first month: a set too small to cover basic hollowing, rounding and detailing teaches frustration instead of carving. The sets gathered here exist at each of those stages, and matching the purchase to the stage, honestly assessed, matters more than any single profile inside the box.
Building a Sharpening Corner That Gets Used
Sharpening systems fail socially before they fail technically: if the strop lives in a cupboard, edges will not get stropped. Keep the strop on the bench, in reach of the carving seat, with its compound applied and a cloth beside it for wiping edges. Add one fine stone for the occasional repair and a magnifier for inspecting edges you cannot judge by feel. That is the entire corner. During a session, strop each tool briefly whenever you set it down to pick up another; maintenance folded into the rhythm of work never becomes a separate chore, and edges stay in the narrow band where carving feels like guiding rather than pushing. At the end of a session, wipe every edge before it goes into the roll, because moisture and sap left overnight are how keen tools quietly become tomorrow’s sharpening project. The carvers whose tools always seem sharp are not more virtuous; their strop is simply closer than their excuses.
Choosing Wood That Teaches Instead of Punishing
Tool choice gets the attention, but wood choice decides whether a session feels like progress. Even, straight-grained, moderately soft timber rewards correct technique immediately: cuts read clearly, grain direction is easy to learn, and edges hold detail without crumbling. Wild grain, knots and very dry hardwood punish the same technique and teach the wrong lesson, that carving is a struggle. Keep a stock of forgiving practice wood for learning new profiles and testing edges, and reserve characterful timber for projects where its difficulty is the point. When a cut goes wrong, ask first whether the wood changed, a grain reversal, a hidden knot, a dry patch, before blaming the tool or the hand. Experienced carvers read wood the way drivers read weather: constantly, and mostly without noticing they are doing it. Your palm gouges will feel dramatically better the day your wood selection catches up with them.
Session Planning for Carvers With Limited Time
Short, frequent sessions beat rare marathons for both skill and safety. Plan each sitting around one stage: roughing, modelling or detailing, and set up only the profiles that stage needs, stropped and ready. Stop while cuts are still clean and attention is still sharp; the last tired half hour produces most injuries and most ruined work. Leave the bench with the next step written on a scrap beside the piece, so the next session starts in seconds rather than in recollection. Palm carving rewards this rhythm particularly well, because the tools ask for fresh hands and the work visibly improves when every session begins with sharp edges and a clear intention.
The Edge Is the Tool
Everything in this guide eventually returns to one sentence: a palm gouge is its edge, delivered by a handle. Keep the edge keen, keep the handle comfortable, keep your hands behind both, and the profiles in any of these sets will carve far beyond what their price or piece count suggests. Let the edge dull, and no set, however distinguished its maker, can save the session. Strop first, carve second, and let that order become the signature of your bench.
Recording What Each Profile Does for You
Keep a small notebook or a note on the tool roll itself recording which profile handled which job well: the sweep that cleaned a relief ground, the V-tool angle that suited your lettering, the small gouge that textured convincingly. Memory blurs across months between projects, and these notes convert scattered sessions into a personal reference that no general guide can match. When a future purchase decision arrives, the notebook, not the catalogue, will tell you which profile your carving actually misses.
Palm Gouge FAQ
What is the difference between a gouge and a V-tool?
A gouge has a curved cutting edge that scoops wood. A V-tool has two angled faces that meet to cut a groove.
Which pick lists the most tools?
The Flexcut FR405 lists nine, seven gouges and two V-tools. The Pfeil Set C lists six pieces.
What do the numbers on a gouge mean?
They usually describe the sweep, which is how curved the blade is, and the width of the cutting edge. Low sweep numbers are generally flatter and high numbers more deeply curved, but scales differ by maker, so check the listing.
Can I use a mallet with palm gouges?
Palm tools are made for hand pressure. Use a mallet only with tools that the maker designs for it, since impact can damage the handle, tang or edge.
How often should I strop my gouges?
Many carvers strop often during a session, since light, frequent stropping keeps the edge keen. Follow the maker's advice and move to a stone only when stropping no longer restores the edge.
What wood is best for a beginner?
A soft, even-grained wood is easier to cut and more forgiving of mistakes. Harder woods hold more detail but need sharper tools and more care.
What is the difference between a V-tool and a gouge?
A gouge has a curved edge that scoops out wood, while a V-tool has two faces that meet at an angle to cut a groove. Many carvers use both together.
Do I need a set or can I buy single tools?
A set gives a range of sweeps in one purchase, while single tools let you fill specific gaps. A small set plus a few single tools is a common way to build up.
How should I store palm gouges?
Keep them in a box, roll or sheath so the edges do not touch. Wipe off sap and moisture first and keep them in a dry place.
Are palm gouges good for beginners?
Yes, they are a common starting point because they are used by hand pressure and are small. Pair them with soft, even-grained wood and a clamp. Learn to strop early, since a sharp tool is safer than a dull one.
How many palm gouges do I really need?
A few well-chosen shapes cover most simple carving. A shallow gouge, a medium gouge, a deep gouge and a V-tool is a common starting mix. Add more only when a project shows a gap.
Can I carve hardwood with palm gouges?
You can, but harder wood needs very sharp tools and lighter cuts. Take shallow passes and watch the grain direction. Softer woods are more forgiving while you learn.
What is a veiner?
A veiner is a gouge with a tight, deep curve that cuts a narrow, rounded groove. It is useful for fine lines such as hair, veins and texture. The PFEIL Set C lists one among its tools.
What is a strop and how do I use one?
A strop is a piece of leather, often charged with polishing compound, used to keep an edge keen. Draw the bevel across it with the angle the maker intends, and strop often. Follow the instructions that came with your tools.
Should I wear a glove when using palm gouges?
Many carvers wear a cut-resistant glove on the hand that holds the work. It helps, but it does not replace good habits such as clamping the piece and keeping both hands behind the blade.
The Short Version
For the widest range, the Flexcut FR405. For a small boxed set, the Flexcut FR310. For tiny named profiles, the Pfeil Set C. For fine engraving, the Narex. For narrow lines, the Flexcut V-tool. For a wide single gouge, the Pfeil No. 7.


