Disclosure: As an Amazon Associate, umtsmarttool.com earns from qualifying purchases. Links to Amazon on this page are affiliate links; they cost you nothing extra. Prices and availability change often, so check the current Amazon listing before you buy.
Where to buy
Start with the best rock tumbler polish kits shortlist: these kits all address the final shine — some as complete systems ending in polish, some as polish-stage specialists; confirm what your earlier stages need, then Start with the top pick: Check on Amazon.
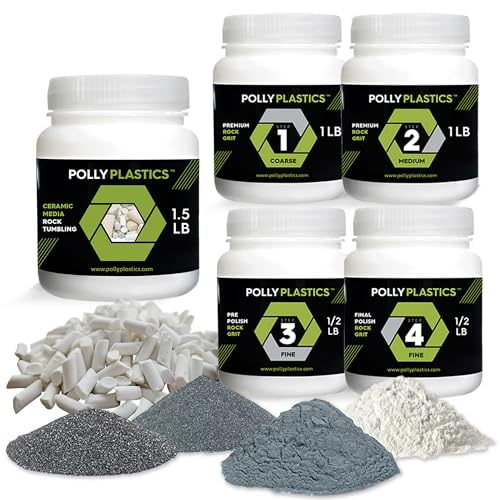
- Polly Plastics Rock Tumbler Grit and Polish Refill with Ceramic Media — Check on Amazon
- National Geographic Rock Tumbler Grit and Media Refill Kit with GemFoam — Check on Amazon
- National Geographic Mega Gemstone Refill Kit with Grit Packets — Check on Amazon
- Polly Plastics Final Polish Refill 1200 Aluminum Oxide — Check on Amazon
- National Geographic Rock Tumbler Grit and Polish Refill Pack — Check on Amazon
- National Geographic Refill Kit with 1 lb Rough Agate — Check on Amazon
Read the full guide ↓
The polish stage is where a month of patience either pays out in glass or collapses into matte grey, and the best rock tumbler polish kits are built to protect that moment: fine aluminum oxide polish, the right finishing media, and — in the complete systems — the full stage sequence that prepares a surface polish can actually shine. This guide compares six kits through the final-stage lens: complete grit-and-polish systems from Polly Plastics and National Geographic, a media-rich National Geographic system with GemFoam finishing pads, a stones-included mega refill, a dedicated final-polish refill, and a small-batch agate refill.
A necessary honesty up front: no polish fixes an unprepared stone. Polish burnishes; it does not cut. If your batches come out dull, the fault is almost always a rushed pre-polish or contamination, which is why several picks here are full systems rather than polish alone, and why the grit-side companion guide best rock tumbler grits matters as much as this one. New setups should start from best rock tumblers and a matched kit; this guide is for the last mile.
Specs are taken from listings and brand materials opened during research — polish grades where the maker publishes them, media contents, and kit composition. No prices are printed; check price on Amazon on each linked pick. Where a kit’s polish is the final stage of a four-stage system (the common 1200 aluminum oxide pattern), the review says so plainly rather than dressing it in mystery.
In this guide
Quick Picks
| Pick | Badge | Key spec |
|---|---|---|
| Polly Plastics Rock Tumbler Grit and Polish Refill with Ceramic Media | Best Overall Polish System | 4-stage system ending in final polish, ceramic media included |
| National Geographic Rock Tumbler Grit and Media Refill Kit with GemFoam | Best Media-Rich Polish System | 4-stage silicon carbide bulk grit, 1.5 lb ceramic pellets, GemFoam polishing media |
| National Geographic Mega Gemstone Refill Kit with Grit Packets | Best Kit with Rough Stones | 3 lb rough gemstones, 12 polishing grit packets, jewelry settings |
| Polly Plastics Final Polish Refill 1200 Aluminum Oxide | Best Dedicated Final Polish | 1200 fine aluminum oxide, Stage 4 final polish refill |
| National Geographic Rock Tumbler Grit and Polish Refill Pack | Best Brand-Matched Refill | Grit and polish refill matched to National Geographic tumblers |
| National Geographic Refill Kit with 1 lb Rough Agate | Best Small-Batch Kit | 1 lb rough agate plus grit and jewelry accessories |
How These Picks Were Chosen
Polish kits were judged on their final stage first: the polish abrasive should be a fine aluminum oxide (the 1200 grade is the mainstream standard) or a clearly described equivalent, in a quantity that can actually finish loads rather than a token sachet. Second came finishing media: ceramic media, plastic pellets, or foam polishing pads such as National Geographic’s GemFoam, because the polish stage is where cushioning most protects edges. Third came system honesty — whether the kit’s earlier stages are properly graded silicon carbide, since a polish kit standing on weak stages is a promise nobody can keep.
Brand-matched systems (National Geographic for its tumblers) and specialist consumable makers (Polly Plastics) anchor the list, and every ASIN was tied to its product by a source opened in research, recorded in the _SOURCES file for the central API pass. Shine claims in this guide are deliberately conditional: these kits provide the correct final abrasives and media, and the guide’s how-to sections cover the preparation and cleaning that let them work — the same process-first stance taken in best gem tumblers.
The 6 Best Rock Tumbler Polish Kits

Polly Plastics Rock Tumbler Grit and Polish Refill with Ceramic Media — Best Overall Polish System
Judged as a polish kit, Polly’s refill wins on completeness: properly graded stages feeding a real final polish, plus the ceramic media the polish stage needs to protect edges while the shine develops.
- System: 4 stages — coarse, medium, pre-polish, final polish
- Polish stage: final polish (aluminum oxide class system)
- Media: ceramic tumbling filler included
- Brand: Polly Plastics
Strengths
- The polish stage arrives with its preparation done by matched stages
- Ceramic media included for a cushioned polish run
- One system to learn, troubleshoot, and reorder
Trade-offs
- Polish quantity is kit-sized, not bulk
- Dedicated polish-only buyers pay for stages they may already own
- Rotary-focused; vibratory users need adjusted timing
Most “polish problems” are system problems, and a matched system is the surest fix. Polly’s stages are graded to hand off cleanly — each erasing the last stage’s scratches — so by the time stones meet the final polish, the surface is genuinely ready, and the included ceramic media keeps the load rolling as one cushioned mass through the long final week.
That is why this kit leads a polish guide despite also leading the grit guide: it is the same product viewed from the stage that matters here, and it remains the recommendation for any tumbler whose results have plateaued at “ smooth but dull.” Run it exactly as directed once before experimenting; a known-good baseline is the most valuable thing in this hobby.
One honest limitation: owners who only need final polish will find a dedicated polish refill (below) the leaner purchase.
Best for: tumblers wanting one matched system through the polish stage / Not suited for: polish-only restocking

National Geographic Rock Tumbler Grit and Media Refill Kit with GemFoam — Best Media-Rich Polish System
The most complete finishing system in the National Geographic line: bulk four-stage grit, a serious quantity of ceramic pellets, and GemFoam polishing media — foam pads used in the final stage to cushion stones and carry polish into a high shine.
- Grit: 4-stage silicon carbide bulk grit (per listings)
- Media: 1.5 lb ceramic pellets plus GemFoam polishing media
- Brand: National Geographic / Blue Marble
- Use: rotary tumblers, matched to National Geographic machines
Strengths
- Foam finishing media is a genuine polish-stage upgrade
- Ceramic quantity supports many loads, not one
- Bulk grit ends the sample-packet cycle for NatGeo owners
Trade-offs
- Largest commitment in this guide; suits committed households
- GemFoam is a brand-system extra other kits do not use
- Still bound by preparation: foam cannot fix rushed pre-polish
GemFoam is the interesting idea here: soft foam cubes join the final stage, cushioning stone-on-stone contact and holding polish against surfaces in a way hard media cannot. For stones with delicate edges or mixed shapes that bruise in a standard polish run, that cushioning is the difference between shiny and shiny-but-chipped. Combined with bulk grit and a real stock of ceramic pellets for the middle stages, this is the National Geographic ecosystem at its most complete.
Choose it if your household runs a National Geographic tumbler regularly and wants the brand’s full finishing method in one purchase. The process discipline still applies — clean between stages, sort by hardness — but within that discipline, this kit gives the polish stage the most mechanical help of any pick here.
One honest limitation: the foam media is an extra consumable to stock and keep stage-dedicated, adding a small ongoing bookkeeping task.
Best for: committed National Geographic households chasing top shine / Not suited for: occasional tumblers

National Geographic Mega Gemstone Refill Kit with Grit Packets — Best Kit with Rough Stones
The refill that restocks everything at once: three pounds of rough gemstones (the listing names amethyst, quartz, tiger’s eye, jasper varieties, agate, sodalite and more), twelve grit packets across the stages, and jewelry settings for finished stones.
- Rough stones: 3 lb assorted gemstones (per listing)
- Grit: 12 polishing grit packets across stages
- Extras: 5 jewelry settings/accessories (per listing)
- Model: NGGEMREFILLMEGA
Strengths
- Solves the “polished everything, nothing left” problem
- Stones are tumbling-appropriate varieties, pre-sorted for the hobby
- Jewelry settings give finished stones a destination
Trade-offs
- Packet grit is portioned convenience, not bulk value
- Stone assortment is the maker’s mix, not your selection
- Mixed varieties still need hardness sorting before loading
A polish is only as good as what enters the barrel, and this refill’s real product is its stones: three pounds of rough in the quartz-family varieties that tumble reliably, which removes the beginner’s hardest sourcing problem. The twelve grit packets then carry those stones through the full sequence ending in polish, and the jewelry settings close the loop from rough rock to wearable result — a complete project in a box.
It is the ideal restock for a family tumbler that has polished its starter stones and stalled, and a strong gift pairing with any machine in best rock tumbler kits for kids. Sort the assortment by hardness before loading (the guide below explains why), and the kit delivers exactly the arc it promises.
One honest limitation: per-load grit value trails the bulk systems; you are paying for stones, portioning, and completeness, fairly — but knowingly.
Best for: restocking stones and grit together, family projects / Not suited for: bulk grit value seekers

Polly Plastics Final Polish Refill 1200 Aluminum Oxide — Best Dedicated Final Polish
The polish-stage specialist: a refill of 1200 fine aluminum oxide, the mainstream final-polish grade, for tumblers whose earlier stages are stocked and dialed and who simply consume polish steadily.
- Stage: Stage 4 final polish
- Abrasive: 1200 fine aluminum oxide
- Format: refill pack (1 lb class per listings)
- Brand: Polly Plastics
Strengths
- The exact standard grade for the final stage, bought on its own
- Economical way to keep the polish shelf stocked
- Consistent with Polly’s full-system grading
Trade-offs
- Polish only — assumes your stages 1–3 are solved
- Cannot rescue under-prepared stones
- Fine powder needs careful, dust-aware handling
There is a stage in every tumbler’s development where the shelf stops needing kits and starts needing ingredients, and this is the polish ingredient: 1200 aluminum oxide, bought by itself, in step with how it is actually consumed. If your pre-polish is honest and your cleaning is scrupulous, this refill is all that stands between a satin batch and a glossy one.
Use it at the standard final-stage measure for your barrel, run the full polish cycle with media cushioning the load, and judge results in daylight after drying — wet stones always look shinier than they are. If the batch disappoints, resist buying a finer polish; the diagnosis section below explains why the answer almost always lives one stage earlier, in the pre-polish covered by best rock tumbler grits.
One honest limitation: as a single-stage product it is useless to beginners without the preceding stages, and it will not forgive skipping them.
Best for: experienced tumblers restocking stage 4 only / Not suited for: beginners or dull-batch rescue on its own

National Geographic Rock Tumbler Grit and Polish Refill Pack — Best Brand-Matched Refill
The straightforward brand refill: National Geographic’s grit-and-polish sequence in refill form, for owners who want to reorder exactly what their machine’s manual describes and get back to tumbling.
- System: grit and polish refill sequence
- Brand: National Geographic / Blue Marble
- Compatibility: National Geographic rotary tumblers and standard barrels
- Format: refill pack
Strengths
- Zero translation between manual and materials
- Balanced quantities for the family-machine workflow
- Easy reordering for households in the brand ecosystem
Trade-offs
- Less bulk value than the media-rich system above
- Brand stage labels differ from generic numbering
- No rough stones included
Not every purchase should be an optimization project. For the many households running a National Geographic tumbler as a family appliance, the correct refill is the one the manual names, in quantities matched to the machine’s barrel, and that is precisely this pack. The polish stage is the standard final step of the brand’s four-stage sequence, and results with clean stage changes are entirely respectable.
Upgrade paths remain open — the GemFoam system above adds finishing media, and Polly’s system offers a different house standard — but as the no-thinking-required restock for a working family tumbler, this refill earns its place in a polish guide honestly.
One honest limitation: households tumbling weekly will find its quantities modest next to the bulk and media-rich options.
Best for: National Geographic owners wanting the manual-matched refill / Not suited for: high-volume tumblers

National Geographic Refill Kit with 1 lb Rough Agate — Best Small-Batch Kit
A smaller complete project: one pound of rough agate — among the most reliable tumbling stones — with the grit sequence to polish it and accessories to finish pieces, sized for a single satisfying batch.
- Rough stones: 1 lb rough agate (per listings)
- Grit: tumbling grit sequence included
- Extras: jewelry accessories (per listing family)
- Brand: National Geographic / Blue Marble
Strengths
- Agate is a forgiving, high-success tumbling stone
- Single-batch sizing suits trying the hobby’s full arc
- Complete project without bulk commitment
Trade-offs
- Small quantity; keen tumblers will reorder soon
- Single stone type limits variety
- Packet grit economics as with other portioned kits
Agate is the stone experienced tumblers hand to beginners: hard, consistent, and capable of a genuinely glassy polish that hooks people on the hobby. This kit builds one clean batch around it — rough, grit through polish, and findings to finish with — making it an ideal first full cycle for a new machine or a manageable project for a young tumbler with adult help.
Because the load is a single stone type of even hardness, it sidesteps the mixed-hardness problem entirely, which quietly makes it one of the highest-success-rate ways to learn the polish stage. Graduate afterward to the mega refill’s variety or the bulk systems, with one good batch’s confidence in hand.
One honest limitation: one pound is one batch; it is a beginning or a gift, not a supply strategy.
Best for: a first complete batch or a gift project / Not suited for: ongoing supply
Comparison Table
| Pick | Polish stage | System type | Media included | Best for |
|---|---|---|---|---|
| Polly Plastics Rock Tumbler Grit and Polish Refill with Ceramic Media | Final polish stage | Complete 4-stage system | Ceramic media | All rotary owners |
| National Geographic Rock Tumbler Grit and Media Refill Kit with GemFoam | Polish with GemFoam finish | Complete system + media | Ceramic + foam | NatGeo owners |
| National Geographic Mega Gemstone Refill Kit with Grit Packets | Full sequence to polish | Kit + rough stones | Packets (media separate) | Family restock |
| Polly Plastics Final Polish Refill 1200 Aluminum Oxide | 1200 aluminum oxide | Polish only | Media separate | Experienced users |
| National Geographic Rock Tumbler Grit and Polish Refill Pack | Brand final polish | Refill sequence | Media separate | NatGeo households |
| National Geographic Refill Kit with 1 lb Rough Agate | Full sequence to polish | Kit + agate rough | Packets | First batch / gift |
How to Choose a Rock Tumbler Polish Kit
What a polish actually does (and cannot do)
Polish is a burnishing stage. A fine abrasive such as 1200 aluminum oxide does not meaningfully cut the stone; it refines a surface that pre-polish has already made uniformly fine, closing the last microscopic texture until the stone reflects light cleanly — the wet look, except dry. This is why polish grade numbers sound extreme: the polish is not a stronger grit, it is a finer, gentler one, and its entire effect depends on the surface it is handed.
The practical consequence governs this whole guide: money spent on polish only pays when stages 1–3 were run fully and cleanly. A kit that includes honest earlier stages (the systems here) is therefore not upselling — it is selling the preparation the polish needs. Judge every polish claim you ever read by whether it talks about preparation; the ones that promise shine from the polish alone are selling the one thing polish cannot do.
Polish grades and specialty finishes
The mainstream final polish is aluminum oxide around 1200 grit, used by the Polly and National Geographic systems here, and it fully polishes the quartz family — agate, jasper, quartz, amethyst, petrified wood — which is most of what households tumble. Finer aluminum oxide grades exist for owners chasing a competition finish, and cerium oxide is the traditional specialist polish for particular materials, notably obsidian and glass-like stones, typically run with dedicated pads or in vibratory workflows.
For nearly every reader, 1200 aluminum oxide run properly beats a specialty polish run casually. Graduate to specialty finishes only when your standard process is repeatable — same stones, full stages, scrupulous cleaning — and a specific material still underwhelms. Until then, the variable is process, not product.
Finishing media: ceramic, plastic, and foam
The polish barrel should roll as a cushioned mass. Ceramic media (included with the Polly system, bulked in the GemFoam kit) keeps the load full and protects edges; it must be rinsed meticulously between stages. Plastic pellets are the classic polish-stage cushion, soft against developing shine, but permanently stage-dedicated because they trap abrasive. Foam media such as GemFoam goes furthest: it pads impacts and holds polish against the stones, which is why the media-rich National Geographic kit is this guide’s finishing specialist.
Whichever media you choose, keep the barrel two-thirds to three-quarters full in the polish stage. A sparse load lets stones strike each other directly, frosting edges that four weeks of work created — the saddest and most preventable failure in the hobby.
The burnish: soap, water, and the cleanest hour in tumbling
Between pre-polish and polish, and again after polish, many experienced tumblers run a short burnishing cycle: stones, water, and a small amount of plain soap (or borax in some workflows), tumbled for a few hours. It strips the grey film of rock flour and spent abrasive from every crevice, so the polish stage starts on truly clean stones and the finished stones emerge without a hazy residue.
Treat burnishing as part of the polish kit’s method even though it uses no kit product: it is the cheapest shine improvement available. After the final burnish, rinse, dry completely, and only then judge the batch — stones straight from the barrel wear a deceptive wet shine that flatters bad batches and insults good ones.
Diagnosing a dull batch before buying anything
Work the checklist in order. One: was pre-polish run a full cycle? If not, that is the answer. Two: was everything — barrel, lid, stones, media — washed between stages, with no shared scoops? Contamination scratches are the second answer. Three: were the stones one hardness family? Mixed loads undercut. Four: was the polish barrel full enough, with media? Bruised edges read as dullness. Five: is the stone type simply a matte material? Some jaspers and rhyolites take a satin finish by nature.
Only after all five should a different polish enter the conversation — and notice that the cures for one through four are a repeated pre-polish, a burnish, and media, which is why this guide’s systems and the grit guide’s stage-3 refill solve more “dull” than any exotic polish.
Key Takeaways
- Polish burnishes a prepared surface; it cannot create one.
- 1200 aluminum oxide is the proven mainstream final polish.
- Cushion the polish barrel with media — a sparse load bruises edges.
- Burnish with soap and water before and after polish for the cheapest shine gain.
- Dull batch? Diagnose pre-polish and contamination before buying finer polish.
How to Run the Polish Stage for a Glass Finish
The polish week is the quietest and most consequential of the cycle. Everything before it was preparation; this is presentation. Load, cleanliness, and patience decide the outcome, in that order.
- Burnish first: run the pre-polished stones for a few hours in clean water with a little plain soap, then rinse until the water runs clear.
- Clean the barrel and lid as if for surgery: any grit residue from earlier stages that survives into polish will scratch the entire batch.
- Load stones plus media to two-thirds or three-quarters full; add water to just below the top of the load and the polish at the kit’s measure (commonly a few tablespoons per pound of capacity).
- Seal and run the full polish cycle — about a week in a rotary barrel — without opening to peek; every opening risks contamination and loses time.
- Empty over a bucket (never a drain), rinse, and run a final short burnish to lift polish residue from crevices.
- Dry the stones completely and inspect in daylight. Judge the batch dry, or not at all.
Problem: stones are shiny wet but dull dry → the surface was burnished, not polished: return to a full pre-polish, clean everything, and re-run polish with media cushioning.
Problem: white haze in crevices after polishing → polish residue: a longer final burnish with soap and water, plus a soft brush on stubborn stones, clears it.
Problem: edges are frosted while faces shine → the polish load was too sparse and stones struck each other; refill with ceramic or foam media and re-run the polish stage.
How to Store Polish and Finishing Media
Polish powders are fine and mobile: store them sealed, dry, and labeled, with a dedicated scoop that never visits the grit jars — cross-contamination runs both ways, and coarse dust in polish is catastrophic while polish in grit is merely wasteful. Keep foam and plastic media in stage-labeled containers, permanently dedicated to the polish stage, and rinse ceramic media thoroughly and dry it fully before shelving.
Keep a batch log: stones, hardness grouping, days per stage, polish used, result. Within three or four batches the log becomes your personal polish manual, more valuable than any kit — it tells you which of your stones need longer pre-polish, which loads need more media, and when a specialty polish is genuinely worth trying. That log, plus the systems in this guide, is the whole craft.
Specialty Stones and the Finishes They Want
The quartz family — agate, jasper, quartz, amethyst, carnelian, petrified wood — is the mainstream for a reason: uniform hardness around Mohs 7, no cleavage surprises, and a reliable response to the standard sequence ending in 1200 aluminum oxide. If your loads live in this family, every system in this guide is chemically sufficient, and your results will be decided by process alone. That is the happiest position in the hobby, and most tumblers should stay in it longer than restlessness suggests.
Step outside the family and the polish conversation changes. Obsidian, a natural glass, polishes beautifully but bruises if you look at it sternly: it wants maximum media cushioning, gentle handling, and is a classic candidate for cerium oxide finishing in careful workflows. Fluorite and apatite are soft enough that standard stages over-cut them; they need shortened cycles and modest expectations. Labradorite and moonstone flash their schiller only when the surface is truly fine, rewarding extended pre-polish more than exotic polish. Turquoise and lapis, being porous and composite, often prefer a satin finish to a forced gloss.
The discipline is to learn one material’s full behavior before collecting exceptions. Run a stone type through your standard system, log everything, and only then adjust a single variable — longer pre-polish, more media, a specialty finish — for the next batch of the same stone. Tumblers who change three variables chase their tails for years; tumblers who change one write, in effect, their own reliable polish manual, which is worth more than any single kit in this guide.
From Polished Stones to Finished Projects
A bowl of polished stones is a beginning disguised as an end. The kits in this guide that include jewelry settings point at the obvious first destination: wire-wrapped pendants, cage necklaces, key rings, and earrings turn a batch into gifts with a story — this stone, from this rough, through four weeks of patience. Children in particular finish the hobby’s arc when a stone they tumbled becomes a necklace a grandparent actually wears; the National Geographic refills build that moment into the box.
Beyond jewelry, polished stones earn their keep as display (a glass vessel of mixed agates is genuinely beautiful and costs nothing once the tumbling is done), as game pieces and counting stones for young children, as aquarium-safe decor when the stones are fully cleaned and the material is inert, and as the raw stock for cabochon cutting for owners who graduate to lapidary saws and grinders. Each destination feeds back into tumbling choices: display wants size and color variety, jewelry wants flat-ish backs and drillable shapes, cabochon stock wants thick, fracture-free slabs of rough.
Keep the best stone from every batch aside, labeled with its material and date. Within a year that small archive shows your progress more honestly than memory does — the first batch’s satin finish beside the latest batch’s glass — and it becomes the household’s quiet museum of a hobby done properly. That archive, more than any single purchase, is what the polish stage is ultimately for.
Building Your Finishing Station: The Polish Shelf, Organized
Experienced tumblers can be recognized by their shelves: the finishing end of the hobby has a physical organization that mirrors the process, and building yours takes an afternoon. Dedicate one zone to polish-stage materials only — the final polish powder in a sealed, labeled jar; its own scoop, stored inside that jar so it can never wander; the polish-dedicated media (foam, plastic pellets, or a reserved set of ceramics) in their own tub; a soft brush for crevice cleaning; and the burnish supplies, plain soap and a rinse basin that never sees grit slurry. Physical separation is the entire contamination strategy made visible: if polish-stage tools cannot touch stage-1 dust because they live in a different box, half the dull-batch causes in this guide are engineered away.
Label with dates and batch numbers, and keep the batch log at the station rather than in a drawer across the room, because a log that is not at arm’s reach during loading does not get written. Note for each batch the stone type, the pre-polish duration, the polish and media used, and the dry daylight verdict. Patterns emerge within a few batches — your agates may want an extra day of pre-polish, your jaspers a fuller polish load — and those patterns are the real product of experience, more valuable than any single kit purchase because they transfer to every kit you will ever buy.
Stock the station on the consumption rhythm the grit guide describes: polish itself is used slowly and evenly, so a single refill lasts many batches, while finishing media wears, traps residue, and needs periodic replacement — foam and plastic sooner, ceramic later. Reorder on the log’s evidence, not on anxiety. A finishing station organized this way turns the polish stage from the hobby’s anxious finale into its calmest routine: burnish, load, wait, burnish, dry, admire. The kits in this guide supply the materials; the station supplies the consistency, and consistency, in the end, is what shine is made of.
Polishing Mixed Batches and Display Pieces
Sooner or later every tumbler faces the mixed batch: a handful of leftover stones from three projects, none worth a barrel alone. The polish stage can forgive mixed shapes and sizes — media fills the gaps — but it cannot forgive mixed hardness, because soft stones undercut and shed debris that dulls their harder barrel-mates at the very moment of shine. The workable compromise is to polish mixed batches only within a hardness family, accept a slightly longer pre-polish as insurance, and cushion generously. Stones outside the family wait for their own kind; a small “pending” jar on the finishing shelf is the mark of a tumbler who has learned this once and declined to learn it again.
Display pieces raise the bar differently. A stone destined for a bowl or a shelf is judged on its worst face, not its best, so display candidates deserve individual inspection after pre-polish: turn each stone through a full rotation under the light and send the flawed ones back a stage while the batch is still in process, rather than discovering the bad face in the display bowl. Slightly extending the polish run for a display batch is reasonable; extending it instead of fixing preparation is not. Finish display stones with the full final burnish and dry them on a soft cloth, and handle them by their edges until they are placed — the last fingerprints of the process should not be yours, preserved in residue on the best stone you have ever polished.
When to Try a Specialty Polish (and When Not To)
There is a right moment for cerium oxide, ultra-fine aluminum oxide, and the other specialty finishes, and it is later than most buyers think. The gate is repeatability: when your standard process — full stages, clean changes, cushioned polish — produces the same good result three batches running, you have a baseline, and a specialty polish becomes an experiment with a control group instead of a superstition. Try it then on a stone type that plateaus under the standard finish, change nothing else, and let the batch log deliver the verdict. If the specialty wins for that material, it earns a labeled jar at the finishing station; if it ties, the standard polish keeps its crown on cost and simplicity.
The wrong moment is mid-frustration, with a dull batch in hand and a shopping page open. A specialty polish bought as a rescue almost always disappoints, because the dullness was never the polish’s fault, and the buyer learns an expensive false lesson — that the product failed — when the process was the author. Rescue the batch with pre-polish and cleanliness, restore the baseline, and only then experiment. That order of operations, boring as it sounds, is the entire difference between tumblers who keep improving and tumblers who keep shopping.
Polishing as a Family Project
The polish stage is the one children remember, because it is the reveal: a month of grey patience opens into color and glass. Households running a family tumbler can make the most of that arc deliberately — let young tumblers own the inspection rituals (dry stones, daylight, the satin test by fingertip), keep the batch log in their handwriting, and reserve the final burnish and unveiling for a moment when everyone is present. The kits in this guide that bundle stones and jewelry settings exist for exactly this household: the polished stone that becomes a necklace is the hobby’s whole argument in one object. Supervise the powder-handling stages as the safety notes describe, keep slurry out of drains as a family rule with a reason attached, and the polish stage becomes what it secretly is in every tumbling household — the ceremony the other three stages were rehearsing for.
Final Check Before You Order
Choose the kit by the state of your process, honestly assessed. Batches that have never shone need a system, not a polish — start with the complete Polly refill. Batches that shine sometimes need consistency — the media-rich National Geographic system removes the most variables. Batches that shine reliably need only ingredients — the dedicated 1200 polish refill keeps the shelf stocked at the lowest fuss. And households whose barrel stands empty need a beginning — the stone-inclusive refills restart the whole arc in one box. Diagnose first, buy second, and the polish stage will repay the honesty with the only verdict that matters: stones that stay shiny on the shelf, dry, in daylight, long after the barrel has moved on to the next batch.
Common Buying Mistakes
Buying finer polish to fix dull stones
Dullness is a preparation diagnosis, not a polish shopping list. A finer polish on an under-prepared surface produces expensive dull stones. Repeat pre-polish, clean rigorously, then polish with the standard grade.
Running the polish barrel half empty
Without enough media, stones collide directly and their edges frost while faces shine. Fill the polish load to two-thirds or more with media; it is the cheapest quality upgrade in the entire process.
Judging stones wet from the barrel
Water flatters everything. A batch judged wet gets declared finished, dries matte on the shelf, and teaches its owner to distrust good products. Dry completely, inspect in daylight, then decide.
Sharing scoops and media across stages
One coarse-contaminated scoop can scratch a whole polish batch. Dedicate scoops per stage, dedicate soft media permanently, and wash hard media like you mean it at every change.
Final Recommendation
For a complete, matched route to a real shine, choose the Polly Plastics Rock Tumbler Grit and Polish Refill with Ceramic Media. If your preparation is already disciplined and you only need the final stage itself, stock the Polly Plastics Final Polish Refill 1200 Aluminum Oxide and spend your effort on cleaning and media instead.
Polish is the reward stage, and it pays out exactly what preparation deposited. Run the full stages, burnish, cushion the load, judge the stones dry — and the kits here will show you what your rocks actually had in them.
Frequently Asked Questions
What is the best polish for rock tumbling?
For the quartz-family stones most people tumble, fine aluminum oxide around 1200 grit is the proven standard final polish, and it is the polish stage in the mainstream systems in this guide. Specialty finishes like finer aluminum oxide or cerium oxide serve particular materials and experienced workflows; they are refinements on a good process, not substitutes for one.
Why are my tumbled stones not shiny?
Work the diagnosis in order: incomplete pre-polish, contamination between stages, mixed stone hardness, an under-filled polish barrel, or a naturally matte stone type. In practice the first two cause most dull batches. The cure is a full, clean pre-polish and a cushioned polish run — not a more exotic polish.
How long should the polish stage run?
About a week in a rotary tumbler is the standard pattern for the final polish, with media keeping the barrel two-thirds to three-quarters full. Opening early to check is understandable and counterproductive: judge the batch at the end of the cycle, after a burnish, fully dry.
What is GemFoam and do I need it?
GemFoam is National Geographic’s foam polishing media: soft cubes that join the final stage to cushion stones and carry polish against their surfaces. You do not need it — ceramic media and plastic pellets are the established cushions — but for edge-sensitive stones it is a genuine mechanical advantage, which is why the media-rich kit in this guide features it.
Can I polish stones in a vibratory tumbler?
Yes, and vibratory machines are often preferred for the later stages because they are faster and gentler on shapes — but most workflows still shape in a rotary first, and vibratory polish uses its own media and timing discipline. The kits here are framed for the rotary mainstream; vibratory owners should follow their machine maker’s stage conversions.
Should I burnish my stones, and with what?
Yes: a short cycle in clean water with a little plain soap, run between pre-polish and polish and again after polish, removes rock flour and polish residue that dull the finish. It costs almost nothing and is the most reliably recommended ‘secret’ in the hobby — which is to say, it is not a secret, just a step beginners skip. More process guidance lives in best rock tumbler grits.