Disclosure: As an Amazon Associate, umtsmarttool.com earns from qualifying purchases. Links to Amazon on this page are affiliate links; they cost you nothing extra. Prices and availability change often, so check the current Amazon listing before you buy.
Where to buy
Start with the best rock tumbler grits shortlist: every grit below is a real, listed refill or kit; match the stages to your barrel size and rock hardness, then Start with the top pick: Check on Amazon.
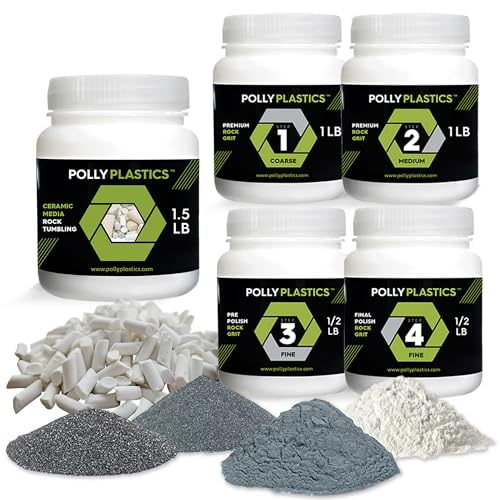
- Polly Plastics Rock Tumbler Grit and Polish Refill with Ceramic Media — Check on Amazon
- Polly Plastics Rock Tumbler Grit Kit with Plastic Filler — Check on Amazon
- Dan&Darci Rock Tumbler Grit Refill Kit (3.5 Pounds) — Check on Amazon
- National Geographic Rock Tumbler Grit and Polish Refill — Check on Amazon
- Polly Plastics Coarse Grit Refill 60/90 (2 lb) — Check on Amazon
- Polly Plastics Pre-Polish Grit Refill 500 — Check on Amazon
Read the full guide ↓
Grit is the consumable that decides whether a month of tumbling ends in glassy stones or dull disappointment, and the best rock tumbler grits share three traits: true silicon carbide for the cutting stages, honest stage grading, and enough quantity to finish the loads you start. This guide compares six ways to buy it — complete 4-stage kits with media, a bulk refill, brand-matched refills for National Geographic tumblers, and single-stage refills for the coarse and pre-polish steps that experienced tumblers run through fastest.
The four-stage system is the grammar everything here speaks: Stage 1 coarse (60/90 silicon carbide) shapes and grinds, Stage 2 medium (commonly 120/220 or 180/220) smooths, Stage 3 pre-polish (500) refines, and Stage 4 final polish (usually 1200 aluminum oxide) shines. If you are setting up the hobby itself, pair this guide with best rock tumblers and best rock tumbler kits for kids; if your machine is a family model, best rock tumblers for kids covers the kid-safe end of the lineup.
Specs below come from the listings and brand materials opened during research: stage grits, abrasive types, and included media. No prices are printed — grit pricing moves with pack size and promotions — so linked picks say check price on Amazon. The buying guide explains how much grit a barrel actually consumes per stage, why coarse disappears fastest, and when single-stage refills beat full kits on value.
In this guide
Quick Picks
| Pick | Badge | Key spec |
|---|---|---|
| Polly Plastics Rock Tumbler Grit and Polish Refill with Ceramic Media | Best Overall | 4-stage silicon carbide grit + polish, ceramic tumbling filler included |
| Polly Plastics Rock Tumbler Grit Kit with Plastic Filler | Best Starter Kit | 4-stage grit kit with plastic filler pellets |
| Dan&Darci Rock Tumbler Grit Refill Kit (3.5 Pounds) | Best Bulk Refill | 3.5 lb total grit media refill across the stages |
| National Geographic Rock Tumbler Grit and Polish Refill | Best for National Geographic Tumblers | Brand-matched 4-stage grit and polish refill, bulk grit media |
| Polly Plastics Coarse Grit Refill 60/90 (2 lb) | Best Coarse Stage Refill | 2 lb of 60/90 silicon carbide, Stage 1 |
| Polly Plastics Pre-Polish Grit Refill 500 | Best Pre-Polish Refill | 500 grit silicon carbide, Stage 3 pre-polish |
How These Picks Were Chosen
Selection privileged abrasive honesty. The cutting stages should be silicon carbide — the standard for rock tumbling because it fractures into fresh sharp edges as it works — and the final polish should be a fine aluminum oxide or equivalent polish-grade abrasive. Kits that name their stage grits plainly (60/90, 180/220, 500, 1200) were preferred over kits that hide behind “step 1–4” with no numbers, because a tumbler who cannot see the numbers cannot troubleshoot a dull batch.
Quantity realism was the second test: a kit should carry a typical 3 lb barrel through multiple full cycles, or say plainly that it is a starter quantity. Media inclusion (ceramic filler, plastic pellets) counted as a real plus, since cushioning media is not optional in later stages. Established tumbling-supply names — Polly Plastics, Dan&Darci, National Geographic/Blue Marble — anchor the list, and each ASIN was tied to its product by a source opened in research, as recorded in the _SOURCES file. Results talk in this guide is framed around process, never promised shine: grit enables a polish; rock selection and cleaning deliver it, a point best gem tumblers also makes for display-grade stones.
The 6 Best Rock Tumbler Grits

Polly Plastics Rock Tumbler Grit and Polish Refill with Ceramic Media — Best Overall
The complete refill most tumblers should keep on the shelf: all four stages of grit and polish plus ceramic filler media in one pack, sized for standard rotary barrels and formulated as a matched system.
- Stages: coarse, medium, pre-polish, final polish (4-step system)
- Abrasive: silicon carbide stages with final polish stage
- Includes: ceramic tumbling filler media
- Brand: Polly Plastics
Strengths
- Matched stages remove guesswork between brands
- Ceramic media included for cushioning later stages
- Resealable packaging suits a working supply shelf
Trade-offs
- Kit quantity suits hobby barrels, not production volumes
- Ceramic media amount is a starter supply, not a lifetime stock
- Polly’s stage 2 grading should be confirmed on the pack for sticklers
Polly Plastics is the name hobbyists hand to beginners, and this refill is why: it bundles the full grit sequence with the ceramic media that later stages need, from a maker whose entire business is tumbling consumables. The stages are graded for the standard rotary process — roughly a week per stage in a 3 lb barrel — and the media cushions stones in stages 2–4 so edges polish instead of chipping.
Buy it as the house standard and replenish single stages (below) as they run out, since coarse grit is consumed fastest. Kept dry and labeled, it is the least dramatic, most reliable way to keep a tumbler fed, and it pairs with any machine in best rotary rock tumblers.
One honest limitation: heavy users running multiple barrels continuously will outgrow kit quantities quickly and should graduate to bulk single-stage bags.
Best for: most rotary tumbler owners wanting one complete refill / Not suited for: high-volume or vibratory-only workflows

Polly Plastics Rock Tumbler Grit Kit with Plastic Filler — Best Starter Kit
The beginner’s first refill: Polly’s four stages bundled with plastic filler pellets, the traditional cushioning media for polishing stages, in quantities aimed at a first few loads in a small barrel.
- Stages: 4-step grit and polish system
- Abrasive: silicon carbide cutting stages, polish final stage
- Includes: plastic filler pellets
- Brand: Polly Plastics
Strengths
- Everything a first refill needs in one box
- Plastic pellets are the classic polish-stage cushion
- Clear stage labeling teaches the process as you go
Trade-offs
- Plastic pellets must be kept stage-dedicated to avoid carrying coarse grit into polish
- Starter quantities assume a small barrel
- Ceramic media fans will still want a ceramic supply for stage 2
Plastic pellets are the old-school media: light, cheap, and excellent in the polish stage, where their softness protects a developing shine. Polly’s kit pairs them with the full grit sequence, making it the natural first purchase after the sample grits in a starter tumbler kit run out — which happens after roughly one load, as every new tumbler owner discovers.
One discipline comes with plastic media: dedicate pellets to a stage and never move them backward, because a pellet that rolled in coarse grit will carry embedded abrasive into your polish and scratch it. Label four small containers and the system works beautifully. New owners setting up from scratch should read this alongside best rock tumbler kits for kids if the barrel will be run with children.
One honest limitation: the stage-dedication plastic pellets demand is real extra housekeeping compared with ceramic media, which can be rinsed and reused more flexibly.
Best for: beginners restocking a starter tumbler / Not suited for: tumblers who hate media bookkeeping

Dan&Darci Rock Tumbler Grit Refill Kit (3.5 Pounds) — Best Bulk Refill
For owners who tumble constantly and are tired of small packs: a 3.5-pound refill spanning the grit stages, from the brand behind one of the most popular family tumbler kits.
- Total quantity: 3.5 lb of grit media (per listings)
- Stages: full grit sequence for rotary tumbling
- Brand: Dan&Darci
- Use: refill for Dan&Darci and standard rotary tumblers
Strengths
- Bulk quantity lowers the cost per load
- One purchase covers many full cycles
- Matches the grit system Dan&Darci tumbler owners already know
Trade-offs
- Bulk only pays if you tumble regularly
- Storage needs dry, labeled containers
- Stage split within the 3.5 lb follows the maker’s ratios, not yours
Grit economics reward commitment: per-load cost drops sharply when you buy stages by the pound rather than by the packet, and coarse — the stage you will re-run most, since stubborn stones repeat stage 1 — is where the savings compound. Dan&Darci’s 3.5 lb refill is sized for the household that keeps a barrel turning most weeks, whether feeding their own Advanced tumbler or any standard rotary machine.
Decant it into labeled, sealed jars on day one, stage by stage, and keep a simple log of loads per stage; you will learn your own consumption ratios within two cycles and can then top up single stages precisely. It is the refill for graduates of best rock tumblers for adults who have moved past the starter-kit phase.
One honest limitation: occasional tumblers will take years to use it, and grit stored badly (damp, unlabeled, mixed) wastes the value entirely.
Best for: regular tumblers running loads most weeks / Not suited for: once-a-year hobbyists

National Geographic Rock Tumbler Grit and Polish Refill — Best for National Geographic Tumblers
The matched refill for the huge installed base of National Geographic (Blue Marble) tumblers: four grades — coarse, medium, fine, polish — in a bulk grit pack sized to keep those family machines running.
- Stages: four grades — coarse, medium, fine, polish
- Quantity: bulk grit media pack (1.5 kg class per listings)
- Brand: National Geographic / Blue Marble
- Compatibility: National Geographic and standard rotary tumblers
Strengths
- Matches the instructions National Geographic owners already have
- Bulk pack polishes many pounds of rock per listings
- Widely stocked and easy to reorder
Trade-offs
- Stage naming (fine vs pre-polish) differs from Polly’s labels
- Formulated for rotary family tumblers, not vibratory workflows
- Rock and jewelry extras belong to the refill kits, not this grit pack
Brand-matched consumables remove a translation layer: the National Geographic instructions say “Step 2,” the packet says Step 2, and a parent running a tumbler with kids at the kitchen table does not have to convert between two brands’ stage names mid-project. The grit itself is a standard four-grade sequence in a genuinely bulk quantity, so the pack outlasts several of the sample cycles that ship with the machines.
Owners who outgrow the family workflow can absolutely run Polly or Dan&Darci grit in the same barrels — the machines do not care — but for households staying inside the National Geographic ecosystem, this is the zero-friction refill. See best rock tumblers for kids for the machines it feeds.
One honest limitation: the brand’s stage vocabulary (coarse/medium/fine/polish) maps imperfectly onto the 60/90–1200 numbering used elsewhere, which can confuse owners cross-reading community advice.
Best for: National Geographic tumbler households / Not suited for: vibratory tumbler owners

Polly Plastics Coarse Grit Refill 60/90 (2 lb) — Best Coarse Stage Refill
The stage-1 specialist: two pounds of coarse 60/90 silicon carbide for the shaping stage, which consumes more grit than the other three stages combined because rough stones often need repeated coarse cycles.
- Stage: Stage 1 coarse
- Grit: 60/90 silicon carbide
- Quantity: 2 lb (per listings)
- Brand: Polly Plastics
Strengths
- Sizes the refill to how grit is actually consumed
- True silicon carbide for aggressive shaping
- Works in any rotary barrel
Trade-offs
- Single stage only — not a complete system
- Coarse slurry disposal needs care (never down drains)
- Very rough or large loads still eat it quickly
Every experienced tumbler learns the same arithmetic: stage 1 is where grit goes to die. A batch of rough agate may need two or three coarse cycles before a single medium cycle, and a full kit’s small coarse portion vanishes while its polish sits untouched. Buying coarse by the two-pound bag is the correction — the refill that matches real consumption instead of retail symmetry.
Use it with discipline: measure per your barrel size (commonly a few tablespoons per pound of barrel capacity, per your tumbler’s instructions), run a full week, and inspect before deciding on another coarse cycle versus moving on. Stones that will not shape after repeated coarse runs are telling you about their hardness or fractures, not about the grit. The companion stage-3 refill below completes the single-stage shelf.
One honest limitation: it solves only stage 1; new owners still need a full kit first to learn the sequence and stock the later stages.
Best for: experienced tumblers shaping rough, hard stones / Not suited for: first-time buyers needing all stages

Polly Plastics Pre-Polish Grit Refill 500 — Best Pre-Polish Refill
The stage-3 specialist: 500 grit silicon carbide pre-polish, the refinement stage that decides whether the final polish can actually shine, stocked separately because careful tumblers extend or repeat this stage often.
- Stage: Stage 3 pre-polish
- Grit: 500 silicon carbide
- Format: refill pack (1 lb class per listings)
- Brand: Polly Plastics
Strengths
- The stage that most determines final shine, stocked properly
- Repeating stage 3 rescues batches that polished dull
- Silicon carbide consistency matches Polly’s full kits
Trade-offs
- Single stage only
- Cannot fix stones rushed through stages 1–2
- Fine grit demands scrupulous cleaning to avoid contamination confusion
Ask tumblers why a batch came out matte and the answer is rarely the polish — it is a rushed or skipped pre-polish. Stage 3 at 500 grit removes the fine scratches stage 2 leaves, giving the 1200 polish a surface it can actually bring to glass. Owning it separately lets you do the two things quality requires: run stage 3 for a full cycle without rationing, and repeat it when inspection says the stones are not ready.
Pair it with the coarse refill above and a full kit, and your shelf mirrors your real process: heavy coarse, honest pre-polish, everything else in balance. If a batch still polishes dull after a proper stage 3, the fault is usually contamination or rock quality — the troubleshooting section below walks that diagnosis, and best rock tumbler polish kits covers the final-stage specialists.
One honest limitation: pre-polish cannot rescue stones with deep fractures or mixed hardness that undercut in earlier stages; it refines surfaces, not geology.
Best for: quality-focused tumblers who repeat stage 3 / Not suited for: beginners who have not run a full kit yet
Comparison Table
| Pick | Stages included | Abrasive | Best for | Extras |
|---|---|---|---|---|
| Polly Plastics Rock Tumbler Grit and Polish Refill with Ceramic Media | 4 stages | Silicon carbide + polish | All rotary barrels | Ceramic media |
| Polly Plastics Rock Tumbler Grit Kit with Plastic Filler | 4 stages | Silicon carbide + polish | First refills | Plastic pellets |
| Dan&Darci Rock Tumbler Grit Refill Kit (3.5 Pounds) | Full sequence | Silicon carbide system | Frequent loads | Bulk quantity |
| National Geographic Rock Tumbler Grit and Polish Refill | 4 grades | Silicon carbide system | NatGeo tumblers | Bulk pack |
| Polly Plastics Coarse Grit Refill 60/90 (2 lb) | Stage 1 only | 60/90 silicon carbide | Rough shaping | 2 lb bag |
| Polly Plastics Pre-Polish Grit Refill 500 | Stage 3 only | 500 silicon carbide | Pre-polish refinement | Refill pack |
How to Choose Rock Tumbler Grit
The four stages, and what each one actually does
Stage 1 (60/90 silicon carbide) is shaping: it grinds away corners, pits, and rind until stones are smooth and rounded. It runs about a week in a rotary barrel and repeats until the batch passes inspection. Stage 2 (120/220 or 180/220 silicon carbide) removes stage 1’s scratches and finishes the surface texture. Stage 3 (500 silicon carbide) is pre-polish: it refines the surface to a satin readiness. Stage 4 (commonly 1200 aluminum oxide) is polish: it does not cut meaningfully; it burnishes a prepared surface to shine.
The stages are a relay, not a menu: each stage’s only job is to erase the previous stage’s scratches. Skipping or shortening a stage leaves scratches the next stage cannot remove in its allotted time, which is the mechanical reason dull batches happen. When a kit names its numbers plainly, you can reason about it; when it hides them, you cannot — hence this guide’s preference for labeled grading.
How much grit a load really uses
Follow your tumbler’s instructions first, but the common rotary pattern is a few tablespoons of grit per pound of barrel capacity per stage, with the barrel loaded about two-thirds full of rock and media and water to just below the top of the load. Coarse consumption is the budget driver because stage 1 repeats: a hard batch may take three coarse charges for every one charge of the later stages.
That arithmetic is why this guide lists both full kits and single-stage refills. New owners should start with a full kit to learn the sequence; from the second restock onward, buy the way you consume — bulk coarse, steady pre-polish, occasional medium and polish. The Dan&Darci bulk refill suits households that would rather simplify and buy the whole sequence by the pound.
Silicon carbide vs aluminum oxide
Silicon carbide is the cutting abrasive for stages 1–3: hard, sharp, and self-fracturing, so it keeps cutting as it breaks down into finer particles through the cycle (which is also why a stage’s slurry feels smoother at the end of the week). Aluminum oxide is the standard final polish at fine grades such as 1200: gentler, rounder in action, and able to bring a prepared surface to a wet-look shine without re-scratching it.
specialty polishes exist beyond 1200 — finer aluminum oxides and cerium oxide for particular stones — and the polish-kit guide covers that end of the shelf. For the mainstream quartz-family stones most households tumble (agate, jasper, quartz, amethyst), the carbide-to-1200-oxide sequence in every kit here is the proven path.
Media: ceramic, plastic, and why barrels need filler
As stones shrink and smooth, the barrel needs filler to keep the load rolling as a mass and to cushion stone-on-stone impacts. Ceramic media is the modern default: durable, rinsable, reusable across stages after thorough cleaning, and included in the Best Overall Polly refill. Plastic pellets are the classic polish-stage cushion: soft and protective, but they must be dedicated to one stage forever, because embedded grit rides them into finer stages.
Fill with media to keep the barrel about two-thirds to three-quarters full in later stages, and use smaller media for smaller stones so the slurry reaches every surface. Media is not an accessory; a half-empty polish barrel bruises edges and wastes a month. Both media types appear in this guide’s kits precisely because running stages without media is the beginner mistake nobody warns about in the box.
Rock hardness decides everything upstream
Grit cannot negotiate with geology. Stones of similar hardness (around Mohs 6.5–7 — the quartz family) tumble beautifully together; mix in soft stones and they undercut and bruise while the hard ones are still shaping. Test unknown rocks, group by hardness, and accept that some beautiful rough — fractured, pitted, or mixed — will never take a polish no matter whose grit you buy.
This is why honest grit guidance talks about process rather than promising shine. The kits here give you correct, labeled abrasives; sorting your rocks and cleaning between stages (next sections) is the other half of the result, and it is entirely in your hands.
Key Takeaways
- Stages are a relay: each erases the last stage’s scratches; never skip one.
- Coarse grit is consumed fastest — buy it in the largest quantity.
- Silicon carbide cuts (stages 1–3); fine aluminum oxide polishes (stage 4).
- Media is mandatory in later stages, not an optional extra.
- Sort rocks by hardness before blaming the grit for dull results.
How to Run a Full Four-Stage Tumble
A standard rotary cycle takes about four weeks, one per stage, and rewards patience and cleanliness in equal measure. Load and timing follow your tumbler’s manual; the sequence below is the common pattern for a 3 lb class barrel.
- Sort rough rocks by hardness and size; discard or set aside fractured pieces that will shed grit-trapping shards.
- Load the barrel two-thirds full with rock (plus media in later stages), add water to just below the top of the load, and add the stage’s grit per the kit’s measure.
- Seal and run Stage 1 for about 7 days. Empty into a colander over a bucket — never pour slurry down a drain, where it sets like cement — rinse, and inspect: repeat Stage 1 on stones that still show pits or sharp edges.
- Clean everything obsessively between stages: barrel, lid, stones, and media. A single teaspoon of coarse grit carried into Stage 3 will scratch the whole batch. A short burnishing run with water and a little soap between stages is the classic insurance.
- Run Stages 2 and 3 for about a week each, with media filling the barrel to two-thirds, inspecting at each change.
- Run Stage 4 polish for about a week, then rinse, dry, and inspect in daylight. Dull stones usually need more Stage 3, not more polish.
Problem: stones come out dull after polish → the cause is almost always upstream: rushed Stage 3 or contamination. Send the batch back to a full Stage 3 with scrupulously cleaned equipment, then re-polish.
Problem: stones are bruised or chipped at the edges → the barrel ran too empty in later stages; add ceramic media to keep the load cushioned and rolling as one mass.
Problem: grit disappears unusually fast in Stage 1 → the load is very rough or the barrel is overfilled; that consumption is normal for hard shaping, and it is exactly why coarse is sold in 2 lb refills.
How to Store Grit and Media
Grit keeps indefinitely if it stays dry and correctly labeled — and becomes a hazard to your batches the moment it does not. Decant bags into sealed jars or tubs labeled with stage and grit number the day they arrive; a scoop that lives in the coarse jar never visits the polish jar. Store off the floor, away from humidity, and keep plastic pellets in their own stage-labeled containers, permanently dedicated.
Ceramic media should be rinsed and fully dried before storage so trapped slurry does not cement it into a lump. Keep a simple shelf order — coarse to polish, left to right — and a notebook of loads run per stage; within a few cycles you will know your household’s true consumption and can buy refills the way this guide is organized: kits to learn, bulk and single stages to run.
Rotary vs Vibratory Tumbling: How Grit Use Changes
Everything in the main guide assumes the rotary mainstream, where barrels roll for about a week per stage and grit breaks down gradually as it works. Vibratory tumblers — the other family in best vibratory rock tumblers — shake the load thousands of times a minute instead of rolling it, and the differences matter for grit buying. Vibratory stages run far faster (days rather than a week for the later stages), use less grit per charge because the action is more efficient, and keep the stones’ natural shapes more faithfully since material removal is gentler and more even.
Most vibratory workflows still begin in a rotary barrel for Stage 1 shaping, because vibratory action is poor at removing bulk material and rounding rough corners. The hybrid pattern — rotary coarse, vibratory medium through polish — is the experienced community’s favorite, and it changes consumption: your coarse usage stays rotary-sized while medium, pre-polish, and polish consumption drops. If you adopt that pattern, the single-stage refills in this guide become even more valuable, because you can rebalance quantities per machine instead of buying symmetrical kits designed for rotary-only use.
One rule survives every machine change: abrasives and cleanliness discipline do not change. Silicon carbide still cuts the early stages, fine aluminum oxide still polishes, and contamination between stages still ruins batches — faster in a vibratory, if anything, because the intense action drives a stray coarse particle across every surface quickly. Buy grit by stage, label everything, and let the machine change the schedule rather than the chemistry.
Troubleshooting the Four Stages, Symptom by Symptom
Stage 1 that never finishes — stones still pitted after three cycles — usually means the load mixes hardness, so soft stones keep shedding fresh roughness, or the rough itself is fractured material that will never clean up. Pull the offenders; a barrel is only as finishable as its worst stone. Stage 1 that finishes suspiciously fast, with stones barely changed, points the other way: too little grit, a barrel so full it slides instead of tumbling, or grit that was not silicon carbide at all. Check the load’s motion through the barrel (it should cascade, not slide as a lump) before blaming the abrasive.
Stage 2 and 3 troubles are quieter. A batch that looks smooth but feels draggy under a fingertip is carrying the previous stage’s texture — the classic sign of a shortened earlier stage — and the cure is time at the correct stage, not pressure to move on. Milky slurry that never thins suggests over-thick loading: too many fines from soft stones can cushion the abrasive’s action, and a mid-stage rinse-and-recharge restores cutting more honestly than simply extending the run.
Polish-stage failures were covered in the diagnosis section, but one more deserves naming: stones that polish beautifully except for one or two dull individuals. Those stones are almost always a different, softer material that crept into the load — a reminder that sorting is a polish-stage activity too, performed at loading with the finished shine already in mind. Keep the batch log suggested in the storage section and these symptoms stop being mysteries; they become entries you have solved before, which is the real difference between a first-year tumbler and a fifth-year one.
Grit Math: Planning a Year of Tumbling
A household that tumbles regularly can predict its grit shelf with simple arithmetic, and doing it once prevents the mid-batch stockout that stalls a barrel for a week. Start from your barrel: a 3 lb class rotary barrel running one batch at a time completes roughly ten to twelve full cycles a year if it turns most weeks, allowing for cleaning days and life. Each cycle consumes one charge of stages 2, 3, and 4 — but stage 1 averages closer to two charges per cycle across a year of mixed rough, because hard batches repeat it. Multiply by your per-charge measure and you have annual consumption per stage, with coarse roughly double the others. That single insight — coarse at two-to-one — is the whole planning secret, and it is why this guide’s shelf is organized as full kits plus a heavy coarse refill rather than symmetrical stacks of everything.
Scale the same math for two barrels or a 6 lb machine and the conclusion strengthens: bulk stops being a preference and becomes the only sane economics, which is the Dan&Darci refill’s home ground. Occasional tumblers should run the math in reverse and buy small on purpose: grit is cheap to reorder and immortal on the shelf, but cash tied up in a decade’s supply of stage 2 is cash that could have bought better rough — and rough quality, as the hardness section argued, decides more finished beauty than any abrasive decision you will ever make.
Keep the log that makes next year’s math exact: date, stones, stage charges used, repeats needed. Three cycles of honest logging replace every estimate in this section with your household’s true numbers, tuned to your rocks, your barrel, and your patience. That is the point at which grit stops being a shopping problem at all and becomes what it should be — a shelf that is simply always ready, in the background of a hobby that runs on weeks, not errands.
Reading a Batch at Each Inspection
The weekly stage change is a reading exercise, and learning the language makes grit decisions obvious. After Stage 1, hold stones dry under a bright light: you are looking for the absence of pits, sharp edges, and original rind, not for beauty. A stone that is smooth but still carries one deep pit will carry it forever unless it returns to coarse — pits do not polish out, they polish in, as tiny dull craters in a shiny field. After Stage 2 the surface should look uniformly matte, like frosted glass held to the light; any patch that looks different — shinier, rougher, a different texture — marks a spot the abrasive did not reach evenly, usually a hollow that needs the load’s attention via smaller media.
After Stage 3, the tell is touch as much as sight: a properly pre-polished stone feels like satin and looks even from every angle, with no single facet catching light differently from its neighbors. Stones that pass this reading almost always polish; stones that fail it almost always disappoint, which is why experienced tumblers treat the Stage 3 inspection as the batch’s true verdict and the polish run as a formality. Record the reading in your batch log in plain words — “two stones back to coarse, rest ready” — and within a few batches you will read a barrel the way a baker reads dough: at a glance, and correctly.
Disposing of Slurry and Working Cleanly
Every stage change produces a bucket of slurry — water, rock flour, and spent abrasive — and handling it well is part of the craft, not an afterthought. The standing rule bears repeating in operational detail: slurry never enters household drains, because the suspended rock flour settles in traps and pipes and hardens into something close to concrete. Instead, empty barrels into a dedicated bucket through a colander, let the solids settle, pour the clear top water onto garden ground away from drains (or evaporate it), and bag the settled solids with household waste, following any local guidance for mineral waste. Rinse water from stage changes follows the same path once grit-bearing loads are involved.
The workspace thanks you for the same discipline: a tray under the barrel catches drips, a dedicated towel lives with the tumbling shelf, and dry grit is poured over the barrel or a paper sheet so spills return to the jar rather than the floor. Fine dry abrasive should be poured gently, not dumped, to keep dust down, and hands washed after handling — ordinary workshop hygiene, applied consistently. None of this is burdensome once it is routine, and it is the difference between a hobby the household welcomes and one it merely tolerates.
A Note on Grit for Very Small Barrels
Everything in this guide scales down, but small barrels — the 1 lb class machines in many starter and kids’ kits — reward two adjustments. First, measure grit by the barrel’s own instructions rather than by 3 lb habits: charges are smaller, and overcharging a small barrel thickens the slurry until the load slides instead of tumbling. Second, expect stage timing to hold roughly steady — small stones in a small barrel still need their week per stage — while inspection matters more, because a small load has fewer stones to average out a bad apple; one fractured stone in a dozen is a bigger contamination share than one in fifty. The kits here all serve small barrels happily; simply respect their measures, keep the load two-thirds full with media as the stones shrink, and the little machine will produce results its size has no business producing.
Final Check Before You Order
Match the purchase to your next three batches, not your next one. If your shelf holds no complete sequence, a full kit is the order; if stages sit half-used while coarse is gone, the coarse refill is the order; if dull batches are your problem, pre-polish is the order. Grit buying done by diagnosis rather than by habit keeps the shelf balanced, the barrel turning, and the hobby’s money flowing toward better rough — which is where, as this guide has argued from its first page, the finished beauty was decided all along.
Common Buying Mistakes
Pouring slurry down the drain
Tumbler slurry is liquid rock. Poured into household plumbing it settles and hardens, and the plumber’s bill dwarfs any grit savings. Empty into a bucket, let solids settle, and dispose of them with household waste per local guidance — every time, without exception.
Skipping the cleaning between stages
One contaminated stage change can undo three weeks: coarse particles in the polish stage scratch every stone. Wash the barrel, lid, stones, and media thoroughly at every change, and burnish with soap and water when in doubt.
Mixing rock hardness in one barrel
Soft stones undercut and bruise while hard stones are still shaping, and the batch finishes with neither done well. Sort by hardness before loading; grit quality cannot compensate for geology.
Judging polish after a rushed pre-polish
Owners buy fancier polish when the real fault is a short Stage 3. If stones are dull, repeat pre-polish properly before spending on exotic final stages — the 500 grit refill exists for exactly this rescue.
Final Recommendation
Stock the shelf with the Polly Plastics Rock Tumbler Grit and Polish Refill with Ceramic Media as your standard system, and add the Polly Plastics Coarse Grit Refill 60/90 (2 lb) beside it, because stage 1 is where your grit will actually go.
Run full stages, clean like you mean it, sort your rocks by hardness, and keep slurry out of the drains. The grit in this guide does the cutting; those habits deliver the shine.
Frequently Asked Questions
What grit do I need for a rock tumbler?
A complete four-stage sequence: coarse 60/90 silicon carbide for shaping, medium (120/220 or 180/220) for smoothing, 500 pre-polish, and a fine polish such as 1200 aluminum oxide. Any full kit in this guide contains exactly that sequence; single-stage refills then replace stages as they are consumed, coarse first.
How long does each grit stage take?
In a rotary tumbler, about a week per stage is the standard pattern, with Stage 1 repeating until stones are smooth and pit-free — so a typical batch takes four to five weeks total. Vibratory tumblers run faster on the later stages but still need a rotary stage 1 for shaping in most workflows.
Can I reuse rock tumbler grit?
Effectively no: silicon carbide breaks down into finer particles as it works, so spent grit has lost its cutting grade. What looks like leftover grit in the slurry is exhausted abrasive and rock flour. Media is the reusable part — ceramic especially — while grit is a consumable, which is why refill economics matter.
Why did my rocks come out dull?
The three usual causes are a rushed or skipped pre-polish, contamination carried between stages, and mixed-hardness rocks undercutting each other. The fix is process, not product: return the batch to a full, clean Stage 3, then re-polish. If specific stones stay dull while others shine, those stones’ geology is the answer.
How much grit should I keep on hand?
At minimum, one full kit plus a coarse refill: stage 1 repeats mean coarse runs out roughly two to three times faster than the later stages. Regular tumblers often keep the Dan&Darci-style bulk sequence plus single-stage coarse and pre-polish, which mirrors how the shelf in this guide is organized.
Is rock tumbler grit safe to handle?
Handle it as you would any fine mineral powder: avoid breathing dust when pouring dry grit, wash hands afterward, and keep slurry and grit away from drains and from young children and pets. The abrasives themselves are standard industrial minerals; the real hazards are dust, mess, and plumbing, all managed by the habits in the how-to section. Families tumbling with kids should supervise loading and cleanup, as with the machines in best rock tumblers for kids.