A kids’ rock tumbler turns rough stones into polished ones over a few weeks, which makes it a patient lesson in how grinding and polishing work. The best kits bundle everything a child needs to begin: a small barrel, grit, polish and a handful of rough rocks. Parents mainly want something quiet, simple and safe to handle.
The six kits below are aimed at young beginners and cover the usual styles, from single-barrel machines to a kit with several specimens. We have not used these products ourselves, so check the recommended age, barrel size and what is in the box on the current listing before buying. Adult supervision is sensible for every one of them.
As an Amazon Associate we earn from qualifying purchases. Links below are affiliate links, and they do not change the product information we give.
What to Look For
| Feature | Why it matters |
|---|---|
| Age range | Makers set a minimum age; read it, and plan on adult help with grits |
| Kit contents | Grit, polish and starter rocks save a second shopping trip |
| Noise level | A rubber barrel is quieter than a hard plastic one |
| Barrel size | A small barrel is fine for a child’s first batch |
| Instructions | Clear steps keep kids from skipping a stage |
In this guide
Specs at a Glance
| Kit | Style | Includes | Notes |
|---|---|---|---|
| National Geographic Hobby Rock Tumbler Kit | Single barrel | Grits and starter rocks | Well-known toy brand |
| National Geographic Starter Rock Tumbler Kit | Single barrel | Grit and rocks | Smaller and simpler |
| Dan&Darci Rock Tumbler Kit | Single barrel | Grit and gems | Science-style kit |
| Discovery Mindblown Rock Tumbler | Single barrel | Grit and rocks | Discovery brand toy line |
| Smithsonian Rock Tumbler Kit | Single barrel | Grit and rocks | Educational branding |
| Playz Rock Tumbler Science Kit | Single barrel | Grits and extras | Activity-style kit |
The 6 Best Rock Tumblers for Kids
Top pickBest for first tumblers for curious kids
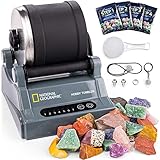
1. National Geographic Hobby Rock Tumbler Kit
A rotary tumbler kit from a brand most parents recognize. It comes with grit, polish and some rough stones so a child can start the first run right away.
Suits: first tumblers for curious kids. Strengths: a complete kit and a familiar brand. Weaknesses: grits can run out before the stones are polished. Skip it if you want a large barrel.
Best for younger beginners
2. National Geographic Starter Rock Tumbler Kit
A simpler, smaller version of the hobby line for children who are still figuring out whether they like rocks. The scaled-down barrel keeps the first project manageable.
Suits: younger beginners. Strengths: simple operation and small footprint. Weaknesses: small batch size. Skip it if you expect to tumble every week.

Best for kids who like experiments
3. Dan&Darci Rock Tumbler Kit
A science-themed kit with a tumbler, grit stages and a selection of stones. It leans on the learning angle, with instructions that explain each polish step.
Suits: kids who like experiments. Strengths: a step-by-step guide. Weaknesses: a single small barrel. Skip it if you want a bigger, hobby-grade machine.
View Dan&Darci Rock Tumbler Kit on Amazon
Best for gift giving
4. Discovery Mindblown Rock Tumbler Kit
A kid-focused rock tumbler from the Discovery toy line, bundled with grit and rough rocks. It is positioned as a gift-ready STEM kit.
Suits: gift giving. Strengths: a ready-to-open box. Weaknesses: limited batch capacity. Skip it if you prefer a machine adults can also use.
View Discovery Mindblown Rock Tumbler Kit on Amazon
Best for young collectors
5. Smithsonian Rock Tumbler Kit
An educational tumbler kit under the Smithsonian name, aimed at children who like collecting and learning about minerals.
Suits: young collectors. Strengths: an educational angle. Weaknesses: fewer details on the barrel than we would like. Skip it if you want proven long-term durability.
View Smithsonian Rock Tumbler Kit on Amazon
Best for kids who like variety
6. Playz Rock Tumbler Science Kit
An activity-style kit that bundles a tumbler with extra science items. It suits kids who enjoy several small projects in a single box.
Suits: kids who like variety. Strengths: extras beyond the tumbler. Weaknesses: the tumbler is only one part of the box. Skip it if you want a tumbler-only product.
View Playz Rock Tumbler Science Kit on Amazon
Care and Setup
- Have an adult measure and handle the grit, and wash hands afterward.
- Keep the tumbler on a stable surface away from the table edge.
- Rinse stones thoroughly between grit stages.
- Never pour tumbler slurry down the kitchen sink; use a bucket outdoors.
Mistakes to Avoid
- Letting a child open the barrel while it is still turning.
- Skipping the grit stages to hurry the shine.
- Overfilling the barrel so stones cannot tumble.
- Buying a kit for a child under the stated age.
Is Your Child Ready for a Tumbler?
A rock tumbler suits a particular kind of child. The process is slow, with long waits between stages and little to see for days at a time, so it rewards curiosity and patience. A child who enjoys collecting rocks, watching experiments or keeping a nature journal is likely to enjoy it. A child who wants quick results may lose interest in the second week, which is worth knowing before you buy. Some families choose to treat the first batch as a trial, with the aim of learning how the process works rather than producing perfect stones.
Age guidance is the starting point, and the listing should state the minimum age set by the maker. Read it and think about the individual child. The machine has a motor and a barrel that can be opened with a lid under pressure, and the grit is abrasive. Even older children need an adult nearby for setup and cleanup. If a younger sibling lives in the house, plan where the tumbler will sit so it cannot be reached.
A few questions help decide whether to buy now or wait:
- Can the child follow multi-step instructions with a little help?
- Is there a suitable place for a machine that runs day and night for weeks?
- Will an adult be available to handle grit and cleanup?
- Does the child care about the final result, or the process itself?
If the answer to most of these is yes, a kit is a reasonable gift. If not, a simple rock-collecting kit or a field guide may be a gentler introduction.
Noise, Placement and Power Supply
Noise is one of the most common complaints about tumblers. The barrel rolls stones continuously, and the sound is a steady rumble and hum, which may be soothing to some people and irritating to others. Because the machine runs for days at a stretch, location matters. A garage, utility room, basement or covered porch with a power outlet is better than a bedroom, living room or kitchen. Rubber barrels tend to be quieter than hard plastic barrels, and a mat or soft surface under the machine helps reduce vibration.
Stability is also important. Place the tumbler on a firm, level surface away from the edge, since vibration can make it creep. Keep the cord out of walkways, and use an outlet with room around the plug. Check that the machine is designed for continuous running, which is normal for tumblers but worth confirming in the manual. Avoid using extension cords unless the maker allows it, and do not place the machine in a damp area where water could reach the motor.
Keep an eye on the barrel. Leaks can drip grit slurry onto the machine and floor, so a tray or a shallow plastic container underneath helps protect surfaces. Place the machine where an adult can hear changes in sound, since a sudden rattle or squeal can signal a problem with the barrel, belt or motor.
- Choose a room where noise is acceptable.
- Put the tumbler on a stable, level surface with a tray beneath.
- Keep it away from water, edges and heat.
What Comes in the Box and What You May Still Need
The kits in this guide are sold as beginner sets, but their contents vary, so check each listing for details. Typical items include the tumbler base, a barrel, rough stones, one or more grit packets, a polish packet and an instruction sheet. Some also include extras such as a small guide to rocks or minerals, a display box or jewelry findings. The amount of grit is often limited, so you may run out before finishing a second batch.
It helps to think of the kit as a starting point. A few household items make the process easier: a plastic bucket for cleaning, an old toothbrush for scrubbing the barrel and stones, a plastic container for slurry disposal, paper towels and a notebook. Gloves and eye protection are sensible, especially for younger users. A magnifying glass is a good addition for examining stones.
When you read a listing, look for these details:
- How many grit stages are included, and how much grit comes in each packet.
- What type of rocks are included, and how many.
- Whether the barrel is rubber or plastic.
- Whether replacement grit and stones are available from the same maker.
Be cautious about claims that are vague or that promise polished stones in a few days. Real polishing takes weeks, and the instructions should reflect that. If the listing does not describe the process clearly, read reviews from other buyers for notes about missing items or unclear steps.
Turning Tumbling into a Learning Project
A tumbler offers more than a pile of polished stones. It is a hands-on way to explore ideas such as hardness, abrasion and the way rocks change over time. Before starting, have the child examine the rough stones and describe them. Weigh the stones, sketch them and note their color and texture. At each stage, repeat the observations and record any changes. This turns the process into a small experiment with a log book.
You can add questions to investigate. Which stones become shiny first? Do different rocks lose different amounts of weight? What happens if you leave out one stage, using a spare batch? A simple hardness test using a copper coin, a nail or a piece of glass can introduce the idea of the Mohs hardness scale, with an adult’s help. Look up the rocks in a field guide or a library book to learn where they form.
Children can take part in many steps with supervision:
- Sorting stones by size, hardness and appearance.
- Measuring grit and water.
- Cleaning and rinsing between stages.
- Photographing the stones at each stage.
- Making labels or a display for the finished stones.
Keep expectations realistic and praise the process. Even stones that do not shine perfectly can be used for crafts, garden displays or a collection box. Sharing results with friends or classmates encourages interest.
When to Move Beyond a Starter Set
If a child enjoys the first batch, the next question is what to do. Options include buying more grit and stones for the same machine, upgrading to a larger tumbler or exploring related hobbies such as rock collecting, fossil hunting or jewelry making. Think about whether the starter machine suits larger batches and how long it is likely to last. Starter tumblers are generally smaller and lighter in build than hobby machines, so wear and tear from regular use can show up over time. Check the listing or the maker’s support page for spare belts, barrels and seals.
Consider the household as a whole. If the family enjoys the hobby together, a larger machine with a bigger barrel may be worthwhile. If interest fades, the kit can be stored for later or passed on to another family. A small tumbler holds its value as a gift if the box and contents are intact.
Signs that it is time to upgrade or replace:
- The motor sounds strained or the barrel turns unevenly.
- The barrel or seal leaks despite cleaning.
- The child wants to tumble much larger batches.
- Replacement parts are hard to find for the starter machine.
Whatever you choose, keep the focus on enjoyment. A modest machine that a child uses happily is better than an expensive one that sits in a closet.
Kids’ Rock Tumbler FAQ
How old should a child be?
Each maker sets a minimum age. Most start around the grade-school years, and an adult should always supervise.
How long until the rocks are shiny?
Expect a few weeks across all stages. Patience is part of the lesson.
Is it loud?
Rubber barrels hum, but a run goes on for days, so place the machine away from bedrooms.
Can we buy more rocks later?
Yes. Rough stones and extra grit are sold separately by many sellers.
What if my child loses interest halfway through?
This is common because the process is slow. Pause the machine, clean the barrel and store the stones, or run a small batch another time.
Can the tumbler run overnight?
Rock tumblers are designed to run continuously, but check the manual for any limits. Place the machine where noise and safety are not a concern.
Is it safe to leave the tumbler running when no one is home?
Many makers advise against unattended operation. Follow the manual and keep the machine on a stable surface away from water and flammable items.
Do I need to buy extra grit?
Often yes for a second batch, since kits include limited grit. Check the listing for what is included and where to buy refills.
Can we tumble sea glass or beach rocks?
Some can be tumbled, but hardness and condition matter. Check the maker's guidance and wash everything before use.
How do we know when a stage is finished?
The instructions give a time range for each stage. Check the stones by rinsing a few and looking for the expected smoothness before moving on.
What can we do with the finished stones?
Display them, use them in crafts, add them to a garden or make simple jewelry with adult help. They also make nice small gifts.
The Four Stages of Tumbling, Explained for Parents
Most kits follow the same sequence, and understanding it makes the long wait easier to manage. Stage one uses coarse grit to grind rough edges off the stones. Stage two uses a medium grit to smooth the surface left by the first. Stage three uses fine grit to prepare the stones for polish. The last stage uses polish, which brings up the shine. Some kits shorten this to three stages, and the listing or manual should spell out what your kit includes and how long each step runs.
Between stages, stones and the barrel must be washed very thoroughly, because a few grains of coarse grit carried into a later stage can scratch the stones and ruin the finish. This is the step children are most tempted to rush. A simple routine helps: use a bucket outdoors, rinse the stones under running water in a strainer, scrub the barrel and lid with an old toothbrush and let everything drain before the next run.
- Open the barrel only when the machine is stopped and unplugged.
- Do not pour slurry down an indoor drain, since the grit can settle and clog pipes.
- Keep a small container for used grit and dispose of it as local rules advise.
Which Stones Behave Well and Which Disappoint
The rocks you tumble matter as much as the machine. Stones of similar hardness polish evenly, and a mixed batch of hard and soft stones can leave the soft ones worn away or dull. Quartz types, agate and jasper are commonly used because they are hard and take a shine. Very soft stones may crumble into the slurry, and stones with cracks can break during a run. Starter kits usually include a mix chosen to work together, and it is better to follow the kit’s guidance than to improvise in the first batch.
Size variety helps too. A barrel filled with only large stones leaves gaps that let them crash against each other, while a mix of sizes cushions and polishes more evenly. Most makers recommend filling the barrel about two-thirds to three-quarters full, but follow your own manual. When a child wants to add a favorite rock from the yard, check its hardness first with a simple scratch test against a steel nail, and keep unusual finds for a separate experiment.
- Choose stones with similar hardness for a single batch.
- Avoid stones with obvious cracks, crumbly layers or a chalky feel.
- Fill the barrel to the level the instructions suggest, not higher.
Handling Disappointment and Keeping Interest High
A first batch rarely produces glossy gems. Pitted surfaces, cloudy patches and stones that look only half finished are normal, and it helps to say so in advance. Explain that professional lapidaries often run several cycles, and that a stone with a visible crack or soft spot is an honest result of nature rather than a failure. Some families keep a small tray of rough stones beside the finished ones, so a child can see the change.
Because the process is slow, give the child small jobs along the way. A wall calendar with the stage dates marked in color shows progress. A notebook with a sketch at each stage keeps the experiment tangible. If the machine runs in another room, a weekly check-in at the same time each week gives the project a rhythm. When a stage finishes, let the child choose how to handle the next step, with an adult present for grit and hot or heavy items.
Plan for what happens to the stones. A small display case, a jar by the window or a gift pouch for a grandparent gives the polished stones a destination, which makes the effort feel worthwhile.
Storing the Kit and Cleaning Up for Good
After the last stage, clean everything before you store it. Wash the barrel, lid and seal, let them dry fully and keep them away from heat, since a warped seal tends to leak. Keep leftover grit in its original packet inside a sealed bag, labeled by stage, and store it out of reach of small children and pets. Wipe the motor base with a dry cloth and coil the cord loosely. Storing the box lid and instructions together makes the next run much easier, because the timings are easy to forget after a few months.
If more than one child shares the kit, label each batch with a name and a start date on a piece of tape, and keep each child’s stones in a separate cup. It avoids arguments about whose stones are whose, and it makes it easy to compare results between batches. Take photographs under the same light each time, so the before and after pictures line up, and let each child write one sentence about what surprised them. Those small records often become the part families keep longest.
Frequently Asked Questions
Why do my tumbled stones look dull or scratched at the end?
The usual cause is leftover coarse grit carried into a later stage, or a stage that ended too early. Wash the stones and barrel very thoroughly between stages, and check the kit instructions for timing. Very soft or cracked stones can also finish dull no matter how carefully you tumble.
How full should I fill the barrel?
Most makers suggest filling the barrel roughly two-thirds to three-quarters full with a mix of stone sizes. Too few stones let them crash together, and too many stop them from moving. Follow your own manual and add the water and grit amounts it lists.
Can children handle the grit themselves?
An adult should measure and pour the grit and supervise cleanup. Grit is abrasive and can irritate skin and eyes, and fine dust should not be breathed in. Children can help with rinsing and sorting, using gloves, and everyone should wash hands afterward.
Where should I dispose of used grit and slurry?
Avoid indoor drains, since the grit can settle and block pipes. Many makers suggest letting the slurry settle in a bucket outdoors, pouring off the clear water and putting the solids in the trash. Check the manual and local rules for the correct method.
The Short Version
For a familiar brand, the National Geographic Hobby. For a smaller start, the Starter. For a science angle, the Dan&Darci. For gifts, the Discovery Mindblown. For collectors, the Smithsonian. For variety, the Playz.