A thread pitch gauge is a set of thin metal leaves cut with tooth patterns. You hold a leaf against a screw or a tapped hole until the teeth mesh with no gap, and the number stamped on the leaf is the pitch. The main choices are whether you need inch threads per inch, metric pitch or both, how many leaves you want and whether the tool folds into a case.
The six tools below run from a compact 51 leaf folding gauge to a chain of 45 nut and bolt checkers. Leaf counts, ranges and materials come from each listing page and are the makers’ own claims. We have not used these tools ourselves. Where a listing disagrees with itself or with the product type, we say so.
As an Amazon Associate we earn from qualifying purchases. Links below are affiliate links, and they do not change the product information we give.
What to Look For
| Feature | Why it matters |
|---|---|
| Units | SAE threads per inch and metric pitch need different leaves |
| Thread angle | 60 degree and 55 degree Whitworth forms are not interchangeable |
| Leaf count | More leaves cover more pitches in one tool |
| Case | A folding case or a chain keeps the leaves together |
In this guide
Specs at a Glance
| Gauge | Range and leaves | Material | Notes |
|---|---|---|---|
| Grip 35428 | 4 to 42 TPI; 0.25 to 5.5 or 6.0 mm | Steel | 60 degree profiles; 3.2 oz; range conflicts |
| Mitutoyo 188-151 | 4 to 42 TPI and 0.4 to 7 mm; 51 leaves | Not listed | Made in Japan; page text has errors |
| PEC Tools 5651 | 4 to 84 TPI in the title; 51 leaves | Hardened and tempered steel | Made in USA; locking case ends |
| QWORK 5-piece | SAE 4 to 84; metric 0.25 to 6.0 mm | Stainless steel, chrome finish | 60 and 55 degree gauges plus three center gauges |
| UNIPEC | 4 to 80 TPI; 28 leaves | Hardened steel | Inch only; folding; 1.76 oz |
| Manalete checker | 24 inch and 21 metric gauges | Steel | Chain of bolt size finders; 44 or 45 pieces |
The 6 Best Thread Pitch Gauges
Top pickBest for a basic inch and metric reference
1. Grip Thread Pitch Gauge MM and SAE
A steel gauge for 60 degree thread profiles, weighing 3.2 ounces. The title says it measures from 0.25 to 5.5 mm and 4 to 42 SAE, while a bullet says up to 6.0 mm, so the top metric size is not consistent. The maker says it saves you from measuring and calculating the pitch of a screw, nut or tapped hole.
Suits: a basic inch and metric reference. Strengths: both unit systems in one tool. Weaknesses: a conflicting metric range. Skip it if you need Whitworth 55 degree leaves.
Best for a named brand with a broad range
2. Mitutoyo 188-151 Screw Pitch Gage, 51 Leaves
A 51 leaf gauge covering 4 to 42 TPI and 0.4 to 7 mm, listed as made in Japan, weighing 3.2 ounces and measuring 3.8 by 1 by 0.8 inches. The page also says the power source is solar and the product type is a saw blade, which cannot be right for a hand gauge, so treat those fields as errors.
Suits: a named brand with a broad range. Strengths: 51 leaves and metric up to 7 mm. Weaknesses: wrong fields on the page and no material listed. Skip it if you want a clean listing.
Best for fine inch pitches
3. PEC Tools Screw Pitch Gauge, 51 Leaves, 4-84 TPI
A 51 leaf gauge listed as made in the USA, with every blade stamped with its thread size and a narrow blade shape that the maker says suits both internal and external threads. The blades are hardened and tempered steel, and each end of the case has a locking device that locks the set for storage or holds one blade in place during use. The title gives 4 to 84 TPI.
Suits: fine inch pitches. Strengths: a range to 84 TPI and a locking case. Weaknesses: the text does not mention metric leaves. Skip it if you need metric pitch.

View Screw Pitch Gauge, 51 Leaves, 4–84 TPI, Made In USA on Amazon

Best for mixed thread forms
4. QWORK 5-Piece Thread Pitch Gauge Set
A five piece stainless steel set with a polished chrome finish and anti-rust oil: one SAE 60 degree pitch gauge, one British Whitworth 55 degree gauge and three center gauges, two at 60 degrees and one at 55 degrees. The maker lists SAE from 4 to 84 and metric from 0.25 to 6.0 mm, plus Whitworth sizes, with small holes at the ends for adjusting and taking the gauge apart. It weighs 5.6 ounces.
Suits: mixed thread forms. Strengths: 55 and 60 degree gauges and center gauges. Weaknesses: the listing text on leaf counts is hard to follow. Skip it if you want one simple folding tool.


Best for inch threads only
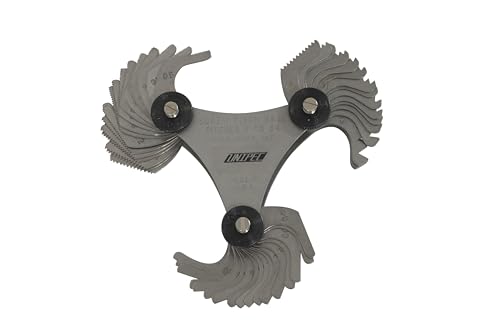
5. UNIPEC Screw Pitch Gauge, 4-80 TPI, 28 Leaves
An inch only gauge with 28 hardened steel blades from 4 to 80 TPI, including steps such as 4-1/2, 11-1/2, 56 and 72. The leaves pivot out and fold into a compact case, and each is permanently marked with its TPI. The page lists 1.76 ounces and a 4 by 4 by 1 inch size.
Suits: inch threads only. Strengths: a light folding case. Weaknesses: no metric leaves. Skip it if you work with metric fasteners.


Best for sorting loose bolts and nuts
6. Manalete 45 Pcs Nut and Bolt Thread Checker
A chain of steel bolt size finders, not a leaf gauge: 24 inch and 21 metric gauges that you thread onto a bolt or nut to find its size. The title says 45 pieces, while the details table says 44, so the count is not consistent. It identifies size by fitting a threaded gauge rather than by reading a pitch.
Suits: sorting loose bolts and nuts. Strengths: inch and metric sizes in one chain. Weaknesses: a conflicting piece count and no leaf pitch reading. Skip it if you want to read a pitch off a thread.

View 45 Pcs Nut and Bolt Thread Checker, 21 Metric/24 SAE, Steel, Chain on Amazon
Care and Setup
- Match the thread angle of the gauge to the thread you are checking.
- Press the leaf gently against the thread and look for light between the teeth.
- Clean oil and grit off the thread first.
- Keep leaves folded in the case.
Mistakes to Avoid
- Using an inch only gauge on a metric thread.
- Mixing 55 degree and 60 degree forms.
- Judging a fit with a dirty thread.
- Trusting a listing with obvious errors without checking the leaves.
Pitch, TPI and Diameter: The Terms Behind the Numbers
A thread is described by more than one number, and a pitch gauge answers only one of the questions. The diameter is the size of the fastener, measured across the crests of the thread, and it tells you which bolt or tapped hole you have. The pitch is the spacing between neighboring threads. Metric threads express pitch as the distance in millimeters from one thread crest to the next, so a smaller number means a finer thread. Inch threads express it as the number of threads in one inch, abbreviated TPI, so a larger number means a finer thread. The two systems run in opposite directions, which is a common source of confusion.
Within each system there are coarse and fine series for the same diameter. A common inch bolt of a given diameter may exist as both a coarse and a fine version, and the same is true of metric bolts. These are not interchangeable, even though the diameter is identical, so identifying the pitch is essential. That is the job of a leaf gauge: it tells you the spacing, while a caliper tells you the diameter.
Written designations combine both numbers, such as diameter followed by pitch, though notation varies between systems. If you know the diameter and the pitch, you can look up the thread in a standard chart. Make sure the gauge you buy covers the pitches you need in the units you use, because an inch-only tool cannot read a metric thread, and some listings above are explicit about this. Check the range printed on the listing, not just the title.
Identifying an Unknown Thread Step by Step
When you find a fastener with no markings, a methodical approach saves guesswork. Start by cleaning the thread with a brush or rag so that dirt and rust do not hide the teeth. Next, measure the outside diameter of a bolt with a caliper, or the inside diameter of a nut with the caliper’s inside jaws. Take the measurement at the crests. The reading will usually sit close to a standard size, and the nearest standard figure points you to a candidate.
Then use the gauge to find the pitch:
- Try a leaf that looks close and press it into the thread so the teeth sit in the valleys.
- Hold it up to the light and look for gaps. A correct leaf meshes fully and shows no light.
- If it rocks or leaves gaps, try the next leaf up or down until it fits.
- Note the number stamped on that leaf and whether it is a metric or inch gauge.
Finally, compare the diameter and pitch with a thread chart to confirm the standard. If the result is not on a standard chart, the thread may be a specialty or worn form. Test with a nut or bolt that you know is a match as a final check. The Manalete-style chain in the listings above works differently, since you thread a known gauge on and see which one fits, which can be quicker for sorting a pile of loose hardware but gives no pitch reading on its own.
Thread Forms and What a Leaf Gauge Cannot Tell You
Not all threads share the same shape. The 60 degree profile is the common form for unified inch and metric fasteners. The Whitworth form uses a 55 degree angle, and a leaf cut for one will not mesh perfectly with the other, even if the pitch number is the same. That is why the post stresses matching the thread angle, and why one listing above includes separate 55 and 60 degree gauges. If you work on older British equipment, check which form you need.
Pipe threads need special attention. Many pipe threads are tapered, meaning the diameter changes along the length, and a flat leaf can read differently along the thread. Some pipe threads also share pitch counts with ordinary threads, but they are not compatible. A pitch gauge can tell you the pitch of a pipe thread, but not whether it is tapered or straight, or which standard it belongs to, so check the fitting’s markings or a reference.
Also remember that a gauge measures spacing, not condition or tolerance. A damaged or worn thread may give a poor fit on every leaf. It does not tell you the class of fit, the thread length or the diameter. Left- and right-hand threads look the same to a leaf gauge, so check the direction by watching how the thread slopes. Treat the gauge as one step in identification and confirm with diameter, form and a matching fastener.
Leaf Sets, Center Gauges and Checkers Compared
The tools in this guide come in different styles, and each suits a different job. A folding leaf gauge holds many blades pivoting on one pin, so you can flip through pitches quickly and carry the set in a pocket. A larger leaf count covers more pitches, including halves and unusual steps, but the leaves are small, and a long set can be fiddly. Look for clearly stamped numbers that stay readable, and for a pivot that holds the leaves without letting them flop.
A center gauge, mentioned in the QWORK set, is a different tool: it is a flat gauge with a notch used to set a threading tool square to the workpiece on a lathe, and it is not used to identify pitch. If you do not do lathe work, you may not need it. Pay attention to what a set includes so you pay only for what you use.
A chain or ring of threaded checkers lets you screw a nut or bolt into a numbered gauge. It is fast for sorting a mixed pile of bolts and nuts and does not rely on reading a leaf, but it covers only the sizes it contains and typically will not read unusual pitches. Choose a leaf gauge for identifying and verifying pitch, and a checker for fast sorting. A buyer who works with both inch and metric fasteners should look for both unit systems in a clear layout, and a person who works on vintage equipment may need Whitworth leaves as well.
Care, Wear and When to Replace a Gauge
Pitch gauges are simple, but they are only useful if the leaves stay clean and undamaged. Wipe oil and grit from the teeth after each use, because debris in the notches leads to false readings. Keep the leaves folded into the body when not in use, and avoid prying with them, since thin blades bend easily. A light film of oil on the steel helps prevent rust, though some makers apply anti-rust oil already, and a very oily gauge can attract dust.
Handle the pivot with care. Do not overtighten or loosen the pin, and if the set is adjustable, follow the maker’s guidance. Store the tool in a dry drawer or box rather than loose in a toolbox with heavy tools that could bend the teeth. Keep it away from corrosive chemicals.
Inspect the leaves from time to time. Signs that it is time to replace the gauge include bent or rounded teeth, leaves that no longer mesh cleanly with a known good fastener, stamped numbers that have worn off, a pivot that has loosened so the leaves flop, and rust or pitting on the teeth. A good test is to check a bolt of known pitch: if the correct leaf does not fit smoothly, the gauge may be damaged. Because gauges are inexpensive compared with the mistakes they prevent, replace a doubtful one rather than guess. When buying a new gauge, favor listings that state the range, the units, the thread angle and the material clearly.
Which thread pitch gauge should you buy?
The best thread pitch gauge covers the units, thread forms and pitch range you actually meet. Match your fasteners to the tools named above.
- Grip Thread Pitch Gauge MM and SAE: a basic inch and metric reference for general repair, though its metric range is listed inconsistently.
- Mitutoyo 188-151: choose it for a named brand and a broad inch and metric range, and ignore the wrong fields on its page.
- PEC Tools Screw Pitch Gauge: suited to fine inch pitches, with a locking case, if you do not need metric leaves.
- QWORK 5-Piece Set: for mixed work with both 60 and 55 degree forms, plus center gauges for lathe setup.
- UNIPEC Screw Pitch Gauge: a light folding gauge for inch threads only.
- Manalete Thread Checker: for sorting loose nuts and bolts quickly, not for reading a pitch.
If you work on older British equipment, look for Whitworth leaves. If everything you own is metric, avoid an inch-only tool.
What to check before you buy a pitch gauge, and who should skip it
Before you buy a thread pitch gauge, check the units, the thread angle and the range printed on the listing. Some honest trade-offs follow.
- Confirm whether the leaves are inch, metric or both.
- Check the thread angle, 60 degree or 55 degree, against your fasteners.
- Compare the range in the title with the bullets and the table.
- Look for clearly stamped numbers and a pivot that holds the leaves firmly.
- Note whether a case or lock keeps the leaves together.
- Read the warranty and return terms on the listing.
The main limit is that a pitch gauge gives spacing only. You still need a caliper for diameter and a thread chart to confirm the standard. More leaves cover more pitches but make the tool bulkier, and a set with extras such as center gauges costs you for items you may never use. Some listings above also contain errors, so inspect the tool when it arrives.
You can skip a leaf gauge if you only sort loose hardware, where a checker chain is faster, or if you buy fasteners from marked packaging and never need to identify one.
Compare the picks above, check the current listing for size and what is included, then choose the one that fits how you will use it.
Going Deeper: How Each Gauge Earns Its Place
A thread pitch gauge is a small tool that prevents large mistakes. Every tap, die, nut and bolt decision downstream depends on identifying the thread in front of you correctly, and the cost of a wrong identification is paid in ruined threads and wasted hardware. The picks above divide into leaf gauges, which measure the spacing of the thread itself, and checkers, which identify a fastener by fitting it. This section examines each pick against real identification work, then sets out a careful identification routine and the limits every user should understand.
Grip Gauge and the Basic Dual-System Tool
The Grip gauge is the straightforward starting point: a folding leaf set covering both metric pitch and inch threads per inch for the common fasteners most people meet. For a home workshop identifying the bolts in a jar, the hardware on a bicycle or the fasteners on household machinery, that coverage answers the great majority of questions. Its appeal is simplicity: fan the leaves, find the one that seats, read the marking. The limitation is the boundary of its range. Unusual fine pitches, very coarse threads and specialist fasteners can fall outside a basic set, and the correct response when no leaf seats convincingly is to accept that the thread is outside the tool’s coverage rather than to declare the nearest leaf a match. Owners whose work stays within common hardware will rarely meet that boundary.
Mitutoyo Gauge and Broad, Trusted Coverage
The Mitutoyo gauge suits users who identify threads often and need a range they can trust across a wide spread of pitches. A maker with a metrology reputation earns its place in inspection and maintenance settings where the identification will be relied on by other people: a workshop identifying a customer’s fastener, a maintenance team ordering replacements, or a machinist verifying a thread before cutting its mate. The practical benefit of a broad, well-made leaf set is confidence at the extremes: fine leaves that still seat cleanly, markings that stay legible, and a pivot that keeps leaves aligned. If your identifications are occasional and your fasteners are common, a basic set will answer the same questions; if identification is part of your trade, the upgrade is in reliability rather than in kind.
PEC Tools Gauge and Fine Inch Pitches
The PEC Tools gauge is aimed at inch-system work where fine pitches are common: machinery, instruments, older equipment and the finer fastener grades that a coarse-oriented set skips over. Fine threads are where identification errors multiply, because neighbouring fine pitches look and feel similar, and a leaf forced into the wrong thread can appear to fit. A set that covers the fine steps densely lets you compare adjacent leaves honestly instead of settling. The user’s part of that bargain is patience: work through the candidates in order, seat each leaf fully along the thread, and check the fit against the light. If your work is mostly coarse construction fasteners, that fine coverage will sit unused, and a simpler set is the proportionate choice.
QWORK Set and Mixed Forms in One Purchase
The QWORK set bundles several gauge forms together, which suits a buyer setting up identification capability from nothing: leaf gauges for thread spacing plus the additional forms that help with related checks such as centring and angle work in a lathe context. For a home machinist or a general workshop, one purchase that covers the common identification tasks is efficient and keeps the tools together. The point to verify is the leaf coverage within the bundle: confirm the metric and inch ranges meet your fasteners, because a bundle’s convenience is no compensation for a gap at the pitch you meet monthly. Owners who already own some forms should price the missing single gauge before duplicating tools they have.
UNIPEC Gauge and a Light Inch-Only Tool
The UNIPEC gauge is the light, focused option for inch-thread work. A smaller leaf count makes it quick to search, easy to carry in a pocket or a machine-side drawer, and entirely adequate where the fasteners are known to be inch-system: maintaining a specific machine, a vehicle of known origin, or a collection of domestic hardware. The boundary is obvious and worth respecting: it will not identify a metric thread, and in a mixed-hardware environment an inch-only gauge invites the classic error of forcing the nearest inch leaf onto a metric thread. Choose it when the environment is genuinely single-system, and choose a dual-system gauge the moment your work crosses over.
Manalete Thread Checker and Sorting Fasteners
The Manalete checker solves a different problem from every leaf gauge above: not measuring an unknown thread in place, but sorting and identifying loose fasteners quickly. You try the bolt or nut against the checker’s male and female references until one fits properly, and you have the size and pitch together, diameter included. For the jar of mixed hardware, the spares drawer and the workbench after a teardown, that speed is unmatched, and it is the tool most likely to be used daily. Its limits are the mirror of its strengths. A checker cannot identify a thread you cannot fit to it, such as a tapped hole in a casting or a stud fixed in a machine, and its coverage is a fixed set of common sizes, so unusual threads fall outside it. Most well-equipped workshops end up with both forms: a checker for loose fasteners and a leaf gauge for threads in place.
Head-to-Head: Leaf Gauge Versus Checker
What Each One Actually Tells You
A leaf gauge tells you the pitch or the threads per inch, and nothing else. Diameter must be measured separately, usually with calipers, and the thread form is assumed rather than proven. A checker tells you the complete designation of a loose fastener it covers, diameter and pitch together, because the fastener either fits the reference or it does not. Understanding that difference prevents the commonest misunderstanding in this category: a pitch alone does not identify a bolt, and a purchase made on pitch alone can still be the wrong fastener.
Which to Buy First
Buy for your commonest situation. If your unknown threads are usually in place on machines, equipment and vehicles, the leaf gauge comes first, paired with the calipers you likely already own. If your unknowns are usually loose fasteners in mixed storage, the checker comes first and will pay for itself in a single sorting session. If both situations are weekly events in your workshop, plan for both tools from the start and treat them as one identification kit kept in one place.
A Careful Identification Routine
- Clean the thread first. Dirt, paint and corrosion fill the thread profile and stop a leaf seating properly, which produces false near-fits. A wire brush and a wipe transform most identifications.
- Measure the diameter. Use calipers across the outside of an external thread or the inside of an internal one, and note it before you touch the gauge. Diameter narrows the candidates dramatically.
- Form a shortlist by system. Decide whether you expect metric or inch from the fastener’s origin and diameter, then test leaves from that system first, while staying willing to cross over if nothing seats.
- Seat each candidate fully. Lay the leaf into the thread along its length, not just at the tip, and look for even contact with no rocking and no visible light gaps at the flanks.
- Compare the neighbours. Test the pitch above and below your candidate. A true match stands out clearly against its neighbours; if two leaves feel equally plausible, the thread may be damaged, non-standard or outside the set’s range.
- Confirm with a known fastener where possible. If you have a nut or bolt of the identified designation, try it. A correct identification accepts its mate smoothly by hand for the first turns.
- Record the result. Note the designation where you will find it again: on the parts list, the storage label or the machine itself. Identification done twice is time wasted once.
Working With Internal Threads
Threads inside a hole are harder to judge because you can see less of the leaf’s contact. Work with the best light you can arrange, seat the leaf at several positions around the hole where access allows, and be extra strict about the neighbour comparison, because partial contact in a hole can flatter a wrong leaf. Where the internal thread matters critically, such as a repair in an expensive casting, confirm the identification by carefully trying a known bolt of the candidate size by hand, and stop at the first sign of resistance rather than proving the fit by force.
Troubleshooting Difficult Identifications
No Leaf Seats Convincingly
Work through the causes in order. The thread may be dirty or damaged, so clean it and inspect for flattened or burred crests that distort the profile. The thread may be a form the gauge does not address, such as a pipe thread, which has its own standards and should be identified with the appropriate references rather than forced into a fastener conclusion. Or the pitch may simply fall outside your set’s range, which is a finding in itself: record the diameter, note that the pitch is outside your coverage, and use a broader gauge or a fastener supplier’s references rather than guessing.
Two Leaves Both Seem to Fit
This happens most with short threads, worn threads and fine pitches. Engage as much thread length as the fastener offers, compare the two candidates against the light in turn, and favour the leaf with full flank contact over the one that merely sits in the grooves. Measuring the diameter precisely often resolves the tie, because the two candidate pitches usually belong to designations with different expected diameters or systems. When doubt remains, test both candidate mates if you can obtain them, and let the hardware arbitrate.
The Identified Mate Will Not Start
Stop and re-check rather than reaching for a wrench. The first turns by hand should be smooth. Resistance at the start means the identification is wrong, the thread is damaged, or the mate itself is mislabelled or damaged. Inspect both threads, re-run the identification routine from a clean start, and chase or repair a damaged thread with the correct tap or die only after the designation is certain.
Decision Scenarios
Sorting Years of Mixed Hardware
Start with a checker and a set of labelled containers. Work through the jar in batches, test each fastener, and store by designation as you go. Keep the leaf gauge beside you for the pieces the checker cannot settle, and accept a small reject pile of damaged or genuinely unusual fasteners rather than forcing them into a category.
Maintaining Machines and Vehicles
Start with a dual-system leaf gauge and calipers, kept with the machine’s service tools. Your threads are in place, your systems are mixed by age and origin, and your identifications feed directly into parts orders, so the neighbour-comparison habit and a written record on the service sheet are worth more than any single feature.
Home Machining and Thread Cutting
Start with the broadest leaf coverage you will use, including the fine pitches your lathe work produces, plus any centre and angle forms your setup requires. In cutting work, identification is verification: check the thread you have cut against the gauge before parting off, while correction is still possible.
Care and Storage
Leaves are thin, precisely formed steel, and they stay accurate only while their profile stays true. Keep the set closed when not in use so the leaves are protected, wipe leaves clean and dry after use, particularly after contact with corroded fasteners, and store the gauge somewhere dry rather than loose in a damp toolbox. Do not force a leaf into a thread, use a leaf as a scraper, or fan the set carelessly; a bent leaf will flatter wrong threads from then on and should be regarded as unreliable. Periodically work through the leaves, checking that each pivots freely and that markings remain legible, because an identification tool you cannot read is no tool at all. Looked after this way, a pitch gauge is one of the longest-lived tools in the workshop, and one of the cheapest insurance policies against the most frustrating fastener mistakes.
Putting Identification Into Practice Across the Workshop
Identifying Fasteners During a Teardown
The best time to identify a thread is while the assembly is coming apart, not weeks later at reassembly. Keep the gauge and calipers with the teardown tools, and as each distinct fastener type comes out, identify it once and store it in a labelled compartment with a note of where it came from. Mixed assemblies, especially older machinery that has been repaired before, routinely contain more thread types than the original design, including replacements in the other measurement system that look identical at a glance. Discovering that during teardown is a curiosity; discovering it during reassembly, with a driver already applied, is damage. A labelled tray built during disassembly is the cheapest thread insurance in the workshop.
Ordering Replacements With Confidence
An identification is only as good as the order it produces, so translate your findings into a complete specification before buying: system, diameter, pitch or threads per inch, length, head style and grade or material where the application demands it. The gauge gives you the middle of that list; the rest comes from measuring the original and noting its markings. Where a fastener is structural, pressure-bearing or otherwise critical, match the grade as carefully as the thread, because a perfectly identified thread in the wrong grade is still the wrong fastener. Keep the old fastener until the replacement is fitted and proven, however bent or rusty it is, since it remains the only certain reference if the order arrives wrong.
Building a Workshop Reference Corner
Workshops that identify threads well tend to share a small setup: the leaf gauge and checker stored together, calipers in the same drawer, a thread reference chart on the wall, and a set of labelled sample fasteners in the common designations used as instant comparison standards. Building that corner takes an afternoon and repays it for years, because identification becomes a single trip to a known place with known tools. Add to it as your work demands: a second gauge with broader fine coverage when fine threads become common, or a pipe-thread reference when plumbing and fittings enter your workload, each added in response to real work rather than in anticipation of everything.
Common Identification Traps, Collected
Certain traps catch almost everyone once, and they are worth naming together. The near-match trap: a metric and an inch thread close enough to start together and certain to destroy each other under load. The painted-thread trap: paint or heavy plating filling the profile so a wrong leaf appears to seat. The worn-thread trap: a thread so worn that several leaves feel plausible and only diameter measurement plus a mate test can settle it. The short-thread trap: too little engagement length to judge a leaf, solved by testing at multiple positions and leaning on the diameter evidence. The assumption trap: trusting that a fastener is original to the machine when a previous repair substituted something else. Every one of these is defeated by the same combination this guide has repeated: clean the thread, measure the diameter, compare the neighbouring leaves, and confirm with a known mate by hand before force is ever applied.
Teaching Identification to Others
If others use your workshop, a five-minute demonstration prevents most of their mistakes: show them a clean thread and a dirty one, show them a leaf seating correctly and the same leaf rocking in the wrong pitch, and show them the neighbour comparison that settles close calls. People remember the feel of a correct seat far better than they remember a lecture about pitch. Leave the routine written inside the gauge’s storage place, and the standard survives your absence, which is when most borrowed-tool damage quietly happens.
How Wear Changes a Thread’s Story
A thread in service does not stay the thread it was made as. Repeated assembly stretches and polishes the flanks, corrosion thins them, and a fastener that has been over-tightened can distort enough that its pitch reads inconsistently along its length. When a leaf seats well at one point and poorly a few turns away, wear is a likelier explanation than a mysterious non-standard pitch, and the practical response is to identify the thread at its least damaged section and judge the fastener’s fitness for reuse separately from its designation. A correctly identified but badly worn fastener should still be replaced in any application that matters, because identification tells you what it was, not what condition it is in. Keeping those two judgements separate, what is it, and is it still good, is the mark of careful maintenance work, and a pitch gauge serves the first judgement while your eyes and judgement serve the second.
Thread Pitch Gauge FAQ
What does TPI mean?
It means threads per inch. A leaf marked 20 has 20 teeth along one inch.
Which gauge has the widest metric range?
The Mitutoyo lists 0.4 to 7 mm. The Grip and QWORK list up to 5.5 or 6.0 mm.
What is the difference between pitch and TPI?
Pitch is the spacing between threads, usually in millimeters for metric threads. TPI counts the threads in one inch for inch threads. Fine threads have a small pitch or a high TPI.
Can I use an inch gauge on a metric thread?
No. The tooth spacing is different, so the leaves will not mesh properly. Use a gauge that covers the unit system of your fastener.
How do I know if a thread is coarse or fine?
Measure the diameter, then find the pitch with the gauge and compare both with a thread chart. For the same diameter, a coarse thread has fewer threads per inch or a larger metric pitch.
Does a pitch gauge tell me the bolt size?
No. It gives the spacing only. Use a caliper to measure the diameter and combine both numbers.
Can I identify pipe threads with a pitch gauge?
It can give the pitch, but many pipe threads are tapered and follow special standards. Check the fitting's markings or a reference as well.
What is a center gauge used for?
It sets a lathe threading tool square to the work. You do not need one just to identify a thread pitch.
Why do none of the leaves fit properly?
The thread may be dirty, damaged, a different form such as Whitworth, or a pitch outside the gauge's range. Clean it and check the form and range.
Do I need both inch and metric thread pitch gauges?
Only if you work with both systems. An inch-only gauge cannot read a metric thread, and the reverse is also true. A combined tool or a pair of gauges covers mixed work.
How do I read the number on a pitch gauge leaf?
On an inch leaf the number is threads per inch, and on a metric leaf it is the pitch in millimeters. Check which side of the tool you are using. The leaf that meshes fully with no gap gives the answer.
What is the difference between a thread checker and a pitch gauge?
A pitch gauge reads the spacing by meshing a leaf with the thread. A checker is a set of threaded gauges that you screw a nut or bolt into to find which fits. The checker is quicker for sorting but gives no pitch reading.
Can I use a pitch gauge on an internal thread?
Yes, a leaf can be pressed against a tapped hole as well as a bolt. Clean the thread first and look for light between the teeth. A narrow leaf shape helps reach inside.
What if my thread sits between two leaf sizes?
The thread may be a worn or specialty form, or a different thread angle. Clean it and try neighboring leaves, then confirm with the diameter and a thread chart. A known matching fastener is a good final check.
How many leaves do I really need?
Enough to cover the pitches you handle. A larger set covers unusual steps, but a smaller set is lighter and easier to flip through. Check that the range matches your fasteners.
The Short Version
For a basic inch and metric tool, the Grip. For a broad range from a named brand, the Mitutoyo. For fine inch pitches, the PEC Tools. For mixed forms, the QWORK. For a light inch gauge, the UNIPEC. For sorting bolts, the Manalete.