Whetstone knife sharpeners put a stone behind a guide, a base or a clamp so you get a steadier angle than you do freehand. That makes them a friendly route for anyone who wants the clean edge of a stone without years of practice.
The six kits and systems below range from a simple stone kit with a holder to guided multi-stone sets. We have not used these products ourselves, so confirm the grit range, the angle options and what is included on the current listing before buying. Whatever you pick, expect a short learning curve.
As an Amazon Associate we earn from qualifying purchases. Links below are affiliate links, and they do not change the product information we give.
What to Look For
| Feature | Why it matters |
|---|---|
| Angle control | A guide or clamp holds the knife at a steady angle and speeds up learning |
| Grit range | Coarse stones repair edges, while medium and fine stones refine and polish |
| Stability | A non-slip base keeps the stone still, which is safer and gives better results |
| Knife range | Check that the system handles your kitchen, pocket and outdoor knives |
In this guide
Specs at a Glance
| Item | Material | Size | Notes |
|---|---|---|---|
| Sharp Pebble Whetstone Kit | Stone with holder | Dual-grit stone | Stone, base and guide |
| Smith Tri-Hone System | Stones in a tray | Three-stone set | Angled bench setup |
| Lansky Deluxe 5-Stone System | Stones and clamp | Five-stone kit | Clamp and guide rods |
| Work Sharp Guided Sharpening System | Abrasives on a guided base | Multi-angle setup | Guided angles; replaceable plates |
| Spyderco Tri-Angle Sharpmaker | Ceramic rods and base | Two sets of rods | Preset angles; no water |
| KME Precision Knife Sharpener | Stones on a clamp | Multi-stone set | Clamp and guided arm |
The 6 Best Whetstone Knife Sharpeners
Top pickBest for first-time stone users
1. Sharp Pebble Premium Whetstone Knife Sharpening Stone Kit
A dual-grit whetstone kit that usually includes a base for stability and an angle guide. It is a practical entry point for kitchen knife owners who want a gentle start with a stone, and the base keeps the stone from sliding while you work.
Suits: first-time stone users. Strengths: a friendly kit with a base. Weaknesses: a guide that may not suit every blade. Skip it if you want a fully guided clamp system.

Best for pocket and hunting knives
2. Smith Tri-Hone Sharpening System
A bench system with a tray of stones set at a preset angle. You rotate through the stones and draw the blade along them, which helps keep the angle steady and the routine simple to repeat.
Suits: pocket and hunting knives. Strengths: preset angle and simple use. Weaknesses: less suited to long blades. Skip it if you sharpen big chef knives.
View Smith Tri-Hone Sharpening System on Amazon
Best for steady guided sharpening
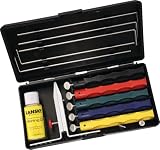
3. Lansky Deluxe 5-Stone Sharpening System
A clamp-style system with multiple hones and angle holes, so you can fix the blade in place and run a stone along guide rods. It has been a staple for years among hobbyists who value repeatable results.
Suits: steady guided sharpening. Strengths: a repeatable angle. Weaknesses: a slower, more setup-heavy process. Skip it if you prefer a quick pull-through.
Best for methodical sharpeners
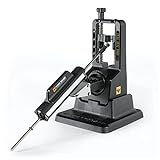
4. Work Sharp Guided Sharpening System
A guided system that holds the knife in place and offers angle choices, with abrasive plates for different stages. It suits users who want control and variety, and it handles both kitchen and outdoor blades.
Suits: methodical sharpeners. Strengths: multiple angles and good control. Weaknesses: more parts to store. Skip it if you want a single stone.
Best for touch-ups on many knives
5. Spyderco Tri-Angle Sharpmaker
A system built around ceramic rods set at fixed angles. You simply hold the blade vertical and stroke it down the rods, and no water is required, so it is neat and quiet. It is best for touch-ups.
Suits: touch-ups on many knives. Strengths: simple, repeatable strokes. Weaknesses: rods rather than flat stones. Skip it if you want a true flat whetstone.
View Spyderco Tri-Angle Sharpmaker on Amazon
Best for precision work
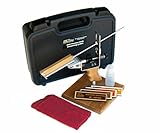
6. KME Precision Knife Sharpener
A clamp-and-arm style system that guides the stone across the blade at a chosen angle. It is aimed at users who want a precise setup for a wide range of knives and are happy to spend time learning it.
Suits: precision work. Strengths: accurate angle control. Weaknesses: takes patience to set up. Skip it if you only sharpen occasionally.
Care and Setup
- Rinse the stones and the guide after each session.
- Let stones dry fully before storing them.
- Flatten flat stones now and then so the surface stays true.
- Wipe the knife clean before you put it away.
Mistakes to Avoid
- Starting on a fine grit when the edge is damaged.
- Pressing too hard and gouging the stone.
- Changing angles mid-stroke.
- Skipping the burr check before switching stones.
Stones, Guided Systems and Rod Systems
Whetstone sharpeners come in more than one format, and the kits in this guide show the main ones. A plain stone kit gives you the stone and perhaps a base and angle guide, but you control the angle by hand. It has the lowest barrier to entry in cost and the highest learning curve, since consistent freehand angles take practice.
Guided systems clamp the knife and hold the stone at a set angle, which takes much of the guesswork out. They suit beginners, people sharpening a variety of knives, and anyone who values repeatable results over tradition. They take more storage space and some setup, and clamps may not suit every blade shape, such as very short, very wide or curved blades. Check what blade sizes the listing says it supports.
Rod or angle-fixed systems hold stones or rods at preset angles while you pull the knife through. They are often compact and forgiving, and a good fit for kitchen knives that need regular touch-ups. Like guided systems, they may offer only certain angles, so verify that those match your knives.
Pick the format that fits your patience and your knives. If you want to learn a skill, a plain stone rewards effort. If you want reliable results with minimal practice, a guided or fixed-angle system is easier.
Grit Progression Explained
Grit numbers describe how coarse or fine a stone is. Lower numbers cut quickly and remove metal, while higher numbers refine and polish the edge. Most sharpening follows a progression: a coarse stone to reshape or repair, a medium stone to set the edge and a fine stone to refine it. Skipping from very coarse to very fine leaves deep scratches that the fine stone takes a long time to remove.
Exact grit labels are not directly comparable across makers, since different companies use different standards and bond types. Treat the numbers as a rough guide and read the listing for how the maker describes each stone.
- Coarse: for chipped, very dull or badly damaged edges, or changing an angle. Use sparingly because it removes the most metal.
- Medium: for regular sharpening of dull but undamaged knives.
- Fine: for refining and a smoother cutting edge on kitchen knives.
Most home cooks do well with a medium and a fine stone, and add a coarse stone only if they deal with damage. Combination stones put two grits on one block and save money and space, though the two sides may wear at different rates.
Matching the Sharpener to Your Knives
Different knives have different edge angles and steels. Many Western kitchen knives have a wider edge angle, while many Japanese-style knives use a narrower one. Pocket knives and outdoor knives may use their own angles again. Check the maker’s recommended angle in the knife’s product information, and then check which angles your sharpener can achieve.
Steel hardness also affects the process. Harder steels can take a fine edge and hold it longer, but may be more brittle and need gentler handling and finer stones. Softer steels sharpen easily and are more forgiving, though they may dull sooner. If you own a mix of knives, a system with adjustable angles makes life easier.
Consider blade shape. Serrated knives, curved blades, very thick blades and knives with a bolster that blocks the heel of the edge can be awkward on some systems. Serrated edges generally need a rod or a specialized tool instead of a flat stone, so check what the sharpener supports before buying. Ceramic knives are very hard and usually call for diamond abrasives, so read the product listing for compatibility rather than assuming.
Keeping Stones Flat and Working
Stones wear unevenly as you use them. The middle gradually dishes out, and a dished stone makes it difficult to sharpen the heel and tip evenly. Many users keep a flattening plate or a coarse stone on hand to level the surface. Check whether the kit includes a flattening tool and whether the maker recommends one.
Whether a stone needs soaking depends on the type. Some are soaked before use, some only need a splash of water, and others use oil. Follow the manufacturer’s instructions, because the wrong liquid can clog or damage a stone, and a stone that has been used with oil should not later be used with water. Keep a damp towel or non-slip base under the stone so it does not slide.
A slurry of fine particles forms on the surface as you work, and it helps the cutting. Rinse it off at the end. Store stones dry and clear of dust, away from freezing temperatures if the manual warns against it. Diamond plates and fixed-angle rods need less flattening but benefit from a rinse and an occasional scrub to remove metal buildup.
Testing the Edge and Knowing When to Resharpen
You do not need fancy equipment to judge the edge. A sharp knife should bite into the skin of a tomato or slice thin paper cleanly without tearing or needing pressure. A dull knife slips, crushes soft food and takes force. Test on food you are about to cut, rather than on your thumb, and handle sharpened knives with care.
Look at the edge under good light. A bright, reflective line along the edge often means a rounded or dull spot. A burr, a thin lip of metal on one side, indicates you have sharpened enough on that side. Flip the knife and repeat, then lighten pressure on the finer stone to remove the burr.
How often to resharpen depends on use, the steel and the cutting surface. A hard cutting board such as glass or stone dulls knives quickly, while wood or soft plastic is gentler. A honing rod can realign a slightly bent edge between sharpenings, though it does not remove metal. When honing no longer restores the edge, it is time to go back to the stone. Sharpen little and often rather than waiting until the knife is very dull.
Whetstone Knife Sharpeners FAQ
Is a guided system better than a plain stone?
A guide helps you hold a steady angle, which beginners find useful. Experienced sharpeners often prefer a plain stone for speed.
Which grit should I start with?
If the edge is only dull, start medium. If it is chipped or damaged, begin coarser, then work through finer grits.
Do I need water or oil?
It depends on the stone. Water stones use water, and some stones need oil, so follow the maker guidance on the listing.
How long does sharpening take?
A first session may take half an hour or more. It gets faster as your hands learn the motion.
Is a beginner better off with a guided system or a plain stone?
Many beginners find guided or fixed-angle systems easier because they control the angle for you. A plain stone has more of a learning curve but offers flexibility. Choose based on how much practice you want to put in.
Can I sharpen serrated knives on a flat whetstone?
Generally not. Serrated blades usually need a rod or a tool made for their scallops. Check whether the sharpener lists serrated support.
What is a burr and why does it matter?
A burr is a thin lip of metal that forms on the opposite side of the edge when you grind to the apex. Feeling for it tells you that you have sharpened enough on that side. It must be removed with lighter strokes on finer grit afterward.
Do I need to soak my stone?
It depends on the stone. Some require soaking, some need only a splash and some use oil. Follow the manufacturer's instructions for your stone.
Can I use the same sharpener for pocket knives and kitchen knives?
Often yes, if it offers the right angles for each. Check the angle recommended for each knife and the sharpener's range. Adjustable systems tend to be more versatile.
How do I know the stone is worn out?
A stone that is deeply dished, cracked or too thin to hold safely should be replaced. A flattening tool can extend a stone's life if it is merely uneven. Diamond plates are worn when they stop cutting effectively.
How can I keep a stone from slipping while I work?
Use a non-slip base, a damp towel or a holder that comes with the kit. Keep your work area dry apart from the stone itself. A stable stone helps you keep a steady angle.
Abrasive Materials: What the Stone Is Made Of
Grit number tells you how coarse a stone is, but the material tells you how it behaves. Knowing the common types helps you read a listing and understand why two stones of the same grit can feel quite different in use.
- Aluminum oxide and similar manufactured stones are the most common in kits. They cut reliably, come in many grits and are generally affordable. Some are sold as combination stones with a coarse side and a fine side bonded together.
- Silicon carbide stones cut fast and are often used for coarse work or for flattening other stones. They tend to wear quickly.
- Diamond plates have industrial diamond particles bonded to a metal plate. They cut very hard steels quickly, stay flat, and need no soaking, though the surface can feel aggressive at first.
- Ceramic stones and rods are very hard and wear slowly, which makes them good for fine finishing and for fixed-angle systems.
- Natural stones are mined and vary from piece to piece. They are prized by enthusiasts, but are a poorer fit for a first purchase because of cost and their quirks.
Kits in this guide mix these approaches. A system with several different stones is useful because each one has a defined job, while a single combination stone is cheaper and takes up less room. If a listing does not name the abrasive, read the description for clues such as how the stone should be wetted, since that usually tells you what you are getting.
Setting Up a Sharpening Station
Many frustrating sharpening sessions are really setup problems. A stone that slides, poor light or a cramped counter makes every pass harder. Spend a few minutes on the workspace before you begin and you will get better edges with less effort.
- Choose a stable surface at a comfortable height, so your forearms can stay level while you work.
- Put a damp cloth or a rubber mat under the stone, or use the base that came with the kit.
- Light the work from the side so you can see the scratch pattern and the edge as it changes.
- Keep a cup of water, a spare towel and any flattening tool within reach.
- Clear the area of children and pets, and keep your phone away so you stay focused.
Allow enough time. Rushing leads to uneven pressure and a sloppy angle. For a first session with a dull knife, plan on a patient half hour, and expect later sessions to go faster as you develop a feel for it.
Common Edge Problems and What They Mean
If the result is not what you hoped, the edge itself can tell you what went wrong. Learning to read it saves repeated frustration.
| What you see or feel | Likely cause | What to try |
|---|---|---|
| Knife is sharp in one section only | Uneven pressure or angle along the blade | Work the whole length with the same motion, including heel and tip |
| Edge feels sharp then dulls fast | A leftover burr that folded or snapped off | Finish with light strokes on a fine stone to remove the burr |
| Edge catches and tears tomatoes | Edge not fully apexed, or rounded | Return to a medium stone and sharpen until a burr forms along the whole edge |
| Visible chips remain | Chips are deeper than the grit you used | Start with a coarser stone, then progress through finer grits |
| Edge looks rounded or shiny at the belly | Too much lift of the spine while sharpening | Check the angle and keep it steady through the curve |
Never judge by sound or feel alone. Look at the edge in good light, check for a burr by gently drawing a fingertip across the edge (never along it), and test it on something safe such as paper or a tomato.
Choosing a Starter Setup Without Overbuying
It is tempting to buy the biggest kit, but a good beginner setup is small. You need a way to hold a consistent angle, a medium abrasive to do the real work and a finer one to finish. Everything else can wait until you know what you enjoy.
Ask yourself a few questions. How many knives do you own, and what are they? A household with two kitchen knives and a pocket knife does not need a dozen stones. Do you want to learn the craft or just get sharp knives back? If it is the second, a guided or fixed-angle system is more forgiving. Do you have room to store the equipment? A compact set kept in a drawer gets used more often than a large one on a high shelf.
Check what the kit includes. A flattening tool, an angle aid and a non-slip base are all useful, and they add up when bought separately. If something important is missing, factor that into the real price before you compare kits.
Working Safely With Sharp Edges
A sharp knife is generally safer than a dull one, but the sharpening process has its own risks. Keep your fingers behind the edge and out of its path, keep the stone steady, and wipe the knife with a cloth that you fold away from the edge. Do not test sharpness by dragging a thumb along the edge.
Wear a cut-resistant glove on your guide hand if you are new, and take a break if your hands are tired. Fatigue causes slips. Store sharpened knives in a block, a sheath or a magnetic strip that protects the edge and your hands, and never leave one loose in a drawer or sink.
Finally, be careful with the slurry and metal particles. Wash your hands, rinse the knife and wipe it dry before using it on food, particularly if you used oil or a diamond plate.
Frequently Asked Questions
What is the marker trick for checking a sharpening angle?
Color the edge bevel with a permanent marker, make a few light passes on the stone, then look at where the ink came off. If it is gone along the very edge, your angle is right. If it is gone higher or lower, adjust until the ink wears evenly.
Can I sharpen scissors on a whetstone?
You can sharpen the single beveled edge on each blade, but it is fiddly, and the blades must be separated and kept at the right angle. Many people prefer a dedicated tool. If you try it, follow the original bevel and avoid touching the flat inner surface.
Is a whetstone better than a pull-through sharpener?
A whetstone removes less metal when used well and gives you control over the angle and finish, but it takes practice. Pull-through tools are quick and easy but can remove more steel and offer less control. The better choice depends on how much effort you want to put in.
Should I sharpen both sides of the blade equally?
For a symmetrical edge, work both sides with the same number of strokes and similar pressure, checking for a burr on each. Some knives, especially certain Japanese styles, have an uneven bevel, so look up the maker’s recommended edge before deciding.
The Short Version
For a gentle start, the Sharp Pebble kit. For pocket knives, the Smith Tri-Hone. For a guided clamp, the Lansky. For flexible angles, the Work Sharp. For a rod system, the Spyderco Sharpmaker. For precision, the KME.