A wood carving knife has a short blade that you control close to the work. Sets usually pair a cutting or sloyd knife for shaping with a detail or chip knife for fine lines. The main choices are the blade steel, the handle wood, which knives come in the set and whether a strop and compound are included to keep the edge keen.
The six sets below range from a four knife roll to kits that add a strop, compound, gloves and a pouch. Steel, handle and origin come from each listing page and are the makers’ own claims. We have not used these knives ourselves. Where a listing is thin or two fields disagree, we say so.
As an Amazon Associate we earn from qualifying purchases. Links below are affiliate links, and they do not change the product information we give.
What to Look For
| Feature | Why it matters |
|---|---|
| Knife mix | A roughing or sloyd knife removes wood, a detail knife handles small cuts |
| Blade steel | High carbon steel takes a keen edge but needs wiping dry |
| Handle | A smooth ash or walnut grip matters over a long session |
| Extras | A strop and compound keep the edge up between sharpenings |
In this guide
Specs at a Glance
| Set | Knives | Steel and handle | Notes |
|---|---|---|---|
| FLEXCUT KN100 | Cutting, detail, pelican, mini-pelican | 1095 high carbon; ash | 4-pocket tool roll; made in the USA (maker) |
| Flexcut KN600 | Cutting, detail, two palm tools | 1095 high carbon; ash | Redeemable offer for a tool roll |
| BeaverCraft S15 | Detail, chip, roughing | Not named; wood handle | Strop, compound, canvas roll, guide |
| BeaverCraft S15X | Detail, chip, roughing | High carbon; walnut | Strop, compound, leather pouch |
| BeaverCraft S19x | Three sloyd knives | High carbon; walnut | Leather roll, strop, compound; 0.37 kg |
| Hutsuls 8 piece | Whittling, hook, chip | Carbon steel; ash | Strop, compound, gloves, roll bag, gift box |
The 6 Best Wood Carving Knives

Top pickBest for carvers who want a mix of knife shapes
1. FLEXCUT 4 Piece Carving Knife Set KN100
Four knives, a cutting knife, a detail knife, a pelican knife and a mini-pelican knife, stored in a four pocket tool roll. The blades are 1095 high carbon steel and the handles are ash. The maker says the set is made in the USA. The listing shows a warranty field reading only “Na”, so check the maker’s terms.
Suits: carvers who want a mix of knife shapes. Strengths: four distinct knives and a roll. Weaknesses: no strop or compound listed. Skip it if you want a kit with sharpening extras.


Best for those who want knives plus palm gouges in one set
2. Flexcut Beginner Palm and Knife Set KN600
A set with an all-purpose cutting knife, a detail knife and two palm tools, all with 1095 high carbon steel blades and ash handles. The maker offers a redeemable free tool roll with the set. The overview lists a 1 inch blade length and a 16 ounce weight, and a lifetime warranty is described in the details.
Suits: those who want knives plus palm gouges in one set. Strengths: a mix of knife and palm tools. Weaknesses: the roll is a mail-in offer. Skip it if you want only knives.

Best for a first kit with sharpening extras
3. BeaverCraft Wood Carving Knife Kit S15
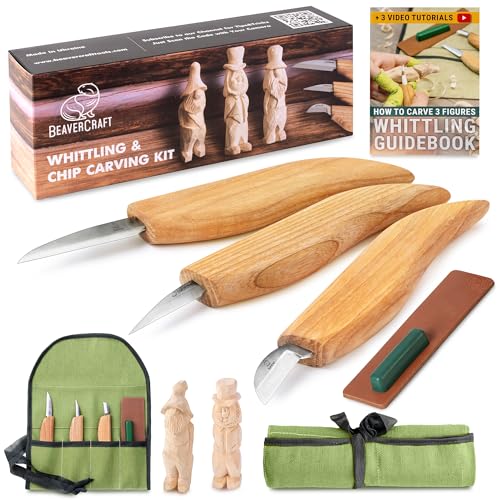
Seven items: a detail knife, a chip carving knife, a roughing knife, a leather strop, polishing compound, a canvas tool roll and a step-by-step guide. The maker says the knives are pre-sharpened and made in Ukraine. The listing names the handle as wood but does not name the blade steel.
Suits: a first kit with sharpening extras. Strengths: strop and compound included. Weaknesses: no steel named. Skip it if you need to know the alloy.

Best for carvers who like a walnut grip and a leather pouch
4. BeaverCraft Deluxe Wood Carving Knife Set S15X
The same three knives as the S15, a detail knife, a chip knife and a roughing knife, with black walnut handles, a leather strop, polishing compound and a leather pouch. The blades are listed as high carbon steel. The details table shows three items although more pieces are named.
Suits: carvers who like a walnut grip and a leather pouch. Strengths: three knives and care accessories. Weaknesses: the item count is unclear. Skip it if you want a canvas roll with a guide book.


Best for general whittling
5. BeaverCraft Deluxe Wood Carving Kit S19x
Three sloyd knives for different tasks, walnut handles, a leather tool roll, a leather strop and green polishing compound. The blades are high carbon steel and the maker says the kit is made in Ukraine. The listing gives 23.5 centimeters in length and 0.37 kilograms in weight.
Suits: general whittling. Strengths: three sloyd knives and a roll. Weaknesses: no detail or chip knife named. Skip it if you want tiny detail blades.


Best for spoon and bowl carving
6. Hutsuls Wood Whittling Kit, 8 Pieces
A gift box kit with a whittling knife, a curved hook knife, a chip carving knife, a leather strop, polishing compound, cut resistant gloves and a knife roll bag. The bullets give ash handles and carbon steel blades. The page has no specification table, so sizes are not listed apart from the box at 7.9 by 3.9 by 2.8 inches.
Suits: spoon and bowl carving. Strengths: a hook knife and gloves included. Weaknesses: sparse specs. Skip it if you need blade lengths before buying.

Care and Setup
- Wipe the blade dry after use and keep it in its roll.
- Strop lightly before and after a session if a strop is included.
- Follow the maker’s instructions for sharpening.
- Practice on softer wood before moving to hard wood.
Mistakes to Avoid
- Buying a large kit when you will use one or two knives.
- Assuming a listing names the steel when it does not.
- Skipping the strop and letting the edge go dull.
- Forgetting that palm tools differ from knives.
Choosing Wood and Reading the Grain
The wood you carve affects how a knife feels almost as much as the knife itself. Softer, even-grained woods are far easier to learn on because the blade moves through them with little effort and rarely tears. Basswood is a classic starting choice among carvers, and other soft woods can be good too. Harder woods demand a sharper edge, a steadier hand and more patience, and they dull blades faster.
Grain direction is the other lesson that saves frustration. Wood fibres run in lines, and cutting with them gives clean, smooth shavings. Cutting against them can lift or split the surface and make the knife dig in. If a cut leaves a rough, torn look, turn the piece and cut from the other direction.
A few habits help beginners:
- Take thin shavings rather than trying to remove a lot at once.
- Look at the surface before each cut and follow the lines you see.
- Avoid knots and cracks, which can catch the blade.
- Choose dry, seasoned wood, since very wet wood can behave unpredictably.
- Start with simple shapes, such as a small spoon blank or a basic figure, before attempting fine detail.
The knives in a set matter here too. A roughing knife removes bulk quickly in soft wood, a detail knife handles tight corners, and a hook knife is for hollowing. Matching the knife to the stage of the project keeps both you and the blade in better shape.
Grips and Safe Cutting Technique
Carving knives are sharp tools used close to the hands, so technique is part of the purchase. A few standard grips cover most cuts, and learning them early reduces the chance of injury.
- Push cut with the thumb as a brace. The thumb of the holding hand pushes against the back of the blade while the knife hand does the cutting, giving fine control for small removals.
- Pull cut toward the body. A short stroke in which the blade moves toward you, kept short and controlled, with the thumb braced against the work.
- Chest-lever cut. The knife hand is braced against the chest while the other hand moves the wood, giving power for larger removals.
- Stop cut. A small incision made across the grain to stop a longer cut from running past the line.
Whatever the grip, keep the cutting edge pointed away from your fingers and body when you can, and never cut toward a hand that is holding the wood. Work seated with the piece supported, and stop when your hands tire, because fatigue is a common cause of slips.
Protective gear is worth considering. A cut-resistant glove on the holding hand is a sensible precaution for beginners, and a thumb guard can protect the brace thumb. Gloves do not make a knife safe, and they do not replace careful habits. Follow the maker’s instructions, supervise young carvers closely, and keep a basic first aid kit nearby.
Sharpening and Keeping an Edge
A sharp knife is safer than a dull one, because it cuts with less force and is less likely to skid. Edges fade with use, and carvers keep them up through two tasks: stropping and sharpening.
Stropping is light, frequent maintenance. A leather strop, often loaded with polishing compound, removes the tiny burr that forms on the edge and restores keenness. Many carvers strop at the start of a session and again whenever the cut starts to feel harder. Pull the blade away from the cutting edge along the strop with the bevel flat to it, using light pressure and consistent angle.
Sharpening is heavier work, needed when stropping no longer brings back the edge or when the blade is nicked. It removes metal on a stone or a similar abrasive to reshape the bevel. Different makers recommend different methods, so follow the instructions that come with your knives. If you are unsure, learn from a trusted guide before working on a good blade.
Signs that an edge needs attention include:
- You must push harder to cut, or the wood crushes rather than slices.
- The cut surface looks fuzzy instead of clean.
- The blade drags or slips on the surface.
- A bright line appears on the edge when you look under a light, a sign of a dull or rounded edge.
Keep blades dry, wipe them after use, and avoid cutting dirt, nails or hard materials. High carbon steel often benefits from a light coat of a suitable oil if the maker suggests it before long storage.
Matching a Set to Your Skill and Budget
A larger kit looks like better value, but beginners often use only one or two knives for months. Think about the kind of carving you want to do before choosing. Spoons and bowls suit a hook knife and a general knife. Small figures suit a detail knife. Relief and chip carving use pointed blades and a steady hand.
Budget tiers can be described in broad terms:
- Lower-priced kits often bundle many pieces, including accessories. They can be fine for trying the hobby, but check the listing for what steel and handle material are named, and expect to learn how to sharpen.
- Middle-tier sets usually focus on fewer, better-documented knives, often with clearer support and care guidance.
- Higher-tier knives may suit regular carvers who want a particular steel, handle shape or maker reputation.
Before buying, ask yourself a few questions. Does the listing state the blade steel and handle? Does the set include a strop or will you buy one separately? Is the handle shape comfortable for your hand size? Are replacement parts or sharpening services available? Is the return policy clear? Younger carvers and left-handed carvers should check that the grip and blade shape suit them. If a listing is thin on detail, treat missing information as a reason to ask or choose another option rather than a reason to guess.
A Beginner’s Checklist for Choosing Carving Knives
Carving is a patient craft, and your first set should help you enjoy it. Consider the following before you order.
- Decide what you want to make. Spoons, small animals and decorative details each lean on different blade shapes.
- Check the handle size against your hand. A grip that feels too thin or too thick tires you quickly.
- Look for a set that includes a strop or honing compound, or plan to buy one with it.
- Pick a few pieces of soft wood, such as basswood, to practice on.
- Buy a pair of cut-resistant gloves and a thumb guard if you are new to knife work.
Treat the checklist as a guide, not a rule. As you carve, you will learn which blades you reach for most and which sit unused in the roll.
Choosing Between a Boxed Kit and Individual Knives
Newcomers often wonder whether to buy a boxed kit or build a collection one knife at a time. The table lays out the trade-offs.
| Question | Boxed kit | Single knives |
|---|---|---|
| Variety | Several shapes in one purchase | You pick exactly the shapes you want |
| Extras | Often includes wood blanks or a strop | Accessories are bought on their own |
| Learning | Good for trying out different cuts | Good once you know your style |
| Storage | Usually a roll or case | You arrange your own |
| Gifting | Easy to hand over as a package | Needs more thought |
A kit is a friendly way to explore, while single knives suit someone who already knows what they like. Either route works well, provided you keep the edge sharp and your technique steady.
A Short Glossary for Whittlers
- Sloyd knife: a general-purpose carving knife with a medium blade.
- Detail knife: a smaller blade with a pointed tip for fine work.
- Hook knife: a curved blade used for hollowing spoons and bowls.
- Strop: a leather strip that polishes the edge between sharpenings.
- Stop cut: a small incision that prevents a following cut from running too far.
- Push cut: a cut made by pushing the blade away with the thumb braced on the work.
Learning these words early will help you follow tutorials and ask experienced carvers sensible questions. Always cut away from your body and keep your free hand out of the blade’s path.
Setting Up a Safe, Comfortable Carving Space
Where you carve matters almost as much as what you carve with. A good space reduces mistakes and makes sessions more enjoyable.
- Sit on a stable chair with your feet flat, and rest your forearms on your knees or a table edge.
- Work in strong, even light that falls on the wood without throwing hard shadows across the blade.
- Lay a cloth or tray on your lap or bench to catch shavings, which also makes cleanup quick.
- Keep first aid supplies nearby, along with a towel for sweaty hands.
- Store sharp tools in a roll or sheath, never loose in a drawer.
Take breaks. Tired hands slip, and carving rewards patience over speed. Take thin shavings rather than forcing deep cuts, and rotate the work often so the grain helps you instead of fighting you.
Keep children away from sharp knives unless an adult guides every step, and follow the age guidance given by the maker of any kit. Treat each blade with respect, close or sheath it as soon as you put it down, and never try to catch a falling knife.
Planning a First Carving: From Blank to Finished Cut
The picks in this guide are sets, and a set only makes sense once you know the sequence of cuts a small carving actually needs. Take a simple spoon or a small animal figure as the model project. The work begins with roughing out, where a larger knife removes bulk and establishes the silhouette; this is the stage where most wood comes off and where a comfortable, stout blade matters more than fineness. Next comes shaping, where the forms are rounded, transitions are blended, and a medium detail knife does most of the work, cutting facets that get smaller as the shape approaches its final surface. Last comes detailing — eyes, texture, the clean-up of inside corners — where a short, fine point earns its place and where a dull edge does the most visible damage, because detail cuts have nowhere to hide. A set that covers those three stages without overlap or gaps is a good set, whatever its piece count, and a set with two knives that duplicate the roughing role while leaving you nothing fine is a poor one. Read the picks below against that sequence and you can see the logic of each kit: the Flexcut sets spread their blades across the stages, the BeaverCraft kits pair knives with the spoon and detail work many beginners actually do, and the Hutsuls kit casts the widest net for someone who does not yet know which stage they will enjoy most.
Choose the blank to match the plan. A blank that is already bandsawn or roughed to outline saves the slowest stage and lets a beginner reach the satisfying shaping cuts quickly, while a rectangular block teaches roughing but demands patience and a knife suited to bulk removal. Either way, mark the centre lines and the main reference lines on the wood before the first cut and re-mark them as they are carved away; beginners lose the symmetry of a figure not through bad cutting but through carving away their own reference marks in the first ten minutes. Work in short sessions at first. Grip strength and the small stabilising muscles in the hands tire quickly in new carvers, and tired hands make the two classic errors — pushing harder to compensate for fatigue, and letting the holding hand drift into the path of the blade. Stop while the cuts are still clean, strop the edge, and come back; the carving will be better for the pause and so will the carver.
Reading grain direction on a real blank
Grain reading becomes practical the moment a cut that sliced cleanly in one direction suddenly tears when you reverse it. On a real blank the grain rarely runs in one tidy direction: it swirls around the figure, runs out through a thin section, and reverses where the wood grew around a branch. The working rule is to cut so the blade exits into air or into a shallower surface rather than diving under rising fibres. When a cut starts to lift a splinter instead of severing a shaving, stop, withdraw, and approach the same spot from the opposite direction or at a shallower angle. Turning the work in your hand is not a failure of technique; it is the technique. Experienced carvers rotate the piece constantly, taking two short cuts from opposing directions to meet in a low spot, rather than forcing one long cut against the grain. Thin sections such as ears, tails and spoon necks deserve special respect: support them with the fingers of the holding hand directly behind the cut, take smaller bites, and finish them later in the session than you planned, when the surrounding bulk that once supported them has already been removed and you can feel how fragile they have become.
Head-to-Head: Comparing the Sets by the Work They Suit
The two Flexcut sets frame the first decision. The four-piece KN100 is a knife-only set aimed at the carver who wants quality blades across the main roles and already owns, or will separately choose, a strop and other support gear. The Beginner Palm and Knife Set KN600 mixes knives with palm tools, which changes the character of the work: palm tools excel at controlled, two-handed pushing cuts on relief and detail work, and many beginners find them easier to control than a knife for small shaping because the force comes from the palm with the fingers guiding close to the edge. If your imagined projects are three-dimensional figures and spoons, the knife-led sets lead; if relief panels, texture and small decorative work appeal more, the palm combination deserves a serious look.
The three BeaverCraft kits reward a closer comparison, because their names are similar while their contents serve different intentions. The S15 is the focused starter: the essential knives for whittling and spoon work, chosen to get a first project finished without decision fatigue. The S15X Deluxe expands the support around the same core idea — more complete finishing and maintenance gear, a better provision for keeping the edge working — suiting the beginner who knows they will continue and would rather buy the complete bench now. The S19x Deluxe kit widens the blade range further, suiting the carver who wants to try several carving styles in the first months rather than committing to one. The Hutsuls eight-piece kit casts the widest net of all: more shapes to experiment with, at the cost of the carver needing to impose their own order on the set. None of these is the wrong answer; the right answer is the set whose contents match the second and third projects you have in mind, not just the first, because the first project is mostly learning and almost any sharp knife teaches it.
What to do with a knife in the set you rarely use
Every set contains a blade that becomes a favourite and one that gathers dust, and that is normal rather than a buying failure. The rarely used knife often suits a stage you have not reached yet — the fine detail blade feels pointless during your rough-cut first month and indispensable during your detailed fourth. Give a set a few complete projects before judging any single piece. If a blade truly duplicates another, keep it as the rough-work or lending knife, or keep it stropped and reserved for the clean finishing cuts where a fresh edge matters. What you should not do is modify a knife early — regrinding a profile you have not yet learned to use destroys the very option you might want later. Skill changes the ranking of a set over time, and the knife you reach for at month six is frequently not the one you reached for at week one.
Setting Up and the First Hour With a New Set
Unbox the set at the bench and inspect every edge before any wood is touched. Factory edges on beginner kits vary, and a few minutes of stropping each blade at the start teaches you the maintenance motion while bringing every edge to a known, consistent state. Test each knife on the end grain of a softwood offcut: a ready edge slices a thin, clean shaving with light pressure; a blade that crushes or tears needs more stropping, or in stubborn cases a few passes on a fine stone before stropping. Lay the knives out in a consistent order — roughing, shaping, detail — and return each to its place as you work, building the habit that keeps edges from clashing in a roll or box and keeps your hand from searching among loose blades.
For the first hour, set one modest goal: a simple shape such as a butter spreader, a small mushroom, or a practice stick of repeated cuts. Practise the core cuts deliberately. The push cut, with the thumb of the knife hand braced on the back of the blade or the thumb of the holding hand pushing the blade, gives controlled power. The pull or paring cut, drawing the blade toward the thumb with the thumb acting as a stop and fulcrum, gives fine control for shaping. The stop cut, a shallow incised line that limits how far a following cut can run, is what keeps a detail from splitting past its boundary. Keep every cut away from your body, keep the workpiece secured or firmly held with the holding hand always behind the edge, and keep a first aid kit on the bench. Work over a tray or an apron that catches the piece if it slips, and never carve with a knife resting in your lap. When the hour ends, strop every blade you used before putting it away; the habit of leaving edges ready is what separates a set that stays sharp for years from one that quietly dulls into frustration.
Stropping technique that actually maintains the edge
Stropping fails for beginners in two predictable ways: too much pressure, which rounds the edge over the leather, and an inconsistent angle, which polishes one part of the bevel and misses another. Lay the bevel flat on the leather so you feel the whole bevel register, then draw the blade away from the edge with light, even pressure, as if you were trying to slice a thin layer off the strop without cutting it. Count strokes per side and alternate, keeping the count even so the edge stays centred. The edge is ready when it shaves a clean curl from softwood end grain and when it catches on a fingernail dragged very lightly across it rather than skating. Strop little and often — a short session every time the knife starts to demand more pressure — instead of waiting for a truly dull edge that stropping can no longer recover and that then needs a stone. A blade maintained this way can go a remarkably long time between stone sessions, which is why the strop, humble as it looks, is the most-used sharpening tool in most carvers’ kits.
Troubleshooting Carving Problems in Diagnostic Order
When a carving session goes badly, diagnose in order before blaming the knives. First, check the edge: most tearing, crushing and excessive effort trace back to an edge that needs stropping, and five minutes of maintenance fixes more problems than any change of tool. Second, check the grain: if the edge is keen but the cut still tears, you are cutting against rising grain, and reversing direction or shallowing the angle is the cure. Third, check bite size: a cut that stalls, chatters or splits ahead of the blade is usually too deep for the wood and the stage of work; take half the bite and let two cuts do the work of one. Fourth, check your grip and support: thin sections that flex away from the blade cannot be cut cleanly, so support them from behind or leave them thicker until the end. Fifth, check the wood itself: a blank with a hidden knot, a drying check, or grain that runs out through a critical section may not be salvageable as planned, and adapting the design to the wood you have is a carving skill, not a defeat.
Splits deserve their own note because they alarm beginners most. A split that runs ahead of the blade usually starts from a cut taken too deep across unsupported end grain, or from carving a thin section before the surrounding shape was established. Stop the split by cutting a stop line across its path on the safe side, then work toward the stop from the other direction with shallow cuts. Small splits in non-structural areas can be carved away as the shape refines; a split through a thin neck or handle may need gluing and a design adjustment. Either way, slow down: nearly every carving accident, to wood or to carver, happens in the minute after a problem appears, when frustration speeds the hands up. Set the piece down, strop the knife, look at the grain again, and resume at half pace.
Storage, Travel and Keeping a Set Ready
Carving knives stored loose destroy each other’s edges and eventually find a hand during a rummage, so the storage system is part of the kit, not an accessory. A roll that separates the blades, a box with individual slots, or a simple rack at the bench all work; what matters is that edges never touch each other or other steel, and that each knife goes back to the same place every time. Keep the set dry and lightly protected in a damp workshop, and keep the strop with the knives rather than in a sharpening drawer across the room, because maintenance that requires a walk happens less often. For travel, a closed roll inside a bag keeps the set legal, safe and organised, and a cut-resistant glove packed with it means the safety habit travels too. Inspect edges before a trip and strop at home; maintaining an edge at a kitchen table without your usual setup is harder than arriving with edges ready. Finally, keep the set complete: a missing detail knife tempts you to force a larger blade into fine work, which is how both carvings and fingers get hurt.
Choosing by User: Matching the Set to the Carver
For the complete beginner who wants a first finished spoon or figure, the focused starter kits are the honest recommendation: fewer decisions, edges that teach good habits, and everything needed to finish a project in the box. For the beginner who is confident this is a long-term hobby, the deluxe kits repay their completeness every time an edge needs attention mid-project, because the maintenance gear is present rather than postponed. For the carver drawn to relief and decorative work, the set that includes palm tools opens a style of cutting the knife-only sets do not cover. For a gift, choose the kit that lets the recipient finish something on day one without a shopping list of extras, and include wood if you can, since a knife set without a blank is a promise rather than a project. For a younger carver under supervision, the deciding factors are not blade count but control and safety: a comfortable handle, a blade length that cannot easily reach the holding hand, a glove that fits, and an adult who has read the safety guidance and stays present. In every case, the set that gets used weekly beats the larger set that stays in its box.
Extra questions readers ask about carving knife sets
How long does a typical small carving take a beginner? Expect the first simple project to take several relaxed sessions rather than one sitting, and treat that as normal; speed arrives with edge maintenance and grain reading, not with effort. Can I carve wood I find outdoors? Fallen branches of known, non-toxic species can carve well when sound, but avoid wood with rot, embedded grit, or any doubt about what it is, and let green wood’s behaviour — it carves easily and may crack as it dries — inform the design. Why do my cuts squeak and polish the wood instead of shaving it? The edge is likely slightly rounded from heavy-handed stropping or overdue maintenance; refresh it with lighter, flatter strokes, or a brief stone session if stropping no longer restores the bite. Should I oil my handles? A light coat of a food-safe oil on spoon handles and on dry wooden knife handles keeps them pleasant and protected; keep oil off the strop and off the blade’s bevel, where it would interfere with maintenance.
Finishing the Carving: Surface, Detail and Presentation
A carving is not finished when the shape is right; it is finished when the surface says what you intended. The last stage of work with the knives in these sets is a surface decision, and beginners often rush it because the exciting part feels done. Decide whether the piece will keep a faceted, knife-cut surface — lively, honest, and characteristic of whittling — or be refined toward smoothness with finer cuts, and in some styles a light sanding. If you keep the faceted surface, the final pass matters enormously: go over the whole piece with your sharpest detail knife, taking thin, even cuts that make the facets consistent in size and direction, so the surface reads as deliberate texture rather than unfinished roughness. Work under raking light and turn the piece constantly, because facets reveal themselves by light and shadow, and a patch carved under flat light will look foreign beside the rest. Cut with the grain wherever the form allows, since final cuts across the grain leave torn fibres that catch light differently and read as fuzz no matter how sharp the knife was.
Details come after the surface pass, in a deliberate order from the most structural to the most delicate: the separations between forms first, then the features such as eyes and mouths, then texture such as hair, feathers or bark. Use stop cuts to protect finished detail from later strokes, and keep the knife freshly stropped through this stage, because a detail cut made with a tiring edge tears exactly where the eye will look first. When the cutting is done, remove the whiskers — the tiny fibres standing in corners — with the knife tip rather than with abrasive, which rounds the crispness you worked for. Then decide on finish. Many small carvings need nothing more than handling, which burnishes them gently over time. Pieces that will be handled by others, used with food, or kept in a dry heated room benefit from a light coat of a suitable oil or wax, applied thinly and buffed, which deepens the colour and protects the surface without hiding the knife work under a glossy film. Test any finish on an offcut of the same wood first; finishes change colour more than beginners expect, and the test piece is cheaper than the surprise.
Photographing and gifting your work
If the carving is a gift or will be shown to others, two small habits elevate it. First, sign and date it discreetly — a knife-cut initial on the base or underside becomes part of the object in a way a pen mark never does. Second, look at it as a stranger would: set it on a plain surface, step back, and check the silhouette and the largest forms before the details, because viewers read a carving at arm’s length first. Small carvings live or die by silhouette, and a five-minute correction to an outline at this stage improves the piece more than an hour of extra detail. Wrap a gifted carving in cloth rather than paper, both to protect its thin sections and because unwrapping cloth slows the moment down pleasantly. None of this requires another tool; it requires the same attention at the end of the project that the sets in this guide received at its beginning.
Keeping a carving diary
One habit quietly accelerates everything else in this guide: a few lines written after each session. Note the wood, the knife you reached for most, where the grain surprised you, and whether the edge needed stropping sooner than expected. Over a few projects those notes become a personal reference no general guide can match, because they describe your hands, your wood supply and your sets as they actually behave together. The diary also settles buying questions honestly — the knife you keep wishing for in the notes is the knife to buy next, and the one never mentioned is telling you something too. Keep the notebook with the tool roll, keep entries short enough that you will actually write them, and date each project. Carvers who do this improve visibly faster than carvers who rely on memory, because every session starts from the recorded lessons of the last one instead of from a vague feeling of how it went.
Wood Carving Knife FAQ
What is the difference between a sloyd knife and a detail knife?
A sloyd knife has a longer blade for removing wood and shaping. A detail knife is shorter and pointed for small cuts.
Which sets include a strop?
The three BeaverCraft kits and the Hutsuls kit list a leather strop and compound. The two Flexcut sets do not.
What is the best wood for a beginner to carve?
Soft, fine-grained woods are the usual advice, and basswood is a common example. Whatever you choose, pick dry wood without knots, and follow the grain for smoother cuts.
How often should I strop a carving knife?
Many carvers strop before starting and again whenever the cut begins to feel harder. Light, frequent stropping keeps the edge keen and delays the need for full sharpening.
Is a cut-resistant glove necessary?
It is a sensible precaution, especially for beginners, but it does not make a sharp knife safe. Good technique, a sharp blade and a steady working position remain the main protection.
Can children use these kits?
Some listings mention young carvers, but the knives are sharp and need close adult supervision. Check the maker's age guidance and teach safe grips before letting anyone start.
Why does my knife tear the wood instead of slicing it?
The edge may be dull, or you may be cutting against the grain. Strop the blade, turn the piece to follow the fibres, and take thinner shavings.
Do I need a hook knife?
Only for hollowing, such as spoons and bowls. If you plan to carve figures or chip patterns, a general knife and a detail knife may be enough at first.
How should I store carving knives?
Keep them dry, clean and covered, ideally in a roll, sheath or case that protects the edge. Store them out of reach of children and away from damp.
When should I replace a knife?
Consider it if the blade is badly chipped or bent, the handle is loose or cracked, or sharpening no longer restores a good edge. Check the maker's warranty terms first.
The Short Version
For a four knife roll, the FLEXCUT KN100. For knives plus palm tools, the Flexcut KN600. For a kit with a guide, the BeaverCraft S15. For walnut handles and a pouch, the S15X. For three sloyd knives, the S19x. For a hook knife and gloves, the Hutsuls.


