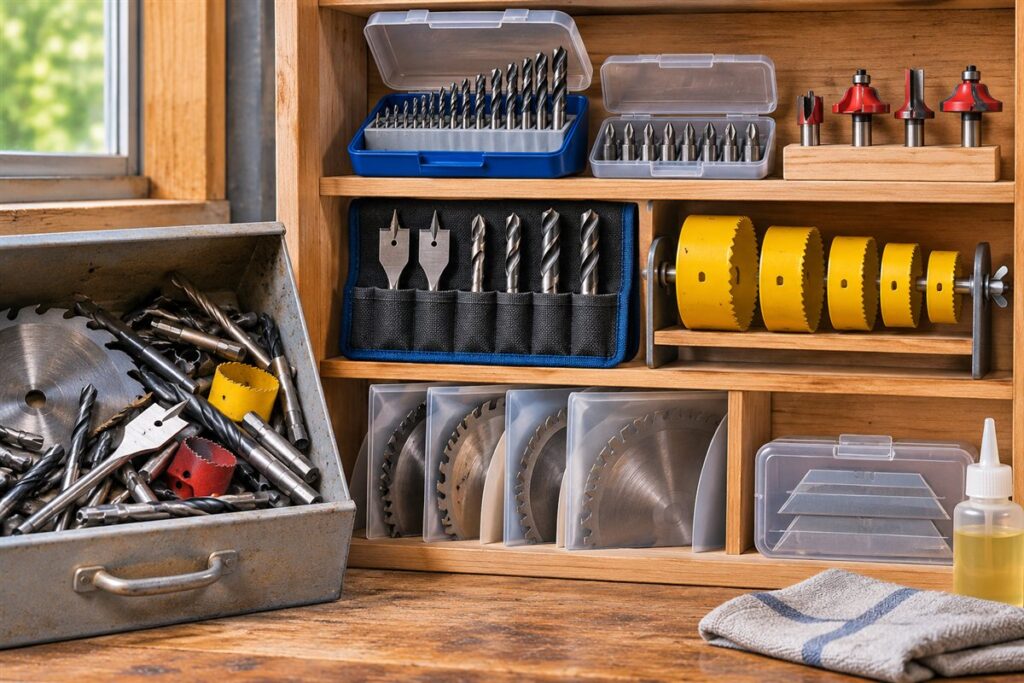
Bits and blades stay in good shape when each type has a labeled place that protects its edges. Sort by kind and size, store them upright or in cases, and keep sharp edges covered.
Why Organization Matters Here
Loose bits rattle together, dull their edges and hide at the bottom of a drawer. Blades can bend or chip if stacked, and exposed teeth can injure hands. A simple system saves time and protects your cutting edges.
Storage Ideas by Type
- Twist drill bits: index cases with a hole for each size, or a drilled block of wood labeled by size.
- Driver bits: bit holders with clear lids, or magnetic strips for the ones you use most.
- Spade and large bits: a roll-up pouch or a wall rack so tips do not knock each other.
- Hole saws: stacked on a rod or kept in a case with their arbors.
- Circular and jig saw blades: in their original sleeves, hung on a peg or stored in a labeled folder.
- Utility and craft blades: in a closed dispenser or a case with a lid.
Building a Simple System
- Gather every bit and blade into one place and discard anything bent, chipped or badly worn, following local rules for metal waste.
- Sort by type, then by size, so you can see the gaps.
- Choose storage that fits how you work: a portable case for jobs, a wall rack for the shop.
- Label the case or shelf, and mark sizes where the index is missing.
- Return each piece after use, and add a quick check to your end-of-job routine.
Comparing Storage Styles
| Style | Good for | Watch for |
|---|---|---|
| Index case | Full sets of drill bits | Missing sizes are easy to spot |
| Magnetic strip | Frequently used steel bits | Keep away from items that should not be magnetized |
| Wall rack | Shop with a fixed layout | Edges should face the wall or be covered |
| Soft pouch | Mobile work | Pointed tips can poke through thin fabric |
| Blade sleeve | Saw blades | Keep dry to limit rust |
Remove the battery or unplug the tool before changing any bit or blade, and handle sharp blades with care, using gloves if the manual or label advises it. Follow the tool maker’s guidance on which bits and blades fit each tool.
Reading Markings and Identifying Sizes
An organized collection is only useful if you can tell what each piece is. Many bits carry a size stamp on the shank, but wear, paint and tool marks can make it unreadable. Drill bits may be marked in fractions, decimals, letters, numbers or metric units, depending on the set. Driver bits are identified by drive type and size, such as the shape of the tip and a number or letter code. Saw blades usually have their diameter, tooth count and arbor size printed on the plate, often in small letters that fade.
Make labeling part of the system. Write sizes on the case or rack beside each position. For loose bits, a small engraved or color-coded mark on the shank can help. Use paint markers, colored tape or a small electric engraver if you have one, applying marks away from the cutting edges and surfaces that must fit the chuck. For blades, write the type and tooth count on the sleeve or a tag, along with the date you started using it.
If you have bits in both metric and imperial sizes, consider keeping them in separate cases, or label clearly so they do not mix. Note the closest equivalents on a card inside the lid. A drill gauge, which is a plate with holes of known sizes, helps you identify unmarked bits. A caliper can measure shanks and blades. Learn the main drive types, so you pick the right driver bit without trial and error.
- Mark sizes on the case as well as the bit.
- Keep a printed size chart in the lid.
- Check unmarked bits against a gauge before storing.
Portable Kits and Job-Site Organization
Bits and blades that travel need a different approach from those that stay in the shop. For work away from home, build a compact kit with the sizes and types you use most often. A hard case with a firm latch protects against crushing and keeps small items from spilling. Soft pouches or rolls are lighter, but sharp points can poke through thin fabric, so pick one with a sturdy lining.
Organize by task. A kit for hanging shelves might contain a few drill sizes, driver bits for common screw heads, a masonry bit and a stud-finding or marking tool. A kit for plumbing might hold hole saws and step bits. Pack only what you need for the job, plus a small set of spares for the pieces that often break or wear out, such as small drill bits and driver tips. Keep a list inside the lid of what the case should contain, and check against it when you pack up.
At the end of the job, return each bit to its slot before leaving. Walk through the area and check for dropped bits and blades. Shake out the case to clear dust and shavings, which can scratch or hold moisture. Keep spare blades in sleeves or with guards. Magnetic bit holders on the tool or belt keep driver bits within reach, but they should not be used for unrelated metal items that could be magnetized.
- Use a case with firmly shaped slots for small items.
- Keep a few common driver bits in a small tin as spares.
Protecting Edges and Preventing Damage
The cutting edge is the most delicate part of any bit or blade, and storage is where much damage occurs. Contact between hard edges chips carbide, dulls steel and bends thin blades. Separate items so they do not touch. Slots, foam inserts and individual sleeves all do this. Choose storage that holds each piece firmly, since a bit rattling in a loose slot suffers as much as one tossed in a drawer.
Consider how items rest. Long thin blades, such as jigsaw blades, stay straight when stored flat or hung from a hole in a stiff holder. Large circular saw blades are best stored vertically in slots or flat with protective sheets between them, never stacked directly. Router bits have delicate cutting edges and are best kept in a block or tray with a hole for each shank. Hole saws and spade bits benefit from racks that hold them by their shanks.
Protect against moisture. Rust attacks bare steel edges quickly in damp places. Wiping with a dry cloth and applying a thin film of light oil or a rust-preventing product helps, but wipe off the excess, particularly on bits that will touch a workpiece to be finished. A moisture absorber in the case or toolbox can help. Do not store bits that are still wet or covered with cutting fluid, since this can promote corrosion. Keep stored blades away from heat sources and direct sun, which can warp thin blades and degrade coatings.
- Cover cutting edges with guards where available.
- Do not stack blades directly on each other.
- Store in a dry place with stable temperature.
Sorting by Project Versus by Type
There are two basic ways to organize bits and blades: by type or by project. Sorting by type, such as all drill bits together and all saw blades together, makes it simple to find a particular size and spot missing items. It suits shops where you do varied work and reach for items as the need arises. Sorting by project, such as a kit for decking or one for cabinet installation, saves time when the same combination of items is used repeatedly.
Many people mix both approaches. A main collection is stored by type in the shop, and smaller job kits are assembled from it for particular tasks. The key is to know where the master copy is, so items return to their original place after the job. Use a simple check-out habit: when you take items for a kit, leave a marker, such as a colored tag or a note in the slot, so you remember to return them.
Within type, order items by size, so that the sequence is predictable. Place the most-used sizes at the front or at eye level. Keep rarely used specialty items in a separate case and label it. Review the collection once or twice a year to discard worn pieces, fill gaps and decide whether your system still suits your work. If you find items you never use, pass them on or recycle them following local guidance.
- Choose the sorting approach that matches how you work.
- Keep an index of what is in each case.
Inspection, Sharpening and Disposal
Organization pays off when it makes inspection easy. When you return a bit or blade to its place, take a second to look at it. Check cutting edges for chips, rounding, burning and discoloration. Look at shanks for bends, scoring and rust, and at saw plates for cracks, missing teeth and warping. Make the inspection part of your end-of-job routine, and set aside damaged items in a separate marked container, so they do not go back into the main collection.
Some items can be sharpened or serviced. Certain saw blades, router bits and chisels may be sharpened by a professional service, and the cost is often less than replacement for good-quality items. Home sharpening of twist bits is possible with the right jig and practice, but poor sharpening can ruin a bit. Follow the maker’s advice, and consider whether sharpening is worthwhile for the item. Low-cost bits and thin blades are usually replaced.
When it is time to discard, handle with care. Wrap sharp blades and broken bits in thick paper or place them in a rigid container before disposal, so that waste handlers are not cut. Check local rules for metal recycling, which may accept steel and carbide items. Do not throw loose blades into household bins. Take care with items contaminated by hazardous materials, such as old paint or treated wood residues, and follow local guidance.
Wear gloves and eye protection when sorting and cleaning old blades and bits.
FAQ
Should I oil bits?
A thin film on bare steel can limit rust in damp places. Wipe off the excess, and do not oil parts that the manual says to keep dry.
How do I tell when to replace one?
Burning, chatter, extra effort or a visibly rounded or chipped edge are common signs. Replace damaged ones instead of forcing them.
What is the best way to store router bits?
Use a block or tray with a separate hole for each shank so the cutting edges do not touch. Keep them dry and lightly protected from rust. Label positions by profile or size.
Can I store bits in a drawer?
Yes, if they are held in an organizer, foam insert or index case. Loose bits in a drawer knock together, damage edges and are hard to find. Add dividers or a holder.
How can I tell if a saw blade is dull?
Burning, slow cutting, rough edges and extra effort suggest dullness. Look at the teeth for rounded tips or chips. If sharpening is an option for your blade type, check the maker's advice, or replace it.
Should I keep bit packaging?
Original packaging often carries size and material information. If you discard it, transfer key details to a label. Keep packaging for specialty blades whose settings you may need later.
How do I organize small driver bits?
Use a bit holder with a clear lid, a magnetic strip or a labeled case with a slot for each size. Group by drive type, then size. Keep the most common sizes at the front.
Is it safe to store bits near magnets?
Steel bits will be magnetized by strong magnets, which is harmless for many uses but can attract swarf. Avoid placing magnets near sensitive equipment or electronics.
How often should I sort through my collection?
Once or twice a year is reasonable, or after big projects. Remove worn items, replace missing sizes and update labels. A quick scan when you put items back helps between sessions.
The Short Version
Sort by type and size, protect edges with cases, racks or sleeves, and label everything. Return each piece after use and discard damaged ones.