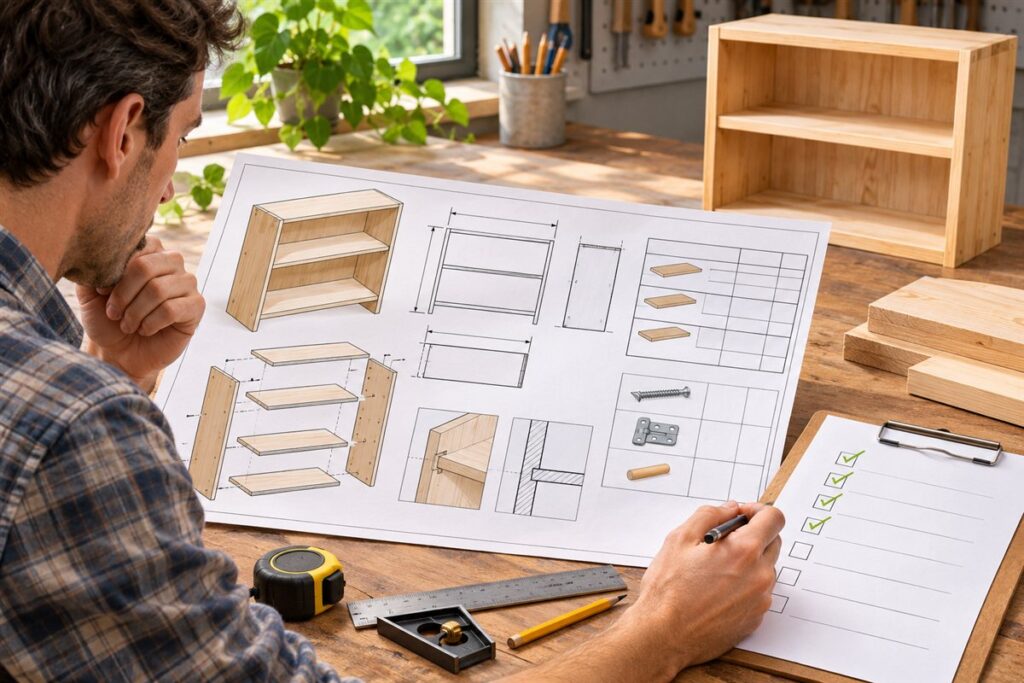
A simple project plan shows what to build, in what size, from which parts and in what order. To read one, look first at the overview, then the dimensions, then the parts list and step notes, and check that everything agrees before you cut anything.
The Parts of a Plan
Most hobby plans share a few common features, even though layouts vary.
- Overview drawing: shows the finished object, often in a 3D view.
- Views: top, front and side views show shapes and positions.
- Dimensions: numbers with lines that show length, width, height and spacing.
- Parts list: names each piece with its quantity and size.
- Hardware list: screws, hinges and other fixings.
- Notes: tips on order, joints and finishing.
Reading Dimensions Correctly
Check which unit system the plan uses, such as millimetres or inches, and whether the sizes are finished or rough. Many plans give finished sizes of the cut piece. Be careful with timber, because a board’s nominal size is often larger than its actual size. Always measure the real material you have before cutting.
A Reading Routine
- Scan the whole plan to understand the finished shape.
- Read the notes at the beginning, which often describe assumptions.
- Match the parts list with the drawings, labelling each piece.
- Add up key dimensions to check they agree. If a shelf is 800 mm wide, the sides and gaps should fit that width.
- Mark any step you do not understand and look it up or ask for help.
- Follow the order of steps, since some joints become impossible to reach later.
Common Symbols and Terms
| Term | Plain meaning |
|---|---|
| Dado or groove | A channel cut to hold another piece |
| Rebate | A step cut along an edge |
| Pilot hole | A small hole drilled before a screw |
| Typical or typ. | The same detail repeats |
| Centre line | Marks the middle of a part |
Check Before You Cut
Do a dry fit with scrap or cardboard where you can. If the plan includes electrical, structural or load-bearing parts, check local rules and ask a qualified professional to check it. Follow the maker’s manual for any tool you will use.
Practise on a small project first. A basic box or shelf teaches most of the symbols and habits you need, and the mistakes cost little. Over time you will begin to see how parts connect before you cut a single piece, which is the real benefit of reading plans carefully.
Scale and Drawing Types
Plans use several kinds of drawings, and each answers a different question. An isometric or perspective view shows how the finished piece looks, but its lines are distorted, so you cannot measure from it. Orthographic views, such as plan, front and side elevations, show true shapes and proportions, and these are the drawings that dimensions are usually attached to.
Check whether a drawing is to scale. A scale note such as “1:10” means one unit on the page represents ten in real life. If a plan has been printed or resized, the scale may no longer be accurate, so rely on written dimensions in preference to measuring the paper. Look for a note such as “not to scale”, which warns that proportions on the page may mislead.
- Exploded views: show parts pulled apart along guide lines so you can see how they join. They are helpful for assembly order.
- Section views: show the inside of a part as if it were cut open. A line with arrows marks where the cut was taken.
- Detail views: enlarge a small area, such as a joint or hinge location, and often carry their own scale.
- Hidden lines: dashed lines usually show edges you cannot see from that angle, such as a groove or a shelf behind a door.
Switch between views as you read. If a feature appears in one drawing, find it in the others and confirm that they agree on its position and size.
Tolerances, Clearances and Fit
Real parts never match their drawings perfectly, so a good plan leaves small gaps and a good builder allows for them. Tolerance describes how much a measurement may vary and still work. In woodworking and home projects, tolerances are often not written down, which means you must judge them yourself.
Think about what must fit and what can vary. A drawer that slides inside a frame needs a small clearance on each side, and the amount depends on the material, the slides used and the humidity. A shelf that sits between two sides needs a snug but not forced fit. Check the plan notes for stated gaps, and check the hardware instructions for required spacing, because drawer slides and hinges often list the clearances they need.
Materials also change with moisture and temperature. Solid timber expands and contracts, mostly across the grain, so tight panels in a frame can bind or crack if they have no room to move. Check whether the plan allows for this, and ask the designer or a knowledgeable supplier when it is unclear. When you are uncertain, test the fit with scrap, adjust before cutting good material, and remember that it is easier to remove a little more than to add material back.
Checking the Materials and Hardware List
The parts list tells you what to buy, but it is worth checking before you shop. Compare the list with the drawings to confirm that every part appears in both. Count quantities, and look for parts that appear in the drawing but not the list, such as small blocks, backing pieces or edge trim.
Look closely at material descriptions. Names like “pine board” or “plywood” cover many grades and thicknesses. Note the thickness, grade and finish, and check what is available near you. If you substitute a different material, think through the effects: a thinner board may be weaker, a different thickness changes joint sizes, and a different wood may take screws or finish differently.
Hardware deserves the same care. Screw length must suit the thickness of the parts so that points do not break through the surface. Check the diameter and type against the material, for example whether a screw is designed for wood, metal or masonry. Hinges, slides and brackets have a load rating and mounting requirements shown on their packaging or manual, so confirm that they suit the weight of your project. Add a margin of extra fasteners, as small parts are easy to lose or strip.
Spotting Problems in a Plan
Plans can contain errors, particularly free or hand-drawn ones. Learning to spot trouble before you start saves material and frustration. Begin by checking the arithmetic: do the part dimensions add up to the overall size? Do inner parts plus thickness equal outer dimensions? A mismatch of even a few millimetres or a fraction of an inch suggests a mistake or an unstated assumption.
- Missing information: a part without a thickness, a joint without a method or a step that skips a stage.
- Impossible order: steps that assemble a part you can no longer reach, or finishing before something must be glued.
- Unrealistic parts: spans that look too long or thin for the load, or fasteners that look too small.
- Inconsistent labels: a part called one thing in the list and another in the drawing.
When something looks wrong, do not guess. Check for an errata note or comments from other users if the plan has them, compare against a similar design, or contact the designer. Build a mock-up from cardboard or offcuts to test tricky parts. If the project involves load-bearing, safety-critical or code-regulated elements such as stairs, balconies or electrical work, have a qualified professional review it and check local rules before building.
Adapting a Plan to Your Space and Skill
Few plans fit your room or your tools exactly. Adapting them is common, but it needs care, because changing one dimension can affect others. Start by measuring the space and recording the real-world constraints: wall flatness, floor level, door widths, skirting boards and anything that might block access. Compare these with the plan’s overall size, then decide what to change.
When you alter a size, trace the effect on each part. Making a cabinet narrower changes the width of shelves, backs, rails and doors. Write the new numbers in a fresh cut list and redraw the affected views. Check that hardware still suits the changed dimensions; a longer shelf may need extra support, and a taller door may need more hinges.
Consider your tools and experience as well. If the plan calls for joints you cannot make, look for simpler alternatives, such as screws and glue in place of dovetails, as long as they suit the strength needed. If a plan assumes a table saw and you do not have one, ask the supplier to cut parts or choose a different saw approach. Keep the original plan unchanged and work from a marked-up copy, so you can go back if an adaptation fails.
FAQ
What if the plan and my materials disagree?
Adjust the plan to the real material, and recalculate related sizes. Write the changes down.
Can I trust any free plan?
Treat all plans with a critical eye. Check the numbers and compare against sensible sizes before cutting.
How do I tell if a plan is suited to a beginner?
Look for a clear parts list, few joint types, common materials and step-by-step notes with each stage explained. Beginner plans usually avoid complex angles and specialist tools. If many terms are unfamiliar, practise a simpler project first.
What does a dashed line on a drawing mean?
Dashed lines usually show hidden edges, such as a groove or a part behind another. Some plans also use dashes or chain lines for centre lines or cut positions. Check the key or legend, if there is one, to be sure.
Should I follow the plan's order of steps exactly?
Mostly yes, because the order often ensures that you can reach joints, apply finish and clamp parts. Change it only if you understand why the step is placed there. When unsure, dry fit the parts first.
Can I scale a plan up or down?
You can, but all dimensions, parts and hardware must be recalculated. Thickness and strength do not scale in a simple way, so a larger piece may need heavier material or extra supports. Treat it as a redesign and check the structure carefully.
What is the difference between nominal and actual timber size?
Nominal size is the trade name for a board, while actual size is what you measure after milling. The two can differ noticeably, so check the supplier's description and measure the stock before cutting.
Do I need to buy all hardware before starting?
It is wise to have the main fixings and fittings on hand, because they affect hole sizes and clearances. Read the packaging for any required spacing or hole diameter before drilling.
How can I practise reading plans?
Pick a small project, such as a box, and mark each part on the drawing with a highlighter as you cut it. Then compare the finished piece with the overview. This builds the habit of matching views and notes.
The Short Version
Read the overview, units, dimensions and parts list, then verify that they match your actual materials. Mark questions, dry fit, and ask a professional about structural or electrical details.