A bar clamp holds pieces together while glue dries or while you fasten or cut them. The jaws slide along a bar, so the opening grows with the bar length. The main choices are the opening size, the style of bar, the listed clamping force and whether the pads are soft enough for the work.
The six sets below run from small one-handed 6 inch clamps to a four pack of 24 inch parallel clamps and a pipe clamp head. Sizes, loads and materials come from each listing page and are the makers’ own claims. We have not used these clamps ourselves. Where a listing disagrees with itself on the force, we say so.
As an Amazon Associate we earn from qualifying purchases. Links below are affiliate links, and they do not change the product information we give.
What to Look For
| Feature | Why it matters |
|---|---|
| Opening | The longest piece you can hold sets the size you need |
| Throat depth | Deeper jaws reach further from the edge |
| Style | One-handed, screw and parallel designs work differently |
| Pads | Soft pads protect the surface of the work |
In this guide
Specs at a Glance
| Clamp | Opening and count | Listed load | Notes |
|---|---|---|---|
| IRWIN mini 6 in | 6 in; 4 pack | 140 or 150 lb (conflict) | One-handed; resin body; lifetime guarantee |
| VEVOR parallel 24 in | 24 in; 4 pack | 1500 lb | PA6 handles; 45 steel bar; clamp or spread |
| SHALL 12 in | 12 in; 4 pack | 600 lb | 2-1/2 in throat; quick-release latch; alloy steel |
| JORGENSEN E-Z Hold | 6 in; 4 pack | 200 lb normal (conflict) | 2-3/8 in throat; clamp or spreader |
| Bessey BPC-H34 | Depends on pipe; 1 head | Not listed | H style foot; Acme thread spindle; soft pads |
| IRWIN medium-duty 12 in | 12 in; 5 pack | 300 lb | I-beam bar; swivel jaws; Quick-Change to spreader |
The 6 Best Bar Clamps
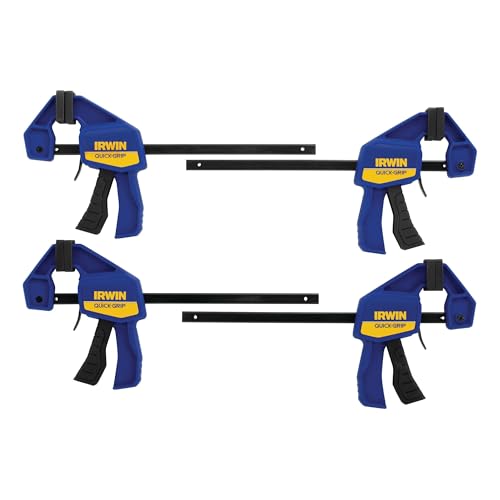
Top pickBest for small pieces and tight spots
1. IRWIN QUICK-GRIP Mini Bar Clamp 4 Pack, 6 in
A four pack of 6 inch one-handed clamps with a resin body, hardened steel bars and non-marring pads, described as 25 percent smaller than the regular Quick-Grip line. The maker backs them with a lifetime guarantee. The details table lists 140 pounds of force while a bullet says up to 150 pounds, so the force figure is not consistent.
Suits: small pieces and tight spots. Strengths: one-handed use and four clamps. Weaknesses: a short 6 inch opening and a mixed force figure. Skip it if you glue wide panels.

View IRWIN Quick-Grip 1964758 One-Handed Mini Bar Clamp 4 Pack, 6″, Blue on Amazon

Best for panel glue-ups
2. VEVOR 24 in Parallel Bar Clamp Set, 4-Pack
Four 24 inch F clamps with parallel clamping faces, a listed 1500 pound load and PA6 handles reinforced with 30 percent glass fiber. The bar is 45 carbon steel and the pads are soft rubber. The jaws can be reversed to spread. The listing weight is 26.5 pounds for the set.
Suits: panel glue-ups. Strengths: a long opening and a high listed load. Weaknesses: heavy at 26.5 pounds. Skip it if you want a light, one-handed clamp.

View VEVOR 24″ Parallel Bar Clamp Set, 4-Pack, 1500 lbs Load Limit on Amazon

Best for general woodworking
3. SHALL 12-Inch Steel Bar Clamps, 4-Pack
Four medium-duty F clamps with a 12 inch maximum opening, a 2-1/2 inch throat depth and a listed 600 pound load. The maker lists a quarter inch thicker hardened steel bar, quick-release latches, grooves cut into both sides of the bar, rubber handles and soft jaw pads.
Suits: general woodworking. Strengths: a clear size and load listing. Weaknesses: 12 inches only. Skip it if you need to reach across wide boards.


Best for light glue-ups and repairs
4. JORGENSEN E-Z Hold 4-Pack 6 in Bar Clamps
Four light-duty one-handed clamps with a 6 inch opening and a 2-3/8 inch throat. The bar is plated high carbon steel and the handle is glass-filled nylon. The maker says two clamps can join to double the opening and that each converts to a spreader. It lists a 200 pound normal load, then a bullet claims up to 300 pounds, while the table shows 150 pounds, so check the manual.
Suits: light glue-ups and repairs. Strengths: clamps can be linked end to end. Weaknesses: three different force figures. Skip it if you need a heavy-duty load.

View JORGENSEN E-Z Hold 4-Pack 6″ 200LBS Light Duty Woodworking Bar Clamps on Amazon

Best for long edge-gluing runs
5. Bessey BPC-H34 3/4 in H Style Pipe Clamp
A single pipe clamp head sold for 3/4 inch pipe, with an H shaped foot that the maker says steadies it in two directions, a tall base, malleable cast jaws, an Acme threaded spindle and replaceable soft pads. The maker says it works with a variety of pipe lengths, so the opening depends on the pipe you add. The listing does not say a pipe is included, and one bullet mentions a BPC-H12 model.
Suits: long edge-gluing runs. Strengths: any length by changing the pipe. Weaknesses: you supply the pipe. Skip it if you want a clamp ready to use out of the box.


Best for a drawer of everyday clamps
6. IRWIN QUICK-GRIP Medium-Duty 12 in Bar Clamp, 5 Pack
A five pack of 12 inch one-handed clamps with a resin body, an I-beam bar, swivel jaws, non-marring pads and a Quick-Change button that turns each into a spreader. The maker lists 300 pounds of sustained clamping pressure and a one-handed trigger release.
Suits: a drawer of everyday clamps. Strengths: five clamps and one-handed use. Weaknesses: 300 pounds is lower than the screw types. Skip it if you want a parallel face.

View IRWIN QUICK-GRIP One-Handed Bar Clamp, Medium-Duty, 12″, 5 Pack, 1964718 on Amazon
Care and Setup
- Use scrap pads or the supplied pads between the jaw and the work.
- Follow the maker’s instructions and listed load.
- Wipe glue from the bar before it dries.
- Store clamps with the jaws open.
Mistakes to Avoid
- Buying 6 inch clamps for wide panels.
- Counting on the highest force figure when the listing shows several.
- Forgetting that a pipe clamp head needs pipe.
- Overtightening on soft wood.
Capacity, Throat Depth and Reach
Three measurements decide whether a bar clamp suits a job. Opening capacity is the maximum distance between the fixed jaw and the movable jaw, which sets the widest workpiece you can hold. Throat depth, sometimes called reach, is how far the jaws extend from the bar, and it determines how far from the edge of a panel you can apply pressure. Clamping force depends on the design and the user, and listings do not always state it, so look for the maker’s own description rather than assuming.
Work out the widest assembly you build. Gluing up a tabletop from several boards needs clamps long enough to span the full width with room for cauls and clamping pads. A picture frame or small box needs short clamps. A set of clamps that is too short cannot be used at all, while a set that is much longer than the job is clumsy and may droop under its own weight.
- Short clamps: small boxes, frames, drawers and quick holding jobs.
- Medium clamps: cabinet parts, panels and chairs.
- Long clamps: tabletops, doors and large glue-ups.
Having several sizes is more useful than a large number of the same size.
Jaw Pads and Protecting the Workpiece
Metal or hard plastic jaws can dent soft woods and leave marks on finished surfaces. Pads on the clamp faces spread the pressure and protect the work. Many clamps come with rubber or plastic pads, some fixed and some removable. Check the listing for pad material and size, and make sure they do not smear dark marks onto light wood. Some pads can leave residue when they warm up or are left on the surface for a long time.
When clamping glue joints, scrap wood blocks placed between the jaws and the work distribute pressure over a larger area and prevent dents. Wax paper or packing tape on the blocks stops them sticking to squeezed-out glue. For clamping across a wide panel, cauls, which are straight pieces of wood placed above and below the glue-up and clamped across the joint, help keep boards flat.
Avoid over-tightening. Too much pressure squeezes out most of the glue, starving the joint, and can bow boards or distort frames. Tighten until the joint closes with a thin bead of glue, then stop. For metal or plastic work, use soft pads to avoid scratches. If the pads on your clamps wear or fall off, replacements may be available from the maker, so check before discarding the clamp.
Clamp Spacing and Glue-Up Technique
How you place clamps matters as much as which ones you own. For a panel glue-up, space clamps along the joint at regular intervals, and alternate them above and below the panel. This balances the pressure and helps prevent the boards from bowing upward or downward. Place the end clamps a short distance in from the edges, not right at the end, where pressure can cause the board to slip.
Before applying glue, dry-fit the parts with clamps set to the right opening. This rehearsal shows if you have enough clamps, whether the sizes are right and whether the parts align. Have pads, a mallet and a damp rag at hand. Once glue is on the joint, you have limited working time, so plan the order of tightening. Start in the middle and work outward, or follow the maker’s recommendation, then check for squareness with a measuring tape across the diagonals.
Keep the clamp bars off the glue line. Squeezed-out glue can react with iron and steel and leave dark stains in some woods, so use wax paper or tape where bars cross the work. Wipe off excess glue with a damp rag or let it gel and scrape it away, depending on the glue instructions. Leave the clamps on for the time stated on the glue label before removing.
F-Style, Pipe and Parallel Compared
The three types in this guide handle pressure differently. F-style clamps have a fixed head and a sliding head on a bar, and a screw tightens the jaws. They are simple, widely available and suit general work. Their jaws can tilt slightly under heavy pressure, so they are less ideal when you need perfect squareness.
Pipe clamps use heads that mount on a length of pipe you supply separately. They can be configured to nearly any length by changing the pipe, which makes them economical for long spans. You need to buy or find pipe of the right diameter and thread, and the weight of the pipe can make them awkward to handle.
Parallel clamps have wide, flat jaws designed to stay parallel under load, which keeps panels and carcasses square and flat. They are well suited to cabinet work and frames. They are usually heavier and take more storage space. Which is best depends on the work: general repairs and light glue-ups suit F-style, long panels suit pipe clamps and precision assemblies suit parallel clamps. Check the product listing for what the clamp includes and what you must buy separately.
Storage, Maintenance and Inspection
Clamps work for years if they are kept clean and dry. After a glue-up, scrape off dried glue from the jaws and bar, and wipe the screw threads. Glue buildup stops the sliding head from moving smoothly and prevents full closure. A little paste wax on the bar helps the head slide, and a drop of light oil on the screw threads keeps them turning easily, but keep oil off the jaws that touch the work, since it can contaminate wood and spoil finishes.
Store clamps on a rack, hooks or shelf so the bars do not bend and the jaws do not bang into each other. Hanging them in a dry place prevents rust. Bars that sit in damp conditions can pit, which makes the head catch.
Inspect regularly. Look for bent bars, stripped threads, cracked handles and heads that no longer lock. A bent bar will not hold pressure evenly. A clamp with a slipping head is unreliable and can release unexpectedly, which is a hazard during a glue-up. Retire damaged clamps or repair them if the maker supplies parts. Do not use a cheater pipe or hammer to add force to a handle, since that can damage the screw and the work.
How Each Clamp Set Earns Its Place in a Real Workshop
A clamp is only ever judged at the moment the glue is already spread. That is when you discover whether the jaws reach, whether the pads stay put, and whether one more hand would have been useful. This section looks at the six sets above the way they are actually used: in glue-ups, in repairs, and in the small holding jobs that fill most workshop days.
The IRWIN QUICK-GRIP Mini 4 Pack for Light, Fast Holding
The mini clamps are the ones that live within arm’s reach. Their job is not panel glue-ups; it is holding a stop block, pinning a small part while adhesive grabs, keeping a workpiece against a fence, and a hundred other two-second tasks where walking to the clamp rack would take longer than the job. One-handed operation is the whole point, and the honest limitation is clamping force and reach. Asking a mini clamp to close a sprung panel joint is asking for disappointment and possibly a spoiled glue-up. Choose the pack if your bench work is full of small parts and jigs. Skip it as your only clamps if furniture panels are your main project, because you will outgrow their capacity in the first build.
The VEVOR 24 in Parallel Set for Panel Work
Parallel clamps exist for one reason: keeping panel glue-ups flat while pressure is applied evenly along the joint. The VEVOR 24-inch set suits the hobbyist who builds table tops, cabinet doors, and cutting boards and has felt the frustration of a panel that bowed because sash-style pressure pulled it out of plane. Parallel jaws stay parallel, which is exactly what a panel wants. The limitations are size and weight. A 24-inch clamp is a poor choice for a 30-inch panel, and parallel clamps are heavier to handle than bar clamps of similar reach, which matters when you are placing several quickly during an open-time-limited glue-up. Choose them if panels are your staple. Skip them if most of your work is small boxes and repairs, where they are simply more clamp than the job needs.
The SHALL 12-Inch Steel Bar Clamps as General-Purpose Spares
Every workshop discovers the same truth: whatever number of clamps you own, a big glue-up wants one more. The SHALL 4-pack plays the role of affordable depth. Steel bar clamps in a mid length are the utility players, used for carcass work, repairs, and holding jigs, and a matched pack means your clamping pressure stays even because the clamps behave alike. The limitation to accept is that budget bar clamps reward a test squeeze before the real glue-up; check that handles turn smoothly and pads sit flat, and do it while the boards are still dry. Choose this set to build numbers quickly. Skip it as your precision panel solution, where parallel jaws do the job better.
The JORGENSEN E-Z Hold 4-Pack for One-Handed Convenience
The JORGENSEN E-Z Hold clamps suit users who work alone and often need a clamp that can be positioned, squeezed, and adjusted with the hand that is not holding the workpiece. That solo workflow is their home ground: holding a board to a bench edge, keeping a cabinet side upright while the other hand reaches for the next part. Like other quick-style clamps, they trade maximum force for speed, and they can also serve as light spreaders in some configurations, which is handy for gentle disassembly work. The honest limit is the same as any quick clamp: for joints that need serious persuasion, reach for a clamp built for force. Choose them for convenience-led work; skip them as the backbone of large panel glue-ups.
The Bessey Pipe Clamp for Reach You Can Extend
The Bessey BPC-H34 pipe clamp is a different philosophy: the clamp fixtures are the product, and the pipe is the length you supply. That makes it the answer for the occasional very long glue-up, because a longer pipe gives you a longer clamp without buying a whole new tool. It suits the workshop that mostly works small but sometimes builds a big table or door. The limitations are practical. The finished clamp is only as straight and rigid as the pipe you choose, the assembly is heavier than a bar clamp, and you need somewhere to store long pipes. Choose it if variable reach matters. Skip it if all your work fits comfortably within fixed-length clamps and you value light, ready-to-grab tools.
The IRWIN QUICK-GRIP Medium-Duty 12 in 5 Pack for Numbers
The medium-duty 12-inch pack is about having enough clamps of a useful size, in hand, at the same time. Five matched clamps cover a small carcass glue-up or a multi-point repair without mixing clamp types and behaviours. The 12-inch size is the workshop’s middle ground: long enough for many furniture parts, short enough to stay handy. The limitation is that medium-duty quick clamps still are not high-force clamps, and a determined sprung joint will expose that. Choose the pack if you are building out a first serious clamp collection. Skip it if your projects are mainly wide panels, where the parallel set serves you better.
Head-to-Head Comparisons
Parallel Clamps Versus Bar Clamps on Panels
On a panel glue-up, the difference is geometry. A parallel clamp’s jaw faces stay aligned, so pressure goes into the joint without encouraging the panel to cup. A conventional bar clamp can absolutely glue a flat panel, but it asks more of your technique: alternating clamps above and below, checking with a straightedge, and adjusting as you go. If you glue panels often, parallel clamps repay you in calm. If you glue panels twice a year, good bar clamp technique is honestly sufficient, and the money is better spent on more clamps overall.
Quick Clamps Versus Screw-Style Clamps
Quick clamps win the first ten seconds and lose the last turn. They are unbeatable for holding, positioning, and light assembly, and they encourage you to clamp things you would otherwise hold by hand and hope. Screw-style and pipe clamps deliver the sustained force that stubborn joints need, at the cost of slower, two-handed operation. Most experienced workshops do not choose between them; they sequence them, using quick clamps to hold everything in place and stronger clamps to do the final closing. If you can only start with one style, start with the style your projects punish you for lacking.
Fixed Length Versus Pipe Clamp Reach
A fixed-length clamp is ready instantly and behaves predictably. A pipe clamp asks for assembly and storage space but never leaves you short on a long job. The deciding question is how often your work exceeds your longest fixed clamp. If the answer is rarely, one pipe clamp set as insurance is a sensible workshop pattern, with fixed clamps doing the daily work.
Glue-Up Technique That Makes Any Clamp Look Good
Most clamp problems are actually preparation problems. Dry-fit everything first, with the clamps set to roughly the right openings and laid out in the order you will use them. Keep cauls, pads, and a mallet within reach before adhesive appears. Apply pressure gradually and evenly, tightening clamps in rotation rather than fully closing one end first, which walks the joint out of square. Check for square early, while adjustment is still possible, and check panel flatness with a straightedge rather than by eye. Clean squeeze-out at the stage the adhesive maker recommends, not in a panic while it is still wet everywhere. Finally, resist the urge to overtighten: the goal is a closed joint with a thin, even line of squeeze-out, not maximum force, and excessive pressure can starve a joint and bow the work.
Protecting Surfaces
Clamp pads and simple cauls protect finished faces from dents and from jaws sliding on a film of glue. Wax paper or similar barriers keep panels from bonding themselves to cauls. These small habits separate a glue-up that needs an evening of rescue sanding from one that comes out of the clamps nearly ready.
Troubleshooting Clamping Problems
The Panel Bows as You Tighten
Bowing usually means pressure is not balanced around the panel’s thickness or the boards themselves have uneven edges. Alternate clamp placement, add a caul, and ease off the clamp that is pulling hardest. If bowing happens on every glue-up, check your board preparation before blaming the clamps; no clamp corrects edges that were never jointed flat.
Joints That Will Not Close
A joint that resists clamping is telling you about fit, not about force. Dry-fit would have caught it. Take the assembly apart while you still can, find the interference, and fix the joinery. Using a stronger clamp to crush a bad fit into submission stores stress in the piece that tends to reappear as a crack or an opened joint later.
Clamps Slipping on the Work
Slipping comes from angled jaw contact, worn or missing pads, or glue acting as a lubricant. Reposition so jaws sit square, replace pads that have hardened or gone missing, and consider a caul to spread contact. A clamp that slips repeatedly under modest pressure has a pad or jaw problem worth fixing on a quiet day, not mid-glue-up.
Building a Clamp Collection in a Sensible Order
Start with the size and style your current project actually needs, in enough numbers to complete it, because a project finished teaches more than a rack admired. Add depth next with an affordable matched pack, since glue-ups consume clamps in groups. Add parallel clamps when panel work becomes regular, and a pipe clamp set when a long job first appears on your list. Store clamps where you can see the gaps in your sizes, keep pads and handles in good order, and your collection will grow in step with your work instead of ahead of it.
Buying Criteria, Expanded: Length, Force, and Numbers
Three questions decide most bar clamp purchases, and they are worth answering with your project list in hand. First, length: a clamp can only span work shorter than itself with room for the jaws and handles, so buy for the largest work you genuinely build, and remember that two shorter clamps cannot substitute for one long one. Second, clamping style and force: quick clamps trade force for speed, parallel clamps trade weight for even, flat-friendly pressure, screw and pipe clamps trade convenience for sustained force. Third, numbers: glue-ups consume clamps in groups, and a matched set of four to six in your main size will serve you better than a scattered collection of singles in many sizes. Around those three, smaller criteria matter at the margins: pads that protect work and are replaceable, handles your hands can turn comfortably when they are tired, and bars that do not flex noticeably under the loads your work applies. A clamp that flexes opens the joint at the far end while the near end feels tight, which is a quiet cause of mysterious glue-line gaps.
Sizing a Collection Around Your Actual Projects
Look at your last few projects and your next two planned ones, and measure the spans you actually clamped. Most furniture-scale workshops discover their work clusters around a couple of lengths, with occasional outliers. Stock deeply at the clustered lengths, cover the outliers with a pipe clamp set whose reach you can extend, and you have a collection shaped by evidence rather than by a catalogue. This is also the honest way to decide between the VEVOR parallel set and the IRWIN medium-duty pack as your main purchase: panels point one way, carcasses and general work point the other.
A Worked Example: Gluing a Panel Without Drama
Picture a tabletop glue-up using the approach this guide recommends. The boards are jointed and dry-fitted, the parallel clamps are laid on the bench opened to roughly the panel width, and the boards rest in them before any adhesive appears, so you can confirm everything reaches. Cauls and pads are at hand. Glue goes on, boards come together in the clamps, and pressure is applied in rotation, a little at each clamp in turn, while a straightedge checks flatness and a square checks the ends. Squeeze-out appears as a thin, even bead, which tells you the pressure is about right; a joint flooded with glue or one bone dry both suggest adjusting. The panel rests undisturbed for the adhesive’s stated clamping time, not for a duration guessed from habit. Afterwards the clamps come off clean because dried adhesive on the bars was prevented or removed last time. Nothing in that sequence required exotic equipment. It required the clamps to be ready, matched, and sufficient in number, which is the entire philosophy behind the sets recommended here.
Clamping Small Work Without Crushing It
Small boxes, frames, and repairs invert the problem: too much force, applied unevenly, distorts delicate work. This is where the mini and quick clamps earn their keep, with light, fast, repositionable pressure, and where pads and cauls matter most because small parts show every dent. Work with the minimum pressure that closes the joint, support thin parts so clamping force goes into the joint rather than into bending the part, and let the adhesive do the holding once it cures. A workshop that owns both gentle and strong clamping options stops having to choose between under-clamping big work and over-clamping small work.
Maintenance That Takes Minutes
Clamps ask for very little: keep adhesive off the bars and screw threads, because dried glue is what makes the next glue-up’s clamps stick and slide badly. A coat of paste wax on bars, renewed occasionally, makes dried glue release easily and helps jaws slide. Check pads and replace them when they harden, crack, or go missing, since a pad is the difference between pressure and a dent. Store clamps where their bars stay straight, ideally hanging or racked rather than piled, and a set stored well is a set that is quick to deploy when the glue is already spread and the clock is running. That readiness, more than any specification, is what these six sets are really selling.
Extra Questions Owners Ask After the First Glue-Up
How many clamps do I really need for a typical project?
Count the joints that must be held at once, not the size of the project. A small box may want four clamps for one glue-up stage; a tabletop may want four or five across its width; a carcass may want more, applied in stages. The sets in this guide are sized so that one purchase covers a typical stage, and the sensible growth path is a second matched set rather than a different style, because matched clamps apply even pressure and handle identically when the clock is running.
Can I mix clamp types in one glue-up?
Yes, and experienced woodworkers do it deliberately: parallel clamps to keep a panel flat, quick clamps to hold cauls and stops, a stronger clamp where a joint needs persuasion. The rule is to apply final, even pressure with matched clamps on the main joints, and use the mixed types for support roles. Mixing as a rescue, because you ran out of the right clamp, works too, but it is a sign the next purchase should add depth where the shortage appeared.
What should I do the day before a big glue-up?
Stage everything. Set each clamp to roughly its working opening, lay them in order, put pads, cauls, adhesive, and cleaning supplies within reach, and dry-fit the whole assembly once with the clamps in place. Ten calm minutes the day before prevents the most common glue-up failure of all: discovering a missing clamp or a mis-sized one with adhesive already spread.
Final Advice: Your First Month With a New Clamp Set
Spend the first month deliberately. Use the new clamps on a small, low-stakes project before trusting them with the build you care about, because every clamp style has a handling feel: how the jaws seat, how the handles turn under load, how the pads behave on your timber. Learning that feel on a practice glue-up is free, while learning it in the middle of an important project, with adhesive setting and panels waiting, is expensive in exactly the currency you cannot recover, which is time inside the glue’s open window. Note which size you reached for most often and which you wished you had more of; that note, written from real work rather than from a catalogue, is the most reliable shopping list your workshop will ever produce, and it usually surprises its writer.
Clean adhesive off the bars the same day, every time, while removal is still easy, and the habit will quietly protect every future glue-up you ever do. Check pads while you clean, because that is when a cracked or missing pad gets noticed in time to be replaced on a quiet day. Store the set together in one visible place, racked or hung so the bars stay straight and the sizes read at a glance. Clamps that live together get used together, and a set you can see is a set whose gaps you notice before the glue is open rather than after it.
Finally, review your first month honestly. If the glue-ups went calmly and the joints closed evenly, your choice fitted your work, whatever any ranking says. If one recurring frustration appeared, too little reach, too little force, too few clamps of the working size, treat it as information rather than failure, because it tells you precisely what the next purchase should be. Workshops are built one unglamorous, evidence-based decision at a time, and clamping, done calmly and in sufficient numbers, is where furniture quietly succeeds or fails long before anyone admires the finish or sits on the result.
Bar Clamp FAQ
What is the difference between a bar clamp and a pipe clamp?
A bar clamp has its own bar. A pipe clamp uses a length of pipe that you supply, so the opening can be as long as the pipe.
Which set has the longest opening?
The VEVOR parallel set lists 24 inches. The SHALL and IRWIN medium-duty sets list 12 inches.
How many clamps do I need for a tabletop glue-up?
As a rule of thumb, enough to place one every several inches along the joint, alternating above and below the panel. Dry-fit first to count the clamps you need.
What are cauls and do I need them?
Cauls are straight boards clamped across a glue-up to keep panels flat. They are helpful for wide panels and tabletops.
Will clamps mark my wood?
Hard jaws can dent soft wood. Use pads or scrap blocks between the jaws and the work to spread the pressure.
How tight should I clamp?
Tighten until the joint closes and a thin bead of glue appears, then stop. Over-tightening can squeeze out too much glue and distort the work.
Can I use bar clamps for things other than woodworking?
Yes, they hold parts for gluing, assembling and holding while you drill or fasten. Use pads on finished or soft materials.
How do I stop glue sticking to my clamps?
Place wax paper or packing tape where bars or jaws meet the work, and scrape off drips before they harden.
When should I replace a bar clamp?
Replace it if the bar is bent, the threads are stripped, the head slips or the handle is cracked. A clamp that cannot hold steady pressure is not reliable.
Uses Beyond Woodworking
Bar clamps are most associated with glue-ups, but they are useful across a home workshop. They can hold frames square while you fasten them, pull a loose joint closed during a repair, secure a workpiece to a bench for sawing or hold metal parts steady while you weld or drill. In home repair, a bar clamp can draw a split chair rung back into place while glue cures or hold a shelf in position while you mark and drill.
When using clamps on metal, be aware of heat and sparks. Welding near clamps can damage plastic jaw pads and the clamp screw threads. Use clamps that you do not mind marring if you are working near a weld, and keep the screw and the bar away from spatter.
Because bar clamps are versatile, a modest collection of different lengths often serves a home user better than a large set of identical ones. Short clamps handle small repairs, while longer ones help with larger panels and furniture.
Clamping Pressure, Glue Type and Open Time
More pressure is not always better. Wood glue needs firm, even contact between surfaces, not extreme force. Over-tightening can squeeze most of the glue out of a joint, leaving it starved and weak, and can bow a panel or damage the wood. Tighten until you see a thin, consistent bead of glue along the seam, then stop.
Glue type affects timing. Standard yellow wood glue gives you several minutes of working time, while fast-setting products leave little room for adjustments, so have your clamps pre-set and ready. Slow-curing epoxies and polyurethane glues may expand or need different pressure. Read the glue instructions for recommended clamp time and do not remove clamps early, even if the joint feels firm.
- Do a dry run before adding glue to check that every clamp fits.
- Wipe squeeze-out promptly so it does not stain the wood.
- Protect bars with tape or wax paper where glue could stick.
Building a Starter Collection
If you are buying your first clamps, think about the projects you will do. A set of four medium-length clamps is enough for small boxes, frames and shelves. For tabletops and larger panels, you will need longer clamps, and more of them, to distribute pressure evenly.
Quick-release bar clamps are convenient for one-hand operation, while heavier parallel clamps give better pressure and keep faces aligned. It is usually more cost-effective to start with a basic set and add specialized clamps as your projects demand. Buying a few quality clamps is often better than a large bundle of weak ones, because a clamp that slips or flexes under pressure is frustrating and can ruin a glue-up.
Safety and Common Failures
Clamps seem harmless, but they store a lot of force. A clamp that slips or breaks can fling parts or pinch fingers. Keep your hands out of the path of the jaws when tightening, and wear eye protection when you are working near a clamped workpiece under strain.
Common failures include stripped screw threads, bent bars, cracked plastic handles and jaws that no longer sit square. Check clamps before each project, discard any that are damaged and avoid using a cheater bar or hammer to get extra pressure. If you notice a clamp walking out of position, reposition the work or use a different clamp rather than over-tightening.
Questions to Ask Before You Buy a Set of Bar Clamps
Start with the work you actually do. Measure the widest assembly you expect to clamp, add a few inches for the clamp jaws and handles, and use that as your minimum opening. Check the throat depth too, since a clamp that reaches only a short distance from the edge will not help if you need to press a panel near its center. A short throat can force you to buy a second, different clamp later.
Look at how the clamp is built. A flat, rigid bar resists bending better than a thin one, and a handle that is comfortable to grip makes a big difference when you are tightening several in a row. Check whether the jaws are faced with pads or bare metal, and whether the pads can be replaced. Ask how the clamp releases, because some designs require a lever while others need you to spin the screw back, which slows down a glue-up.
- What is the maximum opening and the throat depth?
- Does the set include enough clamps for your typical project?
- Can you replace worn pads or handles?
- Is the bar straight and free of obvious flex?
Finally, keep your expectations realistic. Light-duty clamps are fine for hobby work and small repairs but may flex under heavy pressure on wide panels. For heavier jobs, plan on sturdier clamps or more of them to spread the load evenly.
Frequently Asked Questions
How long should I leave clamps on a glue-up?
Follow the glue label, which commonly suggests 30 minutes to an hour for yellow wood glue, with full strength coming after several hours. Leave clamps on longer if the room is cold or the joint is under stress. Removing them too early can let the joint shift.
Can I mix different clamp sizes in the same project?
Yes. Many projects use a mix of lengths to apply pressure where it is needed. Place longer clamps across the main span and shorter ones for smaller joints. Just make sure each clamp is firmly seated and does not twist the workpiece.
How do I clamp a mitered picture frame?
Use corner clamps or a band clamp designed for frames, because standard bar clamps tend to push the miters out of alignment. If you only have bar clamps, use clamping blocks or cauls to direct pressure across the joint and check that corners stay square.
Can bar clamps be used on cabinet face frames?
Yes. Place clamps across the width of the frame, with pads to protect the wood and check that the frame is flat and square. For wide frames, alternate clamps above and below to prevent bowing, and keep pressure moderate.
The Short Version
For small one-handed clamps, the IRWIN mini. For long panels, the VEVOR. For a 12 inch F clamp, the SHALL. For linkable light clamps, the JORGENSEN. For custom lengths, the Bessey. For five 12 inch clamps, the IRWIN medium-duty.


