A wood chisel set covers paring, chopping and cleaning out joints. Sets differ in piece count, blade steel, how the handles take a mallet and whether a sharpening kit comes in the box. Sizes are listed in inches or millimetres, so read the unit.
The six sets below run from a three-piece DEWALT set to a ten-piece WORKPRO kit with a honing guide and stone. Sizes, steels and contents come from each listing page. We have not used these sets ourselves, and steel and hardness claims are the makers’ own.
As an Amazon Associate we earn from qualifying purchases. Links below are affiliate links, and they do not change the product information we give.
What to Look For
| Feature | Why it matters |
|---|---|
| Sizes | A spread from 1/4 to 1-1/2 inch covers most joints |
| Blade steel | Chrome vanadium, chrome manganese and high carbon steel differ |
| Handle and strike cap | Wood suits a mallet, a metal cap suits a hammer |
| Sharpening kit | Some sets add a stone and honing guide |
In this guide
Specs at a Glance
| Set | Pieces and sizes | Steel | Notes |
|---|---|---|---|
| Amazon Basics 8-piece | 6 chisels, 1/4 to 1-1/2 in | Chromium-vanadium | Honing guide, 120/240 stone and case |
| WORKPRO 10-piece | 6 chisels, 1/4 to 1-1/2 in | Cr-V; 28 degree edge | Stone, honing guide, 2 pencils and case |
| Narex 853053 | 6 chisels, 6 to 26 mm | Chrome-manganese; Rc 59 | 25 degree bevel; beech handles; wooden box |
| IRWIN IRHT82507 | 4 chisels, 1/2 to 2 in | Alloy steel | Acetate handle; extra-large strike cap |
| IRWIN Marples M444SB6N | 6 chisels, 1/4 to 1 in | High carbon; 58 HRC | Wooden handles and wooden case |
| DEWALT 3 piece | 3 chisels, sizes not listed | Carbon steel | Metal strike cap; 0.65 kg |
The 6 Best Wood Chisel Sets
Top pickBest for a first full kit
1. Amazon Basics 8-Piece Wood Chisel Set
Six bevel-edge chisels from 1/4 to 1-1/2 inch in chromium-vanadium steel, plus a honing guide, a 120/240 grit sharpening stone and a blow-molded storage case. The handles are wood.
Suits: a first full kit. Strengths: six sizes and a sharpening kit. Weaknesses: the maker gives little steel detail. Skip it if you already own a stone and guide.
View Amazon Basics 8-Piece Wood Chisel Set on Amazon
Best for a bundle with a sharpening kit
2. WORKPRO 10-Piece Wood Chisel Set
Six Cr-V bevel-edge chisels from 1/4 to 1-1/2 inch with a 28 degree edge, a double-sided stone, an adjustable honing guide, two carpenter pencils and a storage case. Handles are polypropylene with rubber, topped with a nickel-plated strike cap, and each blade has a guard.
Suits: a bundle with a sharpening kit. Strengths: blade guards and a strike cap. Weaknesses: the ten pieces include pencils. Skip it if you prefer wood handles.
View WORKPRO 10-Piece Wood Chisel Set on Amazon
Best for bench work with a mallet
3. Narex 6 pc Woodworking Chisel Set 853053
Six chisels at 6, 10, 12, 16, 20 and 26 millimetres, ground at a 25 degree bevel. The maker lists chrome-manganese steel hardened to Rc 59, European beech handles and a wooden presentation box.
Suits: bench work with a mallet. Strengths: a stated hardness and a wooden box. Weaknesses: metric sizes only and no sharpening kit. Skip it if you want inch sizes.
View Narex 6 pc Woodworking Chisel Set 853053 on Amazon

Best for rougher chopping with a hammer
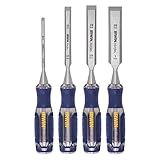
4. IRWIN 4-Pack Chisel Set IRHT82507
A four-piece set sized 1/2 to 2 inches with a fully forged steel core, an extra-large strike cap that can be hit from several angles and an acetate handle. The set name says High Impact, while the edge style reads straight.
Suits: rougher chopping with a hammer. Strengths: a forged core and a large strike cap. Weaknesses: the individual sizes are not listed. Skip it if you want narrow chisels.
Best for traditional fine woodworking
5. IRWIN Marples 6-Piece Chisel Set M444SB6N
Six chisels at 1/4, 3/8, 1/2, 5/8, 3/4 and 1 inch in high carbon steel hardened to 58 HRC, with slim contoured wood handles and a wooden case. The maker states they are meant for use with a wooden mallet.
Suits: traditional fine woodworking. Strengths: a narrow spread and a wooden case. Weaknesses: the title says Blue while the handle is listed as wood. Skip it if you need sizes over 1 inch.
View IRWIN Marples 6-Piece Chisel Set M444SB6N on Amazon
Best for a small hammer-driven set
6. DEWALT Pro 3 Piece Wood Chisel Set
A three-piece set with tempered carbon steel blades, a lacquered finish, a thick metal strike cap and a bi-material handle. The set weighs 0.65 kg.
Suits: a small hammer-driven set. Strengths: a strike cap and a coated blade. Weaknesses: the listing does not state the chisel sizes. Skip it if you need to know sizes before buying.
View DEWALT Pro 3 Piece Wood Chisel Set DWHT16862 on Amazon
Care and Setup
- Follow the maker’s manual for use and sharpening.
- Store chisels in the case or with the guards supplied.
- Wipe blades dry after use.
- Match the handle to the driver: mallet or hammer.
Mistakes to Avoid
- Choosing a handle that does not suit your driver.
- Skipping the size list in the listing.
- Mixing up metric and inch sizes.
- Counting pencils as chisels in a piece count.
Questions to Ask Before You Buy
Chisels are personal tools, so the right set depends on the work you plan to do.
- Will I be paring joints, cutting mortises, or roughing out waste?
- Do I prefer a handle that can take a mallet, or one for hand pressure only?
- Which widths do my usual projects call for?
- Does the set include a roll, a box or guards for the edges?
- Do I already own a way to sharpen and flatten the backs?
- Is the handle shape comfortable for my grip?
Matching Them to Your Workbench
Good chisel work depends on a stable bench and a firm hold on the workpiece. Clamps, a vise or a bench hook keep the wood still so both hands can guide the tool. Place the bench at a height that lets you use your body weight without hunching.
Lighting matters as much as the tool. Raking light from the side reveals tear-out and gaps. Keep a good light source near the joint you are cutting, and keep a small brush nearby for chips.
Plan where the tools will rest between cuts. A rack, a wall strip or a roll keeps the edges apart and within reach, and prevents knocks that dull them. Always cut away from your body and keep your free hand behind the edge.
Who Should Skip Them
If you only need to trim a door hinge once a year, a single basic chisel may be enough. Beginners with no sharpening gear should plan for that extra step. Always follow the maker’s listing, manual and local rules, and wear eye protection when striking tools.
Bevel-Edge and Other Chisel Types
Most sets in this guide are bevel-edge chisels, where the sides of the blade are ground at an angle. That shape lets the blade reach into the corner of a dovetail or a narrow housing without the sides catching. It is the style most woodworkers meet first, and it suits paring and general bench work.
Other types exist and are worth knowing about when you read a listing. A firmer chisel has a straighter, thicker blade and is built for heavier chopping. A mortise chisel is deeper and narrower still, made to be struck hard and to lever waste out of a slot. Some listings use words like heavy-duty or high-impact, as the IRWIN IRHT82507 does, and the product page should tell you what style the edge actually is.
- Paring uses hand pressure or a light push with the tool held close to the cut. Slim blades and comfortable handles matter most.
- Chopping uses a mallet or hammer to drive the blade downward. A sturdy handle and a strike cap matter most.
- Cleaning out joints needs a narrow bevel-edge blade so the sides do not catch the walls of the cut.
A single set rarely does every job equally well. If you mostly cut hinge mortises and clean up joints, a bevel-edge set in a handful of widths covers the work. If you mostly rough out waste, a tougher set with a hammer-ready cap may make more sense. Check what the maker says the chisel is for, because wording on the box is the best guide to the intended use.
The unit also matters: the Narex set in the list is metric, while others are inch-based. Neither is better, but your measuring tools and project plans should match what you buy.
Handles and Striking Tools
The handle decides how the chisel feels and what you can safely hit it with. Handles come in wood, plastic-based material and mixed construction, and each suits a different way of working.
Wooden handles, as on the Narex and the IRWIN Marples sets, are traditionally used with a wooden mallet. They absorb some shock and feel familiar to many woodworkers, but a bare wood end can mushroom if hit with a steel hammer. Plastic or acetate handles, which the WORKPRO and IRWIN IRHT82507 listings describe, are often paired with a metal strike cap so that a hammer can be used. The cap spreads the blow and protects the handle end.
Think about how you will actually work. A mallet is gentler on the handle and gives a softer blow, which suits fine work. A hammer gives a harder strike, which suits rougher chopping, provided the handle and cap are built for it. Follow the maker’s wording on what to strike with.
- Hold the handle and check the shape against your palm, because a handle that digs in will tire you quickly.
- Look at how the blade joins the handle, since a loose or wobbling joint is a reason to return the set.
- If the handle is slim, as on traditional sets, consider whether it is comfortable for long paring sessions.
- Check whether the cap is part of the handle or a separate piece.
Never use a chisel as a pry bar or a screwdriver. The blade is shaped to cut, and levering it sideways can chip the edge or snap the tip.
Steel, Hardness and Edge Retention
Listings name steels like chromium-vanadium, chrome manganese, high carbon and alloy steel. They all make usable chisels, but they differ in how hard they are, how long the edge lasts and how easy it is to sharpen. Makers choose a balance, and the numbers they publish are their own claims, so we do not verify them.
A harder blade tends to keep its edge longer but can be tougher to sharpen, and it may chip if it is struck hard or twisted in the cut. A softer blade sharpens quickly and resists chipping, but may need touching up more often. Neither extreme is right for everyone. The Narex and IRWIN Marples listings give a hardness figure, while others give only the steel name, which means you cannot compare them directly.
- Treat a stated hardness as the maker’s information, and check it against the steel named in the listing.
- Do not assume a more expensive set has better steel, and do not assume a cheaper set has worse steel.
- Look for hints on the factory edge, such as how much work the maker says is needed before first use.
- Check whether the back of the blade is described as flat or ground, because flat backs are important for clean paring.
Many woodworkers sharpen a new chisel before using it, even when the edge looks ready. That is normal and not a defect. Plan time and a method for this, whether you use a stone, a guide or both.
Edge retention also depends on the wood. Hardwoods and wood with grit or glue in it dull a blade faster than soft, clean timber. Expect to hone more often when working such material.
Sharpening Kits and Honing Habits
The Amazon Basics and WORKPRO sets bring a stone and a honing guide, which is the main reason they suit people who own no sharpening gear. A chisel that is not sharp is harder to control, slips more easily and tears the wood instead of cutting it, so sharpening is part of owning one.
A honing guide holds the blade at a steady angle while you rub it on a stone. That repeats the same bevel each time, which helps beginners who find it hard to hold an angle by hand. Check the angle the maker recommends, and read the guide’s instructions for setting the projection of the blade. A coarse and fine side on a single stone, as the listings describe, lets you remove nicks first and refine the edge after.
- Flatten the back of a new chisel first, since a flat back is what makes the edge work.
- Use light, even pressure and keep the stone lubricated as its instructions direct.
- Test the edge on scrap wood, and look for clean, shiny shavings rather than crushed fibers.
- Keep the stone flat, because a hollowed stone gives an uneven edge.
- Wipe the blade and the guide clean before storing them.
If you already have a sharpening setup, you do not need the extras in a bundle, and a set without them, like the Narex, may be a better fit. If you do not, factor the cost of a stone and a guide into your decision so you can compare sets fairly.
Choosing by Budget and Experience
Budget tiers in chisel sets show up in what is included rather than in a simple ranking. Lower-priced sets tend to bundle a stone, a guide and a case so that a beginner can start immediately. Mid-range sets often focus on the chisels themselves, with traditional handles and a stated steel or hardness. Higher-priced sets, which this list does not focus on, usually emphasize steel quality and finish. Always check the current listing for contents.
For a beginner with no tools, a set that includes sharpening gear removes a second purchase and teaches the habit early. For someone who already sharpens, a set of a few well-chosen widths in a good steel may be a better use of money than a large kit with pieces they will not use.
- First kit: choose a set with several widths, a case and a stone and guide.
- Occasional home use: a small set that covers a few widths may do, but check the sizes are stated.
- Fine joinery: look for slim handles, bevel-edge blades and a stated steel.
- Rough work on site: look for a tough handle and a strike cap, and expect to replace it sooner.
Signs it is time to replace or retire a chisel
A cracked handle, a loose blade, a chipped edge that will not grind out, or a blade worn too short to hold in the guide are all signs to stop using the tool. Replace the single chisel if you can, or the set if the rest is also worn.
What should you check before buying a wood chisel set, and who should skip it?
Before buying a wood chisel set, confirm the sizes, the handle type, whether sharpening gear is included and how the chisels are stored. These details decide whether a set suits your work or sits unused.
- Sizes stated: some listings, such as the DEWALT 3 piece and the IRWIN IRHT82507, do not state individual sizes in the post, so check the page.
- Inch or metric: the Narex 853053 is metric, while several others use inches.
- Handle and driver: wood handles suit a mallet, while a strike cap suits a hammer.
- Sharpening kit: the Amazon Basics and WORKPRO sets include a stone and honing guide, and the others do not.
- Storage: a case, box or guards protect the edges between jobs.
- Returns: check the listing’s return terms, since handle comfort is hard to judge from photos.
Honest objections: a set that includes a stone and guide helps a beginner, but the extra pieces do not make the chisels themselves better. The WORKPRO piece count includes pencils, and the steel and hardness claims are the makers’ own, so treat them as information, not proof.
Skip a full set if you only trim a hinge now and then, because a single chisel may be enough. Also skip a set without sharpening gear if you have no way to sharpen, unless you plan to buy a stone and guide as well.
Which wood chisel set should you buy?
The best wood chisel set is the one that matches your driver, your sharpening setup and the joints you cut. Use this guide to match the sets already named in the post to common buyer needs.
- A first complete kit: Amazon Basics 8-Piece Wood Chisel Set, which adds a honing guide, stone and case.
- Blade guards and a sharpening bundle: WORKPRO 10-Piece Wood Chisel Set.
- Bench work with a mallet and metric sizes: Narex 6 pc Woodworking Chisel Set 853053.
- Rougher chopping with a hammer: IRWIN 4-Pack Chisel Set IRHT82507, with its large strike cap.
- Traditional fine woodworking in inch sizes: IRWIN Marples 6-Piece Chisel Set M444SB6N.
- A small hammer-driven set: DEWALT Pro 3 Piece Wood Chisel Set, once you have confirmed the sizes.
If you already own a stone and guide, you gain little from a bundle, and a set like the Narex or the Marples may use your money better. If you are starting from nothing, the two bundles save a second purchase. Compare the sets above, check the current listing for sizes and what is included, then choose the one that fits the way you will drive and sharpen your chisels.
Going Deeper: How Each Set Suits Different Woodworkers
A chisel set is not really bought; it is adopted. Unlike most tools, chisels stay with you for years, are sharpened hundreds of times, and become familiar in the hand, so the right choice depends less on any single specification and more on the match between the set, your work and your willingness to sharpen. This section looks at each pick above through that lens, then covers setup, sharpening habits and bench technique in the depth that decides whether a set delights you or quietly frustrates you.
Amazon Basics Set and the Complete Starter Kit
The Amazon Basics set suits a buyer who wants the whole starter system in one purchase: a spread of sizes and the means to maintain them, without assembling a kit piece by piece. For a first set, completeness has real value, because the beginner’s commonest stall is owning chisels but no way to sharpen them, or owning two sizes when the joint in front of them needs a third. The expectation to set is that a starter set asks for setup work. Expect to flatten backs and hone edges before judging performance, as with almost any new chisel, and expect your sharpening skill, which develops quickly with practice, to matter more than any difference between starter sets. Choose this route when you are equipping a bench from near zero and want to start cutting this week.
WORKPRO Set and Guards, Stone and Bench Practicality
The WORKPRO set leans into workshop practicality: blade guards to protect edges in a drawer or roll, and sharpening provision in the box. Guards sound like a minor detail until you have dulled a freshly honed edge against another tool, which every woodworker does exactly once before becoming a believer. This set suits owners whose chisels will live an active, mobile life: site work, a shared workshop, a bench that doubles for other trades. The check to make is size coverage against your joinery: confirm the widths you will use for mortises, dovetails and paring are present, because a practical case cannot compensate for the one missing size in a fitted joint.
Narex Set and Documented Hardness
The Narex set appeals to buyers who read specifications and want them stated: a maker known for publishing hardness figures and for chisels that arrive with backs needing less work than most. For woodworkers moving up from a first set, that combination, honest steel and honest preparation, is the upgrade that matters, because it converts directly into edges that take a finer polish and hold it through more cuts in hardwoods. The consideration is system completeness: a set of this kind is about the chisels themselves, so budget and plan separately for the sharpening stones, guide and storage your workflow needs if you do not already own them. Owners who already sharpen confidently get the most from this step up.
IRWIN IRHT82507 Set and Heavy Striking Work
This IRWIN set is built for work where chisels are struck hard and often: chopping mortises in construction timber, site joinery, and the heavier end of bench work where a mallet is in your hand all day. Strike-resistant construction and handles made for impact are the point, and for that work they are the correct priority, because a fine paring chisel used for heavy chopping is a chisel being ruined. The trade-off is refinement. A heavy-duty set is not the tool for delicate paring cuts where the work is guided by hand pressure and fingertip control. Many benches legitimately need both characters of chisel; if you must start with one, start with the character that matches your heaviest regular work, since delicacy can be improvised more safely than strength.
IRWIN Marples Set and the Traditional Bench
The Marples set represents the traditional bench chisel: wooden handles, a familiar balance, and a design language that has suited joinery for generations. Owners who chop with a mallet in moderation, pare by hand often, and value how a tool feels across a long session tend to settle happily with this style. Wooden handles ask for a wooden or hide mallet rather than a steel hammer, and for storage that does not crush or split them, which are small disciplines in exchange for the handling character. Choose this set when your work is furniture and joinery at the bench and your striking is measured; look to the heavy-duty options if your chisels will be driven hard in structural timber.
DEWALT Three-Piece Set and the Focused Minimum
The DEWALT three-piece set makes the case for buying few and well-chosen. A small set covering the most-used widths handles a surprising share of real work: cleaning up joints, paring, trimming and the general bench tasks that arise in every project. For owners with limited space, a second set for site work, or a deliberate minimal kit, three good chisels that are always sharp beat eight neglected ones. The risk is equally clear: the day a joint needs the size you do not own, there is no substitute in the drawer. Mitigate it by choosing the three widths against your actual projects, and by knowing that single chisels can be added later in the exact size a new kind of work demands.
Head-to-Head: The Choices Behind the Sets
Many Sizes Versus Few
Size coverage matters when your joinery varies: different mortise widths, different dovetail scales, housings and rebates in several timbers. It matters far less when your work repeats a few joints at a few scales, which describes more benches than marketing suggests. Audit your last projects before buying. The widths you actually reached for, plus one size either side, are your set; the rest is insurance you may never claim. Remember that a chisel slightly narrower than a mortise works with two passes, while a chisel wider than the work cannot be made smaller, which argues for coverage weighted toward the narrower end.
Plastic Handles Versus Wooden Handles
Modern plastic and composite handles tolerate steel-adjacent abuse, shrug off workshop knocks and suit striking caps and heavy work. Wooden handles offer warmth, balance and shock absorption that many woodworkers prefer for mallet work and hand paring, at the cost of needing a suitable mallet and gentler storage. Neither is a quality signal by itself. Decide by your striking tool and your work: if a steel hammer is genuinely part of your workflow, choose handles made and rated for it and follow the maker’s guidance; if your striking is by mallet, both materials are open to you and feel can decide.
Buying the Sharpening System With the Set
However you assemble it, a set plus sharpening provision is the real purchase. A kit that includes a stone and guide suits a beginner who needs a working system immediately. Separate stones suit an owner building a long-term sharpening station. What is not viable is chisels with no sharpening plan at all: every edge in every set here will dull, and the owner without a system experiences that as the tool’s failure rather than as normal maintenance arriving on schedule.
Setting Up New Chisels Properly
- Flatten the back first, at least the section near the edge. A flat back is the reference for every sharpening and every paring cut that follows, and time spent here pays back for the life of the tool.
- Hone the bevel to a consistent angle that suits your work, and keep that angle consistent across sessions by using the same guide or the same practiced freehand method.
- Remove the wire edge completely by alternating light work on bevel and back. A wire edge left in place folds on the first cut and feels exactly like a dull chisel.
- Test on end grain in a soft, even timber. A sharp chisel pares end grain cleanly with hand pressure; a chisel that crushes or tears is telling you to return to the stones, not to push harder.
- Fit guards or return each chisel to its storage the moment setup is done. Fresh edges are at their most vulnerable in the first hour, lying loose on a bench among other tools.
- Record what you did: the bevel approach and the stones used, noted once, turn future honing into a repeatable routine instead of a fresh experiment.
Troubleshooting Cutting Problems
The Chisel Tears Rather Than Cuts
Tearing usually means the edge is dull, the cut is too deep for the direction of the grain, or the work is unsupported where the fibres exit. Sharpen first, because most bench problems are sharpness problems. Then reduce the cut, work from the face toward the middle on end grain and cross-grain work so fibres are supported, and consider whether you are cutting uphill against rising grain, where reversing direction transforms the result.
The Edge Chips or Rolls Quickly
An edge that fails fast is either meeting something it should not, such as grit, staples or glue lines with filler, or being honed at too fine an angle for the work and the timber. Inspect the workpiece, clean suspect areas, and if the work is genuinely demanding, hone a slightly more robust edge for that job rather than persevering with a fragile one. Repeated rolling in ordinary timber suggests the angle, not the steel, so adjust the setup before blaming the set.
Mortise Walls Come Out Uneven
Uneven walls come from levering against the bevel inconsistently and from clearing waste in uneven bites. Work in shallow, even layers, keep the chisel registered against your layout lines, chop across the grain at the ends first to define the boundary, and pare the walls deliberately at the end with the chisel guided by the flat back. A waste-relief hole in deep mortises, where your method allows, reduces the force needed and improves control throughout.
Decision Scenarios
A First Bench for Furniture Projects
Prioritise a complete set with sharpening provision and a useful spread of widths, then invest your first practice hours in setup and honing on scrap joints. Your early progress will come from sharpness and layout far more than from any premium in the steel, and a complete system removes every excuse to postpone the stones.
Site Work and Structural Timber
Prioritise strike-tolerant construction, guards for transport, and sizes matched to the joints and hardware you fit on site. Keep a stone in the kit bag so an edge can be restored where the work is, and treat the set as a working system that will be honed often and carried everywhere.
An Upgrade for an Experienced Woodworker
Prioritise the steel and the preparation: documented hardness, backs that need little work, and the sizes your joinery actually uses, bought as a set or as singles to fill the gaps in what you own. Your sharpening station already exists, so every part of the budget can go into the chisels themselves.
Long-Term Care
Store chisels so edges never touch other tools: guards, a roll, a rack or a case, chosen to suit how mobile your work is. Wipe blades dry after use and protect them from workshop damp, because rust on a polished back undoes your setup work and pits the reference surface you depend on. Hone little and often rather than grinding rarely and heavily; a few strokes at the first sign of resistance keep an edge in the zone where cutting is a pleasure, and keep your bevel geometry stable. Retire or relegate a chisel whose handle has loosened, cracked or begun to mushroom at the striking end, since a failing handle is a safety issue under a mallet, not a cosmetic one. Cared for this way, a set bought today will still be the set on your bench in many years, which is the real economy of chisels and the reason the initial match to your work matters so much.
Bench Workflows: Using the Set Across a Whole Project
Cutting a Mortise Cleanly, Step by Step
Lay out the mortise with a knife and gauge so the walls have lines worth cutting to. Relieve the middle if your method uses a drilled waste hole, keeping the drill inside the layout. Chop across the grain at each end first to establish clean boundaries, then work along the mortise in shallow bites, levering waste out against the bevel with the chisel oriented consistently so the walls stay flat. Check depth with a marked gauge or the tenon itself rather than by eye. Finish by paring the walls with the flat back registered against them, taking whisper cuts until the tenon enters with firm hand pressure. The chisel skills on display here, shallow bites, consistent orientation, paring to finish, are the same skills every other joint rewards, which is why the mortise is such a good training joint.
Paring to a Line Without Overshooting
Paring is controlled slicing, and control comes from limiting what the edge can do. Register the flat back on the reference surface whenever the cut allows it, so geometry, not willpower, keeps you on line. Take thin slices, because a thin slice that stops short can be followed by another, while a thick slice that runs past the line cannot be uncut. Use both hands as your method requires: one to power the chisel in a controlled push, the other to restrain and guide near the edge, always keeping flesh behind the cutting direction. Work toward supported fibres, arrange the cut so the waste side takes any tear-out, and sneak up on final dimensions in stages, checking fit against the mating piece between stages rather than trusting a measurement alone.
Dovetails and Fine Joinery Habits
Fine joinery exposes every habit at once. Saw close to the line so the chisel’s work is refinement rather than excavation. Chop the baseline in stages, undercutting slightly in the waste so the show face stays crisp, and never lever waste against the visible edge. Pare pins and tails with the grain direction of each small surface in mind, since a cut that slices sweetly in one orientation tears in another only millimetres away. Test the fit dry, mark the tight spots with pencil, and pare only where the marks are. A joint forced together splits; a joint pared by evidence closes with hand pressure and a satisfying line. These habits are learnable with any set in this guide, provided the edges are genuinely sharp, which returns the whole discussion, as always, to the stones.
Sharpening as a Session Routine
Treat sharpening as part of the work session rather than an interruption of it. Begin by honing every chisel the session will use, so no mid-joint dulling forces a choice between a dull edge and a broken rhythm. During work, return to the fine stone or strop at the first change in how the edge behaves: the moment a chisel needs noticeably more pressure, it is asking for thirty seconds of honing that will save minutes of forcing and the errors forcing causes. End the session by putting edges away honed and guarded, so the next session starts with cutting rather than maintenance. Owners who adopt this routine consistently report the same discovery: their chisels did not change, but their woodworking did, because a permanently sharp set makes accurate work feel ordinary instead of effortful.
Storing Sets for Different Kinds of Work
Bench sets live best in a rack or case at the bench, edges protected, sizes in order, with the mallet and honing gear within the same reach. Site sets live best in a roll or case that closes securely, with guards on every edge, because transport is where unguarded chisels are dulled and where they damage everything around them. Shared-workshop sets benefit from a visible inventory habit: a case with a place for each size makes a missing chisel obvious at tidy-up time rather than at the next project. In every setting the rules are the same: edges never loose among other tools, blades dry, handles protected from crushing, and a periodic check that every chisel still sits flat on its back and cuts as it should.
Choosing a Mallet to Match the Set
The mallet is the chisel’s partner, and it deserves the same deliberate choice. A mallet should be heavy enough to move the chisel with a tap rather than a blow, soft-faced enough not to damage handles, and balanced so your wrist is not fighting it after an hour of mortise work. Wooden and hide-faced mallets are the traditional partners for bench chisels, while sets with striking caps tolerate a wider range of striking tools within the maker’s guidance. Test the pairing on scrap before project work: the right combination produces a solid, dead sound and a clean advance of the edge, while the wrong one bounces, rings or begins to mushroom a handle end. Replace or dress a mallet face that has hardened or split, because a failing mallet quietly damages handles that would otherwise last for decades.
Wood Chisel Set FAQ
Which sets include a sharpening kit?
The Amazon Basics and WORKPRO sets list a stone and a honing guide.
Do the sets use inch or metric sizes?
The Narex set is metric. The Amazon Basics, WORKPRO and IRWIN Marples sets list inch sizes.
How many chisels do I really need?
A few widths cover most work, such as a narrow, a medium and a wide blade. Add more only when a project calls for a size you lack.
Can I hit any chisel with a steel hammer?
No. Use a hammer only on chisels the maker describes as suited to it, such as ones with a strike cap. Wooden-handled chisels are normally meant for a wooden mallet.
Do new chisels come sharp?
Factory edges vary, and many woodworkers sharpen a new chisel before first use. Check the listing and the manual, then test the edge on scrap wood.
What is the difference between a bevel-edge and a firmer chisel?
A bevel-edge chisel has angled sides that reach into tight corners, while a firmer chisel is thicker and built for heavier chopping. Read the product page to see which you are buying.
Is a wooden case better than a plastic one?
Neither is better in every case. A wooden box looks traditional and protects edges, while a molded case is lighter and may hold the sharpening gear as well.
Why is flattening the back of a chisel important?
The back and the bevel meet to form the cutting edge, so an uneven back gives an uneven edge. Flattening it once gives you a reliable reference for later sharpening.
Should I wear gloves when using a chisel?
Many woodworkers avoid loose gloves near blades because they can catch. Keep your free hand behind the edge, secure the work, and wear eye protection.
How should I store chisels between jobs?
Keep them dry, with the edges covered or separated in a roll, rack or case. Wipe the blades after use to reduce rust.
What size wood chisel is the most useful?
A mid-width blade is the most commonly reached for, because it handles hinge recesses and general joint cleanup. A narrow and a wide chisel alongside it cover most other jobs.
Can I use a wood chisel to cut metal or masonry?
No. A wood chisel is shaped and ground for wood, and striking it against metal or stone can chip or ruin the edge. Use a tool the maker designed for that material.
How do I know if my chisel is sharp enough?
A sharp chisel pares thin, clean shavings with light pressure and leaves a smooth surface. If it crushes the fibers or needs force, it needs honing.
Should I buy chisels with plastic or wooden handles?
Both work, and the right choice depends on your driver. Wooden handles are traditionally used with a mallet, while plastic or acetate handles with a metal cap are often built for a hammer.
How do I stop my chisels from rusting?
Wipe the blades dry after each use and store them in a dry place with the edges covered or separated. A light wipe of oil, as the maker suggests, can help in damp workshops.
Is it worth buying a honing guide?
A honing guide is helpful if you struggle to hold a steady angle by hand, because it repeats the same bevel each time. Skilled freehand sharpeners may not need one.
The Short Version
For a full kit, the Amazon Basics. For blade guards and a stone, the WORKPRO. For hardness figures, the Narex. For heavy strikes, the IRWIN IRHT82507. For a traditional wood-handled set, the IRWIN Marples. For a small three-piece set, the DEWALT.


