A marking gauge scribes a line parallel to an edge at a distance you set. A head slides on a beam, you lock it, and a wheel, pin or knife marks the wood. The main choices are the cutter type, the beam length, the material of the head and how the distance is set.
The six gauges below cover four wheel gauges, an ebony double pin mortise gauge and an aluminum offset gauge with a vernier scale. Sizes, materials and features come from each listing page and are the makers’ own claims. We have not used these gauges ourselves. Where a listing disagrees with itself or leaves a detail out, we say so.
As an Amazon Associate we earn from qualifying purchases. Links below are affiliate links, and they do not change the product information we give.
What to Look For
| Feature | Why it matters |
|---|---|
| Cutter | A wheel slices across grain; pins suit marking along it |
| Beam length | Sets the farthest line you can mark from an edge |
| Head | A flat, wide face rides the edge of the work smoothly |
| Adjustment | Micro-adjusters and engraved scales help repeat a setting |
In this guide
Specs at a Glance
| Gauge | Type | Beam and scale | Notes |
|---|---|---|---|
| Clarke Brothers 8 in | Wheel | 8 in long; scale to 6 in / 150 mm | Brass, steel and aluminum alloy; 2 spare cutters |
| Taytools 464763 | Wheel | 7 in beam, 5/16 in diameter | 1.625 in brass head; 2 spare cutters; 8.8 oz |
| Frienda ebony | Mortise, pins | 6.4 in; pin gap 5.5 to 100 mm | Ebony and brass; double sided, three pins |
| Mr. Pen | Wheel | Scale to 6 in / 150 mm | 1.5 in brass face; 2 spare blades |
| WEN ME251R | Offset, vernier | 10 in; .05 mm and .002 in vernier | Aluminum; no wheel listed |
| iGaging 34-711 | Wheel and mortise | 6 in shaft; 1 mm and 1/32 in marks | Brass head; micro-adjust; can serve as a depth gauge |
The 6 Best Marking Gauges
Top pickBest for general joinery layout
1. Clarke Brothers Wheel Marking Gauge, 8 in
An 8 inch wheel gauge made of solid brass, steel and aluminum alloy, with a roll stop fence that has a flat spot so it stays put on the bench. Laser engraved metric and inch marks run up to 6 inches or 150 mm, which is shorter than the 8 inch length. Two spare hardened steel wheel cutters are included, and the maker describes one-handed use.
Suits: general joinery layout. Strengths: two spare cutters and a head that does not roll. Weaknesses: the scale stops at 6 inches. Skip it if you need a scale that covers the full length.
Best for dovetail and joint marking
2. Taytools 464763 Solid Brass Wheel Marking Gauge
A wheel gauge with a 1.625 inch solid brass head that locks and has a micro adjust, a knurled adjustment knob and tail, and a 7 inch by 5/16 inch hardened steel beam grooved so the head does not rotate while you adjust it. The 3/8 inch cutter retracts into a countersink in the head. Two extra cutters come with it. The listing weight is 8.8 ounces and it shows no scale details.
Suits: dovetail and joint marking. Strengths: a grooved beam and a retracting cutter. Weaknesses: the page does not describe the beam markings. Skip it if you want an engraved scale to read.
Best for mortise and tenon layout
3. Frienda Ebony Mortise Gauge, 6.4 in
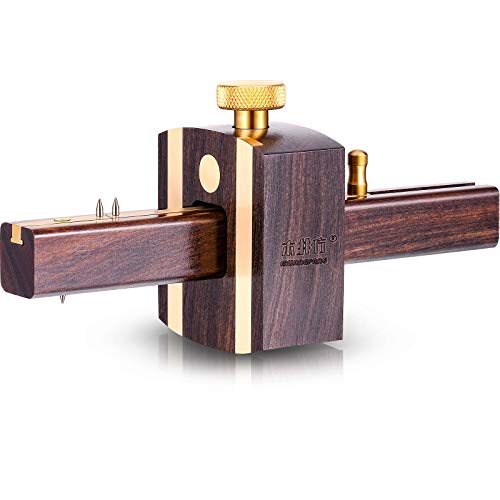
A traditional mortise gauge made of ebony and brass, with a sliding head and a brass fixing screw. It is double sided with three pins so it can draw a single line or a pair, and the gap between the two pins adjusts from 5.5 to 100 millimeters. The listing gives 164 millimeters, or 6.4 inches, for the length and also a 6.73 inch figure in the details table.
Suits: mortise and tenon layout. Strengths: two lines in one pass. Weaknesses: the listing has two length figures and no scale. Skip it if you want a wheel cutter.

Best for a basic wheel gauge with spares
4. Mr. Pen Wheel Marking Gauge
A wheel gauge with a 1.5 inch diameter solid brass face, laser engraved inch and metric marks up to 6 inches or 150 millimeters, and a cutter head that retracts into a countersink. The maker lists a two stage adjustment with a knurled knob and tail. One gauge and two extra blades are included, and the listed weight is 0.14 kilograms.
Suits: a basic wheel gauge with spares. Strengths: an engraved scale and two extra blades. Weaknesses: the listing gives only 6 inches of scale. Skip it if you need a longer beam.

Best for machine setups and reference lines
5. WEN ME251R 10-Inch Aluminum Offset Marking Gauge
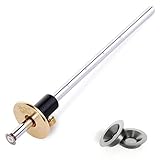
An aluminum offset gauge with a 10 inch length and a vernier scale in both metric at .05 millimeter and imperial at .002 inch. The maker says the laser engraved marks will not fade, that a center knob unlocks the slide and that it can mark reference lines, set cutting depths and align fences. The listing does not describe a cutting wheel, so it works as a setting and layout gauge.
Suits: machine setups and reference lines. Strengths: a vernier scale and 10 inch length. Weaknesses: no wheel listed. Skip it if you want a traditional scribing gauge.

Best for fine layout and transfer of measurements
6. iGaging Mortise Gauge + Wheel Marking Gauge
A compact gauge with a solid brass body, a knurled lock nut and a 6 inch steel shaft graduated in 1 millimeter and 1/32 inch steps. The maker describes a micro adjustment and a free-spinning wheel that cuts wood fibers instead of tearing them. It also says the tool can serve as a depth gauge. The details table lists the graduation range as 1 millimeter, which is the step size.
Suits: fine layout and transfer of measurements. Strengths: micro adjustment and a second use as a depth gauge. Weaknesses: the listing mixes graduation and range. Skip it if you want a pin gauge.
Care and Setup
- Retract or cover the cutter when the gauge is not in use.
- Lock the head before you mark and check the setting against a rule.
- Keep the face against the true edge and push or pull in the direction the maker advises.
- Replace dull wheels with the spare cutters.
Mistakes to Avoid
- Trusting an engraved scale without checking it against a rule.
- Buying a short beam when you need to mark far from an edge.
- Expecting a wheel on an offset layout gauge.
- Pressing too hard so the head lifts off the edge.
How Does a Marking Gauge Work?
A marking gauge works by sliding a head along a beam, locking it at a set distance, and dragging a cutter or pin along the wood so the line stays parallel to the edge. The head rides against the edge of the board and the cutter scribes the line.
The idea is simple but useful. Instead of measuring and marking dots along a board, you set the distance once and draw a continuous line in a single pass. The line is consistent because the head and the beam control the distance, not your eye.
Most gauges have four parts:
- Beam: the bar that carries the scale and sets the farthest line you can mark.
- Head: the block that rides the edge of the work and locks in place.
- Lock: a screw or knob that holds the setting.
- Cutter: a wheel, knife or pin that marks the wood.
Good technique matters. Hold the head tight against the edge, tilt the gauge slightly so the cutter trails, and keep a steady, light pressure. A clean scribed line gives a chisel or saw something to register against, which helps with accurate joints.
Wheel vs Pin Marking Gauges: Which Type Should You Choose?
A wheel marking gauge slices the wood fibers with a rolling cutter, while a pin gauge scratches a line with a point. For most woodworkers, a wheel gauge is the easier choice for cross-grain lines, and a pin or mortise gauge is better for marking along the grain.
The wheel rolls, so it tends to cut the fibers cleanly instead of tearing them. That makes it a popular choice for marking shoulder lines on dovetails and tenons, where a crisp edge helps. The listings for the Clarke Brothers, Taytools, Mr. Pen and iGaging gauges all describe wheel cutters.
A pin can follow the grain more readily and may be more forgiving when you mark along a board. A mortise gauge uses two pins so that you can draw the two edges of a mortise in one pass, which is what the Frienda ebony gauge offers.
- Wheel gauge: clean cross-grain lines and general layout.
- Pin gauge: simple marking, often along the grain.
- Mortise gauge: two parallel lines for mortise and tenon work.
- Offset or vernier gauge: reference lines and machine setups, like the WEN.
Many woodworkers end up with both a wheel gauge and a mortise gauge, since they handle different jobs.
How Do You Set a Marking Gauge Accurately?
To set a marking gauge accurately, loosen the lock, slide the head to approximately the distance, check it against a rule or a piece of stock, then tighten and test on scrap. Do not trust an engraved scale alone.
Engraved scales are a convenient starting point, but they can differ slightly from a reliable rule. The best habit is to confirm the setting with a trusted measuring tool and then make a test mark on scrap wood.
A reliable routine looks like this:
- Loosen the lock and slide the head near the distance you want.
- Use a rule, a square or a piece of the actual stock to set the exact distance from the cutter to the head.
- Tighten the lock firmly, and use a micro-adjust if the gauge has one.
- Make a test line on scrap and measure it.
- Re-check the setting after a few passes, in case it drifted.
Setting from the work itself is often best. If you are marking a tenon to match a mortise, set the gauge from the mortise width instead of a number. That cancels out small errors in the scale.
Micro-adjust features, like those described for the Taytools and iGaging gauges, make small corrections faster than loosening and sliding the head.
Marking Gauge Problems and Fixes: Why Is My Line Wandering?
A marking gauge line wanders when the head lifts off the edge, the cutter is dull or the pressure is uneven. Most problems come from technique or a worn cutter and are easy to correct.
- Line drifts away from the edge: press the head firmly against the edge and check that the edge is straight.
- Line looks torn: the wheel may be dull or you may be marking against the grain direction, so try a lighter pass or fit a spare cutter.
- Setting slips: tighten the lock more firmly and check that nothing, like dust, is under the head.
- Line is too faint: make a second light pass instead of one heavy one.
- Cutter wobbles: check that the cutter is seated properly and the screw is tight.
Several gauges in this guide come with spare cutters, such as the Clarke Brothers, Taytools and Mr. Pen. That makes it easy to replace a worn wheel without buying a new tool.
Keep the head clean, and check that the beam is not bent. A small bump or burr on the beam can stop the head from sliding smoothly. If a gauge feels rough, clean the beam and the inside of the head gently before trying again.
Which Marking Gauge Should You Buy?
Choose the marking gauge that fits your most common job: a wheel gauge for general layout, a mortise gauge for joinery, or a vernier gauge for setups. Here is how the six picks match different buyers.
- If you want a general wheel gauge with spare cutters, go for the Clarke Brothers Wheel Marking Gauge, and note that its scale stops short of its full length.
- If you want a grooved beam and a retracting cutter, choose the Taytools 464763.
- If you cut mortises and tenons, consider the Frienda Ebony Mortise Gauge for two lines in one pass.
- If you like an engraved scale and spare blades, look at the Mr. Pen Wheel Marking Gauge.
- If you set up machines or need fine measurement, the WEN ME251R offers a vernier scale but lists no wheel.
- If you want a compact tool that also marks mortises, choose the iGaging Mortise Gauge plus Wheel Marking Gauge.
If you are buying your first gauge, a wheel gauge is a safe starting point. You can add a mortise gauge later when your joinery calls for it.
What to Check Before You Buy a Marking Gauge
Before buying a marking gauge, check the beam length, cutter type, head material and what is included. These details tell you how far you can mark and how easy the gauge is to maintain.
- Beam length: think about the widest board you will mark, since the beam sets your reach.
- Scale: see whether the marks cover the whole beam, and plan to verify them anyway.
- Cutter: decide between a wheel, pins or a combination, and check for spares.
- Head: a flat, solid face rides an edge more smoothly.
- Locking method: look for a knob or screw that holds firmly.
- Adjustment: micro-adjust helps with repeatable settings.
- Listing details: some listings disagree with themselves, so read the full description.
- Returns and warranty: read the seller’s terms on the listing.
Also think about your hand. Weight and shape affect comfort when you mark many pieces in a row, so a gauge that feels balanced is easier to use accurately.
Is a More Expensive Marking Gauge Worth It? Who Should Skip One?
A pricier marking gauge is worth it if you mark joints daily and want finer adjustment, spare parts and a solid head, but a basic gauge handles occasional work well. Spend where it changes your results.
Better gauges tend to offer smoother locking, micro-adjust and good cutters. Those features matter when you need repeatable lines across many pieces. For a few projects a year, a simple gauge will do the job if you check each setting.
Fair downsides to consider:
- Brass and steel heads can be heavier than you expect.
- A scale can be convenient but is no substitute for checking with a rule.
- Pin gauges need care to avoid tearing along some grain.
- A vernier gauge is useful for setups but is not a traditional scribing tool.
You might skip a dedicated marking gauge if you mark with a knife and square already and rarely need parallel lines. You can also skip the WEN if you want a wheel, since the listing does not describe one.
If a gauge still fits your work, compare the picks above, check the current listing for beam length and what is included, then choose the one that suits the joints you cut most often.
Marking Gauge FAQ
What is the difference between a wheel gauge and a mortise gauge?
A wheel gauge has one round cutter that slices the fibers. A mortise gauge has two pins on a sliding bar so it can mark both sides of a mortise at once.
Which gauge has the longest scale?
The WEN lists a 10 inch length with a vernier scale. The Clarke Brothers is 8 inches long, but its marks stop at 6 inches.
What is a marking gauge used for?
A marking gauge scribes a line parallel to an edge at a set distance. Woodworkers use it for joinery layout, such as shoulder lines, tenons and dovetail baselines.
Do I need both a wheel gauge and a mortise gauge?
Not at first. A wheel gauge handles most layout, and a mortise gauge becomes useful when you cut many mortises and tenons and want two lines drawn in one pass.
How do you use a wheel marking gauge?
Set the head to the distance you want and lock it, then press the head against the edge. Lean the gauge slightly and roll the wheel along the surface in one steady pass.
Why does my marking gauge tear the wood?
A dull cutter, too much pressure or marking against rising grain can tear the surface. Try a lighter pass, change the cutter or swap to a spare.
How do I sharpen or replace a marking gauge wheel?
Many wheel gauges come with spare cutters, so replacement is often easier than sharpening. Check the maker's instructions for how to remove and seat the cutter.
Can a marking gauge be used on metal?
Marking gauges are designed mainly for wood, and the listings here describe woodworking use. Check the maker's notes before using one on other materials.
Is a longer beam always better?
No, a longer beam lets you mark farther from the edge, but it can feel clumsy for small work. Pick a length that matches your typical boards.
How should I store a marking gauge?
Retract or cover the cutter and keep the gauge in a drawer or tool roll. Wipe brass and steel parts so moisture does not mark them.
From First Setup to a Trustworthy Line
A marking gauge becomes accurate through a short setup ritual, and learning that ritual matters more than which of the six gauges you own. Start by choosing the reference face of your board and committing to it: every measurement the gauge makes is relative to the face the fence rides against, so a fence registered on a rough or waney edge copies that error into every line. Dress the reference face flat first, or at least choose the straightest edge and mark it so you return to the same one each time. Next, set the gauge from a rule or, better, from the actual part it must match. Setting from a mating part, such as the real tenon or the actual board thickness, removes ruler-reading error entirely and is the habit that separates consistently fitting joinery from joinery that almost fits.
Lock the fence and then test the setting on scrap of the same stock before touching the workpiece. A test line tells you three things at once: whether the setting survived locking, whether the wheel or pin is cutting at the depth you want, and whether the grain of this particular board will tear under the tool. Adjust depth by pressure and by how the cutter is presented, not by force; a gauge dragged hard leaves a trench that a chisel or plane will follow whether you want it to or not. For most layout, the line should be a clear, shallow score that survives handling but does not dictate the final surface.
Matching the six gauges to the work
The Clarke Brothers 8 in wheel gauge is the straightforward bench choice: enough beam for typical furniture parts, a wheel that cuts cleanly across grain, and no complication beyond the job itself. The Taytools solid brass wheel gauge suits users who value heft and fine adjustment in a compact tool; brass also shrugs off workshop knocks and will not rust in a damp shed, which matters for tools stored outside a heated shop. The Frienda ebony mortise gauge is a traditional pin-style tool for the specific rhythm of mortise and tenon work, where two pins score both cheeks of a mortise in one pass and the layout stays consistent across every joint in a frame.
The Mr. Pen wheel gauge is the accessible entry point: it teaches the same technique as the premium tools, and for occasional furniture projects, layout for hinges, and general marking, technique is most of the result. The WEN 10-Inch aluminium offset gauge, the longest here, earns its place on wider panels and sheet work where shorter beams run out, and the offset fence helps when marking from edges that are not simple straight lines. The iGaging combination tool, pairing a mortise gauge with a wheel gauge, suits the small workshop that wants one purchase to cover both single-line layout and mortise work; the trade-off is that a combined tool asks a little more care in setup than two dedicated tools, each left set for its own job.
Head-to-Head: Wheel, Pin and Mortise in Daily Use
Wheel and pin gauges draw different lines, and the difference shows at the chisel. A wheel severs fibres as it rolls, leaving a clean, defined wall on one side of the line that a chisel edge can register into precisely; this is why wheel gauges dominate dovetail and shoulder layout. A pin drags and can tear, especially across grain, but a pin is easy to sharpen, tolerant of rough handling, and traditional mortise gauges depend on pins because two are needed. Neither is universally better: for a single crisp shoulder line, choose the wheel; for mortise layout in quantity, the twin-pin tool saves repeated setting and guarantees the two lines stay parallel.
Fence design divides the six further. A fence with a large, flat reference face resists rocking on narrow edges; a small or rounded fence demands more hand discipline. Adjustment style matters in proportion to how often you change settings: micro-adjust designs reward users who set the gauge many times a day, while simple thumbscrew fences are perfectly adequate for a gauge that holds one setting through a whole project. Beam length, finally, should match your widest common part, not your widest imaginable one; an over-long beam is clumsy on small parts, and clumsiness costs more accuracy than reach gains.
Marking end grain, curves and repeat parts
End grain is the honest test of a gauge. The cutter wants to follow the grain and wander, so take several light passes instead of one firm one, and keep the fence pressure steady while the cutting hand does less work than instinct suggests. For stopped lines, such as the shoulders of a tenon that should not run past the edge, mark to a knife-stop or a pencil tick rather than trusting your eye mid-stroke. For repeat parts, the gauge becomes a story stick with an edge: set it once, lock it, and mark every part before changing the setting, checking the setting against the first part each time you pick the tool up after a break. Batching by setting, not by part, is the simplest accuracy system in hand woodworking.
Troubleshooting Wandering, Tearing and Shallow Lines
Work through line problems in a fixed order. First, the reference: if the fence is riding a rough edge, no cutter will save the line, so dress the edge or switch reference faces. Second, the setting: confirm the fence lock has not crept by re-measuring the test line, since a fence that slips a fraction mid-stroke produces a line that starts true and drifts. Third, the cutter: a dull wheel or a bent pin tears rather than cuts, so inspect the edge under good light and sharpen or replace as the design allows. Fourth, the grain: on reversing or interlocked grain, reduce depth, lighten pressure, and score from both directions so each pass only crosses fibres it can sever cleanly. Fifth, your grip: most wandering is the fence lifting or rolling because the pushing hand dominates; consciously press the fence into the edge with the fingers of the guiding hand and let the other hand merely advance the tool.
Care keeps those problems rare. Store the gauge in a drawer or rack where the wheel or pins cannot knock against other steel, retract or protect exposed cutters, and keep a light film of oil or wax on steel beams in humid shops while keeping brass parts simply clean and dry. Before a project, spend sixty seconds on a scrap test: it verifies the setting, the cutter, and your hand all at once, and it is far cheaper than discovering a drifting line across the shoulder of a finished tenon.
Choosing by Scenario: First Gauge, Furniture Shop, and Restoration Work
The beginner buying a first gauge needs one tool that teaches correct habits and covers the widest range of early projects: dovetails for a first box, shoulders for a first frame, hinge gains, and general layout. A mid-length wheel gauge is the natural answer, which is the ground the Clarke Brothers and Mr. Pen models occupy from opposite ends of the commitment scale. The beginner’s real decision is not wheel versus pin; it is whether woodworking will be a monthly habit or a yearly one. Monthly justifies the better-made tool immediately, because the gauge will be handled enough for its fence feel and lock quality to matter. Yearly argues for the accessible tool and money spent on timber to practise with instead.
The working furniture shop values settings that stay put and tools that can be left set. Production habits favour owning more than one gauge, each holding a setting through a batch: one for the shoulder lines of a run of tenons, one for the mortise positions, changed only when the project changes. In that context, the iGaging combination and the dedicated mortise gauges divide the labour, and the brass Taytools wheel gauge earns its place as the fine-adjustment tool for the cuts that show. The restoration worker has a third pattern: matching existing, sometimes non-standard dimensions in old pieces, where setting the gauge from the surviving original part is the whole method. Here a gauge that locks positively and reads its setting repeatably matters more than any scale printed on the beam, because the original workpiece is the only drawing that counts.
A complete worked example: laying out a mortise and tenon frame
Take a simple frame of four parts, two stiles and two rails, joined by mortise and tenons. Begin by marking a reference face and a reference edge on every part with clear symbols, and never let a part lose those marks until the frame is glued. Set the mortise gauge from the chisel you will chop with, not from a ruler, so the mortise width equals the tool that cuts it. Score both lines around the mortise positions on the stiles, working always from the reference face. Then set the same gauge, unchanged, to mark the tenon cheeks on the rails; because both halves of the joint were laid out with one setting from one reference, the shoulders align and the cheeks match the mortises by construction rather than by luck.
Next, set a wheel gauge to the shoulder length and score the shoulder lines around each rail, again from the reference face, with a knife-sharp line the saw can follow. Check the first tenon dry against its mortise before cutting the rest; a systematic error found on the first joint costs one part, while the same error found at glue-up costs four. Pare to the scribed lines, not to the measurements, because the lines carry the accumulated truth of the setup. This is the deepest reason the gauge matters: it transfers decisions physically from part to part, immune to misread scales and transposed digits, and a frame laid out this way assembles with the quiet click that tells you the method worked.
Sharpening, Calibration Checks and Long-Term Accuracy
A wheel gauge cuts with a small disc whose edge can be refreshed: remove the wheel if the design allows, and hone its bevel lightly on a fine stone, rotating it to keep the edge even, then refit and test on scrap. A pin gauge is sharpened by filing or stoning the pin to a clean point or a small chisel-like edge aligned with the direction of travel; a pin shaped like a tiny knife tears less than a blunt cone. After any sharpening, re-prove the tool on scrap before project wood, because a freshly dressed cutter often cuts deeper than the one your hand is calibrated for.
Calibration for a gauge means behaviour, not numbers. Check that the fence slides without rocking through its whole travel, that the lock holds against firm hand pressure, and that the beam has not been bent by a drop onto concrete. A practical test: set the gauge, scribe a line on scrap, unlock and reset it three times to the same stop or measurement, and scribe three more lines beside the first; if the four lines coincide, the tool repeats, and repeatability is the accuracy that joinery actually uses. Gauges that fail the repetition test usually have a worn lock or a fence face that is no longer flat, and both are worth repairing on a good tool or replacing on a cheap one.
Pairing the gauge with knives, squares and story sticks
The gauge’s line is a beginning. A marking knife deepens the critical shoulders the gauge scores, a square carries its lines around the part, and a story stick records the project’s dimensions in full size so the gauge can be set from the stick rather than from a tape. Working this way, measurements are taken once, at the stick, and everything downstream is transfer rather than measurement, which removes the most common arithmetic and reading errors from the build. Keep the gauge, knife, and square together as a layout kit, ideally in a roll or a dedicated drawer section, so the habit of reaching for all three forms. Workshops are full of accurate tools used inaccurately in isolation; the craft is in the small system, and the marking gauge is the part of that system that turns intention into a line the rest of the work can trust.
Marking Gauges in Timber Selection and Project Planning
The gauge influences a project earlier than most users realise: at the timber rack. Boards are chosen partly by how their grain will behave under the cutter. Straight-grained stock takes a clean scribed line in both directions and forgives a slightly heavy hand; wild, interlocked grain tears under pins and challenges wheels, and on such boards the plan should include lighter passes, marking from both directions, and possibly substituting a knife-cut line for the most visible shoulders. Checking a board’s grain with a test score on an offcut end, before committing to it for a show part, takes seconds and prevents the familiar disappointment of a torn line across the best face of an expensive piece.
Planning also decides how many settings a project needs, and therefore how the work should be batched. List the gauge settings a project requires, group the parts by setting, and lay out each group completely before changing the tool. This sounds like mere tidiness, but it is an accuracy strategy: every change of setting is an opportunity for a small error, and grouping minimises the number of times the project’s correctness depends on resetting. On a frame with identical rails, one setting serves every shoulder; on a cabinet, the carcass parts share settings that the doors then derive from the finished opening rather than from the drawing. Working from the work, in batches, with the gauge as the transfer instrument, is the method that traditional shops evolved over centuries, and it survives because it quietly removes the most common sources of misfit.
When to reach for a different marking tool instead
Honest tool use includes knowing when the gauge is the wrong instrument. Long rip dimensions on wide panels belong to a panel gauge or a tape and straightedge, because a short beam cannot register reliably at that scale. Curves belong to templates and trammels. One-off measurements in the middle of a board, away from any edge, belong to a rule and square, since the gauge can only speak from an edge. Deep stopped lines that must guide a saw belong to a knife, struck after the gauge has located them. Recognising these boundaries does not diminish the gauge; it protects its authority where it is genuinely the best tool, which is any line parallel to a reference edge that must be repeated, transferred, or matched. Within that territory, the six gauges here cover the needs of nearly every home workshop, and the choice among them is a matter of hand, habit, and the joinery you actually build.
Gauge Lines as a Diagnostic Language
Learn to read your own gauge lines the way you would read a report. A line that is crisp at the start and ragged at the end usually means the fence lost pressure as your hand travelled, a technique fault with a simple cure: slow down and consciously finish the stroke with the same fence contact you started it with. A line that is uniformly heavy suggests the cutter sits too proud or your pressure is habitual rather than judged; lighten until the line is a score, not a furrow. A line that doubles, showing a faint companion alongside the true groove, means the tool was re-registered mid-task from a different face or with a slipped fence, and the fix is procedural: mark the reference face, lock, test on scrap, then commit. A line that tears only in patches maps the grain of that specific board, and the answer is local: score those patches from the opposite direction, or deepen them with a knife after the gauge has located them.
This diagnostic habit generalises across the whole craft. Tools leave evidence of how they were used, and the user who reads the evidence improves without instruction. Keep the first test piece from each project until the project is done; it is a record of your settings and your hand on that timber, in that light, on that day, and comparing the last part against it catches drift that memory would politely forget. The gauge, humble as it looks, is the instrument that writes most of that evidence, which is one more reason its line deserves the care this guide has asked for throughout.
Caring for wooden and brass gauges in changing seasons
Wooden-bodied and brass gauges respond to the seasons differently from steel ones. Wooden fences and stems swell slightly in humid months, which can make a sliding fit firmer and a lock more positive, then relax in dry heat; expect the feel of the tool to change a little across the year and re-prove settings on scrap rather than assuming last season’s behaviour. Brass stays dimensionally calm and resists corrosion, asking only to be kept clean and free of grit that would score the beam it slides on. For all types, storage away from direct heat and damp, in a drawer or roll rather than on a cold wall, keeps fits stable and cutters bright, and a gauge stored well is a gauge whose first line of the season can be trusted.
Recording settings for a project in progress
Keep a project card with the gauge: a scrap of card or a piece of masking tape on the beam noting what the current setting represents, such as shoulder length for the rails of a named project. The habit prevents the quiet disaster of picking up a gauge mid-project, assuming it still holds yesterday’s setting, and laying out a batch of parts to a dimension it no longer represents. When a project ends, clear the card as part of putting the tools away, so the next project starts from a deliberate setting rather than an inherited mystery. Small rituals like this are invisible in the finished furniture and decisive in how it got there, and they cost nothing but the moment it takes to write a few words.
The same card can record the timber and the date, which sounds excessive until the day a client or a family member asks for a matching piece years later and the card, kept with the project notes, lets you set the gauge to the original dimensions in minutes. Craft memory is fragile; paper is not.
Taken together, these habits describe the real product on offer across all six gauges: not a beam and a fence, but a repeatable way of deciding where wood will be removed, recorded in lines that the rest of the build can trust. The gauge you choose will shape how pleasant that recording feels, how long the tool lasts, and how it suits your joinery, and those are worthwhile grounds for choosing carefully. But the accuracy itself is yours, built stroke by stroke, and it improves with every project in which you set, test, and scribe with intent.
Trust, in the end, is the gauge’s whole output: a line you can cut to without hesitation, a shoulder that meets its mate without persuasion, and a frame that closes with a click instead of an argument. Every habit in this guide, from reference faces to project cards, exists to protect that trust, and every gauge in this list, honestly chosen and honestly maintained, is capable of earning it.
The Short Version
For a wheel gauge with spares, the Clarke Brothers. For a grooved beam, the Taytools. For two lines at once, the Frienda. For an engraved scale, the Mr. Pen. For a vernier layout gauge, the WEN. For a compact micro-adjust gauge, the iGaging.


