A band clamp, also called a strap clamp, wraps a strap around the work and pulls it tight. That makes it useful for picture frames, boxes, drawers, chair legs and round or odd shaped pieces that a bar clamp cannot hold. The things to compare are the strap length, how the strap is tightened, and whether corner blocks are supplied.
The six clamps below run from a single 13 foot quick release strap to a 23 foot set with pivoting clips and a ratcheting steel model. Lengths, weights and materials come from each listing page and are the makers’ own claims. We have not used these clamps ourselves. Where the page we read did not state a figure, we say so.
As an Amazon Associate we earn from qualifying purchases. Links below are affiliate links, and they do not change the product information we give.
What to Look For
| Feature | Why it matters |
|---|---|
| Strap length | Sets the largest perimeter you can wrap |
| Tightening | Levers, ratchets and screws pull with different feel |
| Corner pieces | Blocks or claws protect corners and spread the pull |
| Count | Some listings are one clamp, others are packs |
In this guide
Specs at a Glance
| Clamp | Strap | Weight | Notes |
|---|---|---|---|
| BESSEY VAS-23 | 23 ft woven polyester | 1.08 lb | 4 pivoting clips; steel wire loop; composite handle |
| POWERTEC 71101 | 13 ft | 13.7 oz | Quick-release levers; nylon, plastic |
| 4 Pcs 13FT set | 13 ft nylon, 4 clamps | 3.34 lb | Corner blocks built in; quick release |
| Pony Jorgensen 1225 | Not stated in what we read | 15.2 oz | Metal levers; 1 by 1 in non-marring jaws |
| Pony Jorgensen 1215 | 15 ft | 9.6 oz | Ratcheting handle; steel body; acme screw |
| 2 Pack 23 ft set | 23 ft nylon, 2 clamps | 1.3 lb | Variable angle; corner clamp style |
The 6 Best Band Clamps

Top pickBest for frames, boxes and odd shapes
1. BESSEY VAS-23+2K-CB Variable Angle Strap Clamp
A single clamp with a 23 foot woven polyester strap and four pivoting Vario clips. The maker says it holds round, square, rectangular and irregular shapes and that the 2K composite handle applies even pressure. The steel wire loop is said to open quickly for adjustment. The listing weight is 1.08 pounds.
Suits: frames, boxes and odd shapes. Strengths: a long strap and corner clips. Weaknesses: one clamp per listing. Skip it if you need several clamps at once.


Best for drawers and cabinet boxes
2. POWERTEC Strap Clamp, 13 ft, 71101
A 13 foot strap clamp with quick release levers and an ergonomic handle, listed as nylon and plastic and weighing 13.7 ounces. The maker describes it for square and rectangular work, picture frames, cabinets and drawers.
Suits: drawers and cabinet boxes. Strengths: light and simple. Weaknesses: 13 feet is shorter than some others. Skip it if you glue large round work.


Best for glue-ups with several corners at once
3. 4 Pcs Band Clamp, 13FT, with 4 Corner Claws
A four clamp listing, each with a reinforced 13 foot nylon strap, a quick release design and built-in corner blocks that the maker says help frame assembly. The set weighs 3.34 pounds on the details table.
Suits: glue-ups with several corners at once. Strengths: four clamps in one listing. Weaknesses: an unbranded title and limited maker detail. Skip it if you want a known tool brand.

Best for corner glue-ups
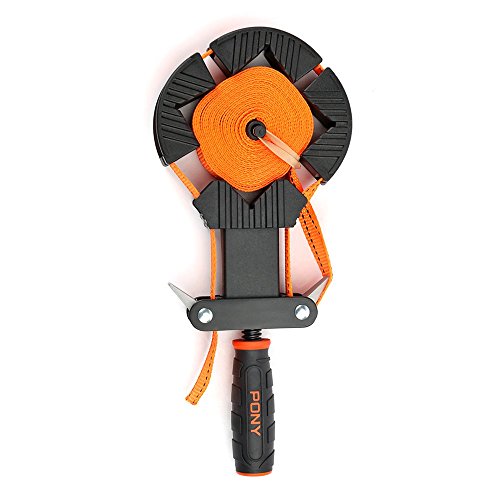
4. Pony Jorgensen 1225 Rapid Acting Band Clamp
A nylon band clamp with metal levers for quick adjustment, a large handle and non-marring 1 by 1 inch jaws the maker says fit corners during glue-up. The listing weight is 15.2 ounces. The text we read did not state the strap length.
Suits: corner glue-ups. Strengths: rapid lever adjustment. Weaknesses: no strap length in what we read. Skip it if you need to know the length before ordering.
View Pony Jorgensen Adjustable Clamp Pony 1225 Rapid Acting Band Clamp on Amazon
Best for framing and larger assemblies
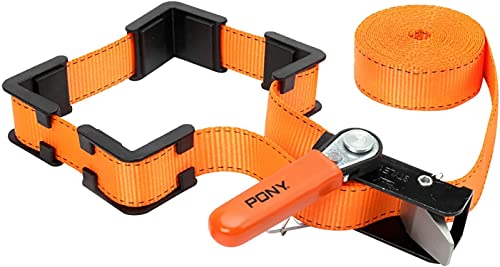
5. Pony Jorgensen 1215 Adjustable Band Clamp, 15 ft
A 15 foot strap clamp with a self-locking ratcheting handle, an acme threaded screw and aluminum levers, on a steel body with a rust-resistant finish. The maker lists it for woodwork and framing. The details table gives 9.6 ounces and alloy steel, nylon and plastic.
Suits: framing and larger assemblies. Strengths: a ratchet lock and a 15 foot strap. Weaknesses: one clamp per listing. Skip it if you prefer a simple quick release lever.

Best for two assemblies at once
6. 2 Pack Band Clamps, 23 ft Variable Angle
Two band clamps with a 23 foot high-density nylon strap each, described for square, round, rectangular and irregular work and picture frames. The listing weight is 1.3 pounds and the material is nylon and plastic.
Suits: two assemblies at once. Strengths: long straps in a pair. Weaknesses: limited maker detail. Skip it if you want a branded ratchet.

Care and Setup
- Wrap the strap once and check the corners are square before tightening.
- Keep glue off the strap so it does not stiffen.
- Release the tension when you store the clamp.
- Follow the maker’s instructions for the tightening style.
Mistakes to Avoid
- Choosing a strap too short for the perimeter.
- Over-tightening on thin frame stock.
- Assuming corner blocks are always included.
- Ordering without a listed strap length.
Measuring the Work and Picking a Strap Length
The first number to work out is the perimeter of the largest thing you expect to clamp. Wrap a flexible tape or a piece of string around the piece, or add the lengths of all sides for a frame or box, then add extra for the tightening mechanism, which uses up some of the strap. A strap that only just reaches around the work will leave you with no room to tension it, so allow a margin.
Think about the range of projects, not just the next one. A short strap is handy for small picture frames and boxes, while a long one covers larger frames, cabinet carcasses and chair assemblies. Very long straps are easy to cut down in use by looping them, but a short strap can never be extended, so people who work on varied pieces often prefer a longer strap. On the other hand, excess strap tail can get in the way, so tuck it away or tie it off as you work.
Also consider how the strap behaves. Woven or nylon straps are flexible and conform to curves, while a stiffer strap may hold a shape better but resists tight corners. Check the listing for the stated length, and note whether that is the usable length or the total. Where the listing does not give a figure, treat the product with caution and ask the seller. For round work such as barrels, legs or turned parts, measure the circumference and compare it with the strap length listed for the exact product you plan to buy.
Tightening Mechanisms Compared
Band clamps differ mostly in how they pull the strap tight, and each approach has a different feel. Lever or cam mechanisms tighten quickly with a squeeze, and release with a flick. They are fast for repeated glue-ups, but the force is often limited by how hard you can squeeze. Ratcheting handles let you take up slack in small steps and build tension gradually, which gives finer control and is useful for stubborn assemblies. Screw-type tensioners provide strong force and slow, precise adjustment, but they take longer to operate.
Each has a tradeoff. Fast mechanisms may be less precise, while precise ones may be slower. If you clamp delicate frames, a mechanism that lets you add tension gradually reduces the risk of crushing a joint. If you glue up many pieces in a session, quick release saves time while glue is open.
- Check how the release works and whether you can do it one-handed.
- Look at how the strap is fed through, since some designs are tricky to thread.
- Consider what happens if you over-tighten: a strong mechanism can bow thin frame members.
- See whether the handle is comfortable and slip resistant.
Whichever you choose, tighten gradually and check the joint as you go. Over-tightening can crush corners or force glue out of the joint.
Corner Protection and Clamping Pressure
A strap alone pulls evenly along its length, but corners are where the force concentrates. Without protection, the strap can cut into soft wood or round off sharp edges, and it can slip off the corners of a frame. Corner blocks, clips or claws spread the load and keep the strap in position. Some clamps include them, and others expect you to supply your own, so check what is in the box.
Corners that pivot or adjust help with angles other than 90 degrees, such as hexagonal frames or irregular shapes. If you build a lot of picture frames or boxes, built-in corner pieces make setup faster. If you work with round or odd-shaped parts, a flexible strap with no corner pieces may be all you need.
Clamping pressure deserves attention. A band clamp is a light-to-moderate pressure tool, ideal for holding glue joints while they set, but it is not designed to pull badly warped parts into shape. Use extra clamps or cauls for heavy corrections. Protect finished surfaces with scrap wood, card or a cloth under the strap, since a tight strap can mark soft wood or leave a pressure line in wet glue.
- Check the fit first by dry clamping without glue.
- Square the assembly by measuring diagonals before the glue sets.
- Wipe squeeze-out before it hardens.
- Leave the clamp on for the time stated on the glue label.
Common Uses Beyond Picture Frames
Many people buy a band clamp for a frame, then discover other uses. Boxes, drawers and small cabinets are natural fits, because the strap draws all four sides together at once. Chair repairs are another strong use, since a strap can pull loose rungs and legs into place around an irregular shape that a bar clamp cannot grasp. Round projects such as drums, barrels, bowls and turned pieces can be held with a strap around the circumference.
The clamp can also work for veneer and edge banding, where wide, even pressure is useful, and for temporary holding during assembly while you screw or nail. Some people use a strap to bundle pipes or to hold bent laminations while the glue cures, provided the pressure is suitable.
Know the limits. A band clamp is not for heavy load-bearing uses, lifting or securing items for transport, and the listing should not be read as saying otherwise. It is a woodworking and repair clamp. For long panels, edge-gluing boards or heavy pressure, bar or pipe clamps are better.
To plan a project, consider the shape, material and glue time. Dry-fit the pieces, position the strap and any corner blocks, and tighten while checking for squareness. If you have multiple joints to glue, work in stages, or use extra clamps to keep the pieces aligned. Wipe the strap clean of glue to avoid sticking in the future.
Care, Storage and When to Retire a Strap
A band clamp is simple, but glue and wear take a toll. Wipe off wet glue with a damp cloth before it dries, as dried glue stiffens the strap and clogs the mechanism. If dried glue has built up, scrape it carefully or follow the maker’s cleaning advice. Keep metal parts clean and dry, and apply a light lubricant to moving joints if the manual recommends it. Do not use solvents that can weaken fabric or plastic.
Store the clamp loosely coiled in a dry place, away from direct sunlight and heat. Sunlight can weaken some strap materials over time. Avoid sharp kinks or tight folding that can cause creases. Keep the strap away from sharp edges and from chemicals that could damage it.
Inspect before each use. Look for frayed edges, cuts, stretched sections, stiffness or flattened areas. Check the metal parts for bending, cracks or rust, and the plastic parts for splits or stress marks. A strap that has stretched or frayed can fail under tension, so retire it. Likewise replace the clamp if the mechanism slips under load, the ratchet no longer holds or the handle cracks.
- Do not use a damaged strap for anything that could injure someone if it let go.
- Keep fingers clear when releasing tension.
- Wear eye protection when tightening tough joints.
Replacement parts may be available from the maker, so check the product page.
How a Band Clamp Differs From a Bar Clamp
A band clamp, often called a strap clamp, wraps a flexible band around an object and tightens it with a ratchet or screw. That makes it very useful for jobs where a straight bar clamp cannot reach, such as picture frames, round tabletops, chair rungs, drums and mitred corners. Pressure is spread along the band, so items with irregular shapes can be held without a custom jig.
When you read a listing, check the strap length first. A longer band covers larger objects, but a short band is easier to manage on small frames. Also see what the strap is made from. Nylon and polyester straps stretch very little and resist wear, while thinner webbing may give a little more.
- Measure the largest circumference you expect to clamp.
- Check the width of the strap against your edge or corner size.
- Look for ratchet mechanisms that release smoothly.
Corner Pieces and Frame Work
Some sets include four corner brackets that keep the band from crushing the edges of a frame. These pieces help distribute pressure at the corners, which is where mitre joints need the most support. Plastic corner blocks protect softer woods, and metal corners can bear heavier loads. If you plan to glue frames regularly, a set with several straps lets you clamp a box or frame in one go.
| Project | What to look for |
|---|---|
| Picture frames | Corner blocks and a medium strap |
| Round furniture parts | Long strap with firm ratchet |
| Box joints | Multiple clamps, even pressure |
| Repairing chair legs | Narrow strap, careful control |
Tightening Technique and Glue Habits
Snug the strap by hand first, then take up slack with the ratchet in small steps. Over-tightening can squeeze glue out of a joint or distort thin stock. Check that corners stay square as the strap is drawn tight. Wipe off squeeze-out following the glue instructions from the maker, and keep the strap from touching wet glue that could stain it.
Care and Storage
Keep straps clean and dry, and wipe off dried glue before it hardens. Store them loosely coiled to avoid kinks and away from sunlight that can weaken fabric over time. Inspect the ratchet before each use and stop if a strap shows fraying.
Safety Notes
A tight strap stores energy, so release it slowly and keep your face and hands clear when you unlock the ratchet. Follow the load limits given by the maker, and do not use a band clamp for lifting or holding heavy weight.
Questions to Ask Before You Buy a Set
Band clamps are often sold singly or in sets of two to four. A quick set of questions will help you choose the right quantity and style.
- What is the largest object you plan to clamp?
- Do you need corner pieces, or will you make your own?
- Is the ratchet easy to release with one hand?
- Is the strap width suited to your stock?
- Does the listing include replacement parts?
For occasional frame work, one strap with corner blocks can be enough. For furniture builders who glue up chairs and boxes, a set of several gives more flexibility, as long as you have room to store them.
Choosing a Band Clamp by Perimeter, Not by Guesswork
A band clamp succeeds or fails on fit before it ever applies pressure. The strap must wrap your workpiece with working length left over for the mechanism, the corners must be protected where the strap changes direction, and the tightening system must let you apply even pressure without fighting the tool. This section deepens the selection logic behind the six clamps in this guide so you can size and choose with confidence.
Measure the work the way the strap travels
Measure around the outside of the assembled piece at the height where the strap will sit, following every corner and recess, then add working allowance for threading the mechanism and taking up slack. Boxes, frames and drawers of modest size sit comfortably within shorter straps, while blanket chests, large frames and multi-sided work consume length quickly. If your projects vary, owning one shorter and one longer strap covers more ground than two of the same size, and the multi-packs in this guide reflect that logic. When a listing gives a strap length, treat it as the total webbing, not the largest workpiece it can surround, because the mechanism and the doubled-back tail consume part of it.
Webbing behavior under load
Good webbing lies flat, resists twisting as you position it, and does not stretch noticeably once tensioned, because stretch turns your careful tightening into gradual loosening as glue sets. Edges matter too: a strap that frays sheds fibers into glue lines and becomes harder to thread through its own mechanism. When comparing the BESSEY, POWERTEC and Pony options with the value multi-packs above, you are largely comparing webbing quality, mechanism smoothness and corner hardware, and those three things decide how pleasant the clamp is on its twentieth use rather than its first.
Corner hardware is part of the clamp
Bare webbing pulled around a sharp corner concentrates pressure on a line, can dent soft wood, and tends to slip as tension rises. Corner brackets, claws and pads spread that pressure, hold the strap at the right height, and keep miters from riding up. For picture frames and fine boxes, corner pieces are close to essential. For rough carcasses and round or irregular work, you may run the strap plain. Judge each option here by whether its corner solution matches the finish level of your work.
Each Pick at Work: Six Straps on Real Assemblies
BESSEY VAS-23+2K-CB Variable Angle Strap Clamp
BESSEY’s variable-angle design is built for work that is not a perfect rectangle: frames with angled joints, multi-sided boxes and assemblies whose corners differ. The pivoting corner elements adapt instead of forcing the work to suit the clamp. It suits frame makers, box builders and restorers who meet irregular geometry regularly and want one clamp that conforms to the piece rather than the other way around.
POWERTEC Strap Clamp, 71101
A straightforward mid-length strap clamp aimed at the general workshop. It fits the common run of work: picture frames, small cabinets, drawers and boxes that need even pressure while glue sets. For a first band clamp or a dependable spare, its simplicity is the point. Users who clamp rectangular work most of the time will find nothing missing and nothing to fiddle with.
4 Pcs Band Clamp with 4 Corner Claws
Quantity is the strategy here. Four clamps let you strap multiple assemblies at once, or stack two straps on a tall carcass for even pressure top and bottom. This suits batch work: a set of frames for a gallery wall, a run of gift boxes, or drawers built in multiples. The included corner claws address the marking concern for finished surfaces. For a small shop that glues up in batches, throughput beats refinement.
Pony Jorgensen 1225 Rapid Acting Band Clamp
The rapid-acting mechanism targets setup speed. Pony Jorgensen is a long-standing clamping name, and this model suits users who assemble, adjust and re-tension frequently, such as framers dry-fitting miters and builders checking squareness before committing. Faster take-up also helps when glue open time is short and the minutes spent threading a slow mechanism are minutes the joint does not have.
Pony Jorgensen 1215 Adjustable Band Clamp, 15 ft
The longer strap extends the same trusted format to bigger work: larger frames, chests, cabinet carcasses and hexagonal or octagonal pieces whose perimeters grow quickly. It suits the workshop whose projects have outgrown a standard strap but whose clamping style has not changed. Owning this alongside a shorter clamp covers nearly every rectangular or multi-sided assembly a home shop produces.
2 Pack Band Clamps, 23 ft Variable Angle
Two long variable-angle straps for the price-conscious builder with large or irregular work: big frames, round tabletops being edged, barrels, planters and oversized boxes. The pair format lets you clamp top and bottom of a tall piece simultaneously, which is how large carcasses stay square. If your project list trends large, length is the feature, and this pack is built around it.
Head-to-Head: Settling the Usual Debates
BESSEY variable angle versus Pony Jorgensen rapid acting
Adaptability versus speed. The BESSEY conforms to odd angles and irregular shapes; the Pony gets tension on and off faster on conventional work. Count your corners: if they are reliably square and your frustration is slow setup, choose speed. If your work includes angled frames and multi-sided pieces, adaptability prevents the strap from fighting the geometry.
Single quality clamp versus multi-pack value
One refined clamp serves the builder who glues one piece at a time and values feel and durability. A multi-pack serves the batch builder, for whom a glue-up stalls if every assembly must wait for a single strap. Neither is a compromise when matched to the workflow; each becomes one only when matched to the wrong one.
Mid-length versus long strap as your only clamp
A long strap can clamp small work, with the excess managed, while a short strap cannot clamp large work at all. If you will own exactly one, length is the safer bet, provided the mechanism takes up slack smoothly. If you will own two, a mid-length for daily work plus a long one for big pieces is the combination most shops settle on.
First Glue-Up: A Calm Setup Sequence
Dry-assemble the piece completely before glue appears. Fit the strap loosely around the dry assembly at the height you intend, place corner protectors, and practice tensioning and releasing once, so every motion is familiar when the clock is running. Check squareness during the dry run by measuring both diagonals; equal diagonals mean square, and adjusting now is free. Lay out glue, brush, damp cloth and the clamp within reach, and protect the bench with paper or a mat where squeeze-out will land.
For the real glue-up, work in order: apply glue evenly, assemble, settle the strap and corners by hand, then tension gradually while tapping joints home with a soft mallet if needed. Re-measure the diagonals under light tension, correct by shifting the strap or nudging a corner, then apply final tension. Wipe squeeze-out at the stage your glue type prefers, and leave the assembly undisturbed for the full handling time on the glue bottle, not the shorter time your patience prefers. Finally, slacken the strap fully before removing it, so the mechanism and webbing return without a snap. Rehearsing this sequence dry is what turns a stressful glue-up into a routine one.
Troubleshooting in Diagnostic Order
When an assembly comes out wrong, diagnose in this order. First, dry-fit quality: gaps and rocking joints cannot be clamped into correctness, and excessive pressure only distorts them, so fix the joinery before blaming the clamp. Second, squareness at setup: if the diagonals were never measured, a parallelogram result is a process failure, not a tool failure. Third, strap position and corner seating: a strap riding high or a corner piece that slipped changes pressure direction and can pull a miter open on one side while closing it on the other. Fourth, tension sequence: full tension applied immediately can drag pieces out of alignment, which is why gradual tension with checks exists. Fifth, glue timing: assemblies adjusted after the glue begins to grab will show weak, starved joints later. Sixth, strap condition: a twisted, frayed or glue-stiffened strap distributes pressure unevenly, and cleaning or retiring it restores performance. In order, these checks explain nearly every disappointing glue-up without buying anything.
Care, Storage and Building Your Clamp Collection
Clean glue from webbing while it is fresh whenever possible; dried glue makes a strap stiff and abrasive against finished surfaces. Washable straps can be rinsed and dried fully before storage, and mechanisms benefit from a occasional brush-out of dust and dried glue. Store straps loosely coiled, never under tension, away from sunlight that degrades webbing over time. Inspect before each use for fraying, cut edges and bent corner hardware, and retire any strap whose webbing is compromised, because a strap that fails under tension fails at the worst moment of a glue-up. Build your collection by evidence: a second strap after the first time two assemblies waited on one clamp, corner protection after the first dented miter, a long strap after the first perimeter that did not fit. That order keeps money tied to problems you have actually met.
Project Scenarios: Band Clamps Beyond the Picture Frame
A mitered frame that must close perfectly
Frames expose every clamping weakness: miters that gap on one side, corners that ride up, glue that squeezes onto finished faces. The winning setup uses corner protection, gradual tension and diagonal measurements before the glue grabs. The BESSEY variable-angle clamp and the Pony rapid-acting clamp both serve framers, one through conformity and the other through speed, and many framers own the pair for different frame styles.
A drawer box production run
Drawers are built in multiples, and multiples reward multiple clamps. Strap each box as it is assembled, check its diagonals against the opening it must fit, and move to the next while the first cures. This is the four-pack scenario from this guide, and it is also where a mid-length strap like the POWERTEC proves its size, because drawer perimeters are predictable and a right-sized strap handles faster than an oversized one with yards of tail to manage.
A hexagonal planter or multi-sided box
Odd-sided work is where band clamps have no real rival, because no arrangement of bar clamps applies even pressure around six or eight sides. The strap follows the geometry, corner pieces protect the arrises, and tension equalizes itself around the shape. Variable-angle designs shine here, and the long two-pack in this guide covers the perimeters these projects grow to.
Round and irregular work: tabletops, barrels and repairs
Edge-gluing a round top, re-gluing a coopered barrel or planter, and clamping a repaired chair base all ask a strap to conform rather than to square. Keep tension moderate, protect finished surfaces generously, and let the strap do the one thing it does uniquely well: pull from every direction at once. A long strap kept for these jobs, even if it is used monthly, justifies itself the first time it saves a piece no other clamp could hold.
Decision Guide by User Type
The dedicated framer should choose mechanism feel and corner hardware first, which points to the BESSEY or Pony options depending on whether angles or speed dominate their work. The batch builder of boxes and drawers should choose count, pointing to the multi-packs. The general woodworker should choose the mid-length single clamp with the smoothest mechanism they can justify, because it will mediate most glue-ups they ever do. The builder of large or odd work should choose length and angle adaptability together. Across all four, the rule is the same: buy for the assembly you repeat, and let the rare assembly borrow, adapt or wait.
Ownership Habits: Strap Health and Glue Discipline
Inspect webbing the way you inspect a saw blade: before the job, not during it. A strap with a cut edge should be retired from tension duty immediately, because webbing fails suddenly and always mid-glue-up. Keep a sacrificial older strap for rough, dirty or painted work so your best strap never meets that duty. Record, on a tag tied to each strap, the largest perimeter it has comfortably handled; that small note ends the guesswork of which strap to grab for a new carcass size. Finally, rehearse every new assembly dry with the strap you intend to use. The dry run is where strap length, corner placement and tension sequence get decided, and glue should never be present for a decision.
Technique Notes: Pressure, Squeeze-Out and the Waiting Game
Band clamp pressure should be firm and even, not heroic. The strap’s mechanical advantage is modest by design, and the joint needs contact and alignment far more than it needs crushing force, which only starves the glue line and distorts thin parts. Judge tension by the joint’s behavior: lines closing evenly, a thin bead of squeeze-out appearing along the seams, and diagonals holding equal as tension rises. If one corner closes while another opens as you tighten, the strap is seated unevenly or a corner piece has shifted, and the fix is to slacken, reseat and begin again rather than to pull harder.
Managing squeeze-out around a strap
Glue and webbing are natural enemies: squeeze-out bonds the strap to the work and stains finished faces under it. Protect vulnerable faces with tape or wax paper strips where the strap will bear, and place corner protectors so they double as glue shields. Time your cleanup to the glue: too early and you smear it into the grain, too late and you chisel it off the surface you were protecting. A strap that has collected dried glue should be cleaned before its next finished job, because yesterday’s glue lump becomes today’s pressure point and dent.
Stacking straps and combining clamp types
Tall carcasses and deep boxes often need two straps, one near the top and one near the bottom, tensioned alternately in small increments so the piece stays parallel instead of being pulled into a taper. Band clamps also partner well: let bar clamps provide the main squeeze across a panel glue-up while a strap keeps the assembly from racking, each tool doing the half of the job it is best at. That division of labor, strap for geometry and bars for pressure, is how experienced builders get flat, square assemblies without owning a wall of specialized clamps.
Materials and Glue Notes for Strap Work
Wood movement and the clamped assembly
A band clamp holds an assembly in the shape it has today, while the wood inside it will move with the seasons. Build with that movement in mind: panels that can float, frames whose miters are glued with realistic expectations, and boxes whose bottoms are not trapped rigidly on all four sides. The clamp’s job ends at cure; the design’s job is everything after, and confusing the two produces assemblies that were square in the shop and cracked by winter.
Glue choice changes the clamping plan
Standard wood glues give a working window measured in minutes, which suits the calm sequence described in this guide. Longer-open-time adhesives buy calm on complex assemblies at the cost of longer clamp occupancy, which matters when clamps are few. Fast adhesives punish any rehearsal skipped. Match the glue to the assembly’s complexity and your clamp inventory together, because a slow glue under a borrowed strap is a schedule problem disguised as a chemistry choice. Whichever glue you choose, its bottle’s stated handling and cure times govern when straps come off, and impatience at that step has undone more good assemblies than bad clamping ever has.
Skill Progression: Dry Runs, Delegation and Bigger Work
The single habit that most improves band clamp results is the full dry run, strap included, treated as non-negotiable for any assembly with more than four parts. The second habit is recruiting a second pair of hands for large glue-ups without embarrassment; professionals do it routinely because a strap, four corners and a glue brush exceed two hands at exactly the moment the glue is least patient. The third habit is scaling gradually: frames, then boxes, then carcasses, then multi-sided work, letting each success teach the tension and sequencing the next size needs. A builder who climbs that ladder finds that the strap itself was never the limitation, only the rehearsal was, and rehearsal is free.
Storing assemblies under clamp pressure in a small shop
Small shops run out of flat space before they run out of clamps. Plan where each clamped assembly will sit before glue is opened: a cleared bench corner, a flat board across sawhorses, or a dedicated glue-up shelf. Assemblies moved while straps are tensioned shift joints silently, so the resting place is part of the setup, chosen in the dry run. Stacking curing work is possible with care and flat cauls between pieces, but only when lower assemblies have reached handling strength. Thinking one glue-up ahead, where it will rest and what it will free, turns a cramped shop from a constraint into a rhythm.
A Note on Renting the Occasion Versus Owning the Habit
Band clamps are inexpensive enough that ownership usually wins, but the principle behind the choice is worth naming because it governs bigger tools too. If a clamp type serves a project you will repeat, frames every season, boxes as gifts, drawers for every room, ownership pays in availability alone: the tool is there at the glue moment, which never schedules itself politely. If a shape appears once, an irregular restoration or a single oversized frame, improvisation with a strap you own, borrowed corner hardware, or a shop-made jig may serve better than a purchase that then occupies a drawer for a decade. Judge by your last two years of projects rather than your next two years of intentions, because intentions overbuy and history does not. The builders with the most satisfying clamp walls are not the ones who bought the most; they are the ones whose purchases all correspond to a glue-up they can still remember.
Two hands, one strap: working alone well
Most home builders glue up alone, and band clamps reward a solo technique: stage the assembly on a surface at a comfortable height, pre-position the strap loosely beneath or around the work before any parts are glued, and use small spring clamps or tape to hold corners in approximate position while the strap is settled. Tension in stages, walking around the piece between stages to check corners from every side, because a single viewpoint hides the corner that is riding up. Photographing the dry run from the angle you will stand at during the glue-up is a surprisingly effective rehearsal tool. None of this requires a second person; it requires deciding, in advance, what your two hands will do in which order, which is the real difference between a calm solo glue-up and a frantic one.
A final word on patience as a clamping tool
Every experienced builder can name an assembly saved by waiting: the extra minute spent re-measuring diagonals, the glue-up postponed until a dry run felt boring in its familiarity, the strap left on for the full cure while the next task waited. Band clamping looks like a test of equipment and is mostly a test of temperament. The clamps in this guide will all hold a well-made assembly square while glue cures; the variable is whether the builder gives the process its stages in order. Build that patience into your routine and the simplest strap in this list will outperform a premium clamp used in a hurry, which is the most useful truth this category has to teach.
Band Clamp FAQ
What is a band clamp good for?
It holds frames, boxes, drawers and round or irregular pieces where bar clamps cannot reach around the shape.
Which listing gives the longest strap?
The BESSEY and the 2 pack list 23 feet. The Pony 1215 lists 15 feet and the POWERTEC and 4 piece set list 13 feet.
Can a band clamp square up a frame?
It can help hold the corners together, but you should still check squareness by measuring the diagonals before the glue sets. Adjust the assembly gently, then tighten.
How tight should I make the strap?
Snug and even is the target. Tighten until the joints close without gaps and a little glue squeezes out, but do not crush the wood or force the frame out of square.
Do I need corner blocks?
They help protect corners and keep the strap in place on square or rectangular work. For round parts, a plain strap may be enough. Check what is included with the clamp.
Will a band clamp mark my wood?
It can on soft wood or finished surfaces if tightened hard. Use scrap wood, cardboard or cloth under the strap for protection.
Can I use a band clamp instead of bar clamps?
Only for certain jobs. Band clamps suit frames, boxes and round pieces, while bar clamps are better for flat panels and heavy pressure.
How do I get glue off the strap?
Wipe wet glue right away with a damp cloth. Dried glue may need gentle scraping, and you should avoid harsh solvents unless the maker says they are safe.
What glue works best with band clamps?
Check the glue label for clamp time and suitability for your material. Wood glues are common for frames and boxes, but use the one recommended for your project.
The Short Version
For a long strap with clips, the BESSEY. For a simple 13 foot clamp, the POWERTEC. For four corner clamps, the 4 piece set. For rapid levers, the Pony 1225. For a ratchet, the Pony 1215. For two long straps, the 2 pack.


