A carving gouge has a curved cutting edge, so it scoops out wood rather than slicing it flat. The curve is called the sweep, and a deeper sweep removes more wood per pass. Palm gouges are pushed by hand, while longer gouges can be driven with a mallet. The main choices are the sweep and width, the handle and how you plan to drive the tool.
The six picks below include two palm kits, a single bent gouge, a set of power gouges for reciprocating carvers, a fishtail set and a four gouge mallet style set. Steel, sizes and handles come from each listing page and are the makers’ own claims. We have not used these gouges ourselves. Where a listing is unclear, we say so.
As an Amazon Associate we earn from qualifying purchases. Links below are affiliate links, and they do not change the product information we give.
What to Look For
| Feature | Why it matters |
|---|---|
| Sweep | Deeper curves hollow quickly, flatter ones smooth |
| Width | Wide gouges rough out, narrow ones detail |
| Palm or mallet | Some tools are for hand pressure only |
| Steel | Hardness affects how long an edge lasts |
In this guide
Specs at a Glance
| Set | Contents | Steel and handle | Notes |
|---|---|---|---|
| BeaverCraft SC05 | 6 pieces: gouges, chisel, V-tool | High carbon; ash | Palm only; no mallet (maker) |
| BeaverCraft SC01 | 6 pieces with strop and pouch | High carbon; ash | Palm chisels; waxed canvas roll |
| BeaverCraft K8a/14 | 1 bent gouge, 0.55 in | High carbon; wood | Palm tool; no mallet |
| Flexcut RG100 | 14 power gouges | 1095 high carbon | For reciprocating carvers; adapter extra |
| Schaaf fishtail | 4 fishtail gouges | Chrome vanadium, C60; ash | Canvas roll; eBook |
| QWORK 4 piece | 6, 12, 18, 25 mm gouges | Chrome vanadium, HRC58-62; wood | Metal hoop on handles |
The 6 Best Carving Gouges
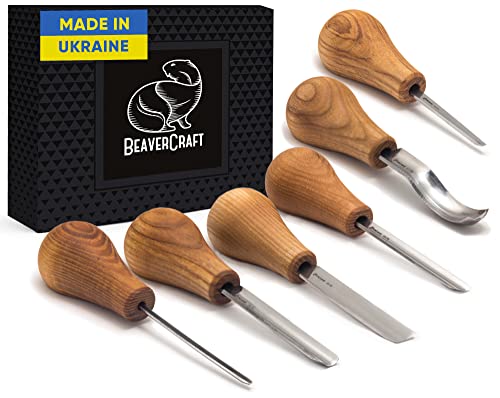
Top pickBest for shaping, detailing and texture by hand
1. BeaverCraft Wood Carving Gouges Kit SC05
A six piece palm set with gouges, a flat straight chisel, a short bent tool and V-chisels, all with ash handles and high carbon steel blades. The maker says the tools are for hand use only and should not be struck with a mallet. They are described as made in Ukraine.
Suits: shaping, detailing and texture by hand. Strengths: a V-tool and several profiles. Weaknesses: not for mallet work. Skip it if you want to strike the tools.

Best for palm carving with a strop in the box
2. BeaverCraft Wood Carving Gouges Chisels Kit SC01
A six item kit with radial gouges, a flat chisel, a short bent gouge, a double sided leather strop, polishing compound and a waxed canvas rolling pouch. The ash handled tools have high carbon steel blades. The bullet list names a rounded chisel twice, so the exact tool count is not clear.
Suits: palm carving with a strop in the box. Strengths: strop, compound and pouch. Weaknesses: an unclear tool list. Skip it if you want a clearly itemised set.


Best for adding a hollowing tool to a kit
3. BeaverCraft Bent Gouge K8a/14, 0.55 in
A single short bent gouge with a 0.55 inch curved blade of high carbon steel and a wood handle. The maker says it is a palm tool for hand use only and is suited to both soft and hard woods. It is the choice when you need one extra sweep, not a whole set.
Suits: adding a hollowing tool to a kit. Strengths: a single tool for spoon bowls. Weaknesses: one size only. Skip it if you need a full set.


Best for owners of a reciprocating carver
4. Flexcut Power Gouge Set of 14, RG100
Fourteen gouges meant for reciprocating power carvers. The listing says they fit tools from several makers and come in a wooden box. The blades are 1095 high carbon steel. A handle adapter is sold separately and is not included. The details table lists no warranty while other text mentions a first aid kit, so read the page before buying.
Suits: owners of a reciprocating carver. Strengths: fourteen profiles in a box. Weaknesses: adapter extra; not hand tools. Skip it if you carve by hand.

Best for relief and detail carving
5. Schaaf 4-pc Fishtail Gouge Set
Four fishtail gouges in chrome vanadium steel hardened, the maker says, to Rockwell C60, with octagonal ash handles, a canvas tool roll and an eBook on care. Fishtail blades widen toward the edge, which the maker says suits tight detail work. The listing page does not give the individual widths.
Suits: relief and detail carving. Strengths: flared blades for tight corners. Weaknesses: no widths shown. Skip it if you need to match specific sweeps.

View 4-pc Wood Chisel Set, Fishtail Gouges, Cr-V 60 on Amazon

Best for mallet driven hollowing
6. QWORK 4-Piece Wood Gouge Chisel Set
Four semicircular gouges in 6, 12, 18 and 25 millimeter widths, forged from chrome vanadium steel listed at HRC58 to 62. The wood handles have a metal hoop at the base, and the maker says they can take mallet blows. Sizes are engraved on the blades and the tools come pre-sharpened.
Suits: mallet driven hollowing. Strengths: clear widths and hooped handles. Weaknesses: one profile only. Skip it if you want varied sweeps.

Care and Setup
- Clamp the work so both hands stay behind the cutting edge.
- Strop or hone the inside curve with a slip, and the outside bevel flat.
- Wipe blades dry and keep edges covered in the roll.
- Use palm tools by hand only if the maker says so.
Mistakes to Avoid
- Striking a palm gouge with a mallet.
- Buying power gouges without a compatible carver.
- Choosing one profile when the project needs several.
- Letting the edge dull before sharpening.
Understanding Sweep, Width and Profile Numbers
Gouge descriptions can sound like code, but two ideas explain most of them. Width is the distance across the cutting edge, and sweep is how curved that edge is. A flat chisel has no sweep. A shallow gouge has a gentle curve and slides across the surface, while a deep gouge has a tight curve that digs a trough. Wide shallow gouges are good for smoothing and shaping surfaces. Narrow deep gouges are good for hollowing, tracing lines and cutting grooves.
Many makers label gouges with a sweep number, and the system is common though not universal. Lower numbers generally mean flatter sweeps, and higher numbers mean deeper ones, but the exact curve for a given number can differ between brands and even between product lines. A listing that states only a number without a width tells you little, so look for a width in millimeters or inches alongside the sweep.
Profile shapes add variety. A straight gouge has a blade that runs in a line, a bent gouge curves along its length to reach into hollows such as spoon bowls, and a fishtail gouge widens toward the edge, which gives clearance in tight corners and helps with fine detail. A V-tool, sometimes sold in carving kits, cuts a V-shaped groove and is useful for lettering and outlines.
When you read a listing, check whether sweep and width are stated for each tool. If they are missing, you may not be able to match the tool to your project. Match the profile to your use: relief carving and lettering call for smaller gouges, while bowl and spoon work calls for bent and deeper tools.
Palm, Mallet and Power-Driven Gouges Compared
How the tool is driven shapes its design, so check the drive method before you buy. Palm gouges have short handles and are pushed with the hand, using the palm for power and the other hand to guide the blade. They give excellent control for detail and small to medium work. Many makers state they are for hand use only and should not be struck, and striking one can crack the handle or damage the blade.
Mallet gouges have longer handles, often with a hoop or ferrule to resist splitting, and they are meant to be struck with a wooden or rawhide mallet. They remove wood quickly and suit larger carvings and heavy hollowing. They take more space to store and need a bench or clamp that can take the blows.
Power gouges, as listed in this guide, are designed for reciprocating carving tools, which move the blade back and forth with a motor. They are not hand tools in the same sense. They need a compatible power carver, and the listing may note that adapters are sold separately. Do not assume they fit any machine, and read the compatibility statement carefully.
If you are starting out, a small palm set suits whittling, spoon carving and detail. If you plan to carve bowls, signs or sculptural work in hardwood, mallet gouges become useful. Power carving suits people who already own the machine and want to speed up roughing out. Choose the drive method for the work you actually do.
Steel Type, Hardness and Edge Life
Steel choice affects how long a gouge stays sharp and how easily you can restore it. High-carbon steels take a keen edge and are relatively easy to sharpen, but they can rust if left damp. Chrome vanadium steels resist wear and corrosion and are common in budget and mid-range tools. Hardness is often stated on the Rockwell C scale, shown as HRC. A higher number means harder steel that holds an edge longer, but very hard steel can be brittle, chip when it hits a knot and take more effort to sharpen.
Treat a stated hardness as a maker’s claim and a rough indication, not a performance guarantee. Heat treatment quality varies, and the same steel type can behave differently from one maker to another. Edge geometry matters too: a thin, well-ground bevel cuts cleanly, while a thick, blunt bevel needs more force.
Pre-sharpened does not always mean ready to carve. Many new gouges benefit from honing and stropping before first use, because factory edges can be coarse. A tool that arrives with a rough edge or uneven bevel can usually be improved with a little work, though a badly ground edge may need more attention.
Consider the kind of wood you carve. Softwoods and basswood are forgiving, and almost any decent steel works. Hardwoods and woods with dense grain are tougher on edges, so a tougher steel and careful sharpening matter more. Also think about maintenance: if you will not oil the tools and keep them dry, a corrosion-resistant steel may suit you better.
Sharpening and Stropping a Curved Edge
A gouge has two surfaces to maintain: the outside bevel and the inside curve. Sharpening differs from a flat chisel because the edge curves, so you rotate the tool as you work. The usual approach is to hone the outside bevel on a stone or abrasive paper while rolling the gouge through its curve, keeping the angle steady. Then use a slip stone, a shaped stone with a rounded edge, or a folded strip of abrasive to remove the burr from the inside. Take care not to round over the inside edge, which would dull it.
Stropping finishes the job. A leather strop, loaded with polishing compound, removes the final burr and polishes the edge so it slices rather than tears. Strops can be flat, with a contoured edge for the inside curve, or shaped from dowels wrapped in leather. A kit that includes a strop and compound helps beginners maintain tools from the start.
Strop often. Light stropping every so often keeps an edge sharp far longer than waiting until the tool is dull and regrinding it. Signs of a dull gouge include having to push harder, torn fibers on the surface, a shiny line on the edge when you look at it under light and wood that crushes rather than shaves.
Work slowly and keep fingers clear. Sharp curved edges can catch skin. Take your time on an edge that needs reshaping, and avoid overheating on a powered grinder, which can soften the steel and ruin the temper. Keep the original angle and shape of the edge unless you have a reason to change it.
Building a Starter Set, Holding the Work and Staying Safe
You do not need dozens of gouges. A practical starter collection includes a shallow wide gouge for smoothing, a medium gouge for general removal, a narrow deep gouge for grooves, a V-tool for outlines and a flat chisel for cleaning up. Bent gouges are specialists for spoons and bowls. Buy additional profiles as projects call for them, and avoid large sets with many shapes you may never use unless the contents match your plans.
Wood choice affects learning. Basswood and other soft, even-grained woods carve easily and forgive mistakes. Green or damp wood is easier on tools than dry hardwood. Beginners often struggle with knotty or very dry wood, so choose clean stock.
Always secure the work. Clamp it to the bench or use a holdfast, or a vise, so that both hands can stay behind the cutting edge. Carve away from your body and away from your holding hand. Never push the blade toward your thigh or wrist. Cut-resistant gloves on the non-carving hand add protection, though they do not replace careful technique.
Keep tools organized. A tool roll or a rack protects edges, and a bench with good light helps you see the grain. Store blades dry, and consider a light oil film on carbon steel. Take breaks, since tired hands slip. Signs a gouge needs replacing include a cracked handle, a loose tang, a chipped edge that will not hone out and rust pitting along the bevel.
Which carving gouge set should you buy?
Choose the gouge set that matches how you will drive the tool and what you plan to carve, because the six picks here are built for different jobs.
- Palm carving with several profiles and a V-tool: the BeaverCraft SC05 is a hand-only set, so do not strike it with a mallet.
- A beginner kit with a strop and pouch: the BeaverCraft SC01 includes a strop, compound and a rolling pouch, though its tool list is not fully clear, so read the listing.
- One extra tool for spoon bowls: the BeaverCraft K8a/14 bent gouge adds a hollowing sweep without buying a set.
- Power carving: the Flexcut RG100 is for reciprocating carvers, and the handle adapter is sold separately.
- Relief and tight detail: the Schaaf fishtail set has flared blades, but the listing gives no individual widths.
- Mallet-driven hollowing with stated widths: the QWORK 4-piece set has hooped handles that the maker says can take mallet blows.
If you are new to carving, a palm set with a strop is the gentlest start. If you already own a power carver, the Flexcut set is the only pick here made for it.
What to check before you buy carving gouges, and who should skip them
Check the drive method, the widths and what is in the box before you order. Gouge listings can be vague, and a mismatch costs more than a quick read.
- Whether the tool is for palm use only or can be struck with a mallet.
- Width and sweep for each gouge, not just a set name.
- Whether a strop, compound, roll or adapter is included.
- Steel type and any stated hardness, treated as the maker’s claim.
- Whether the edge arrives sharp, and whether you will hone it first.
- Warranty and return terms shown on the listing.
Be honest about the trade-offs. Harder steel can hold an edge longer but may chip and take more effort to sharpen. A small set gives limited profiles, while a large set may include shapes you never use. Pre-sharpened edges often still benefit from stropping.
Who should skip them? Anyone who wants only to whittle with a knife may not need gouges yet. Anyone without a way to clamp the work should fix that first, since safe carving needs both hands behind the edge. If gouges still fit your plans, compare the picks above, check the current listing for widths and what is included, and choose the one that fits how you will use it.
Planning a Carving Around the Gouges You Own
A gouge set stops being a list of sizes and becomes a toolkit once you plan a project around it. Consider a shallow bowl or a relief panel as the model job. The work falls into phases, and each phase calls on different profiles. Hogging out the bowl’s interior wants a deep sweep that takes a generous bite and clears waste quickly, worked across the grain in overlapping passes. Refining the interior curve wants a shallower sweep that matches the intended final curve closely, because a gouge leaves the fairest surface when its sweep is near the sweep of the finished shape. The rim, the foot and any crisp transitions want flatter tools and stop cuts to define boundaries before the curved work reaches them. Relief carving follows the same logic in miniature: background lowering with a shallow sweep, modelling with medium sweeps, and undercutting details with a deep, narrow tool. Reading the sets in this guide against those phases shows their intent. The BeaverCraft kits assemble the profiles a beginner needs for spoons, bowls and small sculpture in hand-held sizes. The Flexcut power set assumes a rotary or reciprocating power source and trades hand feel for speed across many profiles. The Schaaf fishtail set specialises in reaching into corners and leaving crisp detail. The QWORK set offers basic profiles for occasional work. None of that is visible from piece counts alone, which is why planning one real project, even on paper, is the fastest way to understand which set is actually complete for you.
Before the first cut, draw the profile of the finished piece on the end of the blank and mark the waste. Gouges remove wood quickly, and the most common beginner error is excavating past the intended curve in the first enthusiastic minutes, leaving a bowl thinner than planned or a relief background lower than the design needs. Work in passes over the whole surface rather than finishing one area completely; a surface developed evenly keeps the overall form visible and lets you correct the shape while there is still wood to correct it with. Keep the workpiece secured — in a vise, on a bench hook arrangement, with a clamp, or held against a stop — so both hands are free for the tool. A gouge driven by two hands, one steering the handle and one guiding near the blade, is dramatically more controlled than a gouge pushed with one hand while the other hand holds the work in the line of the cut. Keep the holding and guiding hands behind the edge at all times, keep cuts directed away from your body, and keep a first aid kit at the bench as a matter of routine.
Sequencing cuts so the surface stays fair
Fair curves come from sequence more than from any single tool. Establish the deepest point of a hollow first and work outward toward the rim, so every later cut has a reference depth to blend into. Overlap each pass by about half the width of the gouge so no ridge survives between passes; ridges left by a deep sweep are tedious to remove with a shallower one. Where the grain reverses, as it does on both sides of a bowl’s interior, reverse your working direction rather than forcing the cut: a gouge entering rising grain will lever out a chunk instead of slicing a shaving. Finish a surface with the shallowest sweep that matches it, taking light cuts with a freshly stropped edge, and judge the surface with your fingertips and a raking light rather than your eyes alone. Fingertips find the small ridges and hollows that flat light hides, and finding them while the work is still secured saves a second clamping session later.
Head-to-Head: Palm Kits, Power Set, Fishtails and the Budget Set
The two BeaverCraft kits, SC05 and SC01, are the natural first comparison because both serve hand carving and differ mainly in emphasis. One leans toward a broader spread of profiles for varied small work, the other toward the core shapes of spoon and bowl carving with the supporting gear a beginner needs. In practice the choice is about your second project again: if spoons, kuksa cups and small bowls are the plan, the kit organised around those curves will feel complete sooner; if you expect to wander into relief, lettering backgrounds and general whittling support, the broader spread delays the day you shop for a single additional profile. Either way, both ask the same of you — hand power, a mallet only where the tool is built for it, and regular stropping — and both reward the carver who learns to read sweep numbers until choosing a profile becomes automatic.
The BeaverCraft bent gouge, sold singly, is a different kind of pick: a problem-solver bought for a shape straight gouges cannot reach. Inside a deep bowl or under a rim, a straight tool’s handle collides with the work before the edge reaches the surface; the bent shank moves the handle out of the way. It is rarely a first purchase and frequently the purchase that rescues a project, which is why it sits in this list beside the sets. The Flexcut RG100 power gouges change the equation entirely. Driven profiles cut with a rapid, short stroke that suits long sessions, larger work and harder woods, and the wide profile range covers shapes a hand set of similar size cannot. The costs are feel and setup: the powered stroke gives less warning before a cut runs too deep, the work must be secured even more rigorously because both hands are on the tool and machine, and dust and noise enter a craft many people choose for its quiet. The Schaaf fishtail set earns its place on detail: the flared, thin fishtail profile reaches into corners, cleans the meeting of two surfaces, and leaves a crisp line where a standard gouge’s thicker shoulders bruise the surrounding wood. The QWORK set is the honest budget option for the occasional user — basic profiles for trying the craft or for rough work you would not risk better edges on — with the understanding that edge preparation and more frequent maintenance will be part of the deal.
When a single gouge beats a bigger set
There is a stage in most carvers’ development where one specific profile, bought singly, improves the work more than another whole set would. It arrives when you can name the cut you cannot currently make: the inside of a bowl your straight tools cannot reach, the corner your standard gouge bruises, the curve none of your sweeps match. Buying that single tool — the bent gouge is the classic example — teaches a useful discipline: tools should answer named problems. Until you can name the problem, a balanced set is the better purchase, because it lets you discover which profiles your style of work actually consumes. After you can name it, singles are the efficient path, and your set grows by deliberate additions rather than by replacement.
First Session: Setting Up and Making Controlled Cuts
Begin by preparing the edges. New gouges, especially in the more affordable sets, often arrive needing a proper honing and stropping before they cut as they should; judge each edge on end grain, and bring every tool to the same ready state so your first impressions reflect the profiles rather than the factory finish. Secure a basswood or pine blank firmly, draw a simple design with a bowl hollow and a flat border, and work through the phases in order: stop cuts around the border, waste removal with the deepest sweep, blending with a medium sweep, and a light finishing pass with the shallowest. Hold the gouge with the bevel riding on the wood as the guide for depth — the bevel is the control surface, and a cut taken with the bevel floating is a cut whose depth is being guessed. Steer by raising or lowering the handle in small degrees rather than by forcing the tool sideways, and let the edge slice with a slight sideways drift as it advances, which severs fibres more cleanly than a dead-straight push.
Keep the session short and end it by stropping every tool you used. Note which profile you reached for most and which you avoided; that note, repeated over a few projects, is your personal profile map and a better guide to future purchases than any general recommendation. If a cut tears, stop and diagnose rather than pushing on: check the edge first, then the grain direction, then the depth of bite, in that order, because that is the order of likelihood and the order of cheapest fixes.
Mallet work without damaging the tools
Only gouges built with a mallet in mind — stout handles, often with a hoop or a reinforced striking end — should be struck, and palm gouges should never be struck at all. When mallet work is appropriate, the mallet drives and the hands steer: hold the tool in position with its bevel registered, strike with controlled taps rather than blows, and re-register the bevel between taps as the cut advances. A mallet that is too heavy removes the feedback that tells you the edge has met a knot or a grain reversal, so choose the lightest mallet that moves the tool through the wood you carve. Work secured, hands behind the edge, and the mallet swung in a short arc that could never continue into your own holding hand. Done this way, mallet work is not rougher than hand work; it is simply how larger bites in harder wood get taken without exhausting the carver’s palms.
Troubleshooting Gouge Work in Diagnostic Order
Most gouge problems announce themselves in the surface, and the surface can be read like a checklist. Torn, fuzzy hollows usually mean a dull edge or cutting into rising grain; strop first, then reverse direction. A surface of regular ridges means the sweep is too deep for finishing work or the passes are not overlapping; switch to a shallower sweep and halve your step-over. Chatter marks — a washboard texture — mean the cut is too light for the edge to bite steadily, the work is flexing in its holding, or the bevel is not riding as a guide; secure the work, commit to a slightly deeper bite, and keep the bevel down. A gouge that digs in at the corners is telling you the cut is too wide for the sweep in that spot; roll the tool slightly to work with the centre of the edge, or step down in width. A tool that keeps slipping out of the cut sideways is usually being steered by its handle rather than guided by its bevel; slow down and re-establish bevel contact before advancing.
Edge damage has its own order of causes. A nicked edge after hitting nothing obvious usually met a hidden knot, a grit particle in bark-side wood, or another tool in storage. A rolled edge suggests the steel met force it was not shaped for — prying with a gouge is the classic cause, and a gouge should never lever out waste. A edge that dulls suspiciously fast on clean wood points back to preparation: an edge that was never fully honed, with its wire edge left on, feels sharp for minutes and then collapses. The fix is a complete, patient honing back to a clean bevel, followed by stropping, rather than repeated emergency stropping of a flawed edge. Treat each of these as a one-variable diagnosis: change the edge, the direction, the bite or the holding — one at a time — and the surface will tell you which change worked.
Storage, Rust Prevention and Edge Protection
Curved edges are harder to protect than straight ones because a gouge can roll in a drawer until its edge finds another tool. Store gouges in a roll with individual pockets, a rack that holds each handle, or a box with dividers, so edges never touch. Keep them dry and wipe them after use in acidic or green wood; a thin protective film is worthwhile in a damp shop, wiped off before carving so it never transfers to the work. Keep the strop stored with the tools, and make the end-of-session strop as automatic as putting the tools away — the two habits together mean every session starts with ready edges. Never store a gouge loose in a toolbox that travels, and never carry one in a pocket. For the power gouges, add a check of the chuck or collet and the drive mechanism to the storage routine, since a profile that sits slightly loose cuts with a chatter that no edge preparation will cure. A set stored well keeps the edges you worked to create; a set stored badly needs rehoning before every session, which is how carving time quietly turns into sharpening time.
Choosing by User: Four Carving Paths
The spoon and bowl carver working by hand should start with the kit whose profiles cluster around medium and deep sweeps in hand sizes, adding the bent gouge when the first deep bowl defeats the straight tools. The relief carver should weight the choice toward shallow and medium sweeps plus fishtail profiles for corners, because background and detail work dominate that style. The carver planning larger work in harder woods, or managing hand strain, should look seriously at the power set, accepting the setup and the stricter work-holding in exchange for sustained cutting. The curious beginner who is not yet sure carving is for them is honestly served by the budget set plus a strop and good basswood: the total commitment stays small, the learning is real, and an upgrade later replaces tools whose limits the carver by then understands from experience. In each path, the strop and the work-holding matter as much as the steel; budget for them as part of the set, not as afterthoughts.
Extra questions readers ask about carving gouges
Can I carve a bowl entirely with one gouge? Yes, if its sweep is close to the bowl’s final interior curve, though waste removal will be slower and the rim work less crisp; most carvers find a deep and a shallow profile the practical minimum pair. Why does my gouge leave a polished, slippery surface instead of cutting? The bevel is probably riding without the edge engaging, because the handle is held too low for the sweep in that wood; raise the handle slightly until the edge bites, then settle into the cut. How do I protect a finished carving’s fine detail during storage? Wrap it in a soft cloth, keep it out of drawers where tools live, and handle it by its stoutest part — detail broken in storage is the saddest damage in the craft because the carving itself was already a success. Should beginners avoid very deep sweeps? Not avoid, but respect them: a deep sweep takes a big bite and can run quickly in soft wood, so learn it on practice stock with the work firmly secured and both hands on the tool.
From Gouge Work to Finished Surface: Scrapers, Rifflers and Final Cuts
What happens after the gouges have done their work decides how the carving is judged, and it is worth understanding even if your sets are your only tools for now. A surface straight off a sharp gouge, cut with the grain in overlapping passes, has a quality that sanding struggles to imitate: crisp, slightly faceted, and alive under changing light. Many carvers therefore treat the final gouge pass as the finish, taking light cuts with the shallowest suitable sweep and a freshly stropped edge, working the whole surface in one direction of light so every ridge shows itself for removal. Where the design calls for smoothness — the inside of a bowl that will hold food, a figure meant to be handled — the sequence continues with finer gouge cuts, then a scraper or riffler to level the facets, and only then, if at all, abrasive. Jumping straight from coarse gouge work to sandpaper is the common shortcut, and it shows: the abrasive rounds the transitions the gouges defined and leaves a surface that is smooth and vague at the same time.
Grain direction governs this finishing stage even more strictly than the roughing stage, because the cuts are thinner and the surface is the final one. A finishing cut taken against rising grain tears fibres that a heavier roughing cut might have severed, so read each area again before its final pass and reverse direction where the grain demands it, even when that means repositioning the work several times for one small hollow. Work secured, both hands on the tool, and the holding hand always behind the edge remain the rules; finishing cuts feel gentle, and that gentleness is exactly when attention wanders and a hand drifts into the path. Keep the first aid kit at the bench to the end of the project, not just its vigorous beginning. When the surface satisfies your fingertips and a raking light in equal measure, stop. The most common finishing error among improving carvers is one pass too many, taken to fix a blemish that only the carver could see, which creates a larger one that everyone can.
Carving Gouge FAQ
What is the difference between a palm gouge and a mallet gouge?
A palm gouge has a short handle and is pushed by hand. A mallet gouge has a handle built to take blows, such as the hooped QWORK handles.
Which pick suits spoon carving?
The BeaverCraft K8a/14 is a short bent gouge described for spoon carving, and the SC01 kit includes a bent gouge.
What does sweep mean on a gouge?
Sweep is the curvature of the cutting edge. A low or flat sweep slides across wood, and a high or deep sweep digs a trough. Numbering varies between makers, so check the listing for widths.
Can I hit a palm gouge with a mallet?
Only if the maker says it is designed for it. Many palm tools are for hand pressure only, and striking them can crack the handle or damage the blade.
Which gouge is best for spoon carving?
Bent gouges are commonly used to hollow spoon bowls because the curve lets the blade reach into the hollow. A small palm set with a bent tool is a typical starting point.
How often should I strop a gouge?
Often and lightly, such as at the start of a session and whenever the edge begins to feel less keen. Frequent stropping delays the need for a full sharpening.
Do I need a mallet for carving?
Not for palm work. A mallet is needed only for tools designed to be struck. Check the tool description before using one.
Is harder steel always better?
Not always. Harder steel holds an edge longer, but it can chip and takes more effort to sharpen. A balanced steel is often easier to maintain.
What wood is best for a beginner?
Soft, even-grained woods such as basswood are popular. Avoid knotty or very dry hardwood until your technique and tools are well established.
What size carving gouge should a beginner start with?
A medium width with a moderate sweep is a flexible starting point, with a narrow deep gouge added for grooves. A small palm set usually covers these. Check that the listing states widths.
Are carving gouges and wood chisels the same thing?
No, a chisel usually has a flat edge, while a gouge has a curved edge that scoops wood. Some sets mix both. Use each for the job it was made for.
Do I need a strop for carving gouges?
A strop is very helpful because it keeps the edge keen between sharpenings. A kit that includes one, like the BeaverCraft SC01, can help beginners. You can also buy one separately.
How do I keep carving gouges from rusting?
Wipe blades dry after use, store them in a roll or rack and apply a light film of oil to carbon steel. Avoid damp storage. Check them periodically for spots.
Can I use carving gouges on hardwood?
Yes, but hardwood is tougher on edges, so keep them sharp and take lighter cuts. Palm tools should not be struck unless the maker allows it. A mallet-ready gouge suits heavier work.
What is a fishtail gouge used for?
A fishtail gouge widens toward the cutting edge, which gives clearance in tight corners. It is often used for relief and detail carving. Check the listing for widths.
The Short Version
For a palm kit with a V-tool, the BeaverCraft SC05. For a kit with a strop, the SC01. For a single bent gouge, the K8a/14. For power carving, the Flexcut RG100. For fishtail detail, the Schaaf set. For mallet work with clear widths, the QWORK.


