Aviation snips, often called tin snips, are compound-action hand shears for sheet metal. They are color coded by cut direction: yellow for straight, red for left and green for right. The main choices are the cut directions you get, the gauge the maker lists, the blade steel and how the latch works.
The six sets below cover left, right and straight cuts in 3 piece sets, plus one 2 piece offset set. Gauges, steels and materials come from each listing page and are the makers’ own claims. We have not used these snips ourselves. Where a set differs from the others, for example a lower listed gauge, we point it out.
As an Amazon Associate we earn from qualifying purchases. Links below are affiliate links, and they do not change the product information we give.
What to Look For
| Feature | Why it matters |
|---|---|
| Cut directions | Left, right and straight snips follow different curves |
| Gauge capacity | A lower gauge number means thicker metal |
| Blade steel | Forged or alloy blades are claimed to last longer |
| Latch | A one-handed latch keeps jaws shut in the drawer |
| Serrations | Serrated edges grip the sheet while cutting |
In this guide
Specs at a Glance
| Set | Pieces | Listed capacity | Notes |
|---|---|---|---|
| HURRICANE 10 in | 3 | 20 gauge cold rolled; 22 gauge stainless | Cr-V serrated blades; TyreGrip handle |
| Crescent Wiss M123R | 3 | Up to 18 gauge rolled steel | Compound action; made in the USA |
| Amazon Basics | 3 | 18 gauge cold rolled; 22 gauge stainless | Chrome vanadium; one-year warranty |
| MIDWEST Blackout | 2 (left and right) | 18 gauge cold rolled | Forged molybdenum alloy; made in the USA |
| Milwaukee 48-22-4533 | 3 | 18 gauge cold rolled; 22 gauge stainless | One-handed lock; flush bolt design |
| Klein 120AVSKIT | 3 | 18 gauge steel; 22 gauge stainless | Forged blades; ASME B107.500.2020 noted |
The 6 Best Tin Snips

Top pickBest for gutters, siding and light duct work
1. HURRICANE 3 pc Aviation Tin Snips Set, 10 Inch
A yellow straight, red left and green right set of 10 inch snips with chrome vanadium blades, micro-serrations and TyreGrip handles. Each has a manual locking latch and a self-opening spring. The maker lists 20 gauge cold rolled steel and 22 gauge stainless, and says to avoid hardened steel, rod and wire mesh. That is a lower capacity than the 18 gauge claimed by most other sets here.
Suits: gutters, siding and light duct work. Strengths: a clear list of what to avoid. Weaknesses: a lower listed gauge. Skip it if you cut 18 gauge steel.


Best for regular sheet metal work
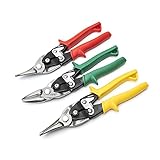
2. Crescent Wiss 3 Piece MetalMaster Compound Action Aviation Snip Set
A set of the M1R, M2R and M3R MetalMaster snips, listed to cut up to 18 gauge low carbon rolled steel. The maker describes blade serrations that spread the cutting force, a pivot bolt with a free float design, a spring-action handle with built-in stops and a one-handed latch for left or right hand use. The listing says it is made in the USA and has a limited lifetime warranty. The weight is 2.8 pounds.
Suits: regular sheet metal work. Strengths: made in the USA and a lifetime warranty line. Weaknesses: the listing does not give a stainless figure. Skip it if you cut stainless sheet.
View Crescent Wiss 3 Piece MetalMaster Compound Action Aviation Snip Set – M123R on Amazon

Best for a home toolbox set
3. Amazon Basics 3-Piece Aviation Snip Set
Straight, left and right snips of chrome vanadium steel with high-frequency heat treatment and serrated blades. The maker lists 18 gauge cold-rolled steel and 22 gauge stainless, and says they also handle wire, thin PVC and square steel tube. The two-color rubberized grips have a one-handed latch release. The warranty is a one-year limited warranty from Amazon Basics.
Suits: a home toolbox set. Strengths: three directions with an 18 gauge listing. Weaknesses: a shorter warranty. Skip it if you want forged blades.

Best for long cuts and trim cuts
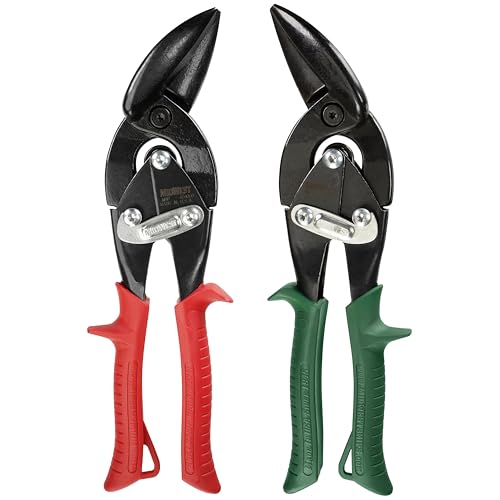
4. MIDWEST Blackout Aviation Snip Set, Left and Right Offset
A 2 piece offset set, left and right, with blades hot drop-forged of molybdenum alloy steel, heat treated and black oxide coated. The maker says the pinch-thru-point design cuts 18 gauge cold-rolled steel from the start of the blade to the tip with 20 percent less effort. The grips are described as chemical resistant, and the set is made in the USA. There is no straight cut snip in the set.
Suits: long cuts and trim cuts. Strengths: forged blades and a notch-cut design. Weaknesses: only two snips. Skip it if you want a straight cut snip included.
View MIDWEST Blackout Aviation Snip Set, Left and Right Offset, Tin Snips on Amazon
Best for mixed siding and metal jobs
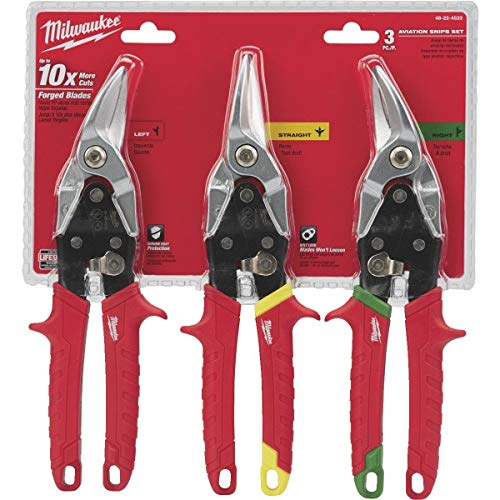
5. Milwaukee 3-Piece Aviation Snip Set 48-22-4533
A left, right and straight set with forged alloy steel blades, a one-handed locking mechanism and a flush bolt design the maker says will not hang up on the material. The cut capacity is listed as 18 gauge cold-rolled steel and 22 gauge stainless. The listing mentions aluminum, vinyl siding, screening, copper and sheet metal. The page does not give a length.
Suits: mixed siding and metal jobs. Strengths: three directions with a flush bolt. Weaknesses: no size given on the page. Skip it if you need to know the exact length first.

View Milwaukee 3-Piece Aviation Snip Set – 48-22-4533 on Amazon
Best for a full set for steady use
6. Klein Tools 120AVSKIT Aviation Snip Set, 3-Piece
Left, right and straight cut snips with serrated blades forged from heat-treated steel. The maker says they conform to the ASME B107.500.2020 performance standard and cut 18 gauge steel and 22 gauge stainless. A self-open latch allows one-handed opening, the grips are color coded and each handle has a hang hole. The kit weighs 3 pounds.
Suits: a full set for steady use. Strengths: a named standard and color coding. Weaknesses: the heaviest kit in this group. Skip it if you want a light, compact set.
Care and Setup
- Match the snip color to the curve you need.
- Cut gently and do not twist the jaws sideways.
- Keep to the gauge in the listing.
- Lock the latch and wipe the blades dry for storage.
Mistakes to Avoid
- Cutting wire or hardened steel with snips not meant for it.
- Using a straight snip on a tight curve.
- Comparing sets without checking the listed gauge.
- Leaving snips unlatched in a bag.
How Compound Action Gives You Leverage
Aviation snips are called compound action because a pair of linkages multiplies the force of your grip. Each squeeze moves the blades a short distance but with much more cutting force than a simple pair of scissors. This is why the handles open wide and the jaws only move a little, and why you can cut thin sheet steel with one hand. The trade-off is that each bite is short, so you cut in a series of small, repeated strokes.
The blades are serrated on most sets, with fine teeth that grip the sheet and keep it from sliding forward as you cut. That helps in steel and stainless, where a smooth edge would skate. Makers describe the serrations in different ways, but the purpose is the same. The pivot bolt holds the blades together, and a well-set bolt keeps the blades in light contact so the metal does not slip between them.
Handle length affects leverage and control. A longer handle gives more mechanical advantage but is harder to turn in tight curves. Hand size matters too. A snip with a handle that is too big for your hand will tire you quickly, and a spring that is too stiff for you will do the same. If you can, try them in a store, or read what buyers say about the grip and the spring. Many snips have a spring that opens the jaws for you, which saves effort on long cuts.
Understand that these are shears for thin sheet. They are not made for thick plate, rod, bolts or hardened steel. Check the gauge listed and stay within it, since forcing a tool past its limit can spring the blades, nick the edge and put your hands at risk.
Cutting Technique for Clean Edges
Good technique makes snips feel easier and gives a cleaner edge. Mark your cut line with a scribe or a marker, and support the sheet so it does not flop as you cut. Open the jaws fully, slide the blades onto the line and squeeze the handles in a smooth motion. Do not close the blades completely on each stroke. Stop short of the tips, reopen and advance, because closing completely creates a tiny notch where each cut ends and leaves a ragged line.
Keep the lower blade in contact with the sheet and watch the line just ahead of the blade tip. For straight cuts, use the straight pattern. For curves, use the left or right pattern to match the direction of the curve, so the waste curls away and does not jam against the handle. In general, the waste strip curls to one side as you cut, and the color-coded pattern is designed so that it curls out of your way. If the waste is getting in the way or bending the sheet upward, you have the wrong pattern for that cut.
For tight inside curves, cut a series of small relief cuts toward the line, then remove the waste in sections. Starting an inside cut often needs a drilled hole as a lead-in, so that the blade has a place to begin. Do not twist or rock the snips sideways in the cut, since that spreads the blades and dulls the edge. Cut along the line with the jaws square to the sheet.
When you finish, check the edge. Cut metal has sharp edges and often a burr. Use a file or a deburring tool to take it off before you handle or install the piece.
Safety Gear and Handling Sharp Sheet
Sheet metal causes more cuts than the tools do. Cut edges are razor sharp, and thin offcuts can spring and fly when they are released. Wear cut-resistant gloves that suit sheet handling, and wear eye protection every time, since small fragments can be thrown. Long sleeves help, but avoid loose cuffs that might snag. Keep the waste and the offcuts under control, because the strip you cut off often has the sharpest edge.
Secure the work. Clamp the sheet to a bench, or hold it flat with a firm grip well away from the cutting line. Never hold the sheet in a way that puts your fingers in the path of the blade. If you cut a large piece, support the end so that its weight does not twist the cut or pull it from your hand.
Pay attention to the latch. Most aviation snips have a latch that locks the jaws closed, to protect the blade edges in storage and to protect you when you reach into a toolbox. Always lock the snips before you put them away. Learn how to release the latch with one hand, so you do not need to fumble with it mid-job.
Know what the snips should not cut. Hardened steel, wire, nails, screws and rod can damage the blades or break them. Wire mesh and fencing may be outside the stated use. If the listing says to avoid a material, follow the advice. Use a tool made for that job, such as a bolt cutter or a hacksaw, to avoid nicked blades and injuries.
Choosing a Set by the Work You Do
The kind of work you do should guide the set you choose. For occasional repairs around the house, such as trimming flashing, cutting a patch for a vent or shaping aluminum trim, a basic three-piece set covers all the cuts. You will find that the straight pattern is the most used, and the left and right patterns come out for curves.
For gutters, siding and light ductwork, look for snips that handle the gauge you meet, and check the length. A longer blade makes longer, smoother cuts in straight runs, while a shorter one is more nimble on curves. If you cut a lot of long straight runs, a straight pattern with long blades is a joy. If you work in tight places, such as inside a duct or under a counter, a smaller snip may fit better.
If you cut stainless steel often, check the stainless capacity listed for the tool. Stainless is tougher than mild steel, and a snip with a lower rating for it will wear faster. Some people prefer forged blades for frequent use, and the listings for several sets mention forged construction. Remember that these are maker claims.
Think about a two-piece set. If you already own a straight pattern, an offset left and right pair may be all you need. The offset design keeps your hand above the work and your knuckles clear of the sheet. Pay attention to handle comfort. Grips with a soft covering and a shaped handle reduce hand fatigue over long jobs.
Finally, for large projects with long cuts, such as roofing panels, consider a powered tool made for that purpose instead of working hand snips to their limit.
Keeping Snips Sharp and Knowing When to Retire Them
With a little care, snips stay useful for years. After use, wipe off metal dust and oil from the blades and dry them. A light coat of machine oil on the blades and the pivot protects against rust and keeps the action smooth. Put a drop of oil on the pivot bolt, work the handles, and wipe off any excess. Store the snips latched and in a dry place, where they will not bang against other tools.
Check the pivot bolt now and then. If the blades start to separate and metal slips between them, the bolt may need a small adjustment. Some snips have a bolt that can be tightened, and others are sealed, so check the maker’s guidance. Do not overtighten, which makes the snips stiff.
Sharpening is possible, but it takes care. The cutting edge has a precise bevel, and the serrations make it tricky. A fine file or a sharpening stone can touch up the ground bevel, but you should not file the flat inner surfaces where the blades slide together, since that changes how they meet. Many people find replacement easier than sharpening for inexpensive sets.
Signs that it is time to replace the snips include blades that chew or fold the metal instead of cutting it, nicks along the edge, a pivot that is loose even after adjustment, handles that are bent or cracked, a latch that no longer holds and cuts that need much more effort than before. Using worn snips is tiring and can be unsafe. Keep the packaging details and the warranty terms, as a tool that fails early may be covered.
What to check before you buy tin snips, and who should skip them
Before you buy aviation snips, check the listed gauge, the cut directions and what the maker says the snips should not cut. Those three details prevent most wrong purchases.
- Gauge and material: match the listed capacity to your metal, and remember that stainless has its own, lower figure.
- Cut directions: a three piece set gives straight, left and right. The MIDWEST Blackout set has only left and right, so you would need a straight pattern separately.
- Size and weight: check the length and weight on the listing. The Milwaukee page gives no length, and the Klein kit is the heaviest of the group.
- Latch and grip: confirm a one-handed latch and a grip that suits your hand size.
- Warranty and returns: the post lists different warranty terms for different sets, so read the listing for the current terms.
- Safety kit: you will also need cut-resistant gloves, eye protection and a file for burrs.
Now the trade-offs. Hand snips make short bites, so long cuts take effort and time. They do not suit hardened steel, rod or heavy plate, and a lower listed gauge limits the thickness you can cut. Maker claims on steel and capacity are not independent test results.
Who should skip them: anyone cutting long roofing panels or thick metal daily, who may prefer a powered tool, and anyone who only needs a single straight cut once, who might borrow a pair instead.
Which aviation snip set should you buy?
The best set of tin snips depends on the metal you cut and how often you cut it. Use these matches, then confirm the details on the listing.
- Light home repairs and gutters: the HURRICANE 3 pc Aviation Tin Snips Set, 10 Inch is a reasonable fit, and its list of materials to avoid is clear. Skip it if you cut 18 gauge steel.
- Made in the USA with a lifetime warranty line: choose the Crescent Wiss 3 Piece MetalMaster set, but note that the listing gives no stainless figure.
- A home toolbox set with 18 gauge and stainless listings: choose the Amazon Basics 3-Piece Aviation Snip Set, and accept the shorter warranty.
- Long offset cuts with forged blades: choose the MIDWEST Blackout Aviation Snip Set, and plan on a separate straight snip.
- Siding, screening and mixed metal jobs: choose the Milwaukee 3-Piece Aviation Snip Set, after you check the size.
- Steady, regular use with a named standard: choose the Klein Tools 120AVSKIT, if the weight does not bother you.
Compare the picks above, check the current listing for gauge, size and what is included, then choose the set that matches the metal you cut.
The Six Snip Sets at the Bench: What Each Does Best
Aviation snips are bought as sets because sheet metal work demands different cut directions, but sets are not interchangeable. Jaw geometry, handle comfort, latch quality, and how honestly a set handles its stated capacity decide whether it becomes your go-to for ductwork, flashing, and sheet projects or the set you lend out and avoid yourself. This section examines each of the six sets above in working terms: the jobs it suits, the hands it fits, and the limitation to accept. Throughout, keep the ordinary safety habits for sheet work front of mind: gloves for handling cut edges, eye protection, and respect for the springy, sharp offcuts that sheet metal produces.
HURRICANE 3 pc Aviation Tin Snips Set, 10 Inch: the accessible starter set
The Hurricane set covers the standard trio of straight, left, and right cuts in a full 10-inch format, which makes it the natural starter for a homeowner facing gutters, flashing repairs, or a first duct project. Having all three patterns from day one teaches the core skill of this tool category: choosing the snip that lets the waste curl away from your hand and your line of sight. Its limitation is the one common to entry-level sets: under sustained heavy-gauge work the edges will dull sooner and the pivot will develop play earlier than the pro sets here. For occasional projects that pace is fine, and the set lets a beginner learn technique without a big commitment.
Crescent Wiss MetalMaster Compound Action Set: the trade-trusted trio
Wiss is a name sheet metal workers have reached for over generations, and the MetalMaster set is the pick for users who cut regularly and want jaws that stay aligned and handles that stay comfortable through a day of duct fitting or roofing work. Compound action multiplies your hand force, and in a well-made set that leverage feels smooth rather than crunchy. It suits HVAC helpers, roofers, and serious DIYers who cut every month. Its limitation is simply that it is a conventional straight-jaw trio: for long cuts in wide sheet where your hand keeps fouling the metal, an offset set like the Midwest below solves a problem this set does not address.
Amazon Basics 3-Piece Aviation Snip Set: the household backup
The Amazon Basics set makes the most sense as coverage: all three cut patterns for the occasional jobs a house produces, such as trimming flashing, cutting wire mesh or thin sheet for a repair, or shortening a piece of duct during a vent project. It suits light, infrequent use and second-location toolboxes. Its honest limitation is capacity discipline: budget snips reward users who stay well within light material and punish those who test the maximum on every cut, because edge wear and jaw spread arrive quickly when the tool is treated as a pry bar or wire cutter. Use it for what it is and it serves well; ask it to do a tradesperson’s week and it will not keep up.
MIDWEST Blackout Aviation Snip Set, Offset Left and Right: the long-cut specialist
Offset jaws drop the handles below the plane of the sheet, so your knuckles clear the metal and the offcut curls away underneath, which transforms long, straight cuts in wide sheet from an awkward scrape into a controlled glide. The Midwest Blackout set focuses on that offset advantage in left and right patterns, and it suits anyone cutting long runs: duct fabrication, metal roofing panels, and large flashing pieces. Its limitation is specialization in the other direction: a two-piece offset set is not the complete trio, and tight curves or cramped work may still call for a conventional straight snip alongside. If long cuts are your pain point, this set solves the exact problem; if your work is small and fiddly, start with a standard trio instead.
Milwaukee 3-Piece Aviation Snip Set 48-22-4533: the jobsite-tough trio
Milwaukee’s set is built for the rhythm of jobsite work: frequent cuts, quick one-handed latch operation, and handles that tolerate being tossed in a tool bag between tasks. It suits contractors, maintenance crews, and committed renovators who want the standard trio in a durable, confident package. The limitation is that jobsite toughness comes with a firmer grip feel that some users with smaller hands find tiring on very long cutting sessions; if your hands are small and your cuts are long, compare grip comfort carefully against the Wiss set. For everyone else, this is a set you buy once and stop thinking about.
Klein Tools 120AVSKIT Aviation Snip Set, 3-Piece: the electrician-friendly set
Klein’s trio speaks to users in the electrical and mechanical trades who cut sheet, strapping, and duct material as part of broader installation work rather than as a single specialty. The set covers the three standard patterns with the build quality Klein users expect, and it suits pros whose snips live alongside strippers and pliers in a working pouch. Its limitation mirrors its origin: it is a generalist trade set, so dedicated sheet metal specialists may still prefer the offset geometry of the Midwest for production cutting. As a complete, dependable trio for mixed trade work, it is an easy set to recommend.
Technique: Cutting Sheet Without Fighting It
Choose the pattern by the waste, not the line
The color system exists for a reason: pick the snip that makes the waste side curl away from your cutting hand and keeps your hand above the sheet where you can see the line. For a straight cut down the middle of a sheet, open the jaws fully, take long bites, and never close the jaws completely at the end of each bite, because the final closure is what leaves a jagged notch at the tip. Keep the snips perpendicular to the sheet rather than tilting them, support the sheet so it does not flap, and let the waste side droop away as you advance. When the cut feels like a struggle, the cause is almost always pattern choice, a dull edge, or material beyond the tool’s honest capacity, in that order.
Starting mid-sheet, curves and finishing edges
To start a cut in the middle of a panel, create an entry hole or notch with an appropriate tool first, then work the snips outward from it; forcing closed jaws through intact sheet damages both the jaws and the panel. For curves, take smaller bites and rotate the sheet rather than twisting the snips, keeping the marked line just visible on the keeper side. Every cut edge on sheet metal is sharp: deburr with a file or a deburring tool, fold or hem edges that hands will touch, and collect offcuts immediately rather than leaving sharp curls on the floor. Gloves rated for handling sheet are standard practice, and eye protection matters because small cuttings can flick upward when a cut releases.
Care, Adjustment and Retirement
Wipe jaws clean after cutting dirty or galvanized material, add a drop of light oil at the pivot occasionally, and store snips latched so the edges do not knock against other tools. Never use aviation snips as wire cutters on hard wire, and never pry with the jaws: both habits spread the jaws, after which the snips chew rather than cut and no sharpening restores the geometry. Test a suspect set on a scrap of the material you usually cut; if it folds thin sheet instead of shearing it, or if the jaws visibly cross or gap, the set has reached retirement for precision work even if it still mangles its way through rough cuts.
Decision Scenarios
Choose the Hurricane set if you are starting out and want the full trio to learn on. Choose the Crescent Wiss set if you cut regularly and want trade-proven smoothness in a conventional trio. Choose the Amazon Basics set if your cutting is rare and light and you mainly need the patterns available. Choose the Midwest Blackout set if long cuts in wide sheet are your recurring frustration. Choose the Milwaukee set if your snips will live a hard jobsite life. Choose the Klein set if you are a tradesperson who wants a dependable trio matched to mixed installation work. Whichever set you bring home, practice first on scrap: ten minutes of test cuts teaches your hands more than any description can, and it keeps your real workpiece safe while you learn.
Extended Buying Criteria: Jaws, Handles and Latches
When comparing snip sets beyond their cut patterns, three details predict satisfaction. The first is jaw alignment out of the box: the cutting edges should meet cleanly along their length with no visible gap or overlap, because misalignment is what turns cutting into folding, and it only worsens with use. The second is handle design: compound-action snips generate force through leverage, and handles that spread that force across your palm let you cut longer without hotspots; users with smaller hands should favor sets whose handles open less widely at rest, since an over-wide grip wastes strength before the cut even starts. The third is the latch: you will open and close it one-handed hundreds of times, so a latch that operates with a thumb flick and stays latched in a tool bag is worth more than any cosmetic feature. Sets in this lineup span from household to professional, and these three checks sort them faster than any specification table.
Also think honestly about the material you cut most. A homeowner trimming aluminum flashing and light duct lives in a different world from a roofer cutting heavier galvanized stock daily, and the right set differs accordingly: lighter sets serve the first user for years, while the second user needs the jaw steel and pivot quality of the trade sets. Buying one tier above your honest duty cycle is sensible insurance; buying three tiers above it buys weight and cost you will never recover. Note the capacity guidance from the maker for each set and treat the top of that range as an occasional limit, not a daily diet, whichever set you choose.
Project Walkthroughs: Snips on Real Jobs
Ductwork and venting
Duct work alternates between long straight runs down a sheet and tight notches around fittings, which is why a full trio earns its keep: straight snips for the runs, left and right for the curves and corners, and the offset Midwest set if the runs are long and wide. Lay out cuts with a marker on the keeper side, cut just outside the line, and remember that duct edges are among the sharpest in any trade: gloves on, edges folded or hemmed where hands will reach, and offcuts controlled rather than dropped. Work from the waste side so the curl falls away from the duct interior, keeping the inside of the duct clean of the burrs that whistle and collect dust.
Flashing, gutters and roofing repairs
Flashing work is curve-and-notch work in material that must lie perfectly flat afterward, so technique matters more than force: small bites, sheet supported on a flat surface, and no twisting of the snips, which is what kinks flashing into a permanent wave. For gutters, the straight snip handles most trimming, and a test fit before the final cut saves the classic mistake of a downspout hole cut a fraction off. Because this work happens on ladders and roofs, latch discipline and a tool belt matter: snips travel latched, and cuts are planned so both hands are never committed above your head at once.
Crafts, mesh and household sheet
At the light end, snips cut hardware cloth, wire mesh, thin craft metal, and packaging strapping, and here the budget and starter sets shine because the material asks little of the jaws. Mesh deserves one warning: its cut ends are rows of tiny spears, so cut with gloves, plan cuts so the sharp edge lands on the waste side, and fold or cap exposed mesh edges wherever skin will pass. For craft work, dedicate one set to the craft bench rather than borrowing the garage set, because adhesive, paint, and mystery materials dull and gum jaws that sheet work depends on.
Mistakes That Ruin Snips and Workpieces
Cutting hard wire, hardened fasteners, or material beyond the set’s capacity is the fastest way to nick jaws, and a nicked jaw tears every subsequent cut at the same spot. Prying with snips, using them as a screwdriver, or twisting them to widen a hole spreads the pivot and ends the set’s precision life. Closing the jaws fully at the end of each bite leaves the notched edge beginners blame on the tool. Storing snips unlatched among other tools chips edges in the bag. And cutting without gloves because the piece is small ignores that small pieces produce the same razor edge as large ones. Each mistake is avoidable with the habits in this guide: right material, right pattern, full bites without the final crush, latched storage, and gloves every time.
Sharpening, Adjustment and When to Replace
Aviation snips can be touched up lightly, but their serrated, compound geometry punishes amateur sharpening: removing metal unevenly changes how the edges pass, and a set that folded material before sharpening often folds it worse afterward. The realistic maintenance is cleaning, pivot oiling, and checking that the pivot bolt is snug, because a loose pivot mimics dullness perfectly. Test on scrap after any adjustment. Replace a set when the jaws gap, when the edges are visibly nicked, or when thin material folds instead of shearing despite a snug pivot and clean jaws. Retire the old set to rough duty such as cutting strapping and mesh, clearly separated from your good set, so a worn tool never sneaks back into precision work.
Reading Your Cuts: Diagnosing Problems From the Edge
The cut edge is a report on your technique, and learning to read it fixes problems faster than any adjustment to the tool. A clean, straight shear with a minimal burr means pattern, capacity, and bite size were all right. A wavy edge means the sheet was unsupported or the snips were twisted during the cut; support the sheet and rotate the work rather than the tool. A series of small notches along the edge means the jaws were closed fully at the end of each bite; leave the last fraction of the stroke open and overlap bites instead. A folded or crushed edge means the material exceeded the set’s honest capacity or the jaws have spread; test the set on known light scrap to separate tool failure from material ambition. A cut that consistently drifts to one side usually means you are cutting with the wrong pattern for the direction, so the waste is pushing the snips off line; swap to the pattern that throws the waste away from your hand and watch the drift disappear.
Keep a piece of scrap from your most common material as a permanent test coupon. Before any real project, make one cut in the coupon: it confirms the set is clean, aligned, and sharp enough, and it warms up your hands on material that does not matter. That thirty-second habit, borrowed from tradespeople who test on scrap without thinking about it, prevents the most common snips disappointment, which is discovering a dull or damaged set halfway across an expensive sheet. The sets in this lineup all reward that professionalism, from the starter Hurricane to the trade Wiss and Milwaukee, because sharp, aligned jaws are a condition you maintain, not a feature you buy once.
Storing and Transporting Snips Without Damage
Snips travel badly when they travel loose. Latch every pair before it goes into a bag or box, because unlatched jaws open, catch, and chip against other tools, and a sprung latch that no longer holds is a small part worth replacing before it costs you a set of edges. In a workshop, a drawer divider or a wall hook per pair keeps the trio separated and instantly findable; on a jobsite, a dedicated pouch pocket per pattern means the color you reach for is the pattern you get, without a visual check. Wipe jaws before storage after cutting anything dirty, galvanized, or adhesive-backed, since residue left overnight hardens into the pivot and the edges. These are thirty-second habits, and they are the entire difference between a set that is ready every time and a set that needs rehabilitation before every project.
Tin Snips FAQ
What do the colors mean?
Yellow is usually straight, red cuts to the left and green cuts to the right. The Hurricane listing spells this out.
Which set lists the thinnest capacity?
The Hurricane set lists 20 gauge cold rolled steel, while the Amazon Basics, Milwaukee, Klein and MIDWEST listings give 18 gauge.
Which snip pattern should I use for a curve?
Match the pattern to the direction of the curve: red for curves to the left and green for curves to the right, as the color coding usually indicates. Straight snips suit straight cuts and gentle curves.
Can tin snips cut stainless steel?
Some can, up to the stainless gauge listed by the maker. Stainless is tougher than mild steel and wears blades faster, so stay within the listed capacity and expect to replace the tool sooner.
How do I avoid a ragged edge when cutting sheet?
Do not close the blades fully on each stroke. Make a series of smooth bites that stop short of the tips, and keep the jaws square to the sheet.
Do I need gloves and eye protection?
Yes. Cut metal edges are very sharp, and small fragments can fly. Wear cut-resistant gloves and eye protection every time you cut.
What is the latch for?
It keeps the jaws closed in storage, which protects the blade edges and prevents accidental cuts when you reach into a toolbox. Lock it after each use.
Can I cut wire with aviation snips?
It depends on the maker's guidance. Some listings say they handle thin wire, while others tell you to avoid wire and rod. Follow the instructions for your set, and use a proper wire cutter when in doubt.
How do I start a cut in the middle of a sheet?
Drill a hole in the waste area so the blade has a place to begin, then cut toward your line. Make relief cuts for tight inside curves.
When should I replace tin snips instead of sharpening?
Replace them if the pivot is loose, the handles are cracked, the blades are badly nicked or the snips keep folding metal. Sharpening is possible, but it takes skill and is not always worth it for an inexpensive set.
What gauge can aviation snips cut?
It depends on the maker's listing, and several sets here state 18 gauge cold rolled steel with a lower stainless figure. Stay within the listed gauge, since forcing the snips can damage the blades.
Are aviation snips the same as tin snips?
Aviation snips are a compound-action type of tin snip with color-coded patterns for straight, left and right cuts. Plain tin snips lack the extra leverage, so check the description.
Can I cut vinyl siding or aluminum with these snips?
Some listings name aluminum, vinyl siding and similar thin materials. Check the specific set's listing, and cut slowly to avoid cracking the material.
Why do my snips leave a curl of metal in the way?
The waste strip curls to one side, and the wrong pattern makes it bend into the handle. Switch to the left or right pattern that matches the curve.
How do I deburr a cut edge?
Run a metal file or a deburring tool along the edge at a shallow angle. Wear gloves, since freshly cut metal is razor sharp.
Should I buy a set or a single pair of snips?
A set covers every cut direction, which helps if you do varied jobs. A single pair makes sense if you only ever make one type of cut.
The Short Version
For a light home set, the Hurricane. For a made in the USA compound set, the Crescent Wiss. For an 18 gauge listing, the Amazon Basics. For forged offset left and right, the MIDWEST. For a flush bolt design, the Milwaukee. For a named standard, the Klein.