Where to buy
Check the latest price, availability and delivery on Amazon. Orders are placed on Amazon. We may earn a commission from qualifying purchases. The DIY-relevant truth first: no powered miter saw exists at $30 from any brand, so the linked pick below is the complete hand miter kit that actually covers weekend-project cutting at this budget, and the remaining picks are honest prose-only alternatives — including the powered saw to save for when your project list outgrows hand power.
- Best for DIY projects under $30: CRAFTSMAN Mitre Saw, 12-Inch Saw & Clamping Box (CMHT20600) — Check on Amazon
- Stanley Saw Storage Miter Box with Saw (20-600) — the self-storing step-up kit, usually just above this budget; prose-only below
- Japanese pull-saw miter box sets — the finish-first route for furniture-grade DIY; prose-only below
- Excel Blades 6-Inch Metal Mitre Box Set (55666) — for craft-scale DIY and models; prose-only below
- Olympia Tools Saw Storage Mitre Box with 14-Inch Backsaw — the basic alternative kit; prose-only below
- The project-graduation route: an entry powered compound miter saw — prose-only below
Read the full guide ↓
Disclosure: As an Amazon Associate, umtsmarttool.com earns from qualifying purchases. Links to Amazon on this page are affiliate links; they cost you nothing extra. Listing details such as price and availability change often, so check the current Amazon listing before you buy.
The best miter saw for diy projects under $30 starts with a definition, because “DIY projects” is the broadest phrase in home improvement: it covers the picture frame you make on Saturday, the shelf you trim on Sunday, the broken chair rail you replicate, the crate, the planter, the costume prop. What unites those jobs is not scale — it is variety. A DIYer’s cutting is small, angled and intermittent: a few 45s here, a square cut there, stock that changes from pine trim to MDF to a hardwood offcut in a single afternoon. And at $30, the tool for that work is honestly not a motor. No powered miter saw exists at this budget — the entry powered compound class costs several times more — so the DIY tier is the hand miter kit: a backsaw in a slotted, clamping box, which turns out to suit project work suspiciously well. It lives in a drawer, comes out for four cuts, goes back without a stand, a cord or a cleanup, and cuts at a pace that matches how DIY actually happens — in bursts, between glue-ups.
This guide reviews the complete hand kits sold at or near $30 through a project lens: which kit handles the widest spread of weekend work, which route gives furniture-grade finishes, which serves craft-scale builds, and where the honest boundary sits — the project types, from flooring to framing, where you should stop hand-sawing and rent or save. The CRAFTSMAN clamping kit leads because project work means odd stock in odd sizes, and odd stock is exactly what cam-pin clamping tames. If your projects skew large or repetitive, the graduation pick and the project-triage section will tell you so plainly; if they skew small and varied, you are in the right guide, and Best Miter Saw Under $30 offers the general buyer’s view of the same shortlist. One more promise before the picks: this guide will not inflate a hand tool into a renovation machine, and it will not dismiss it as a toy either. Project work deserves the accurate version of both claims, because the difference between a satisfying Saturday build and a frustrating one is usually nothing more exotic than the right tool honestly matched to the job in front of it.
In this guide
Quick Picks
Each row matches a DIY project style to the option that serves it. Only the first pick is linked — the one complete kit verified as genuinely sold within this budget — and the rest are described in prose rather than dressed with links they have not earned.
| Project style | Pick | Why it stands out | Link |
|---|---|---|---|
| Best all-round project kit | CRAFTSMAN Mitre Saw, 12-Inch Saw & Clamping Box (CMHT20600) | Cam pins clamp odd-sized project stock; complete kit in one box | Check on Amazon |
| Best for drawer storage | Stanley Saw Storage Miter Box with Saw (20-600) | Saw stores in the box — grab, cut, put away | Prose-only — check price on Amazon |
| Best for fine project finishes | Japanese pull-saw miter box sets | Thin kerf, glue-ready faces on frames and small furniture | Prose-only — check price on Amazon |
| Best for craft-scale projects | Excel Blades 6-Inch Metal Mitre Box Set (55666) | Metal hobby box and razor saw for small stock | Prose-only — check price on Amazon |
| Best basic alternative | Olympia Tools Saw Storage Mitre Box with 14-Inch Backsaw | Simple complete kit for occasional projects | Prose-only — check price on Amazon |
| Best for growing project lists | Entry powered compound miter saw (10-inch, 15-amp class) | Capacity and pace when projects become renovations | Prose-only — several times this budget |
How These Picks Were Chosen
The budget was applied as a ceiling on a complete, ready-to-cut kit: box, backsaw and workholding, sold as a real Amazon listing positioned within $30 in the United States — check the current price on Amazon before you buy, as prices move. That filter removed all powered saws and all bare boxes sold without saws, both of which fail a DIYer in the same way: the project stops while the missing half is sourced.
We did not use these tools ourselves. We read maker listings, specifications and reputable roundups, then ranked for project reality rather than spec-sheet drama. Project work punishes two weaknesses above all: stock that will not stay put — offcuts, short ends and odd profiles that a free hand cannot control — and tools that take longer to fetch and set up than the cut takes. So clamping quality led the ranking, with the cam-pin kits first; setup friction came second, favoring self-storing kits that live where projects happen; and angle coverage third — 90° and 45° do nearly all project work, with 22.5° face angles earning their place for octagonal planters, frames and trim details. Saw length was judged against project stock: 12 to 14 inches covers trim and small lumber, while the 6-inch hobby set was ranked on its own craft terms rather than penalized for not being a carpentry tool.
Every prose-only pick carries its reason on its face: a price that usually sits just above the tier, a listing not verified to link standard, or a powered saw included as planning advice. No specification in this guide is invented; where a figure could not be verified from a maker listing or published specification, it was left out. DIYers comparing across budgets should know the same shortlist logic runs through Best Miter Saw For Diy Projects Under $50, where the step-up kits come into link range.
The 6 Best Miter Saws for DIY Projects Under $30
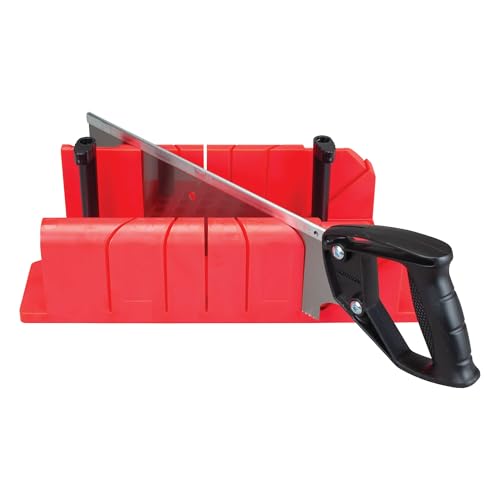
CRAFTSMAN Mitre Saw, 12-Inch Saw & Clamping Box (CMHT20600)
Who it suits: The general DIYer — frames one weekend, shelf trim the next, a furniture repair after that — who wants one kit that clamps whatever the project brings.
Projects rarely present the tool with perfect stock. They present a short end of casing, a warped piece of quarter-round, a hardwood offcut from another build — pieces that are too short, too light or too odd to hold confidently by hand. That is why this kit leads a project guide: its two cam pins twist and lock the workpiece against the box’s honeycomb base, so the stock is held by the tool while you saw. The kit is complete — miter box, 12-inch backsaw and the pins in one box — and the angle menu covers project reality: 90° square cuts, 45° miters, and face angles of 45° and 22.5° for the octagonal planter or the angled trim face that shows up in more builds than you’d expect. The backsaw’s stiff spine keeps cuts flat enough to glue straight off the saw, which is the difference between a project that assembles and a project that gets “fixed later.”
Walk it through a typical month: mitered corners for a poster frame; shoe molding along a repaired baseboard; the angled ends of a crate’s handles; a replacement rail for a chair, cut to match its twin. All of it is this kit’s home ground. Its limits are equally project-shaped: it will not rip, it will not crosscut a wide plank, and a build needing forty identical cuts will make your arm the schedule. Check the current price on Amazon before ordering — it is the one kit verified as sold inside this budget — and keep it somewhere grabbable, because a project tool’s value is measured in setups avoided. For the joint technique that most project miters live or die by, How To Make A Miter Joint is the companion read.
- Cam pins lock odd, short and light project stock against a honeycomb base.
- Complete kit: box, 12-inch backsaw and pins — nothing else to source mid-project.
- 90°/45° cuts plus 45° and 22.5° face angles for planters, frames and trim details.
Honest limitation: Hand pace and small-stock capacity. Repetitive or wide-stock builds outgrow it, and no clamping cleverness changes that.
Choose it if your projects are varied, small and intermittent — the classic DIY pattern. Skip it if your next project is flooring, framing or a production run of anything.
Stanley Saw Storage Miter Box with Saw (20-600)
Who it suits: DIYers whose workshop is a closet, a drawer or the corner of a garage — where a kit that stores as one piece is a kit that survives between projects.
The Stanley design’s project virtue is friction, or rather its absence: the 14-inch backsaw stores inside the high-impact box, so the entire mitering capability of your household is one object you can pull out with one hand. The box provides 90°, 45° and 22.5° slots and a clamping facility for the workpiece, and the longer saw gives a smooth stroke on trim-width stock. For the way DIY actually happens — inspiration at 10 a.m., four cuts at noon, glue drying by lunch — that grab-and-go quality is worth real accuracy, because the best tool for a small job is the one whose setup you do not talk yourself out of.
It sits prose-only in this guide because its US listing has been seen priced just above $30, and we link only what we verified inside the budget. As the step-up project kit it is entirely respectable: proven design, standard angles, self-storage. Compare its live price with the linked CRAFTSMAN on the day you buy; if the gap is small, you are choosing between clamping strength and storage tidiness, and either answer is defensible. If the gap is wide, the CRAFTSMAN’s cam pins are the better project tool for the money. Prices on these legacy listings drift by seller, so the day’s number — not any printed figure — should make the call.
- Self-storing design: saw inside box, one grab per project.
- 90°, 45° and 22.5° slots with work clamping.
- 14-inch backsaw: a longer, smoother stroke on trim stock.
Honest limitation: Usually priced a step above this tier, hence prose-only here; hand pace and capacity limits apply as with the whole class.
Choose it if storage and setup speed drive your project habits. Skip it if the budget is hard — the linked kit clamps better for less.
Japanese Pull-Saw Miter Box Sets
Who it suits: DIYers whose projects are furniture-flavored — frames, small boxes, fine trim, visible joinery — where the cut face is part of the finished look.
A pull saw cuts on the draw stroke, so its blade can be thin, and a thin blade is a project’s best friend in two ways: the kerf wastes almost none of a short, precious offcut, and the face it leaves is smooth enough to glue or even to show. Sets pairing a miter box with a fine pull saw appear in roundups inside this budget, typically with small extras in four-piece configurations. For the DIYer building a hardwood frame, a keepsake box or trim that will be stained rather than painted, this route produces the best-looking results in the guide, and the gentle technique it demands — long, light draws, no forcing — suits project work’s unhurried rhythm.
The trade-offs are real project considerations. Fine pull-saw teeth are brittle: a hidden staple in reclaimed project lumber, or a twisted stroke in a deep cut, chips them, and replacement blades are the running cost of the style. The sets also vary by seller, which is why this pick is prose-only — we did not verify one specific listing’s contents and price to link standard. Read the exact listing: blade quality and piece count are where these sets separate. If your projects are painted MDF and pine, the backsaw kits are tougher and cheaper to run; if they are stained hardwood and visible joints, this is your pick.
- Thin kerf wastes little of short project offcuts.
- Glue-ready, sometimes show-ready, cut faces on fine stock.
- Gentle technique suits unhurried weekend work.
Honest limitation: Brittle fine teeth, and seller-variable set contents — verify the exact listing before buying.
Choose it if your projects show their joints. Skip it if your projects are painted, rough or reclaimed — the backsaw kits shrug off what breaks pull-saw teeth.
Excel Blades 6-Inch Metal Mitre Box Set (55666)
Who it suits: Craft DIYers — model scenes, dollhouse builds, balsa and basswood projects, miniature furniture — whose “lumber” arrives in strips and sheets.
Craft-scale projects fail with carpentry tools: a 12-inch backsaw is a blunt instrument against a basswood strip, and its teeth tear the faces a miniature cannot hide. This set is scaled to the work — a six-inch aluminum-and-steel box, a K5 handle and a razor pull saw, cutting 45° and 90°. The metal box matters for repeat project work: its slots stay true instead of wearing wide, so the tenth tiny miter matches the first. For the DIYer whose projects live on a desk — a model railroad structure, a dollhouse staircase, craft-stick builds — this is not the small option in the guide; it is the correct one, and it is made in the USA.
It is prose-only because we verified the product and its specifications from maker listing information but not a current in-budget US Amazon price to link standard — check the live listing. And its boundary must be respected in the other direction too: it cannot cut room trim or furniture parts, and a general DIYer buying it as their only miter tool would be mis-served. Many project households honestly need both scales eventually; at this budget, choose the scale of your next three projects, not your someday ones.
- Metal box keeps hobby angles true across many small projects.
- Razor saw leaves balsa and basswood faces nearly cleanup-free.
- Desk-scale: works where craft projects actually happen.
Honest limitation: Craft capacity only — no trim, no lumber, no exceptions.
Choose it if your projects are miniature and craft-scale. Skip it if your projects come from a lumber rack — that is the CRAFTSMAN’s territory.
Olympia Tools Saw Storage Mitre Box with 14-Inch Backsaw
Who it suits: Occasional project DIYers who want the simplest complete kit and shop the value brands against each other on price.
Olympia’s kit is the classic pattern — molded storage box, 90°/45°/22.5° slots, a 14-inch backsaw that lives in the box — and for the twice-a-year project it covers the ground without ceremony. Its project weakness is the class weakness of basic boxes: workholding leans on your free hand rather than a positive clamp, and project stock — short, light, odd — is precisely the stock a free hand controls worst. Expect to spend a couple of practice cuts dialing in your holding technique, ideally with the box itself clamped to the bench, which cures most of the wandering.
Prose-only here on verification grounds: the product is a fixture of Amazon miter-box roundups, but we did not verify a current US price and listing to link standard. The project buyer’s rule is comparative and simple — check its live price against the linked CRAFTSMAN kit the same day. A meaningful gap in Olympia’s favor makes it a rational occasional-project purchase; price parity makes the clamping kit the obvious buy, because in project work the clamp is not a luxury feature, it is the feature.
- Complete, self-storing kit for occasional projects.
- Standard angle slots: 90°, 45°, 22.5°.
- Simplest possible setup — nothing to adjust.
Honest limitation: Hand-held workholding versus project stock that loves to move; accuracy is earned with technique.
Choose it if its live price clearly undercuts the clamping kit. Skip it if prices are close — in project work, buy the clamp.
The Project-Graduation Route: An Entry Powered Compound Miter Saw
Who it suits: DIYers whose project list has quietly become a renovation list — and anyone planning a build with dozens of cuts in real lumber.
There is a recognizable moment in a DIYer’s life: the project stops being “a shelf” and becomes “the shelves for the whole wall, plus the trim, plus the flooring transition.” That moment is the powered saw’s job interview. The entry class is well-defined — a 10-inch blade, a 15-amp motor at up to about 5,000 RPM, single-bevel compound head, around 24 pounds — with the Metabo HPT 10-inch compound saw as its usual value benchmark. It costs several times this entire budget, appears here with no link and no price by design, and buys the three things projects eventually demand: capacity for lumber, bevels for compound work, and pace for repetition.
The project-honest alternatives deserve equal billing. Renting a powered miter saw for the one big weekend, while owning the hand kit for the fifty small ones, is the combination many seasoned DIYers land on permanently — the rental covers flooring and framing bursts, the hand kit covers life. And the hand kit is never the wasted purchase in that pairing: it remains the fastest tool in the house for four cuts on a Sunday morning. If you are pricing the step up, Best Miter Saw Under $50 covers the tier where hand kits get better and the powered gap starts, slowly, to narrow.
- 10-inch, 15-amp class: lumber, bevels and repetition handled.
- Rental is the honest bridge for one big project weekend.
- The hand kit stays useful alongside any powered saw.
Honest limitation: Several times this budget — a plan, a rental or a save-up, never a $30 purchase.
Choose it if your projects have become renovations. Skip it if your projects are still measured in frames and shelves — the hand kit is the right-sized tool.
Comparison Table
| Product | Type | Key verified spec | Best use | Link |
|---|---|---|---|---|
| CRAFTSMAN Mitre Saw & Clamping Box (CMHT20600) | Hand miter kit | 12-in backsaw, cam pins, honeycomb base; 90°/45°, face 45°/22.5° | Varied weekend projects with clamped stock | Check on Amazon |
| Stanley Saw Storage Miter Box (20-600) | Hand miter kit | 14-in backsaw stores in box; 90°/45°/22.5° slots | Grab-and-go project cutting | Prose-only |
| Japanese pull-saw miter sets | Hand miter kit | Thin-kerf pull saw with miter box | Visible joinery and fine finishes | Prose-only |
| Excel Blades Mitre Box Set (55666) | Hobby miter set | 6-in aluminum/steel box, razor pull saw, 45°/90° | Craft and miniature projects | Prose-only |
| Olympia Tools Mitre Box with Backsaw | Hand miter kit | 14-in backsaw, storage box, 90°/45°/22.5° slots | Occasional projects on a price dip | Prose-only |
| Entry powered compound miter saw | Powered saw | 10-in blade, 15-amp class, up to ~5,000 RPM | Renovation-scale project lists | Prose-only — above budget |
How to Choose a Miter Saw for DIY Projects
- Inventory your next three projects, not your dream list. Frames, trim and small furniture point to the clamping hand kit; crafts point to the hobby set; flooring and framing point away from this tier entirely.
- Clamping first. Project stock is short, light and odd — the hardest stock to hand-hold. Cam-pin clamping is worth more than any other feature for project work.
- Count setups, not just cuts. DIY happens in bursts. A self-storing kit you can grab in ten seconds will serve more projects than a marginally better tool buried in the garage.
- Match the finish to the route. Painted projects forgive a backsaw’s face; stained, visible joinery rewards the pull saw’s thin kerf. Choose by how the project will look, not how it will be cut.
- Keep the angle menu honest. 90° and 45° cover nearly all project work; 22.5° face angles earn their keep on octagonal and detail work. Bevels and compound cuts are powered territory.
- Buy complete kits. A project stopped for a missing saw or clamp is a project that loses its weekend. Complete-kit price is the only honest comparison.
- Respect the repetition threshold. Past a few dozen cuts in a single project, hand pace stops being charming and starts being the schedule — that is the rental or graduation trigger.
- Leave budget for project consumables. Practice stock, a square for layout, and a replacement blade eventually. The kit plus those beats a pricier kit alone — the same arithmetic we apply across our project-tier guides.
Project Triage: Which Jobs Belong to a Hand Kit, Which Do Not
Green-light projects for a $30 hand kit share a profile: small cross-sections, modest cut counts, and angles from the standard menu. Picture and poster frames. Trim repairs and short runs of casing, baseboard cap and shoe molding. Small furniture builds and repairs — crates, planters, shelf edging, chair rails, drawer boxes. Craft and hobby construction at either carpentry or miniature scale. Garden projects in light stock: trellis ends, planter corners, edging. In every case the kit’s virtues — silence, instant setup, zero dust drama — align with how the work actually unfolds, and the joints it makes are indistinguishable from powered work because, at this scale, they are the same joints.
Red-light projects share the opposite profile, and naming them saves DIYers real frustration. Flooring: hundreds of cuts, many in engineered stock that eats blades, all on a deadline. Framing and deck work: cross-sections beyond the box, all day long. Wide boards and panels: beyond any hand box’s throat, and properly the territory of a circular or table saw in any case. Production anything: a craft-fair run of forty frames is a powered saw’s afternoon and a hand kit’s week. And compound crown molding work at ceiling scale, where bevel-plus-miter geometry is the entire job. For those, the honest DIY answers are the rental counter, the graduation purchase, or a project redesign that brings the cutting back into hand range — all three are respectable, and none involves pretending a $30 kit is something it is not.
Getting Project-Grade Joints: Fit, Glue and the Dry Run
Project miters live or die after the cut, in the fitting. The professional habit that costs nothing is the dry run: assemble every joint without glue, on the bench, and read the frame as a whole. A frame is a system of four angles and four lengths, and small errors announce themselves at the last corner — which is why you check there before glue makes the news permanent. If one corner gaps, resist the urge to force it closed with clamp pressure; clamping force can close a gap by racking the frame out of square, trading a visible gap for an invisible twist that shows up when the frame will not sit flat. The honest fixes are upstream: re-trim the offending cut by a whisper, or adjust its mate — cut pairs in the same box setup, and mark mating pieces so they return to the orientation they were cut in.
Glue-up rewards preparation at project scale: dry-fit first, lay out clamps open and ready, and glue one corner at a time on small work rather than racing the open time across all four. A mitered corner in trim or a frame is mostly end grain, which drinks glue and starves a joint; sizing the ends — a thin first coat allowed to tack before the real application — is the old, unglamorous trick that makes hand-cut project joints last. Finally, keep the offcuts from every project in a labeled box. They are next project’s test pieces, the stock your practice cuts come from, and the fastest way to check a box setup before committing good material. A DIYer’s offcut box is, in the long run, worth as much as the saw.
Mitering Different Project Materials: Pine, MDF, Hardwood and Plastic
Project work rotates materials faster than any other kind of cutting, and each one asks something slightly different of the same kit. Pine and other softwoods are the forgiving default: they cut fast, forgive a slightly heavy stroke, and hide small fitting sins under paint or their own softness. The one pine trap is tear-out on the exit face, cured by easing off as the blade breaks through and supporting the offcut rather than letting it drop. MDF is the opposite personality — dimensionally perfect and utterly unforgiving of a dull blade, which plucks its fibers instead of slicing them, leaving a fuzzy edge that drinks paint unevenly. With MDF, the blade’s sharpness is the whole technique: the moment cuts start to fuzz, the blade is done, and no amount of stroke discipline substitutes.
Hardwoods slow everything down, honestly and instructively. Oak, maple and their dense relatives expose a wandering stroke immediately, because the blade follows the path of least resistance through alternating grain — which is the wood’s way of telling you your pressure is uneven. The fix is rhythm: longer strokes, less force, and letting the cut take the time it takes, which on a frame’s worth of oak miters is still measured in minutes. Painted and reclaimed project stock deserves its own rule — it is abrasive and occasionally booby-trapped with staples and grit, so it gets the old blade, never the fresh one, and a magnet’s worth of suspicion before the first cut. Plastics and PVC cut cleanly but flex: support them close to the cut line so the stock cannot bow away from the teeth, and slow the finish of each cut to keep the exit edge from chipping. None of this requires different tools — it requires noticing which material is in the box today, which is precisely the attentiveness that makes project work satisfying.
A Project Miter Station That Fits in a Drawer
The hand kit’s deepest project advantage is that the entire station packs away. But “packs away” only pays if the working setup is equally fast, and a repeatable little ritual is what makes four cuts on a Tuesday evening feel effortless rather than like a production. The station is four things: the kit, a clamp for the box, a combination square and pencil that live with the kit, and a surface — bench, table or tailgate — that the box can be fixed to at a height where your forearm stays roughly level through the stroke. Add a small brush for clearing the box’s slots and fence between cuts; sawdust trapped against the fence is a silent angle error, and the brush is the cheapest accuracy tool in this entire guide.
Arrange the ritual once and it repeats forever: box out, clamp it down, brush the fence, square and pencil on the right, offcuts bin on the left. Cut, check against the square or the mating piece, stack the finished parts in order. When the project ends, the saw goes back in its box, the box goes back in its drawer, and the room is a room again — no stand to fold, no cord to coil, no dust to vacuum beyond a brush-off. That loop, more than any spec, is why project DIYers keep hand kits for decades after they could afford anything: the tool respects the way projects actually fit into a life. If your space is tighter still — a closet workshop, a shared garage corner — the small-workshop version of this guide applies the same logic with storage as the first criterion.
The Five-Year View: What a $30 Project Kit Really Costs to Own
Project tools should be judged across the projects, not at the checkout, and a hand miter kit’s long arithmetic is where it quietly embarrasses bigger purchases. The kit itself is the whole capital cost: no stand, no blade upgrades required, no batteries aging on a shelf, no cord to damage. Running costs across five typical DIY years amount to replacement backsaw blades as projects dull them — a consumable priced like a sandwich, not a component — and, eventually, the box itself when its guide slots wear wide enough to matter, which in molded plastic boxes used on clean stock is a matter of years, and in metal hobby boxes longer still. Compare that honestly with the powered path at project scale: the saw, the stand or bench space it permanently occupies, the blade it wears, and the hearing protection and dust management it obliges. For a household cutting a few dozen project miters a year, the hand kit’s five-year cost is a rounding error, and every dollar not spent on capacity sits available for materials — the lumber, hardware and finishes that projects actually consume.
The subtler five-year return is skill compounding. Every project cut by hand teaches layout, clamping and grain judgment that transfers intact to any tool you later own, including the powered saw you may eventually buy — whose owner you will be, notably, a better one for having started by hand. There is also a portfolio effect inside the toolbox: because the miter kit is cheap, silent and drawer-sized, it never competes with the next tool purchase, never needs justifying, and never gets sold in a clear-out — which is why so many project households discover, a decade in, that the $30 kit is the senior tool they own. Judged as a project investment rather than a spec sheet, that is the return this tier exists to deliver: capability now, skills forever, and a drawer that still closes.
Common Buying Mistakes
- Buying for the dream project list instead of the next three projects. The kit that fits your actual queue is the one that gets used.
- Skipping clamping because project stock “looks easy to hold.” Short and light is exactly what moves.
- Starting the big project on the hand kit out of optimism, then buying the powered saw mid-project anyway — the most expensive sequence in DIY.
- Gluing before dry-fitting. The last corner is where errors collect; meet them there while they are still free to fix.
- Forcing gapping joints closed with clamp pressure and racking the frame out of square in exchange.
- Running a fine pull saw through reclaimed project lumber full of hidden staples, then blaming the blade.
- Buying a bare box to save money and losing the project’s weekend to sourcing the saw.
- Letting the kit live somewhere inconvenient. Project tools earn their keep through setups that never happen.
Final Recommendation
- Most DIY project work: CRAFTSMAN Mitre Saw, 12-Inch Saw & Clamping Box (CMHT20600).
- Grab-and-go storage: Stanley Saw Storage Miter Box (20-600), when its live price is close.
- Visible joinery projects: a Japanese pull-saw miter box set.
- Craft-scale projects: Excel Blades 6-Inch Metal Mitre Box Set (55666).
- Renovation-scale projects: rent, or save for the powered compound class.
Our top two for project buyers are the CRAFTSMAN clamping kit — the only complete system verified inside this budget, and the one whose cam pins tame the odd stock projects specialize in — and the Stanley storage kit as the step-up for DIYers whose tools must live in a drawer between bursts of work. Between them they cover the realistic project patterns: varied builds at a bench, and varied builds at a kitchen table. Finish-obsessed project work belongs to the pull-saw route; craft-scale work to the Excel set; renovation work to the rental counter. Check the live price before you order, clamp the box to something solid, dry-fit before you glue — and if your project shelf is filling with bigger game, Best Miter Saw For Diy Projects Under $50 is the natural next read.
Frequently Asked Questions
What DIY projects can I actually finish with a hand miter kit?
Frames, trim repairs, small furniture, crates, planters, shelf edging, chair and drawer repairs, and craft builds at both carpentry and miniature scale. The shared profile is small stock and modest cut counts. Flooring, framing and production runs are the honest exceptions — rent or graduate for those.
Is a hand kit accurate enough for furniture projects?
Yes, with clamped stock and a clamped box. At furniture-part scale, a careful hand miter is the same joint a powered saw makes; the powered saw’s edge is pace and capacity, not a different category of truth. Most project gaps trace to movement or forcing the stroke, both fixable habits. The one furniture caveat is repetition: a single chair repair is hand work, while a matched set of six chairs with identical rails is where pace starts to argue for the powered route.
Should I choose the backsaw kit or a pull-saw set for projects?
By finish and stock. Painted pine and MDF projects: the backsaw kit — tougher teeth, simpler running. Stained hardwood, visible joints, short precious offcuts: the pull-saw set — thinner kerf, finer face. Many project households end up owning both eventually; start with the one your next three projects match.
How do I stop short project pieces from moving in the box?
Clamp them — that is what the cam pins are for — and if a piece is too short to clamp safely, cut it from a longer piece while the long piece is clamped, then trim to final length. Never trade fingers for workholding; change the sequence instead.
Can I cut PVC and plastic trim for garden projects?
Yes. Standard backsaw blades handle PVC pipe, plastic trim and similar project plastics cleanly at hand pace, and the box’s angles work the same. Support thin-wall pipe so it does not flex away from the blade, and ease off at the end of the cut to avoid chipping the exit edge.
When does renting a powered saw beat owning the hand kit?
When one project concentrates hundreds of cuts or lumber-sized stock into a weekend — flooring is the classic case. Rent the powered saw for the burst, keep the hand kit for the fifty small jobs around it. The combination costs less than owning a cheap powered saw and serves both patterns better.
Can a miter box handle crown molding for a project room?
Small crown in a small room, yes — with patience and the nested-cutting method, where the molding sits in the box at the same angle it will sit on the wall, so the box’s ordinary 45° slot produces the compound result. It is slow, the stock is springy and unforgiving of a wandering stroke, and a whole house of crown is firmly powered-saw or rental work. One accent room, carefully, is a legitimate hand-kit project and a satisfying one.
What should I buy alongside the kit for project work?
A combination square for layout, a clamp for fixing the box to your work surface if it lacks a vise, and a stock of practice offcuts. Those three, plus the kit, are a complete project mitering station at this budget — everything else is a someday purchase. It is worth saying plainly that this short list is complete: project mitering does not hide a fourth essential behind a paywall of accessories, and a DIYer who owns these four things owns the whole capability this guide describes.